Java 9 Docker Example
This article will introduce us to compiling and running a Java 9 example program using Docker technology. It will prime us in the origins of Docker technology, the differences with orthodox virtualization techniques, it’s architecture, tooling and use thereof to build, and run a Java 9 program.
We will also cover the fundamental Docker commands, more especially those required to accomplish our goal.
We will make use of public Docker images to streamline our goals of building and running a Java 9 program as well as taking a step by step journey in creating and using our very own Dockerfile to build and run a Java 9 Docker image, for our sample program, from “scratch”.
Table Of Contents
1. Introduction
Docker happens to be a company and technology. Formerly dotCloud and now Docker, Docker the technology, was released as an open source project and as a result of the technology’s success, the company pivoted it’s entire business model to center around the Docker technology and grow products and services in that ecosystem.
Docker technology is a container technology that makes use of linux kernel features such as namespaces and cgroupsto achieve resource isolation for groups of processes.
- namespaces : are a means to isolate a process or group of processes on a single machine so that they may have a unified and isolated view of resources being used.
- cgroups : isolates, limits and accounts for resources (CPU, RAM, IO) of a collection of processes.
Think of Docker as a means to package not only the binary of your application, but to be able to package the entire environment that it should execute in, right up to and including the operating system (parts of it), with configuration / tuning parameters. One big package of confidence, giving us the ability to package once and deploy anywhere. (P.O.D.A.). Couple this with the Java philosophy of write once and run anywhere (W.O.R.A) we are truly platform.
2. Technologies used
The example code in this article was built and run using:
- Java 9
- Maven 3.3.9 (3.3.x will do fine)
- Eclipse Oxygen (4.7.0)
- Ubuntu 16.04 (Windows, Mac or Linux will do fine)
- Docker version 17.06.0-ce, build 02c1d87
As a note, you will not need to compile or even write any code for this article on your host machine, the only software that is needed to follow along on this example tutorial is Docker itself.
3. Background
A Docker container is a lightweight, executable piece of software that encapsulates everything needed to run it. Because Docker abstracts the operating system and not the hardware, like typical virtual machines, it is able to start quicker, with a smaller, much smaller footprint.
Owing to their isolation, they are inherently secure, should one Docker process become compromised, the inherent isolation of Docker processes mitigates the risk of other Docker processes falling victim to the same corruption.
The confidence gained by being able to ship the predictability of environments with your application, operations staff and developers alike, enjoy tremendous gains from the technology. From distributed systems to developer productivity to continuous integration, Docker technology can offer tremendous wins in productivity, scale, testing and building.
4. Setup
Installing and setting up Docker is different depending on the environment you are working in. There are different installers and at times a different sequence of steps to follow depending on your host operating system.
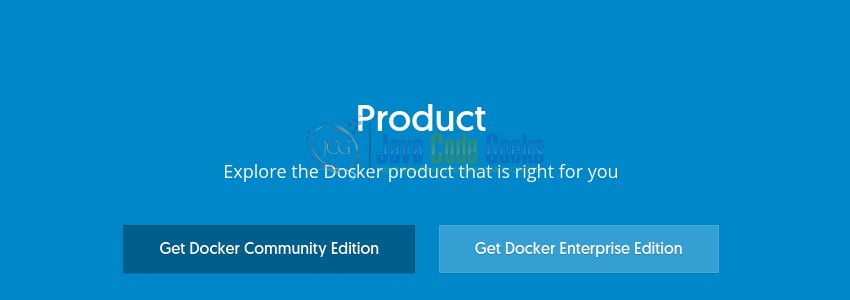
By navigating over to Docker we can download the “Community Edition”

Once selected we select “Get Docker CE from Docker Store”

The following screen will greet us with a list of different downloads corresponding to different host operating systems. Select the correct one and follow the on screen instructions. The installation process also outlines a verification step which is usually a combination of:
docker versiondocker run hello-world
These steps will indicate the version of docker installed and the fact that you can pull, build and run images / containers. If you are running linux (Ubuntu) and do not want to execute docker ... commands as rootthen see here where it outlines how to configure the Docker client to execute as a non root user thus negating the need for sudo
5. Docker primer
When installing Docker you get an engine and a client. The client interfaces with the engine or daemon process when we issue commands. These commands can be viewed by issuing the following command sudo docker --help:
Docker commands help
Management Commands:
  config      Manage Docker configs
  container   Manage containers
  image       Manage images
  network     Manage networks
  node        Manage Swarm nodes
  plugin      Manage plugins
  secret      Manage Docker secrets
  service     Manage services
  stack       Manage Docker stacks
  swarm       Manage Swarm
  system      Manage Docker
  volume      Manage volumes

Commands:
  attach      Attach local standard input, output, and error streams to a running container
  build       Build an image from a Dockerfile
  commit      Create a new image from a container's changes
  cp          Copy files/folders between a container and the local filesystem
  create      Create a new container
  diff        Inspect changes to files or directories on a container's filesystem
  events      Get real time events from the server
  exec        Run a command in a running container
  export      Export a container's filesystem as a tar archive
  history     Show the history of an image
  images      List images
  import      Import the contents from a tarball to create a filesystem image
  info        Display system-wide information
  inspect     Return low-level information on Docker objects
  kill        Kill one or more running containers
  load        Load an image from a tar archive or STDIN
  login       Log in to a Docker registry
  logout      Log out from a Docker registry
  logs        Fetch the logs of a container
  pause       Pause all processes within one or more containers
  port        List port mappings or a specific mapping for the container
  ps          List containers
  pull        Pull an image or a repository from a registry
  push        Push an image or a repository to a registry
  rename      Rename a container
  restart     Restart one or more containers
  rm          Remove one or more containers
  rmi         Remove one or more images
  run         Run a command in a new container
  save        Save one or more images to a tar archive (streamed to STDOUT by default)
  search      Search the Docker Hub for images
  start       Start one or more stopped containers
  stats       Display a live stream of container(s) resource usage statistics
  stop        Stop one or more running containers
  tag         Create a tag TARGET_IMAGE that refers to SOURCE_IMAGE
  top         Display the running processes of a container
  unpause     Unpause all processes within one or more containers
  update      Update configuration of one or more containers
  version     Show the Docker version information
  wait        Block until one or more containers stop, then print their exit codes
Help for each command eg: run or build can be viewed by running sudo docker <command> --help eg:
Docker build command help
$ sudo docker build --help

Usage:  docker build [OPTIONS] PATH | URL | -

Build an image from a Dockerfile

Options:
      --add-host list              Add a custom host-to-IP mapping (host:ip)
      --build-arg list             Set build-time variables
      --cache-from stringSlice     Images to consider as cache sources
      --cgroup-parent string       Optional parent cgroup for the container
      --compress                   Compress the build context using gzip
      --cpu-period int             Limit the CPU CFS (Completely Fair Scheduler) period
      --cpu-quota int              Limit the CPU CFS (Completely Fair Scheduler) quota
  -c, --cpu-shares int             CPU shares (relative weight)
      --cpuset-cpus string         CPUs in which to allow execution (0-3, 0,1)
      --cpuset-mems string         MEMs in which to allow execution (0-3, 0,1)
      --disable-content-trust      Skip image verification (default true)
  -f, --file string                Name of the Dockerfile (Default is 'PATH/Dockerfile')
      --force-rm                   Always remove intermediate containers
      --help                       Print usage
      --iidfile string             Write the image ID to the file
      --isolation string           Container isolation technology
      --label list                 Set metadata for an image
  -m, --memory bytes               Memory limit
      --memory-swap bytes          Swap limit equal to memory plus swap: '-1' to enable unlimited swap
      --network string             Set the networking mode for the RUN instructions during build (default "default")
      --no-cache                   Do not use cache when building the image
      --pull                       Always attempt to pull a newer version of the image
  -q, --quiet                      Suppress the build output and print image ID on success
      --rm                         Remove intermediate containers after a successful build (default true)
      --security-opt stringSlice   Security options
      --shm-size bytes             Size of /dev/shm
  -t, --tag list                   Name and optionally a tag in the 'name:tag' format
      --target string              Set the target build stage to build.
      --ulimit ulimit              Ulimit options (default [])
6. Docker Architecture
As mentioned above, Docker technology makes use of a client server technology, with a client and server daemon installed when doing a typical docker install on linux. On Windows and Mac, in the past, one needed to make use of Docker machine, as the operating systems did not provide support for the Docker software to function without help, but now with Windows 10 and Mac OS X El Capitan 10.11 and newer, native support for Docker is possible and Docker machine is no longer needed provided you are using Docker 1.12 or newer.
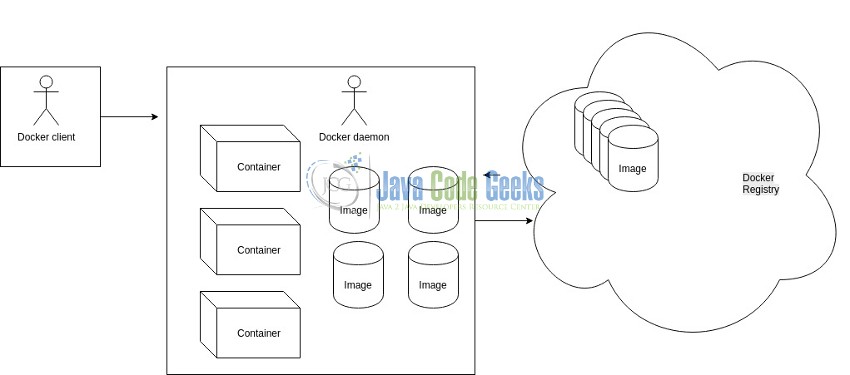
A typical installation will leave you with a command line client and a daemon process (server). We issue our commands via the client to the server which will then act on it. Sometimes those commands could involve a Docker registry (build, pull, push etc). In this case the daemon process will consult said registry for any images being requested or to publish any images already built. One can also setup ones own Docker registry and configure the daemon to talk to it as well.
The Docker daemon and Docker client could be on the same machine (typical developer environment) but the Docker daemon could also be on a remote machine. In cases where you would like to provision multiple remote Docker hosts, Docker machine is perfectly suited to this and probably should be preferred.
The Docker daemon does the heavy lifting of building images (persistent snapshots) on the host machine. At times the images will require baseline images from the Docker registry and the daemon will source this on the client’s behalf. Typical workflows involve building images and running containers from the images. The containers can be seen as the runtime manifestation / instantiation of an image and exhibits an image to many containers relationship. The Docker registry can be used as a source of images or as a destination for built images that are intended for sharing.
Docker compose, another useful tool, can be used when multiple containers are linked together to form a distributed application and this tool allows you to manage them. Docker swarm facilitates treating the container hosts created using Docker machine as a cluster and should be the preferred tool when your use case demands such a scenario.
7. Dockerfile primer
The Dockerfile is a text file which contains a series of instructions to be executed on the command line when executing the following build command: eg: sudo docker build . The period space at the end indicates to the Docker client what needs to be sent to the Docker daemon as part of the context of the build. So, in the case of the sudo docker build the current directory is sent recursively. Be wary of using root / as the entire file system will find it’s way to the Docker daemon.
A .dockerignore file can be used to indicate what to ignore and thus not send to the Docker dameon.
Typically the Dockerfile is called just that, Dockerfile, but can be named something else and located anywhere on your system and referred to via the -f command line argument. The Docker daemon will validate the Dockerfile prior to executing it and fail fast with any validation / syntax issues.
Each instruction in the Dockerfile is executed in isolation and saved to in an intermediate image, thus providing a boost in speed when building subsequent Docker images that leverage the same set of intermediate images.
For more on the Dockerfile and best practices see the following link.
8. The program / application / system
The core of the sample application is taken from a previous article and is a simple Java 9 main program that runs a couple of Http requests, using the new HttpClient in Java 9, against the ngHttp2 online service.
8.1 Jshell
One of the great new features of Java 9 is a REPL (Read-Eval-Print-Loop) which comes bundled with the JDK. From my first exposure with the Scala REPL, I have always wanted something similar for vanilla Java and now we have it in Java 9.
A REPL allows us to execute arbitrary snippets of code and check their results. However to do this, you will need to download and install Java 9. We could however use Docker to run our REPL from a Java 9 container and enjoy the benefits of this Java 9 feature without the headache of having to set it up and impact our own, current environment. Here’s how:
Running Jshell from a Java 9 Docker container
sudo docker run -it openjdk:9 /bin/jshell
...
INFO: Created user preferences directory.
| Welcome to JShell -- Version 9-Debian
| For an introduction type: /help intro

jshell>
- line 1: we issue the command
runto instruct the Docker daemon to spawn a container from the imageopenjdk:9in interactive mode (with standard input open-i) with a psuedo terminal-tand then pass the argument/bin/jshellinstructing the container to start a jshell session after startup. - line 7: we see a prompt
jshell>indicating the REPL is ready to receive input, feel free to type some expressions in, you now have the Java 9 interactive shell available to you. To exit thejshellcan be done by typing/exitwhich will also implicity stop the container.
8.2 Building a Java 9 program
Navigate to the root of the project folder and execute the following code snippet. This will result in a target folder being generated with the result of the build placed in it.
Building a Java 9 program using a Docker container
sudo docker run -it --rm --name java9-http-docker-maven-build -v "$PWD":/usr/src/mavenTmpWork -w /usr/src/mavenTmpWork maven:3.5-jdk-9 mvn clean install package
- line 1: this command will instruct Docker to build us an image and run a container containing maven 3.5 and Java 9 to build our project in. This will allow us to build the Java 9 project without having Java 9 on our system.
-vmounts the current project root folder and-windicates the folder within the running container where the work will be done (building).--rminstructs Docker to automatically remove the container if it already exists.--nameassigns a name to the container.
8.3 Running a Java 9 program
- Navigate to the root of the project folder, if not already there.
- Build the Docker image to run the application using the Dockerfile in the project root.
sudo docker build -t java9-http-client . - Run a container from the built image.
sudo docker run -i -t java9-http-client:latest
Dockerfile for Running a Java 9 program using a Docker container
FROM openjdk:9
COPY ./target/http_client-0.0.1-SNAPSHOT.jar /usr/src/myapp/http_client-0.0.1-SNAPSHOT.jar
CMD ["java", "-jar", "--add-modules=jdk.incubator.httpclient", "/usr/src/myapp/http_client-0.0.1-SNAPSHOT.jar"]
- line 1: we indicate we want to use the
openjdk:9image as our baseline - line 2: we copy the previously built jar file to the
/usr/src/myappfolder inside the container. - line 3: we specify the command to run once the container has started.
When the program runs, you should see log output resembling the following:
Snippet of output from running the Java 9 program in a Docker container
...
-----

'Put'      : 'https://nghttp2.org/httpbin/put'
Status code : 200
 {
  "args": {},
  "data": "Some data",
  "files": {},
  "form": {},
  "headers": {
    "Accept": "application/json",
    "Content-Length": "9",
    "Content-Type": "text/plain",
    "Host": "nghttp2.org",
    "Via": "2 nghttpx"
  },
  "json": null,
  "origin": "105.27.116.66",
  "url": "https://nghttp2.org/httpbin/put"
}

-----

'Delete'      : 'https://nghttp2.org/httpbin/delete'
Status code : 200
 {
  "args": {},
  "data": "Some data",
  "files": {},
  "form": {},
  "headers": {
    "Accept": "application/json",
    "Content-Length": "9",
    "Content-Type": "text/plain",
    "Host": "nghttp2.org",
    "Via": "2 nghttpx"
  },
  "json": null,
  "origin": "105.27.116.66",
  "url": "https://nghttp2.org/httpbin/delete"
}

-----
8.4 Building and running a Java 9 program using Oracle Java 9 container
Navigating to the project root folder you will find a file named: Dockerfile-oracle-java9. To build an image and run the sample Java 9 program using this Dockerfile do the following:
- Build:
sudo docker build -f Dockerfile-oracle-java9 -t oracle-java9-http-client . - Run:
sudo docker run -i -t oracle-java9-http-client:latest
Dockerfile for Oracle Java9 (Hotspot)
FROM ubuntu:latest
MAINTAINER JavaCodeGeeks

RUN apt-get -y update
RUN apt-get -y install software-properties-common python-software-properties
RUN add-apt-repository ppa:webupd8team/java
RUN apt-get -y update
RUN echo oracle-java9-installer shared/accepted-oracle-license-v1-1 select true | debconf-set-selections && apt-get -y install oracle-java9-installer && apt-get -y install oracle-java9-set-default

RUN java -version
RUN javac -version

COPY ./target/http_client-0.0.1-SNAPSHOT.jar /usr/src/myapp/http_client-0.0.1-SNAPSHOT.jar
CMD ["java", "-jar", "--add-modules=jdk.incubator.httpclient", "/usr/src/myapp/http_client-0.0.1-SNAPSHOT.jar"]
- line 1: we specify the baseline image to use
- line 5: we install come components necessary to make the following instruction
add-apt...work - line 6: we add the required package provider for Oracle Java so that we can get the Oracle Java 9 download
- line 8: we download/install the oracle-java9-installer, but not before accepting the license agreement
select true | debconf-set-selections - line 10 & 11: we ensure
javaandjavacare mapped appropriately - line 13: we copy the jar file to the relevant location in the container image
- line 14: we specify the instruction to be run on container startup
9. Summary
In this example we covered some background on Docker and it’s origins, it’s architecture and tooling / commands and how to use it.
We made use of the Docker registry to leverage the wealth of resources and knowledge in the Docker community to slipstream our tasks of building and running a Java 9 sample program using Docker technology. We also learn’t how to build our own Dockerfile from scratch to accomplish the same goal.
10. Download the Source Code
This was a Java 9 Docker example.
You can download the full source code of this example here: Java 9 Docker example


