1. Introduction
This example demonstrates the usage of the new Java Http Client bundled with JDK 9. It is bundled as an incubator module in JDK 9 and implements HTTP/2 and WebSocket with backward compatibility still facilitating HTTP/1.1.
It provides synchronous and asynchronous API’s and facilitates HTTP/2 over TLS (upgraded from SSL) when supported. The examples will be demonstrated via a program driven from the command line showcasing synchronous and asynchronous usage of the common HTTP methods (GET, PUT, POST, DELETE).
2. Technologies used
The example code in this article was built and run using:
- Java 9 (jdk-9+180)
- Maven 3.3.9 (3.3.x will do fine)
- Eclipse Oxygen (4.7.0)
- Ubuntu 16.04 (Windows, Mac or Linux will do fine)
3. Setup
In order for these examples to work the following setup needs to occur first.
3.1 Download and install Java 9 JDK
- Navigate to the early access builds for Java 9 (at time of writing) and accept the license agreement.
- Download the correct, most recent, archive for your platform and extract it to somewhere on your system.

If you have another version of Java defined for your system and you’re using windows, be sure to set your JAVA_HOME variable to the new downloaded Java 9 JDK folder as well as adding the bin folder to your path.
For those running linux, specify an alternative java and javac to point to the new downloaded Java 9 JDK folder and enable it as the default Java.
Specifying alternative Java and Javac in Ubuntu
sudo update-alternatives --install /usr/bin/java java <path to java executable in bin folder> 2
sudo update-alternatives --install /usr/bin/javac javac <path to javac executable in bin folder> 2
Selecting Java 9 as system default in Ubuntu
sudo update-alternatives --config java
...
There are 3 choices for the alternative java (providing /usr/bin/java).

  Selection    Path                                            Priority   Status
------------------------------------------------------------
  0            /usr/lib/jvm/java-8-openjdk-amd64/jre/bin/java   1081      auto mode
* 1            /home/jean-jay/runtimes/jdk-9/bin/java           3         manual mode
  2            /home/jean-jay/runtimes/jdk1.8.0_101/bin/java    2         manual mode
  3            /usr/lib/jvm/java-8-openjdk-amd64/jre/bin/java   1081      manual mode

Press <enter> to keep the current choice[*], or type selection number:
...
sudo update-alternatives --config javac
There are 3 choices for the alternative javac (providing /usr/bin/javac).

  Selection    Path                                            Priority   Status
------------------------------------------------------------
  0            /usr/lib/jvm/java-8-openjdk-amd64/bin/javac      1081      auto mode
* 1            /home/jean-jay/runtimes/jdk-9/bin/javac          3         manual mode
  2            /home/jean-jay/runtimes/jdk1.8.0_101/bin/javac   2         manual mode
  3            /usr/lib/jvm/java-8-openjdk-amd64/bin/javac      1081      manual mode

Press <enter> to keep the current choice[*], or type selection number:
Once these steps have been completed you should be able to run java -version and javac -versionand both execution commands should greet you with something similar to the following:
Confirming Java 9 install
jean-jay@jeanjay-SATELLITE-L750D:~$ java -version
java version "9"
Java(TM) SE Runtime Environment (build 9+180)
Java HotSpot(TM) 64-Bit Server VM (build 9+180, mixed mode)
jean-jay@jeanjay-SATELLITE-L750D:~$ javac -version
javac 9
3.2 Download and install Eclipse Oxygen 4.7.x
Navigating to Eclipse wiki for Java 9.
It states that Java 9 support is available for Eclipse Oxygen 4.7.0. We will therefore need to download and install Eclipse Oxygen 4.7.0. When installing Eclipse Oxygen 4.7.0 it is important to ensure that the previously downloaded Java 9 is enabled and set as your systems default JDK (java -version will indicate it), otherwise you will have to add it as a JDK runtime for Eclipse Oxygen and will need to ensure that your system’s maven installation uses the same Java 9 we are installing.
Once Eclipse Oxygen has been downloaded and installed we need to install Java 9 support from the Eclipse market place. Navigate to Help >> Eclipse Marketplace. When the dialogue box opens be sure to type Java 9 support. Select Java 9 support (BETA) for Oxygen 4.7

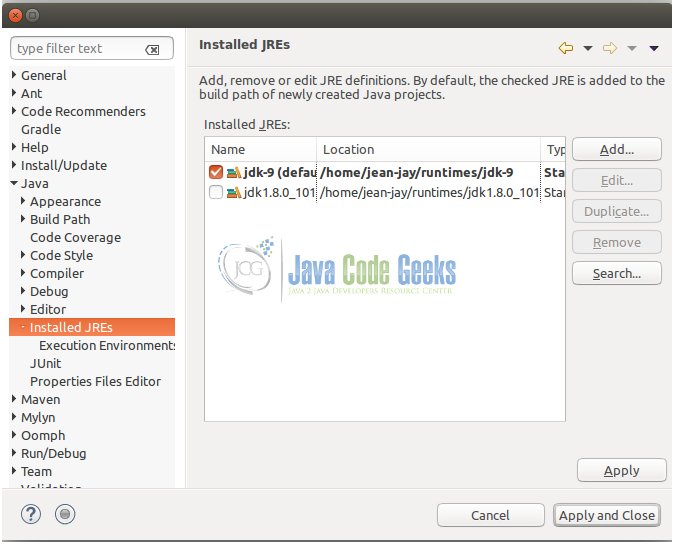
For those that have a different JDK set as the system default or if it did not pick up Java 9 JDK as your system default, adding Java 9 JDK in Eclipse Oxygen 4.7.0 to eclipse and setting it as the default for Eclipse Oxygen can be done by navigating to Window >> Preferences.
When the dialogue box appears, click Add and then point it at the Java 9 JDK folder.
4. Background
With all this talk about HTTP/2, TLS and WebSockets one can certainly feel intimated, so I thought it’s prudent to take a quick step back and briefly touch on the reasons for an Http Client being implemented and shipped as part of the JDK and what brings us by way of being a modern day HTTP client. This should go some ways to demystifying some of the jargon being thrown around (HTTP/2, TLS and WebSockets).
Typically when one needed an Http Client we would usually use a third party implementation (apache, spray or google etc) or resort to the clumsy use of using URL and UrlConnection. But now, by way of Java 9, we have as an incubator module, initially, a modern day Http Client. Being an incubator module means it will be moved to another (permanent) package on the next JDK release (possibly with API changes), but for now we can enjoy its use under the guise of jdk.incubator.http.*
With HTTP/1.1 in full force, the client naturally supports it, but also offers by way of an upgrade header the ability to switch to HTTP/2, should it be offered. What is HTTP/2? Born out of SPDY from Google HTTP/2 is the next major release of the Http network protocol. It offers various performance optimizations by way of reducing network connections through pushtechnology between servers and clients (browsers) and multiplexing requests across a single connection to avoid head of line blocking.
Security is kept center stage with HTTP/2 and TLS 1.2. To read more about it go here.
With Asynchronous API’s gaining traction in most libraries these days it stands to reason that the new HTTP client should offer this interface as well to facilitate scale in the usage of the new client.
5. The API
When working with the Http client 3 core classes are central to its API. These include HttpClient, HttpRequest and HttpResponse with builders available to construct HttpClient and HttpRequest.
The Builders used to create HttpClient and HttpRequest instances are not thread safe but they provide a fluent API to set required state for their respective objects they create. Some headers (not all) are set in our code, while others (security and cookie management) are set via other API’s. The build(...) method will eventually build an instance of an HttpClient or HttpRequest respectively, depending on the builder in question.
An HttpResponse represents the result of an HttpRequest call and the HttpResponse provides an API to read the body, status code and headers of the response. Response bodies are handled in two steps. Firstly a HttpResponse.BodyHandler will check the status code and headers. It will then return an HttpResponse.BodyProcessor to “handle” the body content. Various pre-defined HttpResponse.BodyProcessor types exist and one is also able to implement custom ones.
6. The code
6.1 Module info
The Module info
Module info
module com.javacodegeeks.java9.http_client.synchronous {
	requires jdk.incubator.httpclient;
}
In Java 9, modules are central to its feature list and because we are developing using Java 9, we should / need to define our jar as a module, to be specific an Application module. A module defines, by way of this module-info.java the packages it depends on and exports, in our case jdk.incubator.httpclient.
6.2 Http Client Helper
Snippet of the HttpClientHelper
final class HttpClientHelper {

    static final HttpClient CLIENT = HttpClient.newBuilder().followRedirects(HttpClient.Redirect.ALWAYS).build();
    static final Map<String, String> HEADERS = new HashMap<>();
    static {
        HEADERS.put("Accept", "application/json");
        HEADERS.put("Content-Type", "text/plain");
    }

    private HttpClientHelper() {
        throw new IllegalStateException("Instantiation not allowed");
    }

    static HttpRequest getRequest(final HttpClient client, final URI uri, final Map<String, String> headers) {
        assert !Objects.isNull(client) && !Objects.isNull(uri) && !Objects.isNull(headers);

        Builder builder = HttpRequest.newBuilder().version(client.version()).uri(uri).GET();

        fillHeaders(builder, headers);
        return builder.build();
    }

    static HttpRequest postRequest(final HttpClient client, final URI uri, final Map<String, String> headers,
	    final Supplier<HttpRequest.BodyProcessor> bodyProcessorProducer) {
        assert !Objects.isNull(client) && !Objects.isNull(uri) && !Objects.isNull(headers);

        Builder builder = HttpRequest.newBuilder().version(client.version()).uri(uri).POST(bodyProcessorProducer.get());

        fillHeaders(builder, headers);
        return builder.build();
    }
...
}
The HttpClientHelper is a simple utility class that defines some methods for easily creating HttpRequest objects, and writing response to the console.
- line 3: uses a
Builderto build anHttpClientand specifies via it’s interface that we want to follow redirects. Thebuild(...)method finally builds theHttpClientinstance. - line 17 & 27: uses a
Builderto build anHttpRequestforGETandPOSTrequests respectively. BothBuilderinstances have theirHttpClientversions (HTTP/2) specified via theBuilderinterface as well as theURIto invoke. In the case of thePOSTrequest aHttpRequest.BodyProcessorinstance is supplied which deals with marhsalling the Java object into aByteBuffer.ASuppliertype provided at method invocation time is responsible for supplying theHttpRequest.BodyProcessorto use.
6.3 Http Client Synchronous and Asynchronous Examples
Snippet of the Synchronous usage of HttpClient
...
    static void get() throws URISyntaxException, IOException, InterruptedException {
        final HttpRequest request = HttpClientHelper.getRequest(HttpClientHelper.CLIENT,
           new URI("https://nghttp2.org/httpbin/get"), HttpClientHelper.HEADERS);

        final HttpResponse<String> response = HttpClientHelper.CLIENT.send(request,
           HttpResponse.BodyHandler.asString());

        HttpClientHelper.printResponse(response, "'Get'       : 'https://nghttp2.org/httpbin/get'");
    }

    static void post() throws URISyntaxException, IOException, InterruptedException {
        final HttpRequest request = HttpClientHelper.postRequest(HttpClientHelper.CLIENT,
           new URI("https://nghttp2.org/httpbin/post"), HttpClientHelper.HEADERS,
           () -> HttpRequest.BodyProcessor.fromString("Some data"));

        final HttpResponse<String> response = HttpClientHelper.CLIENT.send(request,
           HttpResponse.BodyHandler.asString());

        HttpClientHelper.printResponse(response, "'Post'      : 'https://nghttp2.org/httpbin/post'");
    }
...
- line 3, 4, 13, 14, 15: with the help of the
HttpClientHelperwe create aGETandPOSTHttpRequestinstances respectively. - line 6,7,17,18: we invoke
send(...)(synchronously) on theHttpClientproviding a pre-definedHttpResponse.BodyHandlerinstance to handle the response from the server.
Snippet of the Asynchronous usage of HttpClient
...
    private static void delete(final CountDownLatch latch) throws URISyntaxException {
	assert !Objects.isNull(latch);

	final HttpRequest request = HttpClientHelper.deleteRequest(HttpClientHelper.CLIENT,
		new URI("https://nghttp2.org/httpbin/delete"), HttpClientHelper.HEADERS,
		() -> HttpRequest.BodyProcessor.fromString("Some data"));

	final CompletableFuture<HttpResponse<String>> futureResponse = HttpClientHelper.CLIENT.sendAsync(request,
		HttpResponse.BodyHandler.asString());

	handleFutureResponse(futureResponse, latch, "'Delete'      : 'https://nghttp2.org/httpbin/delete'");
    }

    private static void handleFutureResponse(final CompletableFuture<HttpResponse<String>> futureResponse,
	    final CountDownLatch latch, final String message) {
	assert !Objects.isNull(futureResponse) && !Objects.isNull(latch) && !Objects.isNull(message);

	futureResponse.whenComplete((response, exception) -> {
	    try {
		if (Objects.isNull(exception)) {
		    HttpClientHelper.printResponse(response, message);
		} else {
		    System.err.println(
			    "An exception occured trying to get the future response of the HTTP client request");
		    exception.printStackTrace();
		}
	    } finally {
		latch.countDown();
	    }
	});
    }
- line 9,10: we call
sendAsync(...)on theHttpClientand get aCompletableFutureback form the call. - line 19-31: we specify via the
whenCompletemethod of theCompletableFuturewhat must happen in the event of a successfulHttpResponseor if the request was unsuccessful.
Before running the code it is imperative to build the artifact using maven mvn clean install package --debug. I included the --debug statement so as to confirm the correct usage of JDK 9 when building using maven. When building from the command line you should see something resembling the following:
Confirming Java 9 usage when building
$ mvn clean install package --debug
Apache Maven 3.3.9
Maven home: /usr/share/maven
Java version: 9, vendor: Oracle Corporation
Java home: /home/jean-jay/runtimes/jdk-9
Default locale: en_ZA, platform encoding: UTF-8
...
- line 4 & 5: we can see that the correct JAVA_HOME variable is being used when maven is running.
Once the build has completed successfully, executing the program can be done as follows:
- Navigate to the
targetfolder within the project root folder. - Execute the following command:
java -jar --add-modules=jdk.incubator.httpclient http_client-0.0.1-SNAPSHOT.jar
Sample program output
Running synchronous HTTP Client examples

'Get'       : 'https://nghttp2.org/httpbin/get'
Status code : 200
 {
  "args": {},
  "headers": {
    "Accept": "application/json",
    "Content-Type": "text/plain",
    "Host": "nghttp2.org",
    "Via": "2 nghttpx"
  },
  "origin": "105.27.116.66",
  "url": "https://nghttp2.org/httpbin/get"
}

-----

'Post'      : 'https://nghttp2.org/httpbin/post'
Status code : 200
 {
  "args": {},
  "data": "Some data",
  "files": {},
  "form": {},
  "headers": {
    "Accept": "application/json",
    "Content-Length": "9",
    "Content-Type": "text/plain",
    "Host": "nghttp2.org",
    "Via": "2 nghttpx"
  },
  "json": null,
  "origin": "105.27.116.66",
  "url": "https://nghttp2.org/httpbin/post"
}

-----
7. Summary
In this example we had to cover setting up our environment to code and compile using Java 9 and Eclipse Oxygen 4.7.0.
We covered the background as to why a “native” Java Http Client was created and some of its features.
We also briefly covered the core abstractions central to its API and we demonstrated usage of the core abstractions through example (GET, POST, PUT, DELETE) requests against an HTTP/2 compliant third party service.
8. Download the source code
This was a Java 9 HttpClient Example.
You can download the full source code of this example here: Java 9 HttpClient Example.

Hey, How do you run this code? I am not able to run it with maven. I keep getting NoClassDefFoundError for any class in the incubator. I guess the module is not getting loaded at runtime. Could you please help me out?
Is it “module “com.javacodegeeks.java9.http_client” instead in the module-info.java file? You don’t have the “synchronous” package in your source code.