This tutorial explains why Java Apache Ant was created and its advantages over other build tools. It also covers the installation of Ant and what goes into a java ant project.
1. Apache Ant Tutorial – Introduction
In this tutorial, a sample project is set up. The Ant build file, for the sample project, is explored along with a discussion of how it is used to build the project. The tutorial ends with a link to download the entire project including source code, data file, and Ant build file.
You may skip the introductory part and jump directly to the Tutorial below.
2. Overview
Java Ant (“Another Neat Tool”) is a popular build tool developed in Java and is included with most modern IDEs such as IntelliJ IDEA, Eclipse, and NetBeans. It was originally part of the Apache Tomcat code base and was released as a standalone product in July 2000.
The principal use for Ant is for automation on building packages and artifacts for Java projects. Another big advantage of Ant is his portability. Just as it was built in Java, it is easily usable in several OS’s unlike other build tools such as make, gnumake, and jam are shell based tools.
Once the dependencies are determined, each task is completed by issuing shell commands, which are limited to the particular OS where the project is being built. Ant avoids this limitation by using Java objects to execute tasks. However, if you need or want to use a shell command, Ant has an task to allow the execution of OS shell commands.
Since many applications use a polyglot (many languages) model it comes with tasks for compiling C, C++, C#, and other languages. This is open source, users can extend the product by creating their own “antlibs”. (See the documentation on the Ant website).
3. Installation
3.1. Ubuntu
Use the apt-get install ant command to install it on Ubuntu. For other distributions, please check the documentation of your vendor.
3.2. Windows
a. Download the binary from ant.apache.org
NOTE: Use the 1.10.x version if you are running Java 8 (recommended). For minor versions (Java 5) use the 1.9.x version.
b. Unzip the binary into a directory of your choice. For this tutorial, the Ant binary was unzipped into C:\Ant
c. Set the ANT_HOME environment variable to the directory where Ant was unzipped. For this tutorial: ANT_HOME=C:\Ant
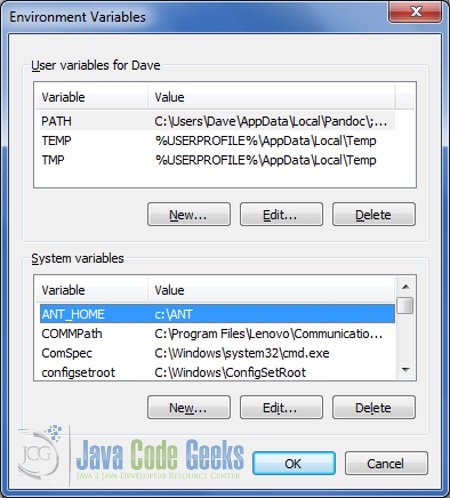
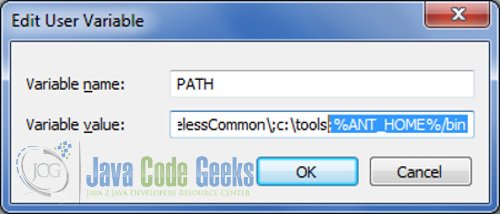
d. Edit the PATH system variable. Append “;%ANT_HOME%\bin” (without the quotes).
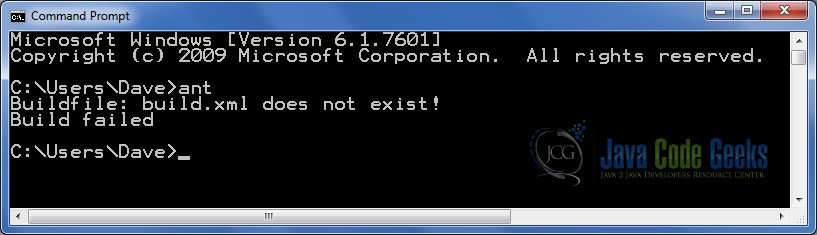
3.3. Testing the Installation
To test your Ant installation:
a. Open a command window and navigate to any directory which DOES NOT contain a build.xml file.
b. Issue the command: ant
You should receive the error message:
Buildfile: build.xml does not exist!
Build failed
4. Anatomy of an Ant Project
As mentioned above it receives its instructions on how to build a particular project from an XML file. The default Ant project file is build.xml.
The build.xml has the following basic structure:
- Project – is the main tag of a build.xml Ant file.
- Task – are the processes that Ant can execute. It is provided and named by Ant (or plug-ins).
- Properties – the tags with the path and other configurations for Ant (e.g. source dir, output dir, etc…).
- Target – It is like a task but it is a user defined name.
Note that we can have tasks and targets in the same Ant build file, but a target is defined by the user.
Now, we’ll see each build.xml tag in detail.
4.1. XML Declaration
Since the Ant build file is an XML file it begins with the typical declaration of an XML file with its version:
1 | <?xml version="1.0" encoding="UTF-8"?> |
4.2. Project Tag
The <project> element is the outer most element in this build file. It is a “container” for all of the properties, tasks, and targets that define the project contained in the build file.
1 | <project name="MyApplication" default="compile" basedir="." >> |
The <project> element has three attributes.
1. name: Set the name of the project contained in this file.
2. default: Set the default target to be executed by ant file.
3. basedir: Set the base directory (i.e.: root folder) of this project.
In this case “.” means the current directory. If this is omitted the parent directory of the build file will be used.
4.3. Tasks
Tasks are predefined individual units of work. Each task uses attributes set to values in order to customize the results of executing the task. Below are some examples of how set some of the <delete> task attributes to get different results:
01 02 03 04 05 06 07 08 09 10 11 12 13 14 15 16 17 18 19 20 21 | <!-- Deletes the file /lib/foo.jar --> <delete file="/lib/foo.jar"/><!-- Deletes all files with the extension .txt from the current directory and any subdirectories --> <delete> <fileset dir="." includes="**/*.txt"/> </delete><!-- Deletes the build directory, including all of the files and subdirectories --> <delete dir="build"/><!-- Deletes the build directory, including all of the files and subdirectories--><!—Same as above --> <delete includeEmptyDirs="true"> <fileset dir="build"/> </delete><!-- Deletes all files and subdirectories of build, but leave the build directory --> <delete includeEmptyDirs="false"> <fileset dir="build"/> </delete> |
Ant comes with over 150 predefined tasks. The predefined tasks can be broken down into the following categories:
| Archive Tasks |
| Audit/Coverage Tasks |
| Compile Tasks |
| Deployment Tasks |
| Documentation Tasks |
| EJB Tasks |
| Execution Tasks |
| File Tasks |
| Java2 Extensions Tasks |
| Logging Tasks |
| Mail Tasks |
| Miscellaneous Tasks |
| Pre-process Tasks |
| Property Tasks |
| Remote Tasks |
| SCM Tasks |
| Testing Tasks |
The Apache Ant User manual provides tables for each of the above categories showing the task name, a brief synopsis of what the task does and a link to the complete documentation. See Ant User Manual ( https://ant.apache.org/manual/index.html ) –> Table of Contents –> Ant Tasks –> Overview of Apache Ant Tasks.
4.4. Properties
Properties can be thought of as global constants that are immutable. However, they can be used throughout the project. Properties simply associate names with values. They are tasks which do not need to be enclosed within a <target> element. There is no limit to the number of <property> elements that can be defined.
The most popular syntax for defining a <property> element takes one of these forms:
01 02 03 04 05 06 07 08 09 10 11 | <!-- Sets the property foo to the value "bar" --> <property name="foo" value="bar"/><!-- Sets the property foo to the value "bar" (Same as above) --> <property name="foo">bar</property><!-- Reads a set of properties from a file called "myproperties" --> <property file="myproperties"/><!-- Reads a set of properties from "http://www.awebsite.com/props/build.properties" --> |
To retrieve the value associated with a particular property; surround the property name with ${ } for example from the examples above ${foo} would expand to bar
Ant provides a number of built in properties (taken from User Manual):
| basedir | the absolute path of the project’s basedir (as set with the basedir attribute of <<project>). |
| ant.file | the absolute path of the buildfile. |
| ant.version | the version of Ant ant.project.name the name of the project that is currently executing; it is set in the name attribute of <project> |
| ant.project.default-target | the name of the currently executing project’s default target; it is set via the default attribute of <project> |
| ant.project.invoked-targets | a comma separated list of the targets that have been specified on the command line (the IDE, an task …) when invoking the current project. This property is set properly when the first target is executed. If you use it in the implicit target (directly under the tag) the list will be empty if no target has been specified while it will contain the project’s default target in this case for tasks nested into targets. |
| ant.java.version | the JVM version Ant detected; currently it can hold the values “9”, “1.8”, “1.7”, “1.6”, “1.5”, “1.4”, “1.3” and “1.2”. |
| ant.core.lib | the absolute path of the ant.jar file. |
4.5. Targets
Target elements are user defined containers of tasks used to bring the build process to a known state. A powerful feature of targets is the depends attribute used to ensure targets are executed in the desired order.
For example, given the following targets:
1 2 3 4 5 | <target name="init" /><target name="clean" depends="init" /><target name="compile" depends="clean" /><target name="manifest" depends="compile" /><target name="buildJar" depends="manifest,compile,clean,init" /> |
If the buildJar target is executed; from the depends attribute the expected order of target execution might be: manifest –> compile –> clean –> init before executing the buildJar target, which is exactly backwards from the desired order (since it makes no sense to build the .jar file first, and perform the initialization task last). Fortunately when evaluating the order of targets to be executed, the depends attribute of the buildJar target depends on manifest, which depends on compile, which in turn depends on clean, which depends on init. Ant only executes a target once within a dependency chain so the targets are executed once and in the expected order.
4.6. Extension-Points
Extension-Points are targets without tasks. Introduced in Ant 1.8. Extension-points are executed from the command-line. The main purpose of extension-points is to execute the targets in its dependency list to bring the build process to the desired state.
1 | <extension-point name="build_source" depends="compile"/> |
5. Sample Project
Here is the build.xml file that builds the three .java files into the Using a Default Handler Java application adapted from my earlier article <a href=”https://examples.javacodegeeks.com/core-java/xml/xpath/java-xpath-using-sax-example/”Java XPath Using SAX Example.

The root directory for the project is proj, and contains:
| build.xml | The Ant build file for this project |
| inventory.xml | The XML data file used by the application after being copied to the classes directory (which is created during the build) |
| SaxParse.bat | Batch file to run the application |
The src directory contains the three Java source files:
| Computer.java | |
| JavaSAXParse.java | Main class |
| MyHandler.java |
Below is the build file – build.xml.
01 02 03 04 05 06 07 08 09 10 11 12 13 14 15 16 17 18 19 20 21 22 23 24 25 26 | <?xml version="1.0" encoding="UTF-8"?><!-- Project definition --><project name="AntSample" basedir="." default="compile"> <!-- Define properties needed for build --> <property name="srcdir" value="src"/> <property name="outdir" value="classes"/> <!-- Clean target. Delete the output directory. --> <target name="clean" > <delete dir="${outdir}" /> </target> <!-- Init target. Create the output directory. if it does not exist. --> <!-- Copy inventory.xml to $(outdir) --> <target name="init" depends="clean" > <mkdir dir="${outdir}" /> <copy file="${basedir}\inventory.xml" todir="${outdir}" /> </target> <target name="compile" depends="init" > <javac srcdir="${srcdir}" destdir="${outdir}" /> </target> </project> |
To build the project:
1. Open a Command Prompt
2. Navigate to the root directory \AntSample\proj
3. Issue the command: ant
To run the application:
1. Open a Command Prompt
2. Navigate to the root directory \AntSample\proj
3. Issue the command: SAXparse.bat
5.1 Using Ant with Eclipse
Now, we’ll take this example to the next level. We going to use Eclipse to wrap our code into a jar file and make Ant execute it.
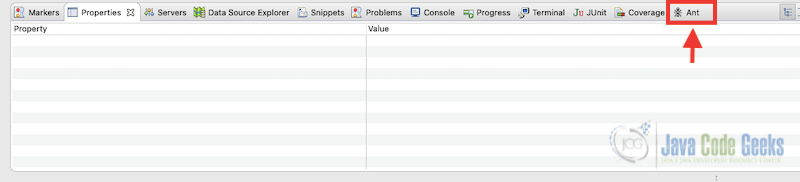
Eclipse already came with a tool that we can use to build or project. We can enable this tool in Window > Show View > Other > Ant > Ant. The view will appears in Eclipse Views tabs bottom.
In the sample for Eclipse some additions was made to create the jar file using target. However, the most important parts are the tasks jar and run.
Compile target
<target name="jar" depends="compile">
		<mkdir dir="${jardir}"/>
	    	<jar destfile="${jardir}/${ant.project.name}.jar" basedir="${outdir}">
	        	<manifest>
	            	<attribute name="Main-Class" value="${main-class}"/>
	            </manifest>
	        </jar>
	</target>
Run target
<target name="run" depends="jar">
		<java jar="${jardir}/${ant.project.name}.jar" fork="true"/>
	</target>
When the project is imported into Eclipse, we’ll see in the tab all the tasks that are inserted in build.xml.
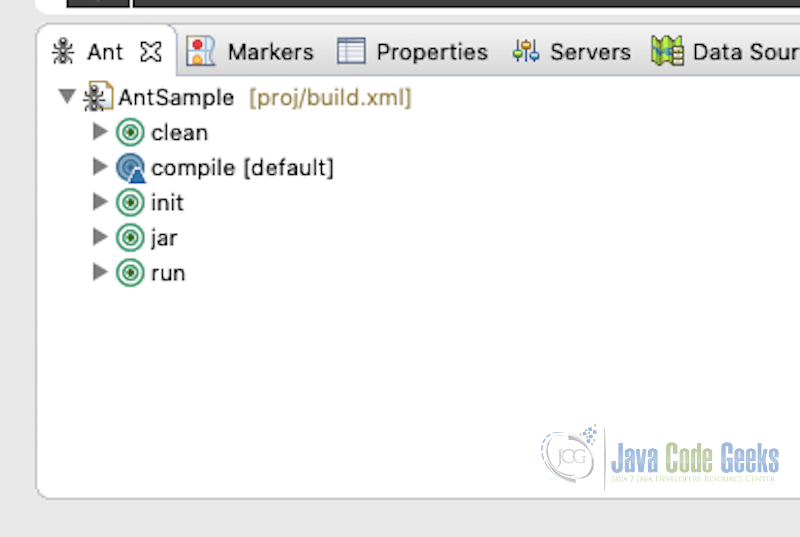
To compile and execute the application, double click in run task and see the result in Console tab with all tasks been executed in order.
6. For More Information
For more information consult the Java Ant Use Manual.
A copy of the manual is included with the Ant download. If you installed Java Ant, then your copy can be found at %ANT_HOME%\manual\index.html.
An online copy can be found at https://ant.apache.org/manual/index.html
7. Download the Source Code
You can download the full project for this tutorial here: Apache Ant Tutorial for Beginners
Last updated on Oct. 29th, 2020
