Spring Batch Admin exposes a web-based user interface featuring an admin console for Spring Batch applications and systems. This tutorial shows how to set up a Spring Batch Job and then monitor it using the User Interface offered by Spring Batch Admin. The example will use the following tools and libraries.
- Eclipse Helios
- Maven 2.2
- Tomcat 7
- Spring 4.0.5.RELEASE
- Spring Batch 3.0.4.RELEASE
- Spring JDBC 4.0.5.RELEASE
- HSQL 1.8.0.7
- Spring Batch Admin 1.3.1.RELEASE
The tutorial has been organized into sections and sub-sections as shown below. Feel free to skip to any section of interest or just read through. The entire example code is available for download at the end of the article.
Table Of Contents
1. Introduction
Spring Batch is a popular open-source batch processing framework. It allows configuring Jobs that process bulk data in batches. While these Jobs can be run as simple Java applications or can be scheduled to run periodically using schedulers like Quartz etc. Spring Batch Admin offers some added advantages. It not just provides a UI to view and monitor the Jobs that have been configured but it also allows easier control on running and scheduling of these Jobs, monitoring the performance of these jobs, checking the job status and also restarting or stopping a Job etc.
As stated above in this tutorial we will show how to configure a simple Job that reads data from a CSV file and writes it to a database table. We will use the in-memory HSQL database. The Job configuration will be based on XML. And then we will show how to set-up Spring Batch Admin so that this Job shows up in the Admin Console from which we can start, stop or restart the job.
2. Spring Batch Basics
For the novice we will just take a quick peek at the basics of Spring Batch Framework. For those wanting a more detailed glimpse may follow one of the previous articles here .
In a nutshell, Spring Batch is an open-source batch processing framework. Say, in an enterprise application millions of records (data) need to be read from some source. The source could be a database table, a text file or a CSV file etc. Some simple or complex business logic may then need to be applied to these records and then finally, these records need to be written out to some output which could again be a database table or a file etc. Spring Batch provides a mechanism to execute this entire operation through Jobs with minimum human intervention. Now to step-up a Job requires a few other things which we will not delve upon here like JobRepository wherein the meta-data related to the execution of a Job are stored, JobLauncher that actually picks up the JobExecution of a Job and gets it running, TransactionManager that looks after the management of database transactions in the JobRepository. We will quickly brush up on two main concepts here; namely, Job and Step.
2.1 Job
A Job encapsulates the entire concept of batch processing. It is actually an interface with its simplest implementation provided by the framework being SimpleJob. When using XML configuration the framework abstracts away the fact that we are actually creating an instance of SimpleJob. The actual events in a Job happen in a Step within a Job. A Job must have one or more Steps in it. Steps can be made to run in parallel, in sequence or can be partitioned if needed. More details on it are available in a previous JCG article here. I think this much should suffice for an introduction to Jobs. Just for the sake of completion, presenting following snippet that shows how a Job is configured.
XML Job Configuration
<job id="myjob" xmlns="http://www.springframework.org/schema/batch" restartable="true">
   	<step id="myStep" allow-start-if-complete="true">
   		<tasklet>
   			<chunk reader="cvsFileItemReader" processor="itemProcessor" writer="itemWriter" commit-interval="1000"/>
   		</tasklet>
   	</step>
</job>
2.2 Step
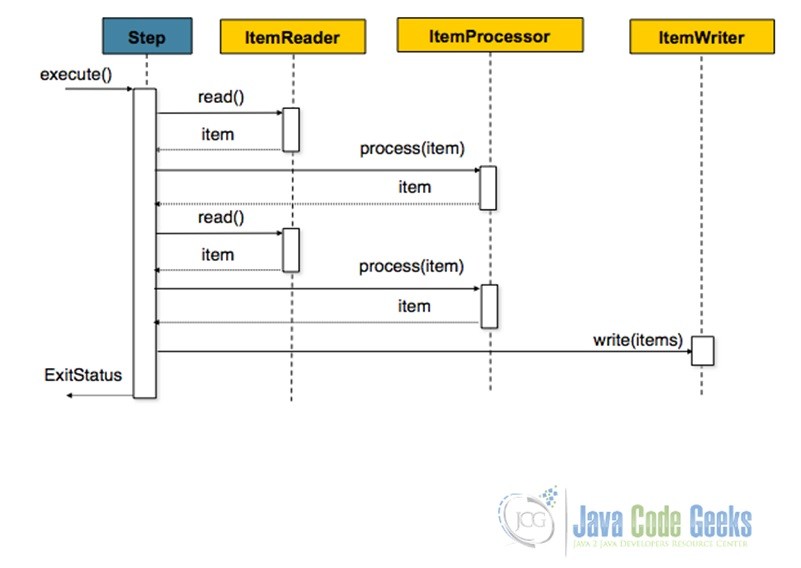
As said above, a Step is where the actual action of a Job happens. There are two fundamental ways in which Step execution occurs. The first is called Chunk-Oriented Processing. This is used when Reading, Processing and Writing of data is involved. Processing could be an optional operation though. In this approach, data are read and processed into chunks and aggregated till the specified chunk-size is reached. When it does, the entire chunk is written out to the output. The following diagram from the official documentation and the code snippet below it show Chunk-Oriented Step Processing.
Configuring Chunk-Oriented Processing
<job id="sampleJob" job-repository="jobRepository">
    <step id="step1">
        <tasklet transaction-manager="transactionManager">
            <chunk reader="itemReader" writer="itemWriter" commit-interval="10"/>
        </tasklet>
    </step>
</job>
The other manner in which Step processing happens is Tasklet Step Processing. This is used when a Step involves just one operation say, invoking a stored procedure, making a remote call etc. The following snippet shows how a Tasklet is configured. A JCG article on Tasklet Processing is available here.
Configuring Tasklet Step
<step id="step1">
    <tasklet ref="myTasklet"/>
</step>
3. Spring Batch Admin
As stated in the official documentation, Spring Batch Admin provides a web-based user interface that features an admin console for Spring Batch applications and systems. It is an open-source project from Spring. So it is basically a web application based on Spring MVC.
3.1 Use Cases
It has the following four main use-cases. Have attached the relevant screenshots from the official page to demonstrate how each use-case could be realized.
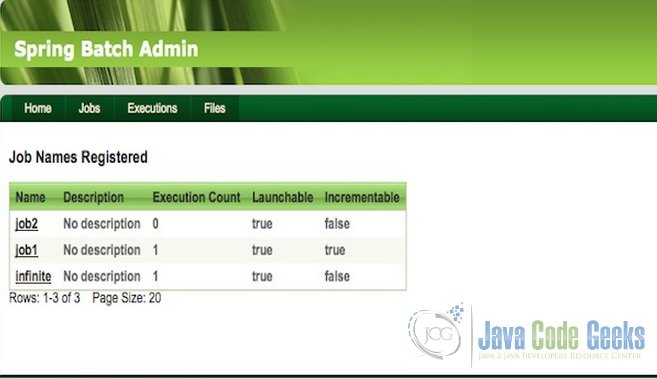
- Inspect Jobs
The console displays all the jobs that have been registered into the jobRepository, hence allows inspection at one glance.

Fig.2 Inspect Jobs - Launch Job
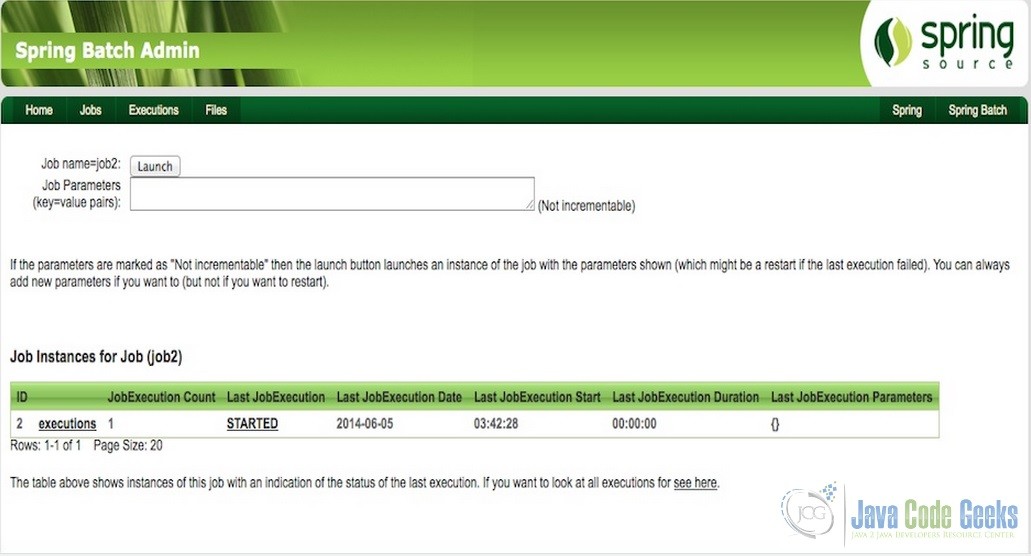
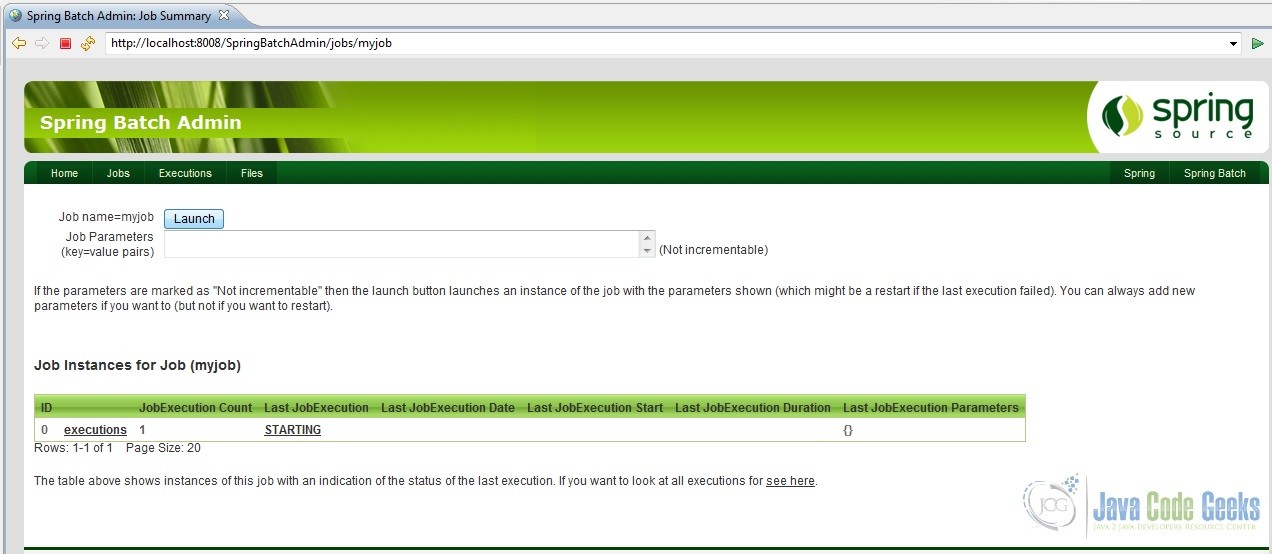
The UI also displays if the job is launchable or not. If yes, it can be launched from the UI by clicking on ‘launch’ button. One could provide the relevant jobParameters, if required; else it could be left blank.

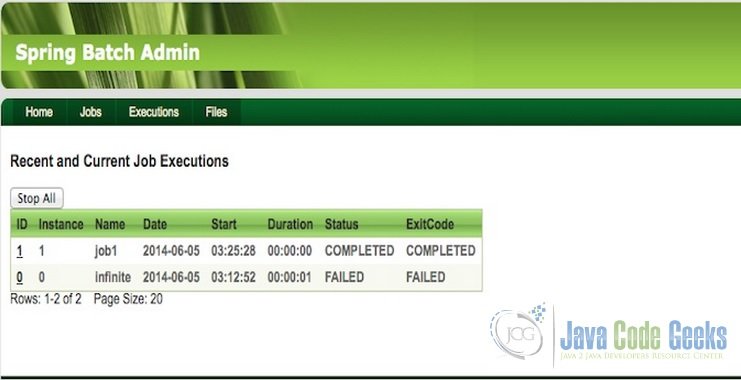
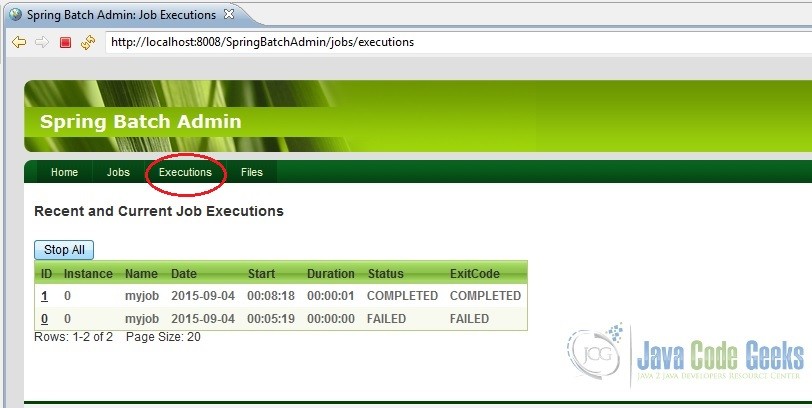
Fig.3 Launch Job - Inspect Executions
One can view the status of all jobs in a running, failed or completed state as well in the UI.

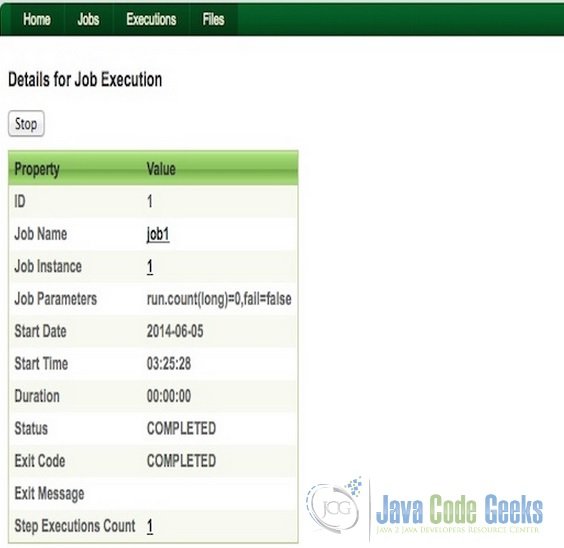
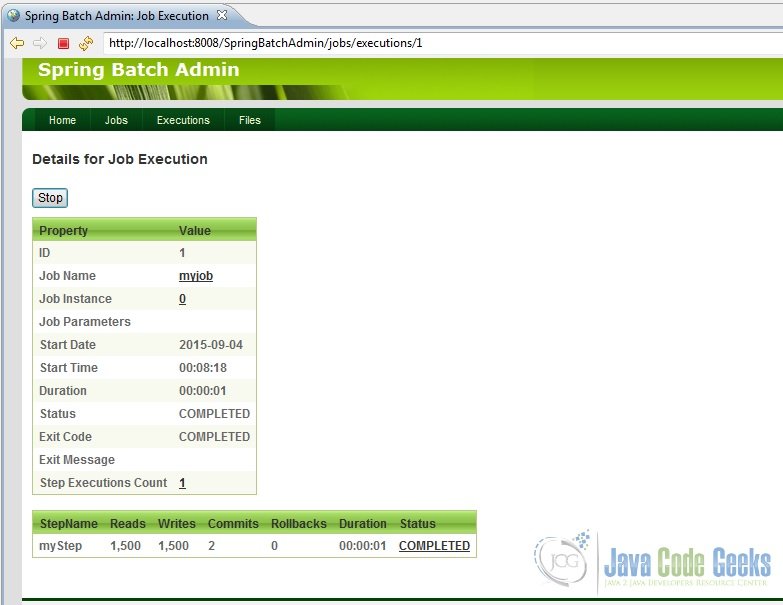
Fig. 4 Inspect Job Execution - Stop an Execution
One can simply click on the ‘stop’ button on the UI screen and stop an execution of the Job as well.

Fig.5 Stop a Job Execution
4. Spring Batch Admin Tutorial
In this tutorial we will learn how to configure a Job with just one Step in it and monitor it via the Spring Batch Admin provided web console. It will be a simple Job that reads data from a CSV file and writes the records into a database table. As mentioned above, we will use HSQL which is an in-memory database. So let’s begin.
4.1 Project Set-Up
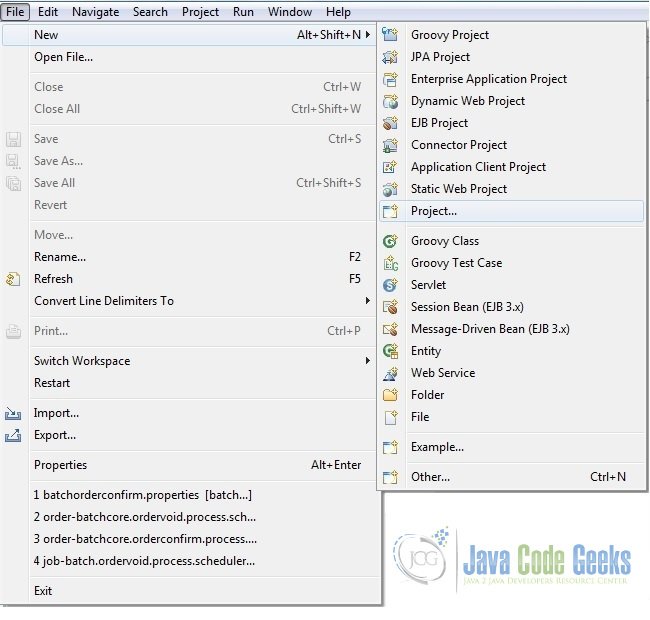
- Fire up Eclipse from a suitable location and create a standard Maven web-apps project
- Provide a suitable name to the project
- Add a few files and folders to it
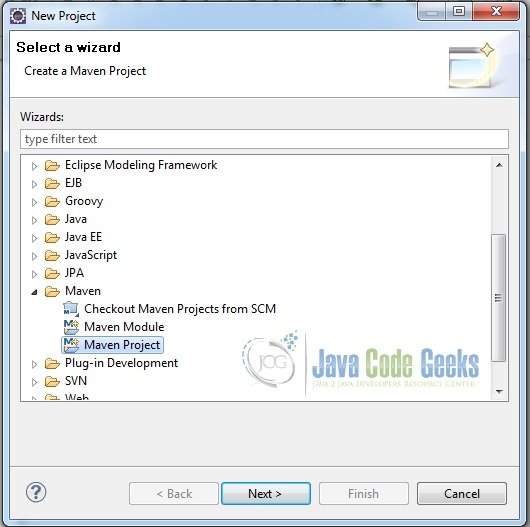
- The following snapshots show the creation of our final project

Fig.6 Create Project 
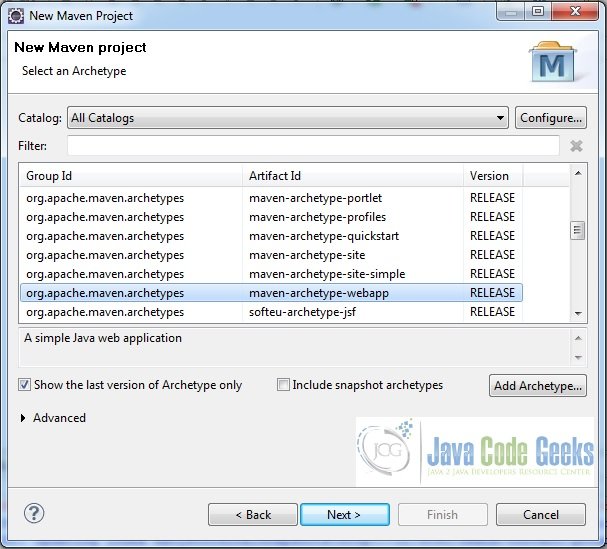
Fig.7 Choose the Creation of a Maven Project 
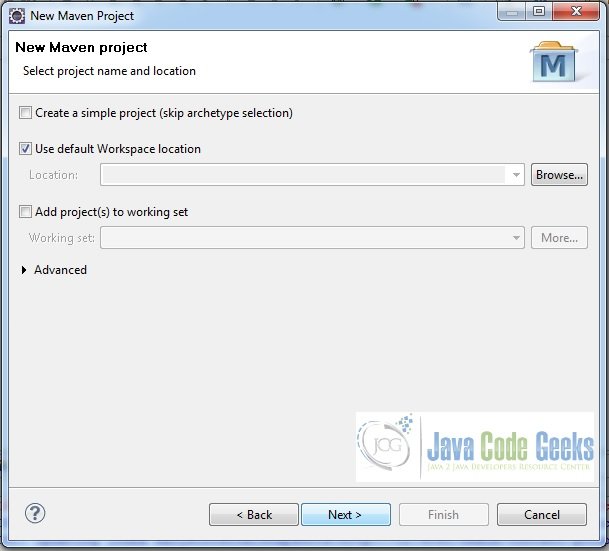
Fig.8 Go for Maven Archetype Selection 
Fig.9 Choose a standard web-apps project 
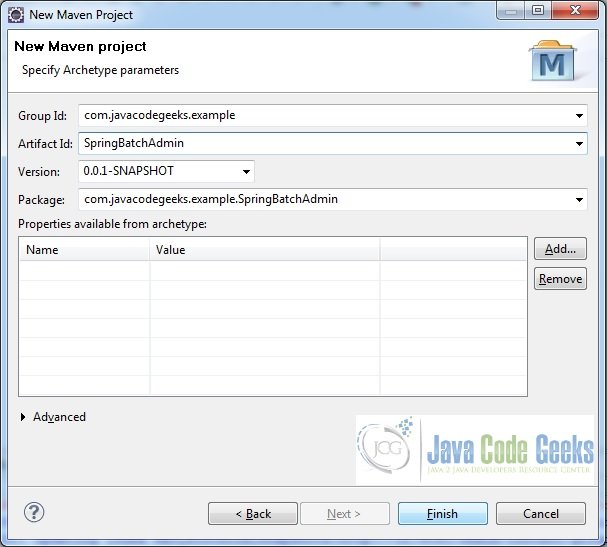
Fig.10 Provide Project Name 
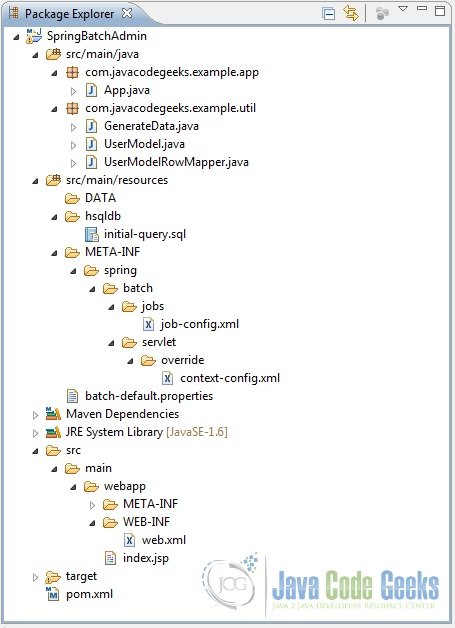
Fig.11 Created Project Structure
4.2 Maven Dependencies
Open the pom.xml file and add the following Maven dependencies to it. Note the use of <exclusions> tag with Spring-Batch-Admin* related dependencies. This is done because these have transitive dependencies on some other Spring artifacts; hence there is a possibility of version conflict.
pom.xml
<project xmlns="http://maven.apache.org/POM/4.0.0" xmlns:xsi="http://www.w3.org/2001/XMLSchema-instance"
  xsi:schemaLocation="http://maven.apache.org/POM/4.0.0 http://maven.apache.org/maven-v4_0_0.xsd">
  <modelVersion>4.0.0</modelVersion>
  <groupId>com.javacodegeeks.example</groupId>
  <artifactId>SpringBatchAdmin</artifactId>
  <packaging>war</packaging>
  <version>0.0.1-SNAPSHOT</version>
  <name>SpringBatchAdmin Maven Webapp</name>
  <url>http://maven.apache.org</url>
       <properties>
		  	<spring.version>4.0.5.RELEASE</spring.version>
		  	<spring.batch.version>3.0.4.RELEASE</spring.batch.version>
		  	<spring.jdbc.version>4.0.5.RELEASE</spring.jdbc.version>
		  	<hsql.version>1.8.0.7</hsql.version>
		  	<commons.version>1.4</commons.version>
		  	<spring.oxm.version>4.0.5.RELEASE</spring.oxm.version>
		  	<spring.batch.admin>1.3.1.RELEASE</spring.batch.admin>
      </properties>
  <dependencies>
    <dependency>
	<groupId>org.springframework.batch</groupId>
	<artifactId>spring-batch-core</artifactId>
	<version>${spring.batch.version}</version>
</dependency>

   <dependency>
		<groupId>org.springframework</groupId>
		<artifactId>spring-context-support</artifactId>
		<version>${spring.version}</version>
    </dependency>
    <dependency>
		<groupId>hsqldb</groupId>
		<artifactId>hsqldb</artifactId>
		<version>${hsql.version}</version>
	</dependency>
	<dependency>
		<groupId>org.springframework</groupId>
		<artifactId>spring-jdbc</artifactId>
		<version>${spring.jdbc.version}</version>
   </dependency>
     <dependency>
		<groupId>commons-dbcp</groupId>
		<artifactId>commons-dbcp</artifactId>
		<version>${commons.version}</version>
	</dependency>
	<dependency>
		<groupId>org.springframework</groupId>
		<artifactId>spring-oxm</artifactId>
		<version>${spring.oxm.version}</version>
	</dependency>
   <dependency>
       <groupId>junit</groupId>
       <artifactId>junit</artifactId>
       <version>3.8.1</version>
       <scope>test</scope>
    </dependency>
    <dependency>
		<groupId>org.springframework.batch</groupId>
		<artifactId>spring-batch-admin-manager</artifactId>
		<version>${spring.batch.admin}</version>
		<exclusions>
			<exclusion>
				<groupId>org.springframework.batch</groupId>
        		<artifactId>spring-context-support</artifactId>
			</exclusion>
		</exclusions>
	</dependency>
	<dependency>
        <groupId>org.springframework.batch</groupId>
        <artifactId>spring-batch-admin-resources</artifactId>
        <version>${spring.batch.admin}</version>
        <exclusions>
        	<exclusion>
        		<groupId>org.springframework.batch</groupId>
        		<artifactId>spring-context-support</artifactId>
        	</exclusion>
        </exclusions>
     </dependency>

  </dependencies>
  <build>
    <finalName>SpringBatchAdmin</finalName>
    <plugins>
    	<plugin>
    	    <groupId>org.apache.maven.plugins</groupId>
       	    <artifactId>maven-compiler-plugin</artifactId>
        	<version>2.2</version>
    		<configuration>
    			<source>1.6</source>
    			<target>1.6</target>
    		</configuration>
    	</plugin>
    </plugins>
  </build>
</project>
4.3 POJOs
Next, we will create a couple of POJO classes. These are used to map the data from the CSV file to the database tables. Most of this portion of the code should be self-explanatory.
UserModel.java
package com.javacodegeeks.example.util;

public class UserModel {
	String firstName, lastName;
	String city;
	String id;

	public String getFirstName() {
		return firstName;
	}
	public void setFirstName(String firstName) {
		this.firstName = firstName;
	}
	public String getLastName() {
		return lastName;
	}
	public void setLastName(String lastName) {
		this.lastName = lastName;
	}
	public String getCity() {
		return city;
	}
	public void setCity(String city) {
		this.city = city;
	}
	public String getId() {
		return id;
	}
	public void setId(String id) {
		this.id = id;
	}
	@Override
	public String toString(){
		return firstName+" "+lastName+" is from "+ city;
	}

}
Its corresponding Row-Mapper should be written as shown below.
UserModelRowMapper.java
package com.javacodegeeks.example.util;

import java.sql.ResultSet;
import java.sql.SQLException;

import org.springframework.jdbc.core.RowMapper;

public class UserModelRowMapper implements RowMapper{

	public UserModel mapRow(ResultSet rs, int rowNum) throws SQLException {
		UserModel user = new UserModel();
		user.setFirstName(rs.getString("firstName"));
		user.setLastName(rs.getString("lastName"));
		user.setCity(rs.getString("city"));
		user.setId(rs.getString("id"));
		return user;
	}

}
4.4 HSQL Table Creation
Next, we will write the following script to create a table in HSQL database wherein the read data from the CSV file will be written into. In a later section, we will elaborate on how this script would be called.
initial-query.sql
DROP TABLE USER_MODEL IF EXISTS;

CREATE TABLE USER_MODEL(
    firstName varchar(40),
    lastName varchar(40),
    city varchar(40),
    id varchar(20)
);
4.5 Job Configuration
Here we will set up a simple Job with a single Step. Notice that we are using chunk-oriented processing to achieve what we outlined above. Also notice the use of the Spring provided FlatFileItemReader and JdbcBatchItemwriter for reading input data and writing the output respectively. An important point to take note of here is that Spring Batch Admin looks for job-configurations under ‘/META-INF/spring/batch/jobs’; hence all custom job configurations are to be placed under this folder structure, else they may not show up in the Admin console.
job-config.xml
<?xml version="1.0" encoding="UTF-8"?>
<beans xmlns="http://www.springframework.org/schema/beans"
	xmlns:batch="http://www.springframework.org/schema/batch"
	xmlns:util="http://www.springframework.org/schema/util"
	xmlns:task="http://www.springframework.org/schema/task"
	xmlns:xsi="http://www.w3.org/2001/XMLSchema-instance"
	xsi:schemaLocation="http://www.springframework.org/schema/batch
	http://www.springframework.org/schema/batch/spring-batch-3.0.xsd
	http://www.springframework.org/schema/beans
	http://www.springframework.org/schema/beans/spring-beans-4.0.xsd
	http://www.springframework.org/schema/util
	http://www.springframework.org/schema/util/spring-util-4.0.xsd">


	  <bean
		class="org.springframework.beans.factory.config.PropertyPlaceholderConfigurer">
		<property name="locations">
			<list>
				<value>classpath:batch-default.properties
				</value>
			</list>
		</property>
		<property name="searchSystemEnvironment" value="true" />
		<property name="systemPropertiesModeName" value="SYSTEM_PROPERTIES_MODE_OVERRIDE" />
		<property name="ignoreUnresolvablePlaceholders" value="true" />
	</bean>


	<job id="myjob" xmlns="http://www.springframework.org/schema/batch" restartable="true">
   	<step id="myStep" allow-start-if-complete="true">
   		<tasklet>
   			<chunk reader="cvsFileItemReader" writer="itemWriter" commit-interval="1000"/>
   		</tasklet>
   	</step>
   </job>

     <bean id="cvsFileItemReader" class="org.springframework.batch.item.file.FlatFileItemReader">
   	<property name="resource" value="${INPUT_FILE_LOCATION}"></property>
   	<property name="linesToSkip" value="1"></property>
   	<property name="lineMapper">
   		<bean class="org.springframework.batch.item.file.mapping.DefaultLineMapper">
   			<property name="lineTokenizer">
   				<bean class="org.springframework.batch.item.file.transform.DelimitedLineTokenizer">
   					<property name="names" value="${INCOMING_COLUMN_MAPPING}"></property>
   				</bean>
   			</property>
   			<property name="fieldSetMapper">
   				<bean class="org.springframework.batch.item.file.mapping.BeanWrapperFieldSetMapper">
   					<property name="prototypeBeanName" value="userModel"></property>
   				</bean>
   			</property>
   		</bean>
   	</property>

   </bean>


   <bean id="itemWriter" class="org.springframework.batch.item.database.JdbcBatchItemWriter">
   	<property name="dataSource" ref="dataSource"></property>
   	<property name="sql" value="${INSERT_QUERY}">
   	</property>
   	<property name="itemSqlParameterSourceProvider">
   		<bean class="org.springframework.batch.item.database.BeanPropertyItemSqlParameterSourceProvider"/>
   	</property>
   </bean>

   <bean id="userModel" class="com.javacodegeeks.example.util.UserModel" scope="prototype"/>


</beans>
4.6 Context Set-Up
Now, we want our context file to be loaded in which we have defined the common beans like jobRepository, transactionManager etc. And just as our job-configuration file needs to be at the specified location, similarly this context file must be present at ‘META-INF/spring/batch/servlet/override’. Here are the contents of this file.

context-config.xml
<beans xmlns="http://www.springframework.org/schema/beans"
	xmlns:xsi="http://www.w3.org/2001/XMLSchema-instance"
	xmlns:jdbc="http://www.springframework.org/schema/jdbc"
	xsi:schemaLocation="
		http://www.springframework.org/schema/beans
		http://www.springframework.org/schema/beans/spring-beans-3.2.xsd
		http://www.springframework.org/schema/jdbc
	    http://www.springframework.org/schema/jdbc/spring-jdbc.xsd">

	<!-- using in-memory store for batch meta-data -->
	<bean id="jobRepository"
		class="org.springframework.batch.core.repository.support.JobRepositoryFactoryBean">
		<property name="dataSource" ref="dataSource" />
		<property name="transactionManager" ref="transactionManager" />
		<property name="databaseType" value="hsql" />
	</bean>

	<bean id="transactionManager" class="org.springframework.jdbc.datasource.DataSourceTransactionManager">
		<property name="dataSource" ref="dataSource"></property>
	</bean>

	<bean id="jobLauncher"
		class="org.springframework.batch.core.launch.support.SimpleJobLauncher">
		<property name="jobRepository" ref="jobRepository" />
	</bean>

	<bean id="dataSource" class="org.apache.commons.dbcp.BasicDataSource"
		lazy-init="true" destroy-method="close">
		<property name="driverClassName" value="org.hsqldb.jdbcDriver" />
		<property name="url"
			value="jdbc:hsqldb:file:src/main/resources/hsqldb/batchcore.db;shutdown=true;" />
		<property name="username" value="sa" />
		<property name="password" value="" />
	</bean>


	<!-- Create meta-tables. Here we are also invoking the initial-query.sql script
	<jdbc:initialize-database data-source="dataSource">
	    <jdbc:script location="classpath:hsqldb/initial-query.sql" />
		<jdbc:script location="classpath*:org/springframework/batch/core/schema-drop-hsqldb.sql" />
		<jdbc:script location="classpath*:org/springframework/batch/core/schema-hsqldb.sql" />
    </jdbc:initialize-database>-->


</beans>
4.7 Wiring-up With Spring Batch Admin
So far so good, let’s move further. When integrating Spring Batch Admin into our project there are two important things to be mindful about; first, Spring Batch Admin is a web-application based on the same principles as Spring MVC and second, it expects the folders to be arranged or located in a specific hierarchy. A look at the following three files should give an idea: servlet-config.xml, webapp-config.xml and WEB-INF/web.xml in the package org.springframework.batch.admin.web.resources in the Spring-Batch-Admin-Resources artifact .
Now, to wire-up Spring Batch Admin into our code, we will do two things. First, copy the contents of WEB-INF/web.xml from org.springframework.batch.admin.web.resources into the web.xml file of our code which is under Web Resources: src/main/webapp/WEB-INF/web.xml. And second, we will provide all the properties required to connect to our HSQL database and create the meta-data tables required for Spring Batch and create the User_Model table (remember initial-query.sql above?); properties to read the data from the input file and write out the result to the database table etc. in the batch-default.properties file. The contents of both these files have been shown below.
batch-default.properties
# Default placeholders for database platform independent features
batch.remote.base.url=http://localhost:8080/spring-batch-admin-sample
# Non-platform dependent settings that you might like to change

batch.jdbc.driver=org.hsqldb.jdbcDriver
batch.jdbc.url=jdbc:hsqldb:file:src/main/resources/hsqldb/batchcore.db;shutdown=true;
batch.jdbc.user=sa
batch.jdbc.password=
batch.schema.script=classpath*:/org/springframework/batch/core/schema-hsqldb.sql
batch.drop.script=classpath*:/org/springframework/batch/core/schema-drop-hsqldb.sql
batch.business.schema.script=classpath:hsqldb/initial-query.sql
INPUT_FILE_LOCATION = classpath:DATA/sampleData.csv
INCOMING_COLUMN_MAPPING = firstName,lastName,city,id
INSERT_QUERY = insert into USER_MODEL(firstName,lastName,city,id) values (:firstName,:lastName,:city,:id)
web.xml
<?xml version="1.0" encoding="UTF-8"?>
<web-app version="2.5" xmlns="http://java.sun.com/xml/ns/javaee"
	xmlns:xsi="http://www.w3.org/2001/XMLSchema-instance"
	xsi:schemaLocation="http://java.sun.com/xml/ns/javaee http://java.sun.com/xml/ns/javaee/web-app_2_5.xsd">

	<context-param>
		<param-name>contextConfigLocation</param-name>
		<param-value>classpath*:/org/springframework/batch/admin/web/resources/webapp-config.xml</param-value>
	</context-param>

	<listener>
		<listener-class>org.springframework.web.context.ContextLoaderListener</listener-class>
	</listener>

	<filter>
		<filter-name>shallowEtagHeaderFilter</filter-name>
		<filter-class>org.springframework.web.filter.ShallowEtagHeaderFilter</filter-class>
	</filter>

	<filter>
		<filter-name>hiddenHttpMethodFilter</filter-name>
		<filter-class>org.springframework.web.filter.HiddenHttpMethodFilter</filter-class>
	</filter>

	<filter-mapping>
		<filter-name>shallowEtagHeaderFilter</filter-name>
		<url-pattern>/*</url-pattern>
	</filter-mapping>

	<filter-mapping>
		<filter-name>hiddenHttpMethodFilter</filter-name>
		<url-pattern>/*</url-pattern>
	</filter-mapping>

	<servlet>
		<servlet-name>Batch Servlet</servlet-name>
		<servlet-class>org.springframework.web.servlet.DispatcherServlet</servlet-class>
		<init-param>
			<param-name>contextConfigLocation</param-name>
			<param-value>classpath*:/org/springframework/batch/admin/web/resources/servlet-config.xml</param-value>
		</init-param>
		<load-on-startup>1</load-on-startup>
	</servlet>

	<servlet-mapping>
		<servlet-name>Batch Servlet</servlet-name>
		<url-pattern>/*</url-pattern>
	</servlet-mapping>

</web-app>
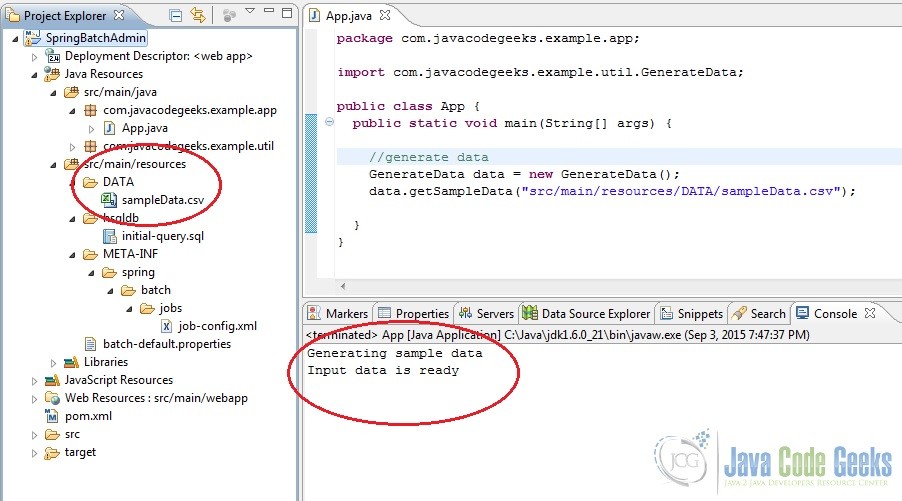
4.8 Sample Data Generation
Batch processing is generally used when dealing with large data-sets, to imitate the scenario we will write a class that simply generates a huge number of random figures, appends them to a file and places the file at a specified location. This file would then be used as input data in our Job. One could of course, use a more meaningful data-set if available. Just remember that our POJO classes would need to correspond to these input data-set.
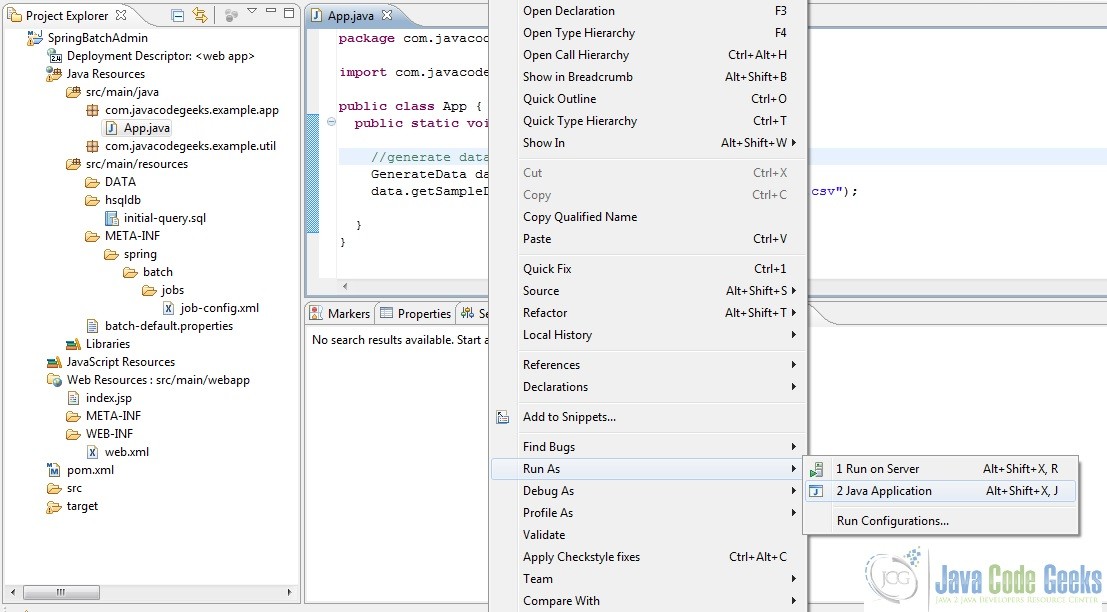
Hence, we are going to write a class GenerateData.java and set-up an App.java class to invoke the former class. Notice how we have directed the GenerateData.java class to create the CSV file and place it under src/main/resources/DATA. Run the App.java class as a Java Application and then refresh the project to have the input data in place before running the project as a web-application. Code written into these two Java classes and the screenshots of running it as a Java Application have been provided below.
GenerateData.java
package com.javacodegeeks.example.util;

import java.io.FileWriter;
import java.util.Random;

public class GenerateData {
	private final int SIZE = 1500;
	private FileWriter writer = null;
	private String delimiter = ",";

	public String[] generateRandomData(String prefix, int size){
		String[] randomData = new String[size];
		Random randomNumber = new Random();
		for(int i=0;i< size; i++){
			randomData[i] = prefix + Integer.toString(randomNumber.nextInt(size+1));
		}
		return randomData;
	}

	public void getSampleData(String fileName){
		System.out.println("Generating sample data");
		String[] firstName = generateRandomData("Fname: ", SIZE);
		String[] lastName = generateRandomData("Lname: ", SIZE);
		String[] city = generateRandomData("City: ", SIZE);
		String[] id = generateRandomData("ID: ", SIZE);

		try{
			writer = new FileWriter(fileName);
			writer.append("FirstName");writer.append(delimiter);
			writer.append("LastName");writer.append(delimiter);
			writer.append("CITY");writer.append(delimiter);
			writer.append("ID");
			writer.append("\n");

			for(int i=0; i< SIZE; i++){
				writer.append(firstName[i]);
				writer.append(delimiter);
				writer.append(lastName[i]);
				writer.append(delimiter);
				writer.append(city[i]);
				writer.append(delimiter);
				writer.append(id[i]);
				writer.append("\n");
		}
		}catch(Exception e){
			System.out.println("Exception while appending to the file.");
			e.printStackTrace();
		} finally{
			try{
				writer.flush();
				writer.close();
				System.out.println("Input data is ready");
			}catch(Exception ex){
				System.out.println("Exception while closing the writer.");
				ex.printStackTrace();
			}
		}
	}
}
App.java
package com.javacodegeeks.example.app;

import com.javacodegeeks.example.util.GenerateData;

public class App {
  public static void main(String[] args) {

	//generate data
	GenerateData data = new GenerateData();
	data.getSampleData("src/main/resources/DATA/sampleData.csv");

  }
}
Open the App.java class and then right click and run it as a Java Application. Upon refreshing the project data should be available.
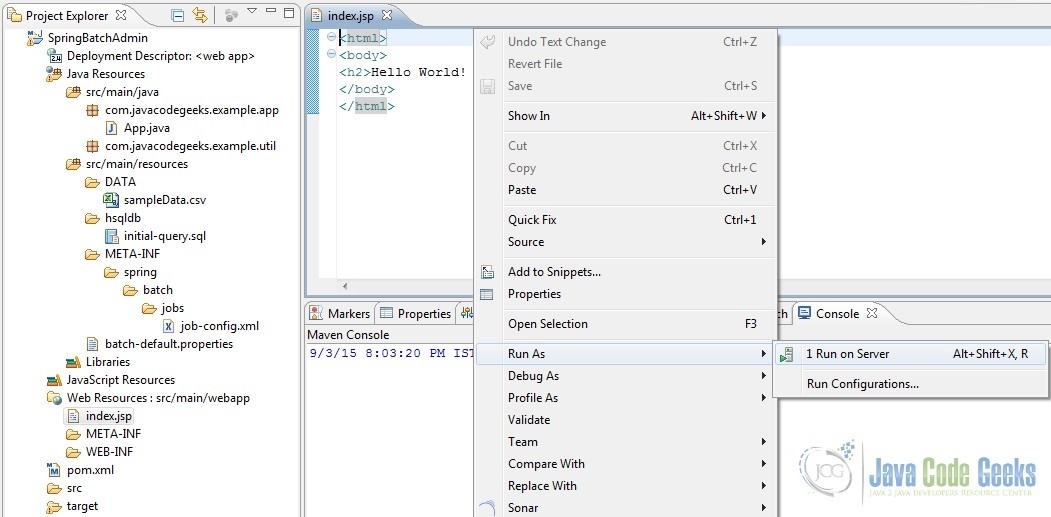
4.9 Run the Application on Server
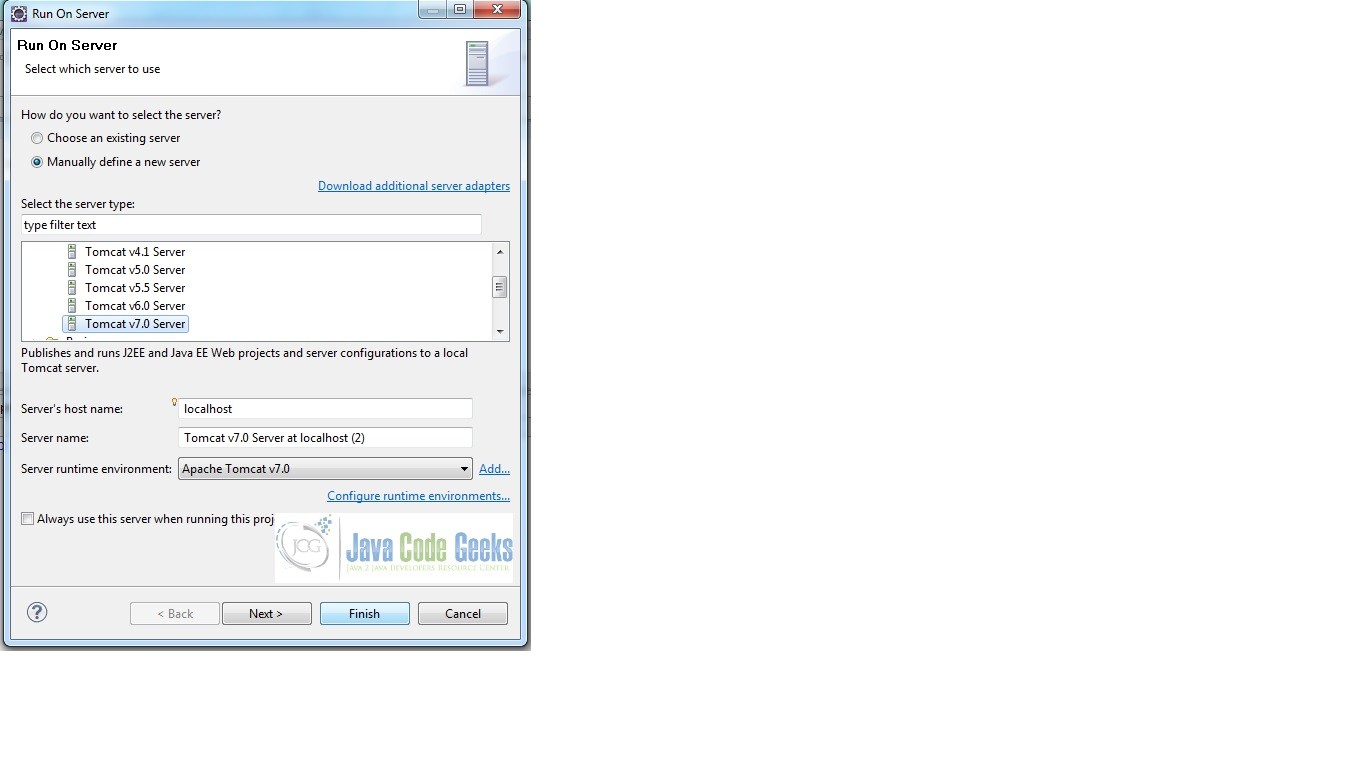
If the tutorial steps mentioned above have been followed along, we should be in a state to build and deploy this application on a server and see our application up and running. One could choose any mechanism to deploy it but in this tutorial we will simply run this application on Tomcat 7 server from our Eclipse IDE. The steps have been as shown in the screenshots below.
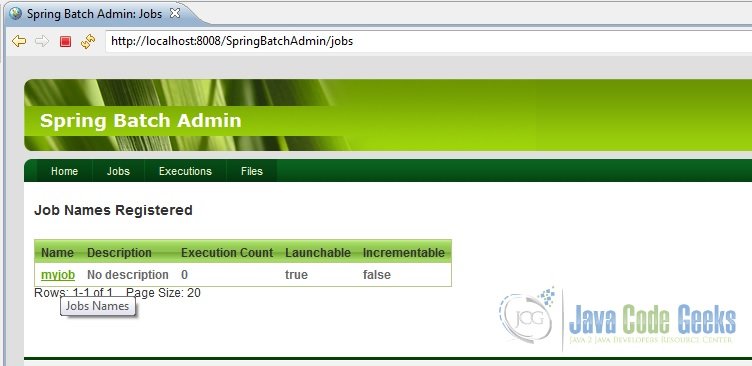
Once the server starts up fine, a tab should open in your Eclipse IDE showing the home page of the application. One could also open a browser and type the URL http://localhost:8008/SpringBatchAdmin. Note: the URL is basically the localhost:/<port on which tomcat runs>/<application-name>. Notice the ‘jobs’ in the screen. It could be clicked to view all the configured jobs and perform operations on them like start, stop etc.

So that’s it, we have successfully build and deployed our code on Tomcat server.
4.10 Application Output
Now, just play around the UI a bit. Click on ‘jobs’. The UI should show our configured job namely, ‘myjob’. Launch the job and observe its execution and the outputs as shown in the screenshots below.
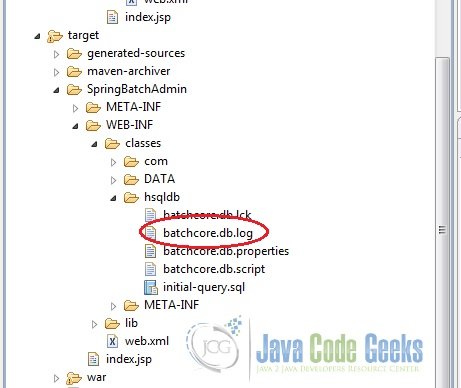
Another little thing, would like to point out. In case we were using a database like DB2 or MySQL, we could actually connect to it and check for ourselves whether the data from the CSV file has actually been written into the table or not. But we are using an in-memory database, HSQL. So how does one check that? Look at the target folder and read the batchcore.db.log file created. In it, all the statement executed in the HSQL database would be logged. So that is where we will find all the inserts made into our HSQL database table. Refer screenshot below.
5. Conclusion
This brings us to the end of this tutorial. The basic idea behind it was to demonstrate by means of an example how Spring Batch Admin could be integrated with Spring Batch to view and monitor the configured Jobs from a User Interface or Console. As promised, the entire example is available for download below.
You can download the full source code of this example here: SpringBatchAdmin

What is the logic behind Spring version compatibility with spring batch admin version?I am using Spring Version 4.2.3 and Spring batch admin version 1.3.1 is not compatible. Please suggest. Thanks