1. Introduction
In this tutorial, we are going to explain what Selenium Grid is and how you can use it in your project. We are going to install and configure the Selenium Grid, write and execute the tests on it. Selenium Grid is one of tool from Selenium framework. It is the distributed system for execution tests.
It has few benefits:
- You can execute tests in parallel, so it can reduce the execution time.
- You can set particular environments for tests.
Actually. It is the daunting task to reduce the tests executions time, because some of functional tests spent about hour for executions process. Selenium team offers the great solutions for it. It uses the separate nodes, which compound in full distributed system. For this reason, it can be scaled easily.
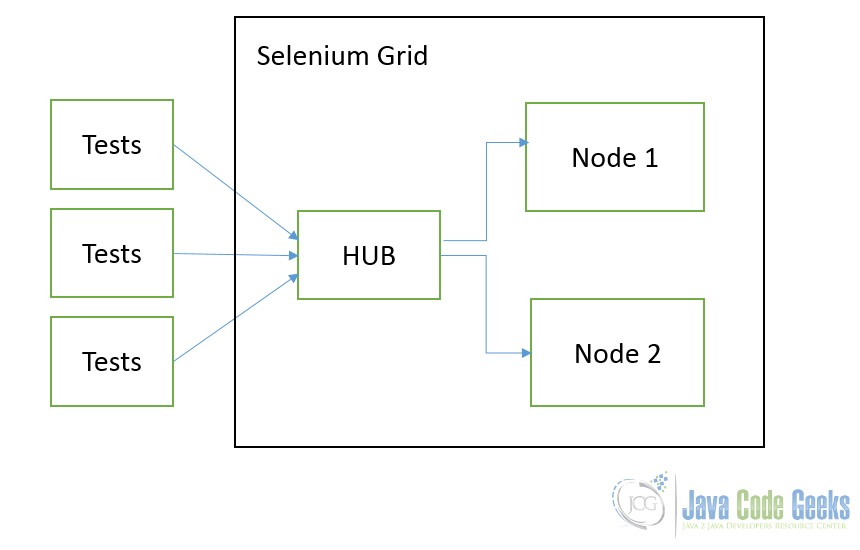
Below you can see the highly level architecture.
2. Installing Selenium Grid
Firstly, you should download the necessary library. The great thing about Selenium Grid is that you need only one JAR file. You need to go to the official web site seleniumhq.org/download and download the Selenium Server. It can be configured to Selenium Grid.
Below you can see the download page:

Right now, you can run this jar and use Selenium Grid. You can find the details about it in the next section.
3. Usage cases
How we said before, all you need is the Selenium Server JAR. You can run it this key --help, that get help information about supported operations.
c:\Users\parsentev\Downloads>java -jar selenium-server-standalone-2.49.1.jar -help

-------------------------------
Running as a standalone server:
-------------------------------

Usage: java -jar selenium-server.jar [-interactive] [options]

  -port : the port number the selenium server should use
    (default 4444)
  -timeout : an integer number of seconds we should allow a
    client to be idle
  -browserTimeout : an integer number of seconds a browser is
    allowed to hang
  -interactive: puts you into interactive mode.  See the tutorial for
    more details
  -singleWindow: puts you into a mode where the test web site
    executes in a frame. This mode should only be selected if the
    application under test does not use frames.
  -profilesLocation: Specifies the directory that holds the profiles
    that java clients can use to start up selenium.  Currently
    supported for Firefox only.
  -forcedBrowserMode : sets the browser mode to a single
    argument (e.g. "*iexplore") for all sessions, no matter what is
    passed to getNewBrowserSession
  -forcedBrowserModeRestOfLine : sets the browser mode to
    all the remaining tokens on the line (e.g. "*custom
    /some/random/place/iexplore.exe") for all sessions, no matter what
    is passed to getNewBrowserSession
  -userExtensions : indicates a JavaScript file that will be
    loaded into selenium
  -browserSessionReuse: stops re-initialization and spawning of the
    browser between tests
  -avoidProxy: By default, we proxy every browser request; set this
    flag to make the browser use our proxy only for URLs containing
    '/selenium-server'
  -firefoxProfileTemplate : normally, we generate a fresh empty
    Firefox profile every time we launch.  You can specify a directory
    to make us copy your profile directory instead.
  -debug: puts you into debug mode, with more trace information and
    diagnostics on the console
  -browserSideLog: enables logging on the browser side; logging
    messages will be transmitted to the server.  This can affect
    performance.
  -ensureCleanSession: If the browser does not have user profiles,
    make sure every new session has no artifacts from previous
    sessions.  For example, enabling this option will cause all user
    cookies to be archived before launching IE, and restored after IE
    is closed.
  -trustAllSSLCertificates: Forces the Selenium proxy to trust all
    SSL certificates.  This doesn't work in browsers that don't use the
    Selenium proxy.
  -log : writes lots of debug information out to a log
    file and disables logging to console
  -logLongForm: writes information out to console in long format (for
    debugging purpose)
  -htmlSuite    : Run a
    single HTML Selenese (Selenium Core) suite and then exit
    immediately, using the specified browser (e.g. "*firefox") on the
    specified URL (e.g. "http://www.google.com").  You need to specify
    the absolute path to the HTML test suite as well as the path to the
    HTML results file we'll generate.
  -proxyInjectionMode: puts you into proxy injection mode, a mode
    where the selenium server acts as a proxy server for all content
    going to the test application.  Under this mode, multiple domains
    can be visited, and the following additional flags are supported:

    -dontInjectRegex : an optional regular expression that
      proxy injection mode can use to know when to bypss injection
    -userJsInjection : specifies a JavaScript file which will
      then be injected into all pages
    -userContentTransformation  : a regular
      expression which is matched against all test HTML content; the
      second is a string which will replace matches.  These flags can
      be used any number of times.  A simple example of how this could
      be useful: if you add "-userContentTransformation https http"
      then all "https" strings in the HTML of the test application will
      be changed to be "http".

This synopsis lists options available in standalone role only. To
  get help on the options available for other roles run the server with
  -help option and the corresponding -role option value.
How you can see in the architecture diagram, firstly, we need to run the HUB nodes. It will takes all receiving tests and route to participated nodes, which has appropriate environment.
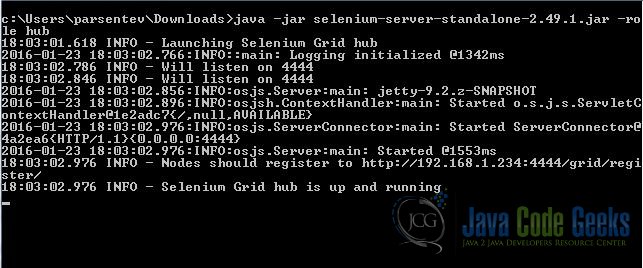
You need to run the JAR with follow key -role hub
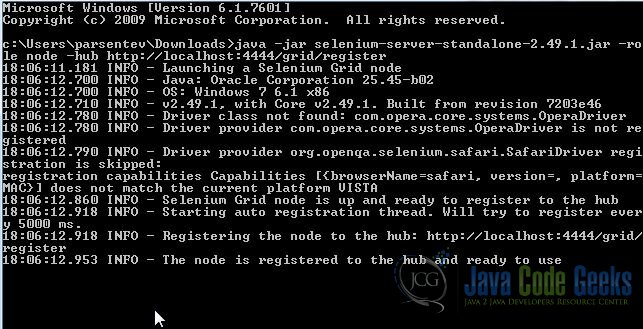
Now, we need to add the node. Node is used for executing the particular test on special environments. Therefore it means that you can run the node on separate machine. You can do by following command java -jar selenium-server-standalone-2.49.1.jar -role node -hub http://localhost:4444/grid/register

Selenium Grid is run and we can use it.
Let’s create the simple maven project in order to demonstrate how it works.
pom.xml
<?xml version="1.0" encoding="UTF-8"?>
<project xmlns="http://maven.apache.org/POM/4.0.0"
         xmlns:xsi="http://www.w3.org/2001/XMLSchema-instance"
         xsi:schemaLocation="http://maven.apache.org/POM/4.0.0 http://maven.apache.org/xsd/maven-4.0.0.xsd">
	<modelVersion>4.0.0</modelVersion>

	<groupId>ru</groupId>
	<artifactId>parsentev</artifactId>
	<version>1.0-SNAPSHOT</version>

	<dependencies>
		<dependency>
			<groupId>junit</groupId>
			<artifactId>junit</artifactId>
			<version>4.12</version>
		</dependency>
		<dependency>
			<groupId>org.seleniumhq.selenium</groupId>
			<artifactId>selenium-java</artifactId>
			<version>2.48.2</version>
		</dependency>
	</dependencies>
</project>
How you can see, we need to add the Selenium library in dependencies. Then, let’s create the simple test cases, when we want to test the search function in http://www.javacodegeeks.com/
ru\parsentev\SeleniumStantaloneServerTest.java
package ru.parsentev;

import com.thoughtworks.selenium.DefaultSelenium;
import com.thoughtworks.selenium.Selenium;
import org.junit.Test;
import org.openqa.selenium.By;
import org.openqa.selenium.WebDriver;
import org.openqa.selenium.WebElement;
import org.openqa.selenium.remote.DesiredCapabilities;
import org.openqa.selenium.remote.RemoteWebDriver;

import java.net.MalformedURLException;
import java.net.URL;

import static org.hamcrest.core.Is.is;
import static org.junit.Assert.assertThat;

/**
 * Tests for selenium standalone server.
 * @author parsentev
 * @since 19.11.2015
 */
public class SeleniumStandaloneServerTest {

	@Test
	public void executeFirefoxDriver() throws MalformedURLException {
		this.execute(DesiredCapabilities.firefox());
	}

	@Test
	public void executeChrome() throws MalformedURLException {
		this.execute(DesiredCapabilities.chrome());
	}

	private void execute(final DesiredCapabilities capability) throws MalformedURLException {
		WebDriver driver = new RemoteWebDriver(
				new URL("http://localhost:4444/wd/hub"), capability
		);
		driver.get("http://www.javacodegeeks.com/");
		WebElement element = driver.findElement(By.name("s"));
		element.sendKeys("selenuim");
		element.submit();
		assertThat(
				driver.getTitle(),
				is("You searched for selenuim | Java Code Geeks")
		);
		driver.quit();
	}
}
In example above, we pointed that we want to execute the test on Chrome and Firefox browsers by following commands: DesiredCapabilities.chrome().
You can set more specific requirments for execution environments by additional API, which offer the Selenium library:
capability.setBrowserName();
capability.setPlatform();
capability.setVersion()
capability.setCapability(,);
The same time, you need to configure your nodes for particular environment. Selenium Grid supports two way, how you can do it.
- It is used command-line key. For example, we want that this node execute only tests in Internet Explorer 9. We can configure in like:
-browser browserName=iexplorer,version=9,platform=WINDOWS - It is used JSON configuration file.
{
  "capabilities":
      [
        {
          "browserName": "*firefox",
          "maxInstances": 1,
          "seleniumProtocol": "WebDriver"
        }
      ],
  "configuration":
  {
    "proxy": "org.openqa.grid.selenium.proxy.DefaultRemoteProxy",
    "maxSession": 5,
    "port": 6543,
    "host": 127.0.0.1,
    "register": true,
    "registerCycle": 5000,
    "hubPort": 4444,
    "hubHost": 127.0.0.1
  }
}
4. Conclusion
In this article, we explained what Selenium Grid is and shown how to configure, run, execute tests. We could not cover all narrow things about Selenium Grid, so if you want to improve your knowledge about Selenium and particular about Selenium Grid, please, visit the official web site seleniumhq.org
5. Download the Maven project
You can download the full source code of this example here: SeleniumGrid
