In this tutorial, we will show you an easy way to create a single Java project, using Apache Maven. Also, we will transform our project, in order to be recognizable and supported by the Eclipse IDE. Finally, we will conclude the tutorial, by presenting how we can package our Java project into an executable “.jar” file.
In this example, we use the following tools on a Windows 7 platform:
- Apache Maven 3.1.1
- Eclipse Kepler Service Release 1
- JDK 1.7
1. Create a Java Project using Maven’s Archetype
Archetype is a Maven project templating toolkit that enables the creation of Maven project templates for users. For more information about Maven Archetype, click here.
First of all, using the terminal (Linux or Mac) or the command prompt (Windows), navigate to the folder where the new project shall be created. Using the command
$ mvn archetype:generate -DgroupId={project-packaging} -DartifactId={project-name} -DarchetypeArtifactId=maven-archetype-quickstart -DinteractiveMode=falsewe create a new Java project, using the maven-archetype-quickstart template. If the argument archetypeArtifactId is missing, Apache Maven uses the maven-archetype-quickstart template by default.
Now, we execute the command:
$ mvn archetype:generate -DgroupId=com.javacodegeeks -DartifactId=SampleApplication -DarchetypeArtifactId=maven-archetype-quickstart -DinteractiveMode=false
This command creates a new Java project under the name SampleApplication, along with its entire directory structure.
2. Layout of the Project’s Directory
The Apache Maven creates a standard directory layout, as shown below:
SampleApplication
|-- pom.xml
`-- src
    |-- main
    |   `-- java
    |       `-- com
    |           `-- javacodegeeks
    |                   `-- App.java
    `-- test
        `-- java
            `-- com
                `-- javacodegeeks
                        `-- AppTest.java
You can check the official guide for more information.
By default, the source code of the project is located under the folder “/src/main/java/project-package”, while all unit tests are located under the folder “/src/test/java/project-package”.
In addition, a file called pom.xml is generated by Apache Maven. This special file contains all necessary and vital information about the project and looks like Ant’s build.xml. Specifically, this file contains the directory structure, all necessary plugins and all projects’ dependencies. For more information, you can read the official POM guide.
A sample pom.xml file is shown below:
<project xmlns="http://maven.apache.org/POM/4.0.0" xmlns:xsi="http://www.w3.org/2001/XMLSchema-instance"
xsi:schemaLocation="http://maven.apache.org/POM/4.0.0 http://maven.apache.org/maven-v4_0_0.xsd">
<modelVersion>4.0.0</modelVersion>
<groupId>com.javacodegeeks</groupId>
<artifactId>SampleApplication</artifactId>
<packaging>jar</packaging>
<version>1.0-SNAPSHOT</version>
<name>SampleApplication</name>
<url>http://maven.apache.org</url>
<dependencies>
<dependency>
<groupId>junit</groupId>
<artifactId>junit</artifactId>
<version>3.8.1</version>
<scope>test</scope>
</dependency>
</dependencies>
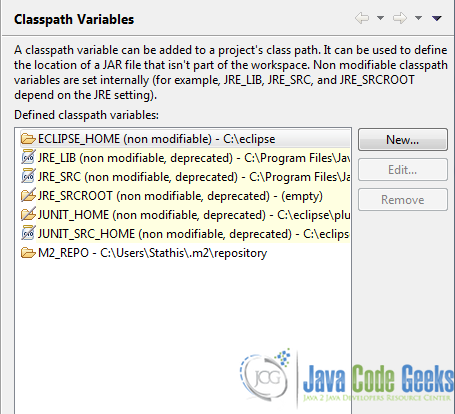
</project>3. Add the M2_REPO classpath variable in Eclipse IDE
The “M2_REPO” classpath variable is required by the Eclipse IDE, in order to locate all declared depencencies for a Maven project. This variable must point to Maven’s Local Repository.
We will add the “M2_REPO” variable to Eclipse‘s classpath variables, by undergoing the following steps:
- Inside the Eclipse IDE, we click on Windows > Preferences.
- In the left panel, we click on Java > Build path > Classpath Variables.
- In the right panel, we click on “New:” button and we fill these values:
Name: “M2_REPO”
Path: “C:\Users\Username\.m2\repository\” - We click on the “OK” button.
If the procedure has been completed successfully, our newly created variable will be placed among the other variables, as shown:
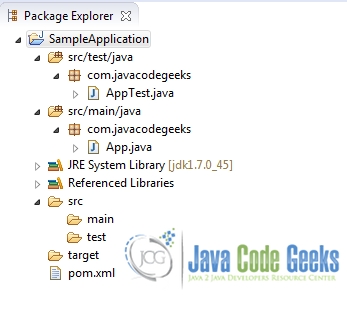
4. Eclipse IDE Integration
Apache Maven is able to transform a project into a form, recognizable by the Eclipse IDE. To achieve this, we must first navigate to the folder of the project. Open a terminal as in Step 1 and navigate to the newly created SampleApplication project. Then, execute the following command:
$ mvn eclipse:eclipse
This command generates those files required by the Eclipse IDE, in order for the project to be recognized as a valid Apache Maven project.
5. Enrich the “pom.xml” file
The default created pom.xml file is very simple and contains the minimum information required by a Maven project.
It is recommended that you add the compiler plugin, in order to guide Maven for which JDK version to use for compiling your project. Add the following lines to your pom.xml file:
<build>
 <plugins>
  <plugin>
   <groupId>org.apache.maven.plugins</groupId>
   <artifactId>maven-compiler-plugin</artifactId>
   <version>3.1</version>
   <configuration>
    <source>1.7</source>
    <target>1.7</target>
   </configuration>
  </plugin>
 </plugins>
</build>
In order for our project to be able to support and execute jUnit tests, we must add the following dependency to our pom.xml file:
<dependencies>
 <dependency>
  <groupId>junit</groupId>
  <artifactId>junit</artifactId>
  <version>4.11</version>
  <scope>test</scope>
 </dependency>
</dependencies>
The above XML snippet is called a “Maven Coordinate”. In order to declare the jUnit “.jar” file as a dependency to your project, you must find its corresponding Maven Coordinate. The same procedure must be executed for every external “.jar” file that poses as a dependency to your project, such as Apache Common, Spring, etc. For your convenience, visit the Maven Central Repository and choose the most appropriate Maven Coordinate for every dependency of your project.
The final form of our pom.xml file is the following:
pom.xml:
<project xmlns="http://maven.apache.org/POM/4.0.0" xmlns:xsi="http://www.w3.org/2001/XMLSchema-instance"
xsi:schemaLocation="http://maven.apache.org/POM/4.0.0 http://maven.apache.org/maven-v4_0_0.xsd">
 <modelVersion>4.0.0</modelVersion>
 <groupId>com.javacodegeeks</groupId>
 <artifactId>SampleApplication</artifactId>
 <packaging>jar</packaging>
 <version>1.0-SNAPSHOT</version>
 <name>SampleApplication</name>
 <url>http://maven.apache.org</url>
 <dependencies>
  <dependency>
   <groupId>junit</groupId>
   <artifactId>junit</artifactId>
   <version>4.11</version>
   <scope>test</scope>
  </dependency>
 </dependencies>
 <build>
  <plugins>
   <plugin>
    <groupId>org.apache.maven.plugins</groupId>
    <artifactId>maven-compiler-plugin</artifactId>
    <version>3.1</version>
    <configuration>
     <source>1.7</source>
     <target>1.7</target>
    </configuration>
   </plugin>
  </plugins>
 </build>
</project>
Finally, we must again execute the command
$ mvn eclipse:eclipse
in our terminal, in order for Maven to download all declared plugins and every project dependency. All downloaded files are stored in Maven’s Local Repository.
6. Develop our Application
In this step, we will create a simple Java application that reverses an input string. Inside the folder “/src/main/java/com/javacodegeeks/”, we locate the file App.java. Copy and paste the following code:
App.java:
package com.javacodegeeks;

public class App {
   public String reverseString(String src) {
      return new StringBuilder(src).reverse().toString();
   }

   public static void main(String[] args) {
      final String str = "Hello!";
      App appObject = new App();

      System.out.println("The reverse string of \"" + str + "\" is \"" +
                         appObject.reverseString(str) + "\"");
   }
}
Next, we will create a simple jUnit test, in order to confirm that our application functions properly. Inside the folder “/src/test/java/com/javacodegeeks/”, we locate the file AppTest.java. Copy and paste the following code:
AppTest.java:
package com.javacodegeeks;

import org.junit.Assert;
import org.junit.Test;

/**
* Unit test for simple App.
*/

public class AppTest {
   @Test
   public void testApp() {
      App appObject = new App();
      Assert.assertEquals(appObject.reverseString("Test!"), "!tseT");
   }
}
In this class, we define a testing method called testApp, in order to verify that our method works properly, using the function assertEquals. We must be careful not to forget the @Test annotation before the class, otherwise Maven won’t run our test.
7. Package our Application into a .jar file
We can now use Apache Maven to package our application into an executable “.jar” file. The packaging element inside our pom.xml file defines the packaging format or output.
<groupId>com.javacodegeeks</groupId>
<artifactId>SampleApplication</artifactId>
<packaging>jar</packaging>
<version>1.0-SNAPSHOT</version>
<name>SampleApplication</name>
Open a terminal as in Step 1, navigate to the SampleApplication project folder and execute the command:
$ mvn package
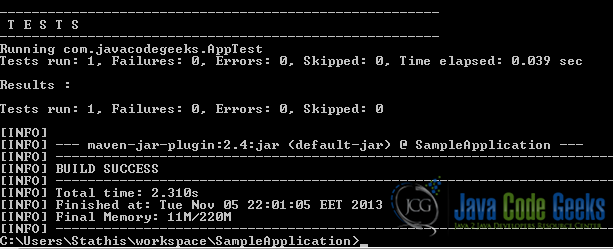
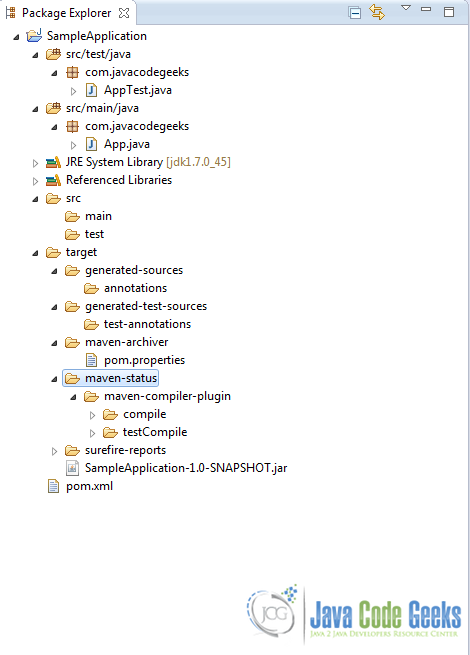
This command compiles our project, executes all unit tests and finally, generates the executable “.jar” file inside the “project/target” folder.
Our project shall have the following structure inside the Eclipse IDE:
8. Sample Project Execution
The generated executable file can be executed using the following command:
$ java –cp target\SampleApplication-1.0-SNAPSHOT.jar com.javacodegeeks.App

9. Download The Eclipse Project
The Eclipse project of this example: SampleApplication.zip.
This was an example on how to create a Java project, using Apache Maven.
