In the client-server or web applications, log statements that belong to distinct client’s request are mixed and it is hard to trace them separately. The Mapped Diagnostic Context ( MDC ) in the Logback is a great way to differentiate them. In this post, we will explain the MDC and show you who to use it in the Logback.
Logback is a modern, high-capable logging framework. It is intended as a successor to the popular Log4j project. I hope, you have already had some basic knowledge about the Logback. If you haven’t, you can look at my previous post about the Logback: Logback Additivity Example
1. Mapped Diagnostic Contexts(MDC) in the Logback
Assume that you have a high-traffic web application. Your clients login to your application with their username and passwords. You want to keep the transactions of the accessing to your application and able to trace the log messages when it is needed. To prevent mixing the log messages of the different client transactions, you get the username parameter data and pass it explicitly to each log statement which is a dull and repetitive effort. There is a better solution to this issue in the Logback: Mapped Diagnostic Contexts(MDC)
Basically, the MDC is a map which stores the context data of the current thread. Every client request will be handled by a different thread. So each thread can access to the values of its MDC within the thread life-cycle. There is no need for the developer to worry about thread-safety or synchronization when programming with the MDC because it handles these issues safely and transparently.
In the pattern layout configuration of the Logback, there is a special pattern: %X{key} to get the value that are stored in the MDC map. For example, you put a value to the MDC by the userid key. Then you can configure your pattern like:%X{userid} - %m%n. Thus in the current request thread, the userid value in the MDC is appended to the every log statements relevant to this pattern and you don’t need to add the value of the userid in every log statement explicitly.
2. Overview
We design a simple web application that has a basic “servlet” and a “servlet filter” in it. In the servlet filter, we retrieve the “clientName” user data through the request and store it the MDC. Subsequent processing by other filters and servlets will automatically benefit from the MDC data that was stored previously. Finally, when our servlet filter gets control, we clean MDC data. To illustrate the MDC processing in a multi-threading, we send a couple of requests to the servlet simultaneously and explore the log messages.
Our preferred IDE is Eclipse and preferred build automation tool is Maven. To able to run the web application and our Servlet, we need a servlet container. So we prefer Tomcat and define it in the Eclipse, and add our application to this server instance. We use JMeter tool to send requests simultaneously to the servlet.
You may skip project creation and jump directly to the beginning of the example below.
3. Set Up Eclipse
In my other previous examples ( see Logback Syslog Example), I exemplified how to create a “Maven Project” selecting a defined Archetype in the Eclipse. But in this post, I show you a different technique.
3.1 Create a Maven Dynamic Web Project
We create a new “Dynamic Web Project”. Go to File -> New -> Dynamic Web Project.
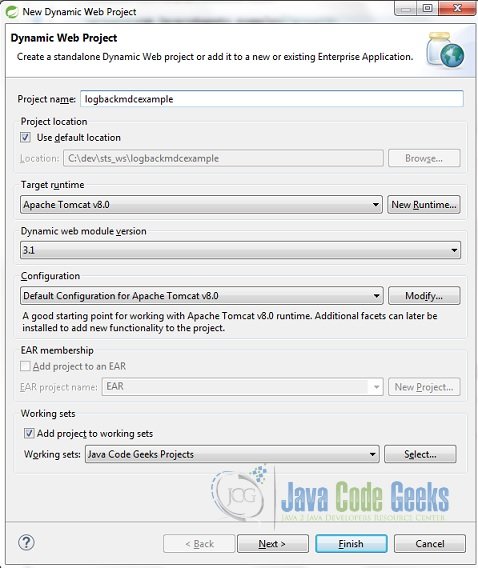
Type the Project name and accept the other options as default and click on Next
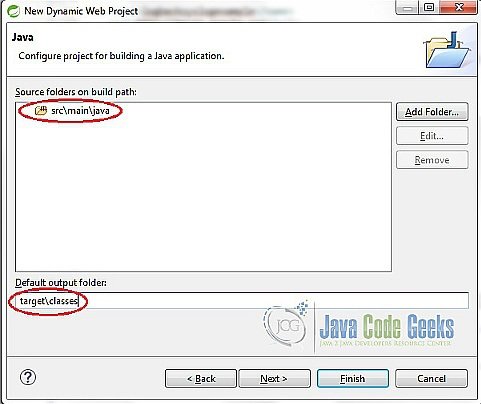
In the next screen, set the source folder as src/main/java and output folder as target/classes to conform the Maven Standard Directory Layout.
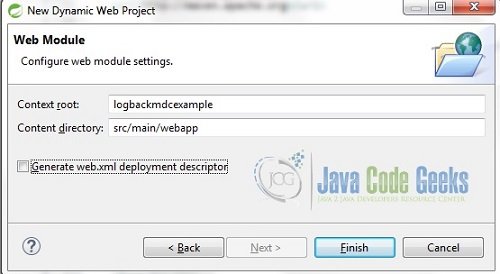
In the next screen, set the content directory as src/main/webapp to conform the Maven web context directory name standard and click on Finish. Your project will be created in your workspace. Then please add the “pom.xml” file as below to the main folder of your project.
pom.xml
<project xmlns="http://maven.apache.org/POM/4.0.0" xmlns:xsi="http://www.w3.org/2001/XMLSchema-instance"
	xsi:schemaLocation="http://maven.apache.org/POM/4.0.0 http://maven.apache.org/xsd/maven-4.0.0.xsd">
	<modelVersion>4.0.0</modelVersion>

	<groupId>com.javacodegeeks.examples</groupId>
	<artifactId>logbackmdcexample</artifactId>
	<version>0.0.1-SNAPSHOT</version>
	<packaging>war</packaging>

	<name>logbacksyslogexample</name>
	<url>http://maven.apache.org</url>

	<properties>
		<project.build.sourceEncoding>UTF-8</project.build.sourceEncoding>
	</properties>

	<build>
		<plugins>
			<plugin>
				<groupId>org.apache.maven.plugins</groupId>
				<artifactId>maven-compiler-plugin</artifactId>
				<version>3.2</version>
				<configuration>
					<source>1.7</source>
					<target>1.7</target>
				</configuration>
			</plugin>
		</plugins>
	</build>

	<dependencies>
		<dependency>
			<groupId>ch.qos.logback</groupId>
			<artifactId>logback-classic</artifactId>
			<version>1.1.3</version>
		</dependency>
		<dependency>
    		<groupId>javax.servlet</groupId>
    		<artifactId>javax.servlet-api</artifactId>
    		<version>3.1.0</version>
    		<scope>provided</scope>
		</dependency>
	</dependencies>
</project>
As a last step, right click on your project folder -> Configure -> Convert to Maven Project. You will see that your project is converted to a Maven project, the classpath of your project is configured and dependencies in the pom.xml file are added to the classpath automatically.
3.2 Define Tomcat in the Eclipse
In the Eclipse, you can define a server pointer from the workbench to an existing installation of an application server to test your project resources. So please download a Tomcat 8 server directory and put it in a folder. In the Servers view (Window > Show View > Servers ), right-click and select New > Server.
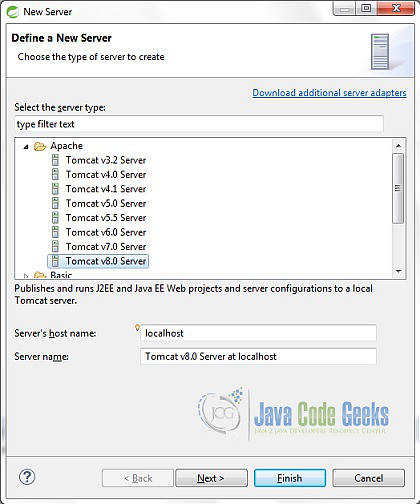
The New Server wizard opens. In the Select the server type list, select the Tomcat v8.0 and click on Next.
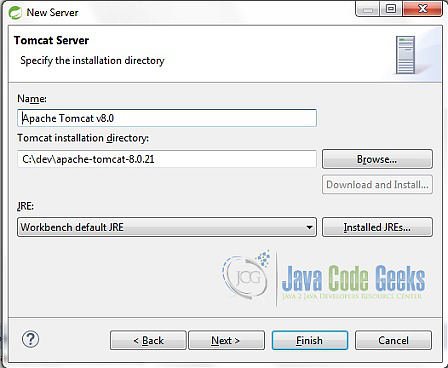
In the next window, please select your Tomcat installation directory and click on Next.

You will see the available web projects in your workspace, please add our “logbackmdcexample” project and click on Finish. That’s it. We have created our Maven dynamic web project, defined a Tomcat server and added the project to the server. It is ready to execute our web application in the Eclipse.
4. Implementation
In the Logback configuration file, we add a simple file appender with a pattern layout that contains the special MDC map syntax ( %X{clientName} ). At the beginning of the every log messages, the value of the “clientName” item stored in the MDC map is printed.
logback.xml
<?xml version="1.0" encoding="UTF-8"?>
<configuration>

	<appender name="FILE_APPENDER" class="ch.qos.logback.core.FileAppender">
		<file>C:/logs/mdc.log</file>
		<encoder class="ch.qos.logback.classic.encoder.PatternLayoutEncoder">
			<Pattern>
				%X{clientName}, [%thread], %-5level %logger{36} - %msg%n
			</Pattern>
		</encoder>
	</appender>

	<root level="INFO">
		<appender-ref ref="FILE_APPENDER" />
	</root>
</configuration>
There are two log statements and a straightforward response statement in the Servlet class, to keep it simple. Please note that the Servlet class is annotation-based. So “web.xml” file is unnecessary to describe the servlet and its path.
MDCServlet.java
package com.javacodegeeks.examples.logbackmdcexample;

import java.io.IOException;

import javax.servlet.ServletException;
import javax.servlet.annotation.WebServlet;
import javax.servlet.http.HttpServlet;
import javax.servlet.http.HttpServletRequest;
import javax.servlet.http.HttpServletResponse;

import org.slf4j.Logger;
import org.slf4j.LoggerFactory;

@WebServlet( value = "/mdcexample" )
public class MDCServlet extends HttpServlet {

	private final Logger		LOGGER				= LoggerFactory.getLogger( MDCServlet.class );

	private static final long	serialVersionUID	= -1L;

	@Override
	protected void doGet( final HttpServletRequest request, final HttpServletResponse response )
		throws ServletException, IOException {

		LOGGER.info( "MDCServlet has been called" );

		response.getWriter().write( "GET response" );

		LOGGER.info( "MDCServlet has been finished" );
	}
}
In the Servlet Filter, the value of the “clientName” parameter is read in the Request object and stored in the MDC map. Consecutive filters and servlets can use this stored value. In our example, there is only one servlet to use this data. When the control comes back to the filter, we can remove the data.
MDCFilter.java
package com.javacodegeeks.examples.logbackmdcexample;

import java.io.IOException;

import javax.servlet.Filter;
import javax.servlet.FilterChain;
import javax.servlet.FilterConfig;
import javax.servlet.ServletException;
import javax.servlet.ServletRequest;
import javax.servlet.ServletResponse;
import javax.servlet.annotation.WebFilter;

import org.slf4j.MDC;

@WebFilter( filterName = "mdcFilter", urlPatterns = { "/*" } )
public class MDCFilter implements Filter {

	@Override
	public void destroy() {

	}

	@Override
	public void doFilter( final ServletRequest request, final ServletResponse response, final FilterChain chain )
		throws IOException, ServletException {

		// Get the parameter value.
		final String parameter = request.getParameter( "clientName" );

		// Put it in the MDC map.
		MDC.put( "clientName", parameter );

		try {
			chain.doFilter( request, response );
		} finally {
			// When the control returns to the filter, clean it.
			MDC.remove( "clientName" );
		}
	}

	@Override
	public void init( final FilterConfig filterConfig ) throws ServletException {

	}
}
5. Run the Code
Mapped Diagnostic Contexts shine brightest within client-server architectures. Typically, multiple clients will be served by multiple threads on the server. To simulate this environment, we can use JMeter by making Http load test. JMeter is an open-source application to perform load and performance test. Please download and start the JMeter tool.
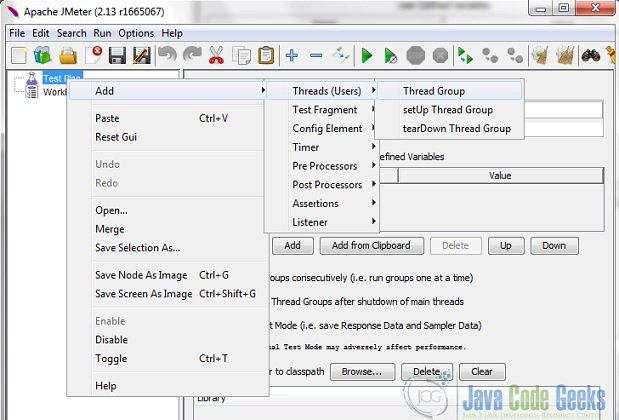
Right click on the “Test Plan” and Add -> Threads -> Thread Group
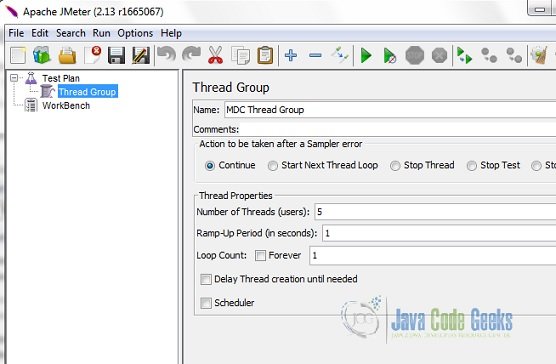
In the next screen, type the name of the Thread group as “MDC Thread Group” and set the number of the threads as “5”
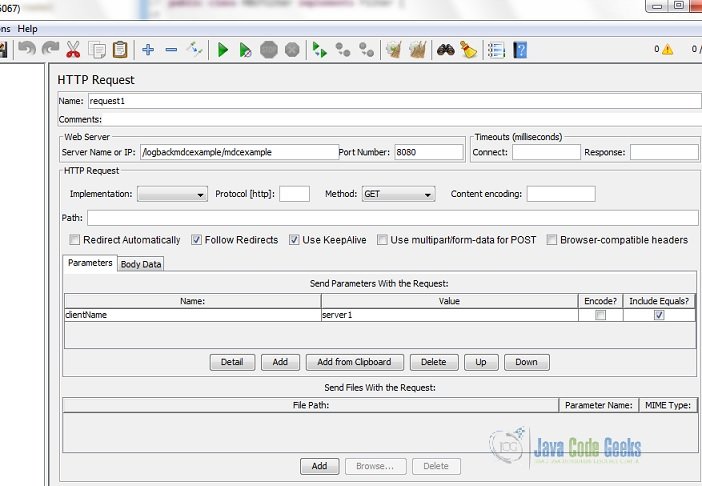
Now let’s add “Http Request Sampler” under the Thread Group. While the mouse cursor is on the “MDC Thread Group”, right click, go to “Add” -> “Sampler” -> “Http Request”. A fancy screen with lots of settings will be opened. Type the name as “request1”, server name as “localhost”, port number as “8080” and path as “/logbackmdcexample/mdcexample”. In the “Parameters” section, please add a parameter with the name as “clientName”, and values as something you want. I give “server1” as the clientName. Then copy this configuration under the thread group and paste for the new one. In the copied new configurations, change only their names and value of the “clientName” parameter. I create three of them and name as “request1”, “request2” and “request3” with client name as “server1”, “machine1” and “computer1”, respectively.
In the end, thread group should look like this:

After the Tomcat starts, it listens to the default 8080 port. So before the test, please start the Tomcat server in the Eclipse Servers view. Then in the JMeter, run the test by the green play button. After execution, Let’s see the log file to check the result.
mdc.log
server1, [http-nio-8080-exec-2], INFO  c.j.e.logbackmdcexample.MDCServlet - MDCServlet has been called
server1, [http-nio-8080-exec-6], INFO  c.j.e.logbackmdcexample.MDCServlet - MDCServlet has been called
server1, [http-nio-8080-exec-4], INFO  c.j.e.logbackmdcexample.MDCServlet - MDCServlet has been called
server1, [http-nio-8080-exec-5], INFO  c.j.e.logbackmdcexample.MDCServlet - MDCServlet has been called
server1, [http-nio-8080-exec-3], INFO  c.j.e.logbackmdcexample.MDCServlet - MDCServlet has been called
server1, [http-nio-8080-exec-2], INFO  c.j.e.logbackmdcexample.MDCServlet - MDCServlet has been finished
server1, [http-nio-8080-exec-6], INFO  c.j.e.logbackmdcexample.MDCServlet - MDCServlet has been finished
server1, [http-nio-8080-exec-4], INFO  c.j.e.logbackmdcexample.MDCServlet - MDCServlet has been finished
server1, [http-nio-8080-exec-5], INFO  c.j.e.logbackmdcexample.MDCServlet - MDCServlet has been finished
server1, [http-nio-8080-exec-3], INFO  c.j.e.logbackmdcexample.MDCServlet - MDCServlet has been finished
machine1, [http-nio-8080-exec-8], INFO  c.j.e.logbackmdcexample.MDCServlet - MDCServlet has been called
machine1, [http-nio-8080-exec-10], INFO  c.j.e.logbackmdcexample.MDCServlet - MDCServlet has been called
machine1, [http-nio-8080-exec-7], INFO  c.j.e.logbackmdcexample.MDCServlet - MDCServlet has been called
machine1, [http-nio-8080-exec-8], INFO  c.j.e.logbackmdcexample.MDCServlet - MDCServlet has been finished
machine1, [http-nio-8080-exec-1], INFO  c.j.e.logbackmdcexample.MDCServlet - MDCServlet has been called
machine1, [http-nio-8080-exec-10], INFO  c.j.e.logbackmdcexample.MDCServlet - MDCServlet has been finished
machine1, [http-nio-8080-exec-9], INFO  c.j.e.logbackmdcexample.MDCServlet - MDCServlet has been called
machine1, [http-nio-8080-exec-7], INFO  c.j.e.logbackmdcexample.MDCServlet - MDCServlet has been finished
machine1, [http-nio-8080-exec-1], INFO  c.j.e.logbackmdcexample.MDCServlet - MDCServlet has been finished
machine1, [http-nio-8080-exec-9], INFO  c.j.e.logbackmdcexample.MDCServlet - MDCServlet has been finished
computer1, [http-nio-8080-exec-2], INFO  c.j.e.logbackmdcexample.MDCServlet - MDCServlet has been called
computer1, [http-nio-8080-exec-2], INFO  c.j.e.logbackmdcexample.MDCServlet - MDCServlet has been finished
computer1, [http-nio-8080-exec-9], INFO  c.j.e.logbackmdcexample.MDCServlet - MDCServlet has been called
computer1, [http-nio-8080-exec-9], INFO  c.j.e.logbackmdcexample.MDCServlet - MDCServlet has been finished
computer1, [http-nio-8080-exec-1], INFO  c.j.e.logbackmdcexample.MDCServlet - MDCServlet has been called
computer1, [http-nio-8080-exec-1], INFO  c.j.e.logbackmdcexample.MDCServlet - MDCServlet has been finished
computer1, [http-nio-8080-exec-4], INFO  c.j.e.logbackmdcexample.MDCServlet - MDCServlet has been called
computer1, [http-nio-8080-exec-2], INFO  c.j.e.logbackmdcexample.MDCServlet - MDCServlet has been called
computer1, [http-nio-8080-exec-4], INFO  c.j.e.logbackmdcexample.MDCServlet - MDCServlet has been finished
computer1, [http-nio-8080-exec-2], INFO  c.j.e.logbackmdcexample.MDCServlet - MDCServlet has been finished
We have three HTTP request sampler with five threads in each of them. Thus, the servlet is called for 15 times. And each servlet contains 2 log statements. As you see and we expect, there are 30 lines of log statements in the log file. We set the clientName parameter differently for each of the HTTP sampler: server1, machine1 and computer1. For example, notice the highlighted lines: The thread called “http-nio-8080-exec-6” prints “server1” in its two log statements for the “clientName” value in the MDC map.
In a multi-threading server application, MDC in the Logback is a fine and efficient solution. Each thread has its own map and the values stored in the map are used through the lifecycle of this thread without worrying about thread-safety.
6. Download the Eclipse Project
This project illustrates how to use the “Mapped Diagnostic Contexts(MDC)” in the Logback framework. Download link is below.
You can download the full source code of this example here : logbackmdcexample

Is MDC thread safe? Could it be possible that server1’s threads log clientName as computer1?