Welcome readers, in this tutorial, we will make an introduction to AWS EC2 and we will perform some operations using AWS CLI.
1. Introduction
AWS represents the Amazon Web Services and it provides different services ranging from IaaS (Infrastructure as a Service), PaaS (Platform as a Service), or SaaS (Packaged software as a Service).
- It offers flexibility by giving the users flexibility of what to do and what not
- Cost-effective solutions
- Scalability/Elasticity techniques to automatically scale up/down the application infrastructure when demand increases or decreases respectively
- Provides end-to-end security configuration and privacy to its customers
- A virtual infrastructure that offers complete privacy and isolation of operations
1.1 AWS Elastic Compute (EC2)
- It is an AWS web-service that provides resizable compute capacity in the cloud
- It provides full control to the operating system layer
- In the cloud, AWS key-pairs are used to successfully connect to EC2 instances. A key pair is nothing but a public key that AWS stores, and a private key file that the user store
- EC2 consists of 3 pricing models i.e. On-Demand, Reserved, and Spot
- EC2 instances are available in different categories such as General Purpose, Compute Optimized, Memory Optimized, Accelerated Optimized, and Storage Optimized
1.2 Setting up an IAM user for CLI operations
If someone needs to go through the process of creating an IAM user and attaching the Administration access policy, please watch this video. Readers are free to select the EC2 full access policy if they want to allow access to the CLI user for the AWS EC2 service only.
2. Using Amazon EC2 with the AWS CLI
Here is a systematic guide for implementing this tutorial but before going any further I’m assuming that readers are aware of the AWS basics.
2.1 Application Pre-requisite
To start with this tutorial, I’m hoping that readers at present have the AWS CLI running on this local environment and have created an IAM user to perform the CLI operations. If someone needs to work on the installation, please download the MSI installation from this link and follow the instructions given on the page.
2.2 Configuring AWS CLI
Once the CLI is successfully installed, we need to configure the application to be able to connect with the AWS account. For configuring we can use the following command –
AWS Configure
1 | aws configure |
This command prompts the below information where –
- AWS access Id and Secret Key: These are two required ones to perform the operations via CLI (i.e. Acts as the account credentials and are generated through AWS Identity and Access Management (IAM))
- Default Region and Output Format: These two are the optional ones where default region signifies the region where the requests will be sent to and the default output format signifies how the results are formatted

2.3 EC2 Operations using AWS CLI
Now let us go through some AWS CLI operations for EC2.
2.3.1 Create a new ec2 instance and run it
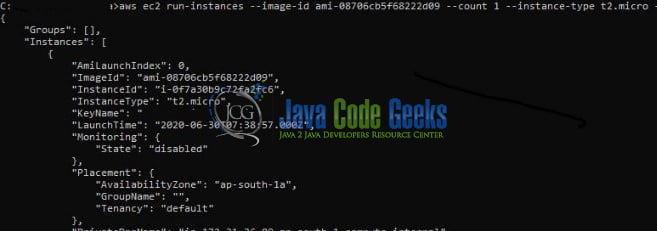
To create & run the ec2 instance we use the aws ec2 run-instance command. Let us understand this with the help of a command snippet and an example.
Create & Run EC2 instance
1 2 3 4 5 | Syntax – aws ec2 run-instances --image-id <ami_id> --count <no_of_instances_to_be_launched> --instance-type <instance_type> --key-name <key_pair_name> --security-group-ids <security_group_ids> --subnet-id <subnet_id> --region <region_code>Example –aws ec2 run-instances --image-id ami-08706cb5f68222d09 --count 1 --instance-type t2.micro --key-name myec2keypair --security-group-ids sg-05caeaeb7adf125b6 --subnet-id subnet-c5c0f2ad --region ap-south-1 |
If everything goes well the following output will be shown on the terminal and the same can be verified from the AWS console and developers can use the putty to perform operations on this ec2 instance.
2.3.2 Listing the ec2 instances created in a given region
To list the ec2 instances we use the aws ec2 describe-instances command. Let us understand this with the help of a command snippet and an example.
Listing the ec2 instance
1 2 3 4 5 | Syntax –aws ec2 describe-instances --filters <filter_criteria> --query <query_parameter> --region <region_code>Example –aws ec2 describe-instances --filters "name=instance-type,values=t2.micro" --query "reservations[].instances[].instanceid" --region ap-south-1 |
If everything goes well the following output will be shown on the terminal.

2.3.3 Deleting the created ec2 instance
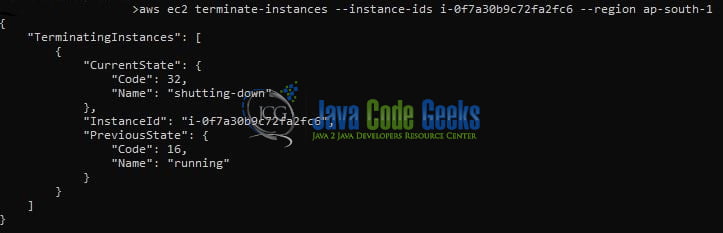
To delete the ec2 instance from the terminal aws ec2 terminate-instances command is used. Let us understand this with the help of a command snippet and an example.
Deleting the ec2 instance(s)
1 2 3 4 5 | Syntax –aws ec2 terminate-instances --instance-ids <instance_id> --region <region_code>Example – aws ec2 terminate-instances --instance-ids i-0f7a30b9c72fa2fc6 --region ap-south-1 |
If everything goes well the following output will be shown on the terminal.
That is all for this tutorial and I hope the article served you whatever you were looking for. Happy Learning and do not forget to share!
3. Summary
In this section, we learned the following:
- Introduction to AWS EC2
- Working with EC2 using CLI
You can download the sample commands and high-resolution images from the Downloads section.
4. Download the Eclipse Project
This was an example of performing EC2 CLI operations.
You can download the full source code of this example here: Using Amazon EC2 with AWS CLI
