A company recently asked me to develop a solution to receive batch data from a third party data vendor, run business logic against the data, and store the resulting values in a database. This demo will show how to build such a process using AWS and Java. We will receive a sample grade book via a batch file in AWS S3, calculate an overall grade for each student in the grade book using an AWS Lambda function and store the results in a DynamoDB table.
1. Introduction
Why use AWS Lambda? Lambda (not to be confused with lambda expressions introduced in Java 8) is a serverless compute platform (Function as a Service) where our Java code will run. As you might expect, there is still a server, however the burden of responsibility has been placed on AWS. This means that provisioning, monitoring, patching, scaling, and other infrastructure activities are managed by AWS. After code is deployed it can be established to run automatically when some external event occurs such as a RESTful call or a new S3 object received. For services that only need to run on occasion and in response to a trigger, Lambda is an excellent solution.
Lambda is an excellent choice compared to cloud compute platforms like AWS EC2 when it isn’t necessary to have control of server instances, when code is only going to run in response to another event, or for code that is run infrequently. For example, Netflix uses Lambda to help automate the encoding process of media files.
S3 (Simple Storage Service) is a storage solution for bulk data. Amazon describes it as “secure, durable, highly-scalable cloud storage.” Common uses include hosting static websites, big data objects, and holding objects for processing by other AWS services.
DynamoDB is a NoSQL database which is extremely fast, with single-millisecond latency, and delivers consistent read and write executions. Like Lambda, it’s fully managed and scalable. It provides an advantageous database solution for simple read and write processes without complex joins.
2. Setup
First you will need to get an AWS account and set up the CLI. Amazon has instructions to do this at http://docs.aws.amazon.com/lambda/latest/dg/setup.html
Additionally, we will follow setup using Eclipse IDE and AWS SDK plugin. Amazon has setup instructions here: http://docs.aws.amazon.com/toolkit-for-eclipse/v1/user-guide//getting-started.html
Once you have set up CLI and your adminuser account, log in at https://signin.aws.amazon.com/console
2.1 S3
We will create two buckets, one to store the raw data to be processed and a second to store our Java code.
After logging in to the AWS console, select from the top menu:
- AWS > Storage and Content Delivery > S3
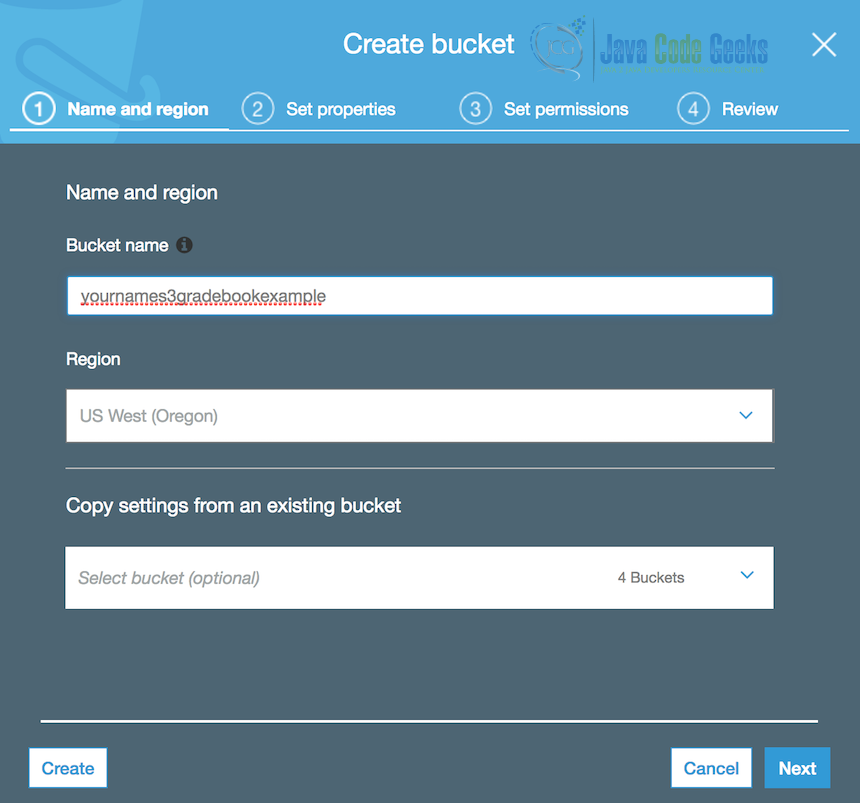
- Select the ‘Create Bucket’ button
Amazon policy allows for names with lowercase letters, numbers, periods (.), and hyphens (-). Your bucket must have a unique name across all of AWS. Amazon recommends DNS compliant names.
For this tutorial I suggest creating your first bucket with the name yournames3gradebookexample. While my examples use US West (Oregon), also referred to as us-west-2, there are a number of considerations to make when choosing a region that we will not explore in this tutorial, including cost, SLA, and latency. For this demo US West (Oregon) will be a good default.
There is no need to copy any settings; choose the ‘Create’ button on the bottom left.
Repeat the same steps and create a second bucket to store code. Call this yournamelambdacode. Create this bucket in the same region.
2.2 DynamoDB
Similar to the first steps above, select from the top menu:
- AWS > Database > DynamoDB
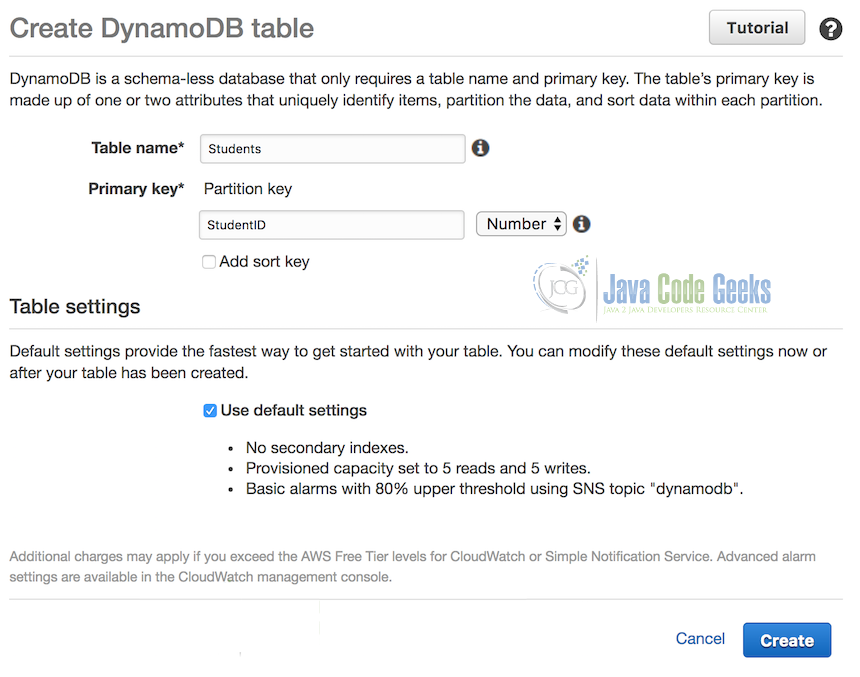
- Select ‘Create Table’
- For Table Name, enter ‘Students’.
- For Partition Key, enter ‘StudentID’ and set the type to Number.
- The sort key option is only needed if the partition key can have duplicate entries. We won’t need one for our example.
- Leave the ‘default settings’ option checked.
- Select the ‘Create’ button at the bottom of the page.
2.3 Lambda
- From Eclipse, choose File > New > Project… > AWS > AWS Lambda Java Project
- Add a project name. I called mine Gradebook. This is only used for your local file system.
- Group ID and Artifact ID are Maven specific. It is ok to use the default if you’re unsure what these are for. I used the names
com.zackroppel.lambdaandgradebookfor these. - Package name should match a combination of Group ID and Artifact ID, you don’t need to change this.
- Call your class
LambdaGradebook. - Set Input Type to S3 Event.
- Click Finish.
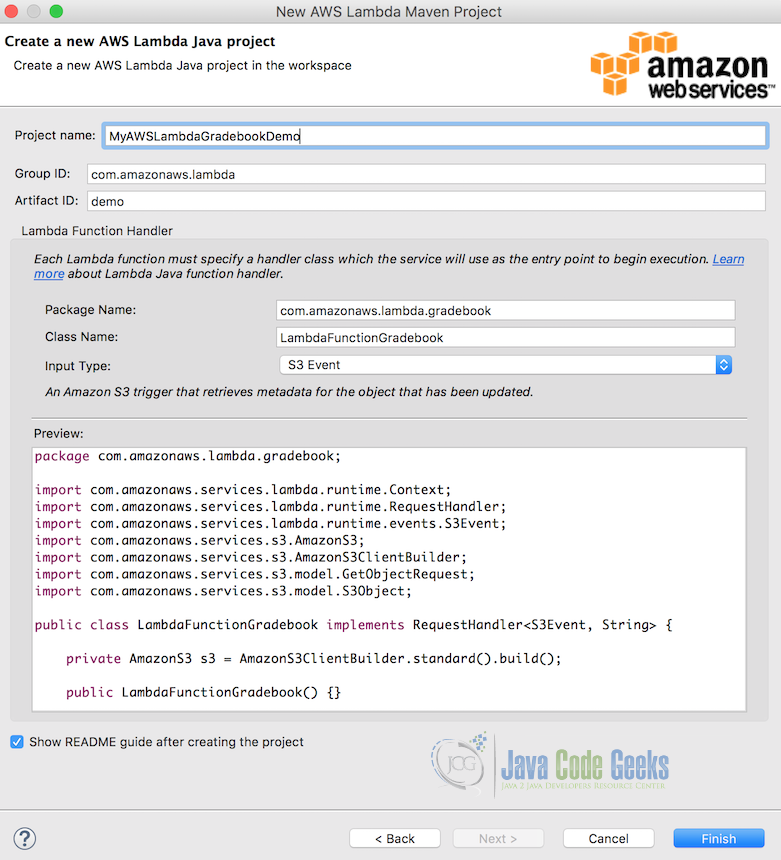
What you now have is a simple Lambda example which can be deployed to AWS. In your src/main/java directory in your project, you’ll see your LambdaGradebook class. This class implements the AWS RequestHandler interface and overrides handleRequest(), a method in that interface. As generated this method looks for a file in a given S3 bucket and returns a String containing the content type (we will see the input for this shortly).
We will first test to make sure the skeleton setup is complete and allows us to read from S3 in our Lambda function, and further in the tutorial we will make modifications to this class to calculate grades and store results in DynamoDB.
2.4 IAM Role
You will need to create an IAM role in order for your Lambda function. Doing this sets the access levels that your Lambda function has within AWS. To do this:
- Go to the AWS console > IAM
- Select Roles > Create New Role
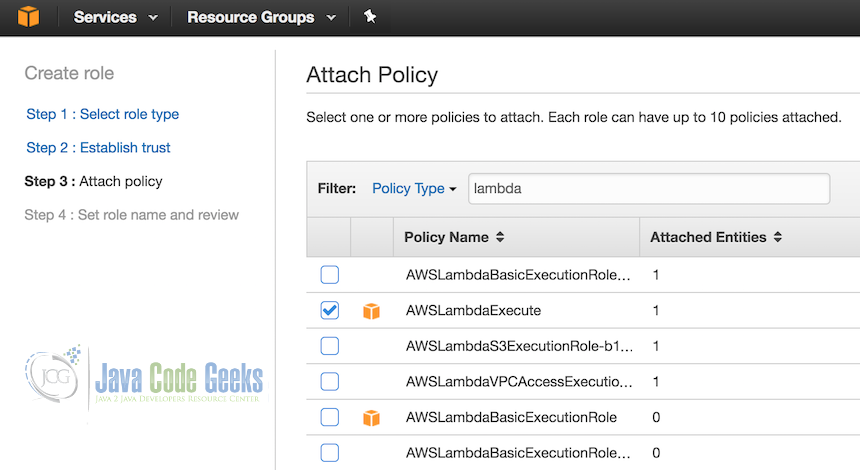
- In the dialog for Select role type, choose AWS Lambda in the AWS Service Role category
- Attach Policy > Select boxes for both AWSLambdaExecute and AmazonDynamoDBFullAccess
- Call your role lambda-s3-execution-role
- Create the role.
You have now created a role with full access on DynamoDB resources and the ability to read and write S3 resources.
2.5 Deploy Lambda code to AWS
In Eclipse, right click your code and select Amazon Web Services > Upload function to Lambda…
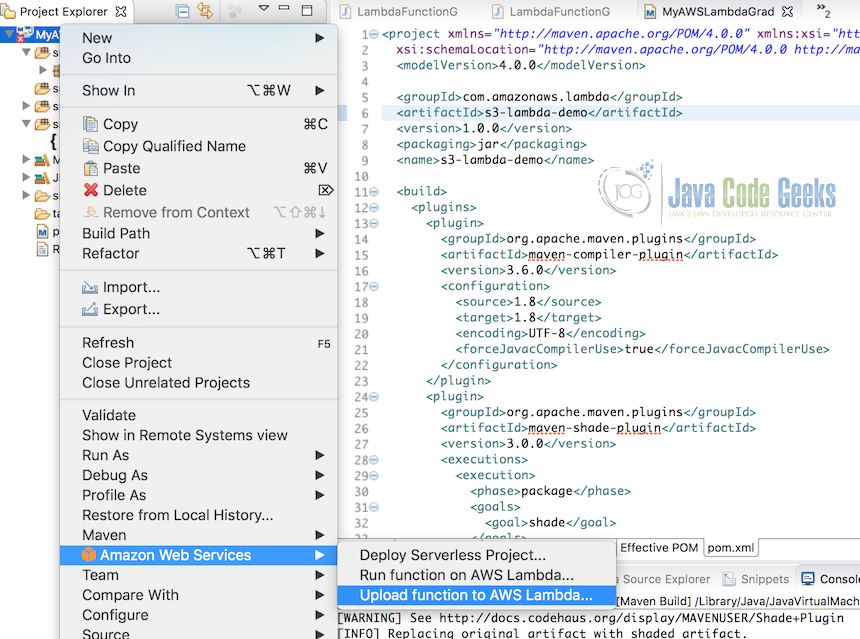
In the dialog:
- Make sure the region is consistent with what you chose for S3.
- Create a new Lambda function:
Gradebook - Click to the next page
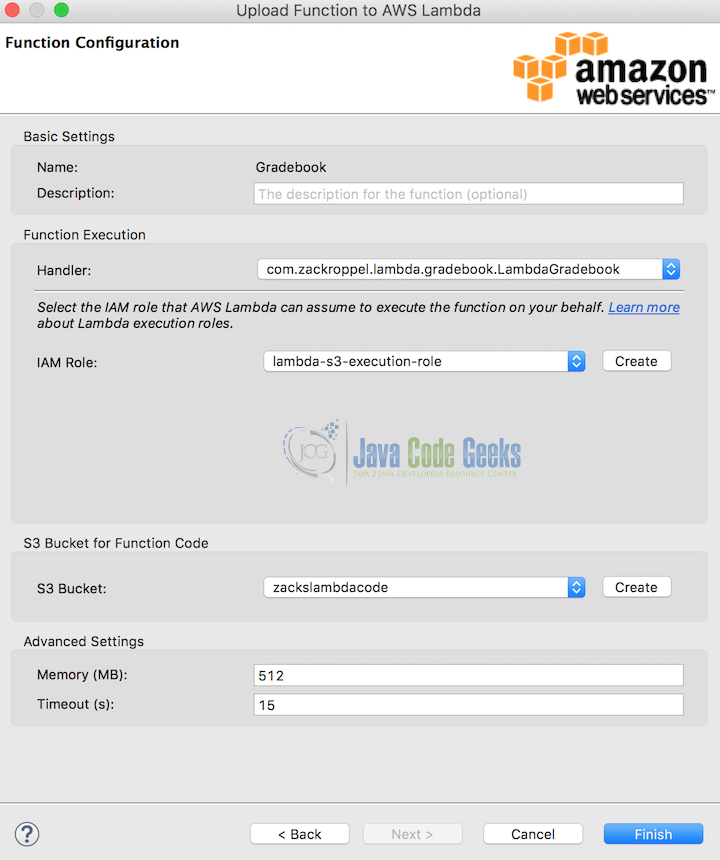
- Description is optional
- Handler should be preselected, leave as is
- Check that your IAM role matches the
lambda-s3-execution-roleset in step 2.4 - Match the S3 bucket with the previously created
yournamelambdacode.
Once your function successfully uploads you’ll see the name of your lambda function in brackets in your Eclipse project explorer appended to your project name. If you return to your AWS Console for Lambda you’ll see the function just created.

2.6 Input file
We need to create a sample CSV file to work with. In a text editor, create a file with the following two lines
100,91,88,79,99
101,88,75,90,83
Save the file in your local filesystem as grades.csv and upload it via the AWS Console at S3 >yournames3gradebookexample > Upload > Add Files > Upload.
2.7 Manual job processing
Now we’ll invoke the function manually to see that set up is successful. In the AWS console, go to Lambda > Gradebook > Actions > Configure Test Event
In the dialog that appears, choose a sample event template of S3 Put from the dropdown. Then make the following edits as shown in the sample below:
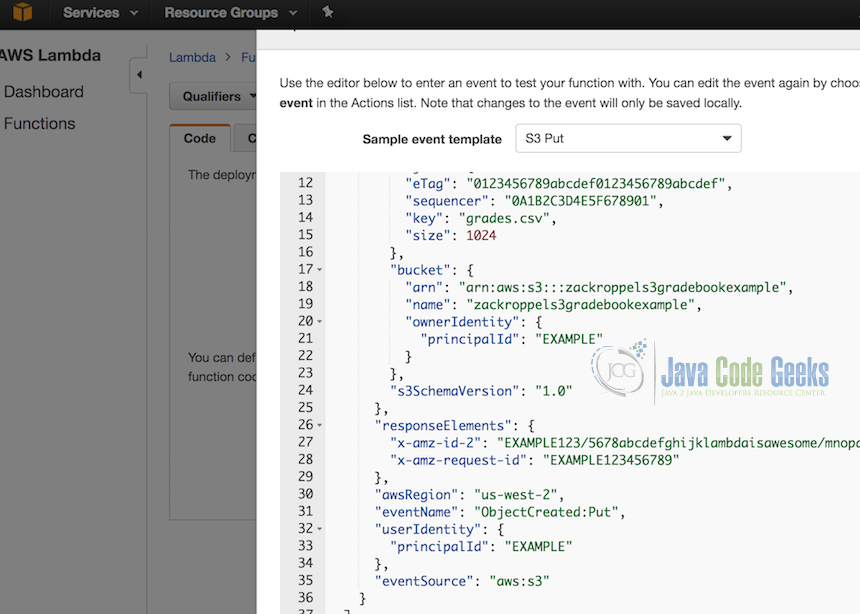
- In the lines for bucket ARN and bucket name, update the sample bucket with your first S3 bucket
yournames3gradebookexample. - Update your S3 key to grades.csv.
- Make sure your AWS region matches as previously used.
- Click ‘Save and test’.
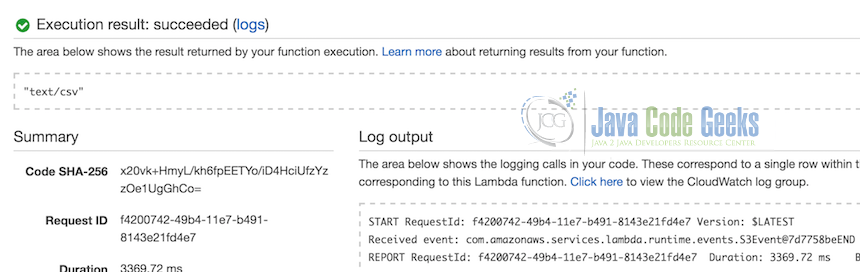
The application will run and you will see a successful result which logs the content type as “text/csv” on the second line of the log output.
2.8 Gradebook logic
We’re going to modify our code to calculate grades and store results in a DynamoDB table. The code will be updated like the following:
package com.yourname.lambda.gradebook;

import java.io.BufferedReader;
import java.io.IOException;
import java.io.InputStreamReader;

import com.amazonaws.regions.Regions;
import com.amazonaws.services.dynamodbv2.AmazonDynamoDB;
import com.amazonaws.services.dynamodbv2.AmazonDynamoDBClientBuilder;
import com.amazonaws.services.dynamodbv2.document.DynamoDB;
import com.amazonaws.services.dynamodbv2.document.Item;
import com.amazonaws.services.dynamodbv2.document.Table;
import com.amazonaws.services.lambda.runtime.Context;
import com.amazonaws.services.lambda.runtime.RequestHandler;
import com.amazonaws.services.lambda.runtime.events.S3Event;
import com.amazonaws.services.s3.AmazonS3;
import com.amazonaws.services.s3.AmazonS3ClientBuilder;
import com.amazonaws.services.s3.model.GetObjectRequest;
import com.amazonaws.services.s3.model.S3Object;

public class LambdaGradebook implements RequestHandler<S3Event, String> {

	private AmazonS3 s3 = AmazonS3ClientBuilder.standard().build();
	private AmazonDynamoDB client = AmazonDynamoDBClientBuilder.standard().withRegion(Regions.US_WEST_2).build();
	private DynamoDB dynamoDB = new DynamoDB(client);

	private static String tableName = "Students";

	public LambdaGradebook() {
	}

	// Test purpose only.
	LambdaGradebook(AmazonS3 s3) {
		this.s3 = s3;
	}

	@Override
	public String handleRequest(S3Event event, Context context) {
		context.getLogger().log("Received event: " + event);

		// Get the object from the event and show its content type
		String bucket = event.getRecords().get(0).getS3().getBucket().getName();
		String key = event.getRecords().get(0).getS3().getObject().getKey();
		try {
			S3Object response = s3.getObject(new GetObjectRequest(bucket, key));
			String contentType = response.getObjectMetadata().getContentType();

			BufferedReader br = new BufferedReader(new InputStreamReader(response.getObjectContent()));
			// Calculate grade
			String csvOutput;
			while ((csvOutput = br.readLine()) != null) {
				String[] str = csvOutput.split(",");
				int total = 0;
				int average = 0;
				for (int i = 1; i < str.length; i++) {
					total += Integer.valueOf(str[i]);
				}
				average = total / (str.length - 1);
				createDynamoItem(Integer.valueOf(str[0]), average);
			}
			return contentType;
		} catch (IOException e) {
			e.printStackTrace();
			context.getLogger().log(String.format("Error getting object %s from bucket %s. Make sure they exist and"
					+ " your bucket is in the same region as this function.", bucket, key));
			return e.toString();
		}

	}

	private void createDynamoItem(int studentId, int grade) {

		Table table = dynamoDB.getTable(tableName);
		try {

			Item item = new Item().withPrimaryKey("StudentID", studentId).withInt("Grade", grade);
			table.putItem(item);

		} catch (Exception e) {
			System.err.println("Create item failed.");
			System.err.println(e.getMessage());

		}
	}
}
The logic now computes an average student grade and calls the method createDynamoItem() to add the student ID and grade to the Students table.
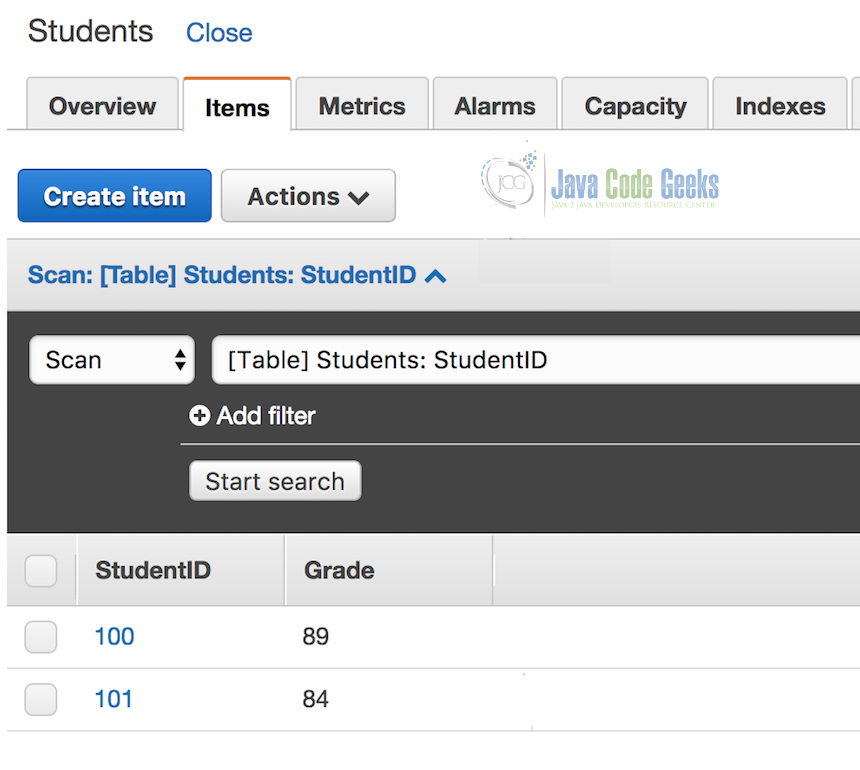
Repeat the steps in 2.5 using the existing Lambda function Gradebook. Return to the AWS console in your browser. Go to Lambda > Functions > Gradebook > Test. The test configuration previously used will be run again.
In the AWS console, go to DynamoDB > Tables > Students > Items. You should see student records as shown below:
2.9 Automation
Now that we have a working pipeline, we want to automate processing of data when new CSV files are received. Run the following CLI command in your terminal, replacing the values in parentheses:
aws lambda add-permission \
--function-name Gradebook \
--region (us-west-2) \
--statement-id (gradebook-unique-id) \
--action lambda:InvokeFunction \
--principal s3.amazonaws.com \
--source-arn arn:aws:s3:::(yournamelambdacode) \
--source-account (bucket-owner-account-id) \
--profile adminuser
- Check that your region matches
- Statement ID can be anything you want and does not necessarily need to be changed
- Append your source bucket to the end of source-arn
- Append your account ID to the source-account, removing any dashes.
- Your account ID is a 12 digit number which appears on the top right side when you log in to the browser console. Enter it without dashes.
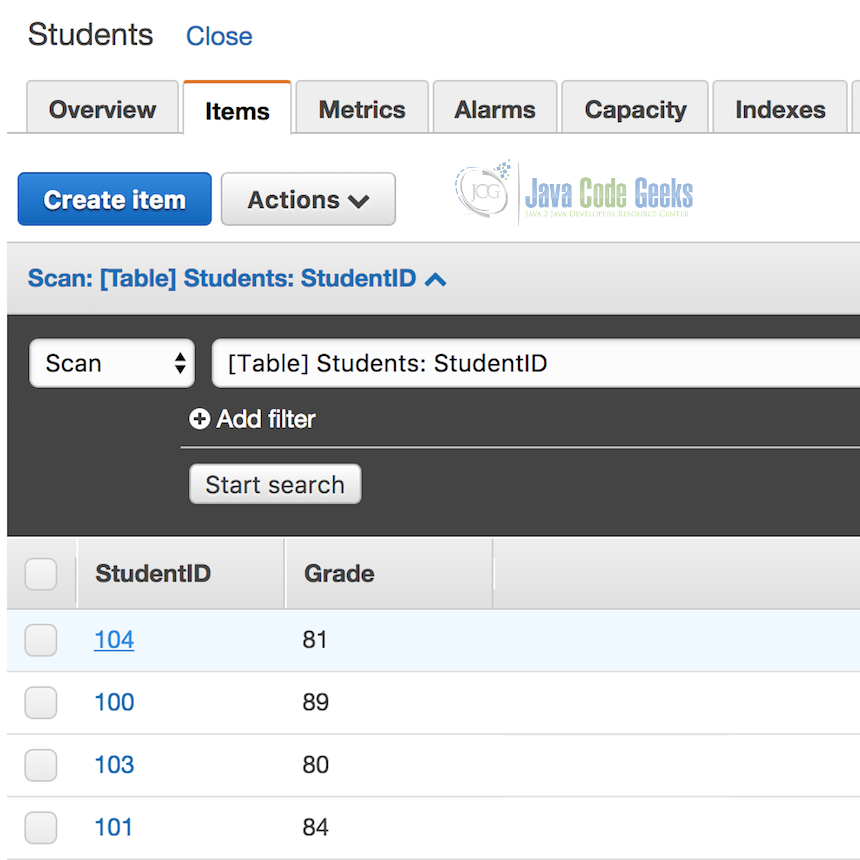
Repeat step 2.6 with a new .csv file that has different student IDs (I added 103 and 104 to mine).
Verify in your DynamoDB console that your new records are in the table:
3. Summary
We have set up an AWS environment from scratch that takes batch files, applies business logic to them, and saves the results in a NoSQL database. We were able to do this without having any responsibility on the infrastructure. We were able to deploy our code automatically using the AWS Toolkit for Eclipse. The result is a highly available and scalable solution that runs automatically as needed and allows us to focus on our code.
4. Download The Source Code
You can download the full source code of this example here: Gradebook

Nice Blog with very interesting and useful information on your website. Thanks for sharing the blog and this great information which is definitely going to help us.
cheapest dedicated server host
Throwing error : not authorized to perform: dynamodb:PutItem on resource:
Fix : Add policy: AmazonDynamoDBFullAccess