Hello. In this article, we will exaplain how to upload files to AWS S3 using Node.js.
The node.js framework is commonly used to create server-based applications which are further used to show the contents to the users. We will create an endpoint to upload the file on the AWS S3 bucket.
1. Introduction
AWS Simple storage service is used to store any type of file on the cloud. It is object-based storage and offers files storage up to 5TB.
1.1 Setting up Node.js
To set up Node.js on windows you will need to download the installer from this link. Click on the installer (also include the NPM package manager) for your platform and run the installer to start with the Node.js setup wizard. Follow the wizard steps and click on Finish when it is done. If everything goes well you can navigate to the command prompt to verify if the installation was successful as shown in Fig. 1.

2. Uploading files to AWS S3 using Node.js
To set up the application, we will need to navigate to a path where our project will reside. For programming stuff, I am using Visual Studio Code as my preferred IDE. You’re free to choose the IDE of your choice.
2.1 Application pre-requisite(s)
To successfully implement this tutorial we will need –
- AWS CLI user who should have an S3 full access policy attached to it so that it can successfully perform the upload operation from the application
- Sample S3 bucket
2.2 Setting up the implementation
Let us write the different files which will be required for practical learning.
2.2.1 Setting up dependencies
Navigate to the project directory and run npm init -y to create a package.json file. This file holds the metadata relevant to the project and is used for managing the project dependencies, script, version, etc. Add the following code to the file wherein we will specify the required dependencies.
package.json
{
  "name": "express-awss3",
  "version": "1.0.0",
  "description": "upload files to aws s3 using node and express",
  "main": "index.js",
  "scripts": {
    "test": "echo \"Error: no test specified\" && exit 1"
  },
  "keywords": [
    "node",
    "express",
    "aws",
    "s3",
    "fileupload"
  ],
  "author": "yatbat",
  "license": "MIT",
  "dependencies": {
    "aws-sdk": "^2.960.0",
    "express": "^4.17.1",
    "multer": "^1.4.2"
  }
}
To download the dependencies navigate to the directory path containing the file and use the npm install command. If everything goes well the dependencies will be loaded inside the node_modules folder and you are good to go with the further steps.
2.2.2 Setting up Environment configuration
In the root folder create a folder named config and add the following content to the env.js file. The file will contain the details of the CLI user and AWS S3 bucket name.
env.js
const env = {
    ACCESS_KEY: '',         // YOUR_ACCESS_KEY
    SECRET_KEY: '',         // YOUR_SECRET_KEY
    REGION: '',             // S3_BUCKET_REGION
    BUCKET_NAME: ''         // S3_BUCKET_NAME
};

module.exports = env;
2.2.3 Setting up the Multer configuration
In the root folder create a folder named config and add the following content to the multer.js file. Multer is an npm middleware package for handling the multipart/form-data primarily used for uploading files.
multer.js
const multer = require('multer');

var memoryStorage = multer.memoryStorage();
var upload = multer({ storage: memoryStorage })

module.exports = upload;
2.2.4 Setting up AWS S3 configuration
In the root folder create a folder named config and add the following content to the s3.config.js file. The file will be responsible to create an AWS S3 client and pass it further for application usage.
s3.config.js
const AWS = require('aws-sdk');
const env = require('./env');

const client = new AWS.S3({
    accessKeyId: env.ACCESS_KEY,
    secretAccessKey: env.SECRET_KEY,
    region: env.REGION
});

const s3 = {
    client: client,
    bucket_name: env.BUCKET_NAME
};

module.exports = s3;
2.2.5 Creating a controller
In the root folder create a folder named controller and add the following content to the s3controller.js file. The file will contain an upload file endpoint.
s3controller.js
const s3 = require('../config/s3.config');

// uploading file to s3
exports.upload = (req, res) => {
    // req.file contains information of the uploaded file
    if (!req.file) {
        res.status(400).json({ error: 'Please select a file to upload' });
    }

    // setting up s3 upload parameters
    const params = {
        Bucket: s3.bucket_name,
        Key: req.file.originalname.replace(/\s+/g, "-"),    // replace space in a filename with hyphen
        Body: req.file.buffer
    };

    console.log('Starting file upload op');
    s3.client.upload(params, (err, data) => {
        if (err) {
            // console.log(err);
            res.status(500).json({ error: 'Error while uploading file' });
        } else {
            // console.log(data);
            res.status(204).json({
                message: 'File uploaded successfully',
                object_url: `${data.Location}`
            });
        }
    });
};
2.2.6 Creating router configuration
In the root folder create a folder named router and add the following content to the router.js file. The file will be responsible for handling the routing configuration to the appropriate endpoint.
route.js
const express = require('express');
const router = express.Router();

const upload = require('../config/multer');
const controller = require('../controller/s3controller');

// endpoint - http://localhost:3001/api/upload
// 'file' is the name of our file input field in the form
router.post('/api/upload', upload.single('file'), controller.upload);

module.exports = router;
2.2.7 Creating index file
In the root folder add the following code to the index.js. The file will be responsible for acting as the entry point.
index.js
const express = require('express');
const app = express();

const router = require('./router/route');
app.use('/', router);

const port = process.env.PORT || 3001;
app.listen(port, () => {
    console.log(`Application listening on http://localhost:${port}`);
});
3. Run the Application
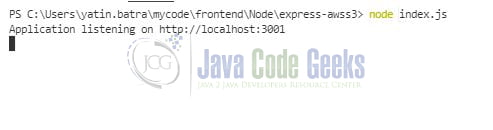
To run the application navigate to the project directory and enter the following command as shown in Fig. 2. If everything goes well the application will be started successfully on port number 3001.
4. Demo
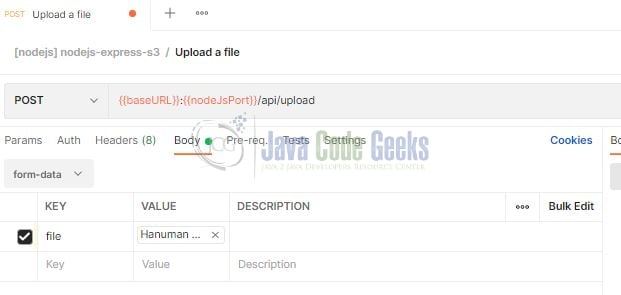
You are free to use postman or any other tool of your choice to make the HTTP request to the application endpoint as shown in Fig. 3.
// HTTP POST call
http://localhost:3001/api/upload
If everything goes well and the file will be successfully uploaded in your choice’s S3 bucket, the following output will be returned to the postman with an HTTP 204 response code.
{
    "message": "File uploaded successfully",
    "object_url": "https://your_bucket_name.s3.ap-south-1.amazonaws.com/somefile.png"
}
That is all for this tutorial and I hope the article served you with whatever you were looking for. Happy Learning and do not forget to share!
5. Summary
In this tutorial, we learned how to create an application that can be used to upload a file to the S3 bucket of your choice. You can download the source code and the postman collection from the Downloads section.
6. Download the Project
This was a tutorial to implement upload file functionality with AWS S3.
You can download the full source code of this example here: Uploading files to AWS S3 using Node.js
