Hello readers, these days to protect the data against any damage or any unforeseen outages it is recommended to move a database from one server to another. In Mongo world, it is pretty straightforward and in this tutorial, we will see how to use the export and import features of the Mongo database.
1. Introduction
If you have installed the Mongo database application (version 3.6) on Windows or Ubuntu operating system and you wish to learn about exporting and importing the data in Mongo database, then follow the below steps. It is very simple, but before moving further let’s take a look at the Mongo database, its features, and the JSON basics.
1.1 What is MongoDB?
- MongoDB is a high-performance NoSQL database where each database has collections which in turn has documents. Each document has a different number of fields, size, content, and is stored in a JSON-like format (i.e. Binary JSON (BSN)
- The documents in MongoDB doesn’t need to have a schema defined beforehand. Instead, the fields (i.e. records) can be created on the go
- Data model available within the MongoDB allows developers to represent the hierarchical relationships, store arrays, and other more complex structures easily
- This NoSQL solution often comes with embedding, auto-sharding, and onboard replication for better scalability and high availability
1.1.1 Why MongoDB?
- As a NoSQL type database, MongoDB stores the data in the form of a document. Thus, MongoDB offers more flexibility
- This database supports search by field-name, range queries, and the regular expressions. It often provides queries to return the particular fields inside the documents
- MongoDB offers indexes to improve the search performance within the NoSQL database
- To offer horizontal scalability, MongoDB uses sharding by splitting the data across the many MongoDB occurrences
- Replication: MongoDB can give high availability with the replica sets
1.2 What is JSON?
- JSON is known as JavaScript Object Notation which stores the data in an organized, easy-to-access, and human-readable way
- JSON format acts as a human-readable collection of data which can easily be exported and imported using any tool which supports JSON
- JSON is language independent and consists of the name-value pairs in the form of string literal
- JSON is convenient to work with, but it does lack the data types that are available in the Binary JSON (i.e. BSN). Thus resulting in loss of fidelity of the information
1.2.1 Why JSON?
JSON offers:
- Freeness
- Internationalization
- Extensibility to support array and objects
- Intelligibility and Clarity
- Interoperability between different tools which supports JSON
2. MongoDB Import and Export JSON Data Example
In this Mongo tutorial, we will learn how to handle the Export and Import utilities provided by the Mongo database.
2.1 Exporting the Data
In Mongo database, the data is exported in a human-readable format. By default, this exported data is in JSON format but developers can export the same results to the CSV format as well. To export the database, developers should use the mongoexport command. This command nicely takes a snapshot of the entire collection and either display it on the administration console or places it in the dump directory. When the mongoexport command runs without the host input argument, it simply connects to the local-host Mongo instance on port 27017 and exports the collection. Here is what the syntax will look like.
Mongo database Export syntax
> mongoexport --host <host_name> --username <user_name> --password <password> --db <database_name> --collection <collection_name> --out <output_file>
Where:
--hostis an optional parameter that specifies the remote server Mongo database instance--usernameand--passwordare the optional parameters that specify the authentication details of a user--dbspecifies the database name--collectionspecifies the collection name--outspecifies the path of the output file. If this is not specified, the result is displayed on the console
Let’s understand this with the help of an example.
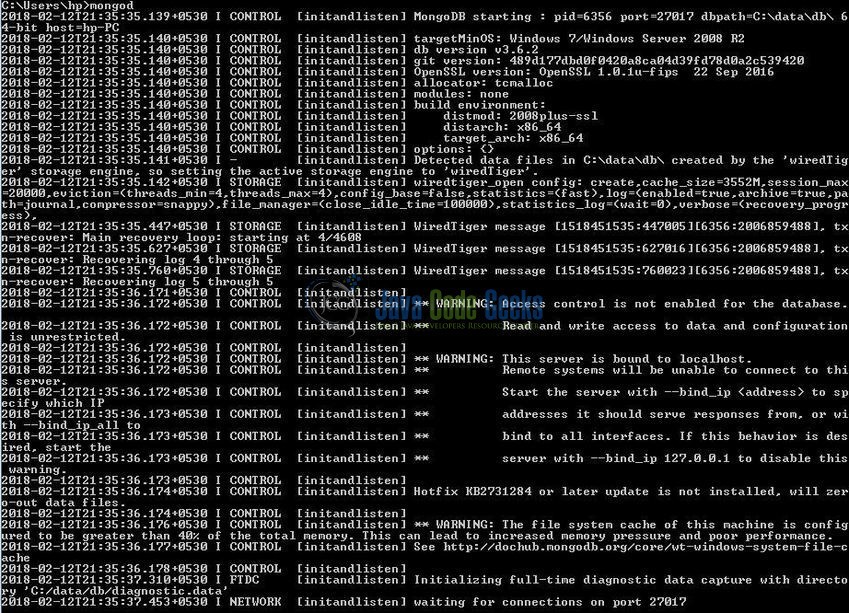
2.1.1 Start MongoDB
Start a standalone mongod instance as shown below.
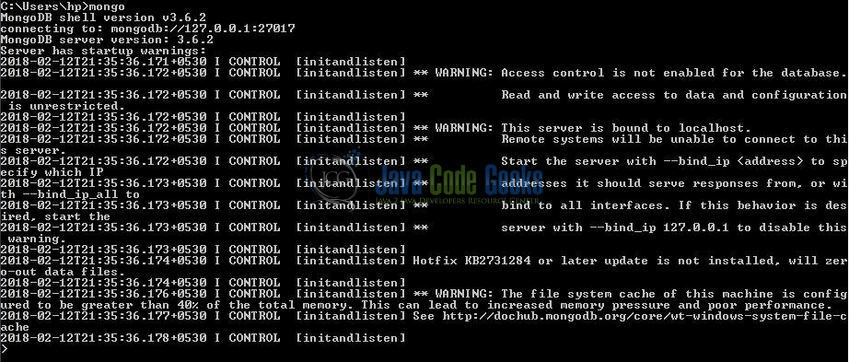
2.1.2 Connect to the Mongo Instance
Connect with the mongo shell to make a connection with the MongoDB instance on port 27017 as shown below.
2.1.3 Check Mongo database and collection
Check how many databases and collections in a database exist on the server by executing the show dbs and show collections commands as shown below.
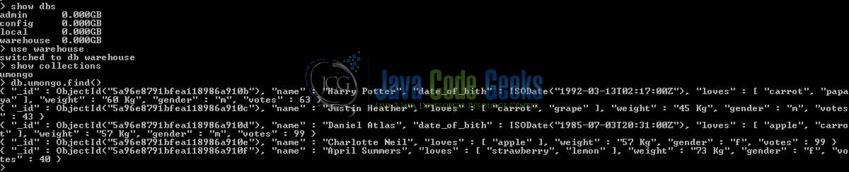
Here warehouse is the sample database that we have created and this database has a sample collection named umongo.
2.1.4 Data export
Now, go back to the administration window and type the mongoexport command to activate the data export as shown below.
Query
> mongoexport --db warehouse --collection umongo --out C:\Mongo_Import_Export\warehouse_umongo_production_bkp_feb28.json --jsonArray --pretty
Where:
--dbspecifies the database name--collectionspecifies the collection name--outspecifies the path of the output file- By default, the
mongoexportcommand writes the data using one JSON document for every Mongo document. Using the optional--jsonArrayparameter modifies the output of themongoexportcommand as a single JSON array --prettyis again an optional parameter that outputs the collection in a pretty-printed JSON format

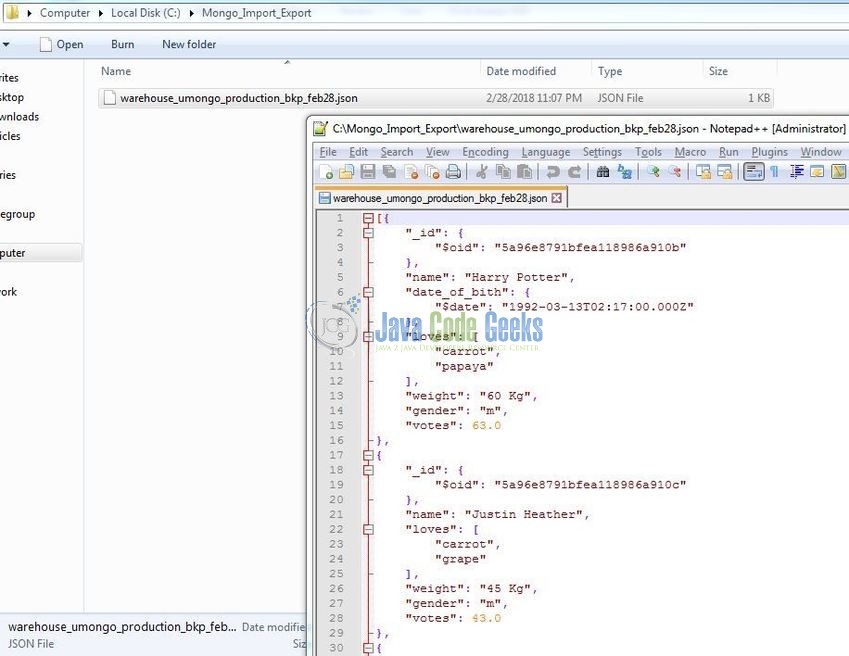
2.1.5 Output file
The Mongo database export utility will create the collection backup named warehouse_umongo_production_bkp_feb28.json in the specified output directory (i.e. C:\Mongo_Import_Export\). In this folder, we will have the collection backup in a pretty-printed JSON format.
The below list shows the variations in which the mongoexport command can be used.
| Syntax | Description | Example |
|---|---|---|
mongoexport --db <database_name> --collection <collection_name> | This command takes the collection backup and displays it on the administration console | mongoexport --db warehouse --collection umongo |
mongoexport --host <host_name> --username <user_name> --password <password> --db <database_name> --collection <collection_name> | This command takes the collection backup of the specified remote server Mongo database instance and displays it on the administration console | mongoexport --host home.mongolab.com:47307 --username daniel123 --password admin!123#4 --db warehouse --collection umongo |
mongoexport --db <database_name> --collection <collection_name> --fields "<field1,field2>" --out <output_file> | This command specifies a field or fields while is be only included in the collection back-up. Use a comma-separated field list to specify multiple fields | mongoexport --db warehouse --collection umongo --fields "name,loves" --out <file_path>\warehouse_umongo_fields_production_bkp_feb28.json |
mongoexport --db <database_name> --collection <collection_name> --fields "<field1,field2>" --query "<search_query>" --out <output_file> | This command will export only those documents from the collection that matches the search query | mongoexport --db warehouse --collection umongo --fields "name,loves,gender" --query "{ "gender": { $eq: 'f' } }" --out <file_path>\warehouse_umongo_fieldsWithSearchQuery_production_bkp_feb28.json |
2.2 Importing the Data
In Mongo database, the import utility imports the data from the Extended JSON or the CSV file created by the mongoexport command. The mongoimport command restores the documents from the JSON file into the Mongo collection. Here is what the syntax will look like.
Mongo database Import syntax
> mongoimport --host <host_name> --username <user_name> --password <password> --db <database_name> --collection <collection_name> --file <input_file>
Where:
--hostis an optional parameter that specifies the remote server Mongo database instance--usernameand--passwordare the optional parameters that specify the authentication details of a user--dbspecifies the database name--collectionspecifies the collection name--filespecifies the path of the input file. If this is not specified, the standard input (i.e.stdin) is used
Let’s understand this with the help of an example.
2.2.1 Drop database
Go to the mongo shell and drop the warehouse database. We will drop the database by executing the db.dropDatabase() command as shown below.

2.2.2 Importing the collection
In this step, we will go ahead and restore the database and the collection. Go back to the administration window and type the mongoimport command to import the collection from the exported JSON file.
Query
> mongoimport --db warehouse --collection umongo --file <file_path>\warehouse_umongo_production_bkp_feb28.json --jsonArray
Where:
--dbspecifies the database name--collectionspecifies the collection name--filespecifies the path of the input file--jsonArrayaccepts the data import with multiple Mongo database documents within a single JSON array. Do remember, this tag is used conjugation withmongoexport –jsonArray

Do remember, this command will automatically create the non-existence database.
2.2.3 Check for the restored collection
Now, go back to the mongo shell and we will check the restored collection by executing the show collection and db.collection_name.find() commands as shown below.

The below list shows the options that can be used with the mongoimport command.
| Syntax | Description | Example |
|---|---|---|
mongoimport --db <database_name> --collection <collection_name> --file <input_file> --upsert --jsonArray | This command imports all the documents and insert or update the objects that already exist based on the Mongo database _id field | mongoimport --db warehouse --collection umongo --file <file_path>\warehouse_umongo_production_bkp_feb28.json --upsert --jsonArray |
mongoimport --host <host_name> --username <user_name> --password <password> --db <database_name> --collection <collection_name> --file <input_file> --jsonArray | This command imports the documents from a local file (i.e. warehouse_umongo_production_bkp_feb28.json) into the specified remote server Mongo database instance | mongoimport --host home.mongolab.com:47307 --username username123 --password password123 --db daniel123 --collection admin!123#4 --file <file_path>\warehouse_umongo_production_bkp_feb28.json --jsonArray |
That’s all for this post. Happy Learning!!
3. Conclusion
In this tutorial, we learned about the data export and import features of the Mongo database. Do note, developers should avoid using mongoexport and mongoimport commands for full instance production backups as JSON do not store the BSON data-types. The above sample commands can be downloaded in the Downloads section.
4. Download the Eclipse Project
This was an example of Export and Import utilities of the Mongo database.
You can download the full source code of this example here: MongoDbExportImportJsonExample
