Hello readers, in today’s world it is important to understand the information of a query plan. In Mongo world, it is pretty straightforward and in this tutorial, we will see the explain() method available in the Mongo database.
1. Introduction
If you have installed the Mongo application (version 3.6) on Windows or Ubuntu operating system and you wish to learn the explain() method then follow the below steps. It is very simple, but before moving further let’s take a look at the Mongo database and its characteristics.
1.1 What is MongoDB?
- MongoDB is a high-performance NoSQL database where each database has collections which in turn has documents. Each document has a different number of fields, size, content, and is stored in a JSON-like format (i.e. Binary JSON (BSN))
- The documents in MongoDB doesn’t need to have a schema defined beforehand. Instead, the fields (i.e. records) can be created on the go
- Data model available within the MongoDB allows developers to represent the hierarchical relationships, store arrays, and other more complex structures easily
- This NoSQL solution often comes with embedding, auto-sharding, and onboard replication for better scalability and high availability
1.1.1 Why MongoDB?
- As a NoSQL type database, MongoDB stores the data in the form of a document. Thus, MongoDB offers more flexibility
- This database supports search by field-name, range queries, and the regular expressions. It often provides queries to return the particular fields inside the documents
- MongoDB offers indexes to improve the search performance within the NoSQL database
- To offer horizontal scalability, MongoDB uses sharding by splitting the data across the many MongoDB occurrences
- Replication: MongoDB can give high availability with the replica sets
1.2 What is a Cursor in MongoDB?
In Mongo world, a cursor is an object that allows developers to iterate through the documents of a Mongo collection. The behavior of cursor allows an automatic iteration across the results of the query; however, developers can explicitly go through the items returned in the cursor object. The below diagram lists 4 documents where the Mongo cursor will point to the first document and then iterate through all the other documents of a collection.

1.2.1 Why Cursor in MongoDB?
Cursor offers:
- A true snapshot of a system i.e. it returns the data in batches and increases the database performance
- It saves system memory by allowing batch inserts and updates
- Intelligibility and Clarity on the ad-hoc and complex queries of the sequential nature having large result sets and low consistency requirements
- Openness to work on small batches of data as developers don’t need to wait for the processing and download of the complete record-set
2. MongoDB explain() Example
In this tutorial, we will learn how to handle the explain() method provided by the Mongo database.
2.1 explain() method in the Mongo database
In the Mongo universe, the explain() method returns a document along with the information on the query plan. This method has the following prototype form:
Mongo database ‘explain()’ Syntax
> db.collection_name.explain(<verbosity_parameter>)
Where:
- The verbosity_parameter is an optional string value that specifies the verbosity mode for the explain command. This value determines the amount of the returning information and supports the following
3modes i.e.queryPlanner,executionStats, andallPlansExecution
Do remember, the default mode for the explain() method is the queryPlanner.
2.1.1 Behavior of Verbosity modes
Let’s take a look at the below-listed verbosity modes to find the amount of the information provided.
- queryPlanner Mode: This is the default mode and the specified query in the
find()method is put by the query optimizer to find the most efficient plan. The effective plan is then passed to this mode and the information is returned for the evaluated query - executionStats Mode: When a Mongo query is executing in this mode, the query optimizer selects and executes the execution plan to complete and return the statistics describing the winning plan execution
- allPlansExecution Mode: When a Mongo query is executing in this mode, the query optimizer selects and executes the execution plan for further processing. In this mode, Mongo database return the statistics describing the winning plan execution and the other candidate plans captured during the plan choice
2.2 Practical usage
Let’s understand the implementation of this method with the help of the sample snippet.
2.2.1 Start MongoDB
Start a standalone mongod instance as shown below.

2.2.2 Connect to the Mongo Instance
Connect with the mongo shell to make a connection with the MongoDB instance on the port 27017 as shown below.

2.2.3 Create Mongo database and collection
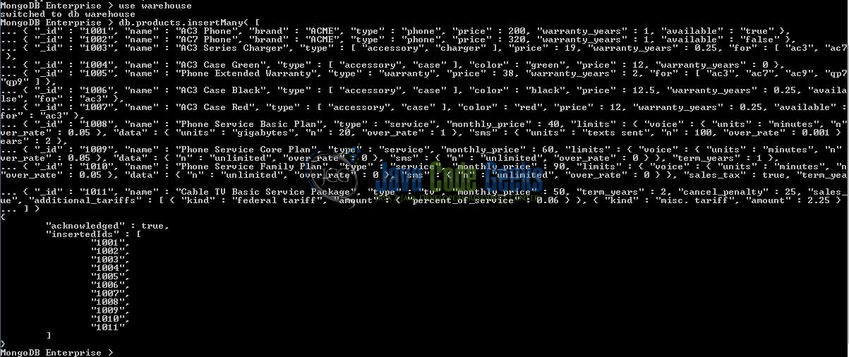
To begin with the implementation, we will need to create a sample database and collection. The below script creates a database called warehouse with a collection of products. Open the Mongo terminal and execute the script.
Database & Collection creation script
> use warehouse

> db.products.insertMany( [
	{ "_id" : "1001", "name" : "AC3 Phone", "brand" : "ACME", "type" : "phone", "price" : 200, "warranty_years" : 1, "available" : "true" },
	{ "_id" : "1002", "name" : "AC7 Phone", "brand" : "ACME", "type" : "phone", "price" : 320, "warranty_years" : 1, "available" : "false" },
	{ "_id" : "1003", "name" : "AC3 Series Charger", "type" : [ "accessory", "charger" ], "price" : 19, "warranty_years" : 0.25, "for" : [ "ac3", "ac7", "ac9" ] },
	{ "_id" : "1004", "name" : "AC3 Case Green", "type" : [ "accessory", "case" ], "color" : "green", "price" : 12, "warranty_years" : 0 },
	{ "_id" : "1005", "name" : "Phone Extended Warranty", "type" : "warranty", "price" : 38, "warranty_years" : 2, "for" : [ "ac3", "ac7", "ac9", "qp7", "qp8", "qp9" ] },
	{ "_id" : "1006", "name" : "AC3 Case Black", "type" : [ "accessory", "case" ], "color" : "black", "price" : 12.5, "warranty_years" : 0.25, "available" : "false", "for" : "ac3" },
	{ "_id" : "1007", "name" : "AC3 Case Red", "type" : [ "accessory", "case" ], "color" : "red", "price" : 12, "warranty_years" : 0.25, "available" : "true", "for" : "ac3" },
	{ "_id" : "1008", "name" : "Phone Service Basic Plan", "type" : "service", "monthly_price" : 40, "limits" : { "voice" : { "units" : "minutes", "n" : 400, "over_rate" : 0.05 }, "data" : { "units" : "gigabytes", "n" : 20, "over_rate" : 1 }, "sms" : { "units" : "texts sent", "n" : 100, "over_rate" : 0.001 } }, "term_years" : 2 },
	{ "_id" : "1009", "name" : "Phone Service Core Plan", "type" : "service", "monthly_price" : 60, "limits" : { "voice" : { "units" : "minutes", "n" : 1000, "over_rate" : 0.05 }, "data" : { "n" : "unlimited", "over_rate" : 0 }, "sms" : { "n" : "unlimited", "over_rate" : 0 } }, "term_years" : 1 },
	{ "_id" : "1010", "name" : "Phone Service Family Plan", "type" : "service", "monthly_price" : 90, "limits" : { "voice" : { "units" : "minutes", "n" : 1200, "over_rate" : 0.05 }, "data" : { "n" : "unlimited", "over_rate" : 0 }, "sms" : { "n" : "unlimited", "over_rate" : 0 } }, "sales_tax" : true, "term_years" : 2 },
	{ "_id" : "1011", "name" : "Cable TV Basic Service Package", "type" : "tv", "monthly_price" : 50, "term_years" : 2, "cancel_penalty" : 25, "sales_tax" : "true", "additional_tariffs" : [ { "kind" : "federal tariff", "amount" : { "percent_of_service" : 0.06 } }, { "kind" : "misc. tariff", "amount" : 2.25 } ] }
] )
The script gives the below output.
2.2.4 Check Mongo database and collection
If the script works well, the database and the collection will be shown in the Mongo Workbench. Using the db.collection_name.find() or the db.collection_name.find().pretty() command the documents of a collection will be shown as below.

2.2.5 Implementation of ‘explain()’ method
Now, go back to the Mongo shell and use the explain() method to display the query planning information for the specified find() operation.
Query 1
> db.products.find( { "available" : "true" } ).explain()
This command will execute in the default verbosity mode (i.e. “queryPlanner”) to return the query planning information.

In Fig. 6, the queryPlanner section is worth exploring i.e.
- The
queryStageattribute provides information about the “execution plan” or “winning plan” operation type. This can be one of the following:- The
COLLSCANvalue indicates a full collection scan i.e. To fetch the result, the specified query searched each document in the Mongo collection - The
IXSCANvalue indicates an index search - The
FETCHvalue is simply used for retrieving the documents of a collection - The
SHARD_MERGEvalue indicates the merged data from different shards
- The
- The
directionattribute shows whether the query was performed in a forward or reverse order - The
serverInfosection displays the server information on which the query was executed and the version of the Mongo database. Do remember, each accessed shard information would be listed in this section if the collection is in a sharded environment - The
"ok" : 1output means the command is executed successfully
Now let’s say developers want to execute the query using the executionStats verbosity mode. This mode will display more information and has the following prototype form:
Query 2
> db.products.find( { "available" : "true" } ).explain("executionStats")
This command will execute in the executionStats verbosity mode to share any more information along with the query planning information.

Among other things, here we see:
- The time of the query
- The count of the documents that were returned by the query (i.e.
nReturned) - Total number of the documents that were examined by the database (i.e.
totalDocsExamined)
That’s all for this post. Happy Learning!!
3. Conclusion
In this tutorial, we learned about the explain() method that can be used by the programmers to check the slow queries in the Mongo database. Developers can download the sample commands in the Downloads section.
4. Download the Eclipse Project
This was an example of the explain() method available in the Mongo database.
You can download the full source code of this example here: CodeSnippet
