Hello readers, these days authenticating a user is an important practice to keep the data integrity in a database. In this tutorial, we will see how to set up authentication in the MongoDB database.
1. Introduction
If you have installed the MongoDB application on Windows or Ubuntu operating system and you wish to run the MongoDB database in a secure mode then follow the below steps to give a controlled access to your database. It’s very simple to enable authentication in MongoDB. But before moving further let’s take a look at MongoDB and its features.
1.1 What is MongoDB?
- MongoDB is a high-performance NoSQL database where each dB has collections which in turn has the key-value pairs, known as documents
- Each document has a different number of fields, size, and content. Each documentation in MongoDB is stored in a JSON-like format (i.e. Binary JSON (BSN))
- The documents in MongoDB doesn’t need to have a schema defined beforehand. Instead, the fields (i.e. records) can be created on the go
- Data model available within the MongoDB allows developers to represent hierarchical relationships, store arrays, and other more complex structures more easily
- This NoSQL solution often comes with embedding, auto-sharding, and onboard replication for better scalability and high availability
1.2 Why MongoDB?
- As a NoSQL type database, MongoDB stores the data in the form of a document. Thus, MongoDB offers more flexibility
- This database supports search by field-name, range queries, and the regular expressions. It often provides queries to return the particular fields inside the documents
- MongoDB offers Indexes in order to improve the search performance within the NoSQL database
- To offer horizontal scalability, MongoDB uses sharding by splitting the data across the numerous MongoDb occurrences
- Replication: MongoDB can give high availability with the replica sets
2. MongoDB Authentication Example
Enabling the authentication on MongoDB enforces the users to show themselves and access the database through a name and password. This access control mechanism allows the users to do the actions in a controlled manner and as determined by their roles. In this tutorial, we will learn how to enable the access control on an independent mongod instance.
2.1 Start MongoDB without access control
The following command shows how to start a standalone mongod instance.
Syntax
> mongod
If the command is successfully executed, the following output will be shown.

2.2 Connect to the Mongo Instance
The following command shows how to connect a mongo shell to the MongoDB instance.
Syntax
> mongo
If the command is successfully executed, the following output will be shown.

2.3 Create a User with Admin privileges
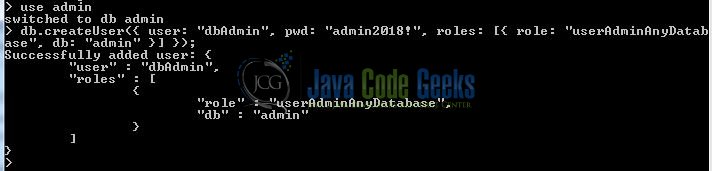
In this step, we will add the userAdminAnyDatabase role to the “admin” database. The following command shows how to create a user with the administrator privileges.
Syntax
> use admin
> db.createUser({ user: "dbAdmin", pwd: "admin2018!", roles: [{ role: "userAdminAnyDatabase", db: "admin" }] });
This command creates a “dbAdmin” user authenticated by the “pwd” field. This user will have the admin privileges in the “admin” database. If the command is successfully executed, the following output will be shown.
Once the user is successfully added, we will disconnect the mongo shell and reconnect again with the access control.
2.4 Re-start the MongoDB instance with Access Control
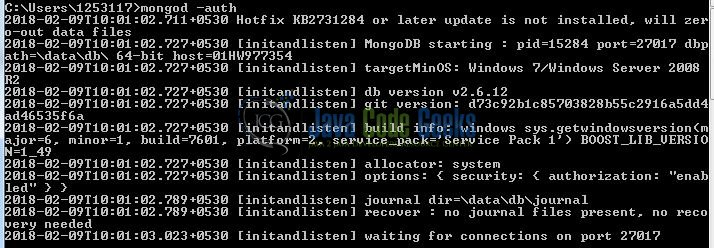
To restart the MongoDB instance in a secure mode, the following command needs to be executed.
Syntax
> mongod –auth
If the command is successfully executed, the following output will be shown.
2.5 Connect and Authenticate as the Administrator
To connect with the MongoDB database, developers can do this in two ways using the mongo shell i.e.
- Authenticating user in connection
- Authenticating user post connection
2.5.1 Authenticating user in connection
To authenticate a user during the connection, we will start the mongo shell with the following command line options i.e.
- -u <username>
- -p <password>
- –authenticationDatabase <database>
The following command shows how to authenticate a user during the connection.
Syntax
> mongo -u dbAdmin -p admin2018! --authenticationDatabase admin
If the command is successfully executed, the following output will be shown.

2.5.2 Authenticating user post connection
To authenticate a user post connection, we will connect the mongo shell and shall simply switch to the authentication data. In this approach, we will use the db.auth(<username>, <pwd>) method to authenticate the users. The following command shows how to authenticate after the connection.
Syntax
> use admin
> db.auth("dbAdmin", "admin2018!")
If the command is successfully executed, the following output will be shown.
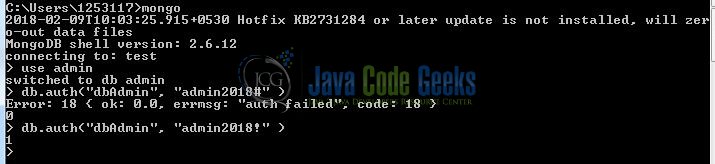
Here 1 denotes that user is successfully authenticated and 0 denotes that user authentication is unsuccessful. Do remember, once a user is authenticated as the administrator, we can use the db.createUser() to create more users and assign any built-in roles or user-defined roles. The following command shows how to do this.
Syntax
> use test
> db.createUser({ user: "test", pwd: "test!1234#", roles: [ { role: "readWrite", db: "test" }, { role: "read", db: "reporting" } ]})
Developers can connect to the MongoDB database and authenticate as “test” user.
That’s all for this post. Happy Learning!!
3. Conclusion
The main goal of this article is to give an introduction to MongoDB and to show how to enable the user authentication. Developers can download the sample application as an Eclipse project in the Downloads section.
4. Download the Eclipse Project
This was an example of user authentication in MongoDB.
You can download the full source code of this example here: MongoDBAuthentication
