Java MongoDB Update Document Example
Hello readers, in this tutorial we will show how to update the documents of a Mongo collection using the Java driver.
1. Introduction
If you have installed the MongoDB application (version 3.6.X) on Windows or Ubuntu operating system and you wish to learn this tutorial, then follow the below steps. It is very simple, but before moving further let’s take a look at MongoDB and its features.
1.1 What is MongoDB?
- MongoDB is a high-performance NoSQL database where each database has collections which in turn has documents. Each document has a different number of fields, size, content, and is stored in a JSON-like format (i.e. Binary JSON (BSN)
- The documents in MongoDB doesn’t need to have a schema defined beforehand. Instead, the fields (i.e. records) can be created on the go
- Data model available within the MongoDB allows developers to represent the hierarchical relationships, store arrays, and other more complex structures easily
- This NoSQL solution often comes with embedding, auto-sharding, and onboard replication for better scalability and high availability
1.1.1 Why MongoDB?
- As a NoSQL type database, MongoDB stores the data in the form of a document. Thus, MongoDB offers more flexibility
- This database supports search by field-name, range queries, and the regular expressions. It often provides queries to return the particular fields inside the documents
- MongoDB offers indexes to improve the search performance within the NoSQL database
- To offer horizontal scalability, MongoDB uses sharding by splitting the data across the many MongoDB occurrences
- Replication: MongoDB can give high availability with the replica sets
2. Java MongoDB Update Document Example
Here is a step-by-step guide for implementing this tutorial using the MongoDb Java driver.
2.1 Tools Used
We are using Eclipse Kepler SR2, JDK 8, MongoDb and Maven. Having said that, we have tested the code against JDK 1.7 and it works well.
2.2 Project Structure
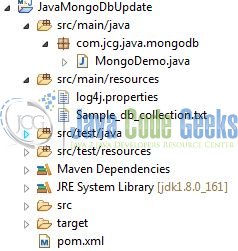
Firstly, let’s review the final project structure, in case you are confused about where you should create the corresponding files or folder later!
2.3 Project Creation
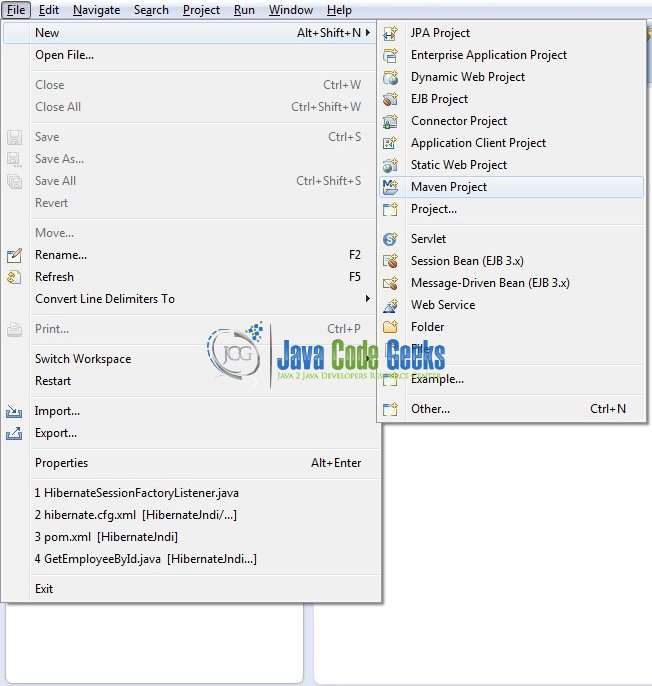
This section will demonstrate how to create a Java-based Maven project with Eclipse. In Eclipse IDE, go to File -> New -> Maven Project.
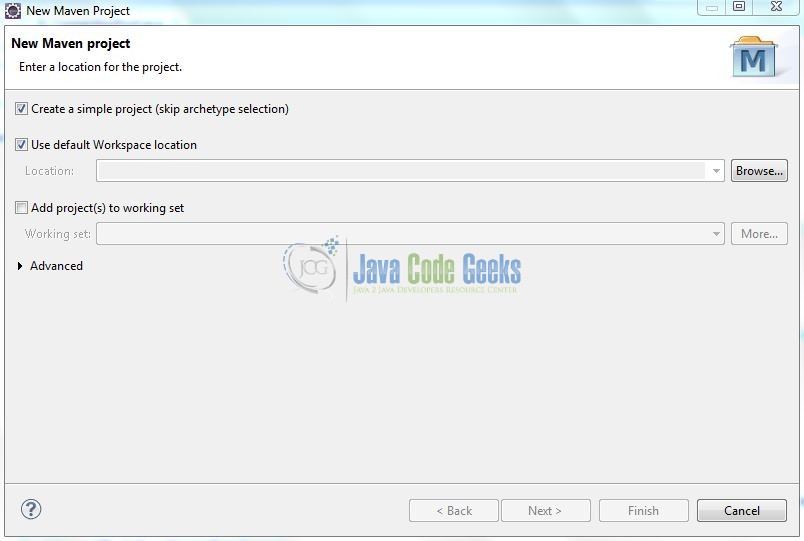
In the New Maven Project window, it will ask you to select a project location. By default, Use default workspace location will be selected. Select the Create a simple project (skip archetype selection) checkbox and just click on next button to proceed.
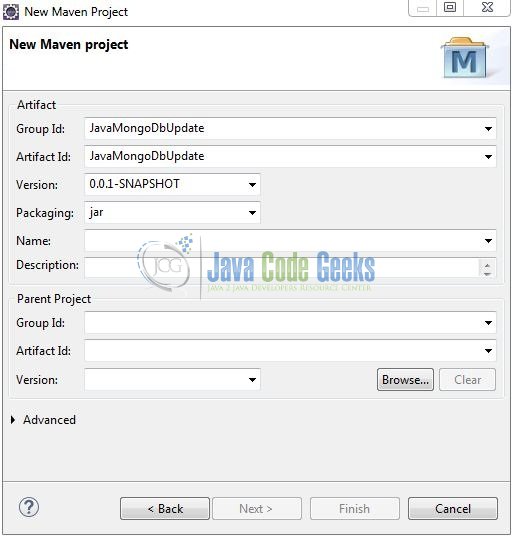
It will ask you to ‘Enter the group and the artifact id for the project’. We will input the details as shown in the below image. The version number will be by default: 0.0.1-SNAPSHOT.
Click on finish and the creation of a maven project will be completed. If you observe, it has downloaded the maven dependencies and a pom.xml file will be created. It will have the following code:
pom.xml
<project xmlns="http://maven.apache.org/POM/4.0.0" xmlns:xsi="http://www.w3.org/2001/XMLSchema-instance" xsi:schemaLocation="http://maven.apache.org/POM/4.0.0 http://maven.apache.org/xsd/maven-4.0.0.xsd">
	<modelVersion>4.0.0</modelVersion>
	<groupId>JavaMongoDbUpdate</groupId>
	<artifactId>JavaMongoDbUpdate</artifactId>
	<version>0.0.1-SNAPSHOT</version>
</project>
We can start adding the dependencies that developers want like MongoDb Java Driver, Log4j etc. Let’s start building the application!
3. Application Building
Let’s create an application to understand the basic building blocks of this tutorial.
3.1 Database & Table Creation
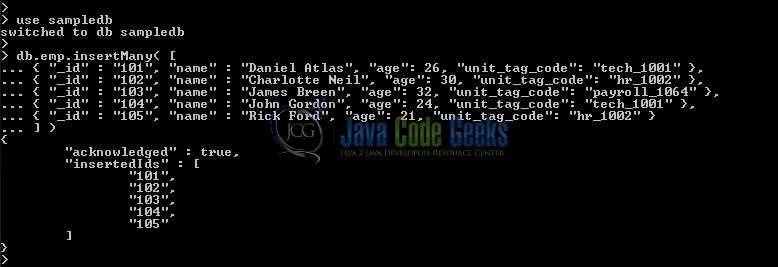
To begin with the implementation, we will need to create a sample database and collection. Open the Mongo terminal and execute the script.
Database & Collection creation script
> use sampledb

> db.emp.insertMany( [
	{ "_id" : "101", "name" : "Daniel Atlas", "age": 26, "unit_tag_code": "tech_1001" },
	{ "_id" : "102", "name" : "Charlotte Neil", "age": 30, "unit_tag_code": "hr_1002" },
	{ "_id" : "103", "name" : "James Breen", "age": 32, "unit_tag_code": "payroll_1064" },
	{ "_id" : "104", "name" : "John Gordon", "age": 24, "unit_tag_code": "tech_1001" },
	{ "_id" : "105", "name" : "Rick Ford", "age": 21, "unit_tag_code": "hr_1002" }
] )
If everything goes well, the database, user, and the collection will be shown in the Mongo Workbench.
3.2 Maven Dependencies
MongoDB Java driver is an all-in-one jar, which embeds the core driver and BSON. BSON, short for Binary JSON, is a binary-encoded serialization of the JSON-like documents. In this example, we are using the stable MongoDB Java driver version in order to make the database connectivity. The updated file will have the following code:
pom.xml
<project xmlns="http://maven.apache.org/POM/4.0.0" xmlns:xsi="http://www.w3.org/2001/XMLSchema-instance"
	xsi:schemaLocation="http://maven.apache.org/POM/4.0.0 http://maven.apache.org/xsd/maven-4.0.0.xsd">
	<modelVersion>4.0.0</modelVersion>
	<groupId>JavaMongoDbUpdate</groupId>
	<artifactId>JavaMongoDbUpdate</artifactId>
	<version>0.0.1-SNAPSHOT</version>
	<dependencies>
		<!-- https://mvnrepository.com/artifact/org.mongodb/mongo-java-driver -->
		<dependency>
			<groupId>org.mongodb</groupId>
			<artifactId>mongo-java-driver</artifactId>
			<version>3.5.0</version>
		</dependency>
		<!-- log4j dependency -->
		<dependency>
			<groupId>log4j</groupId>
			<artifactId>log4j</artifactId>
			<version>1.2.17</version>
		</dependency>
	</dependencies>
	<build>
		<finalName>${project.artifactId}</finalName>
	</build>
</project>
3.3 Java Class Creation
Let’s write a sample Java program which connects to a Mongo database running on the localhost at a default port and will update the documents of the Mongo collection. Add the following code to it:
MongoDemo.java
package com.jcg.java.mongodb;

import org.apache.log4j.Logger;
import org.bson.Document;

import com.mongodb.MongoClient;
import com.mongodb.MongoClientURI;
import com.mongodb.client.FindIterable;
import com.mongodb.client.MongoCollection;
import com.mongodb.client.MongoCursor;
import com.mongodb.client.MongoDatabase;
import com.mongodb.client.model.Filters;
import com.mongodb.client.result.UpdateResult;

public class MongoDemo {

	private static Logger log = Logger.getLogger(MongoDemo.class);

	// Performing a read operation on the collection.
	private static void getAllDocuments(MongoCollection<Document> col) {
		FindIterable<Document> fi = col.find();
		MongoCursor<Document> cursor = fi.iterator();
		try {
			while(cursor.hasNext()) {
				log.info(cursor.next().toJson());
			}
			log.info("\n");
		} finally {
			cursor.close();
		}
	}

	@SuppressWarnings("resource")
	public static void main(String[] args) {

		// Mongodb initialization parameters.
		int port_no = 27017;
		UpdateResult result = null;
		String host_name = "localhost", db_name = "sampledb", db_coll_name = "emp";

		// Mongodb connection string.
		String client_url = "mongodb://" + host_name + ":" + port_no + "/" + db_name;
		MongoClientURI uri = new MongoClientURI(client_url);

		// Connecting to the mongodb server using the given client uri.
		MongoClient mongo_client = new MongoClient(uri);

		// Fetching the database from the mongodb.
		MongoDatabase db = mongo_client.getDatabase(db_name);

		// Fetching the collection from the mongodb.
		MongoCollection<Document> coll = db.getCollection(db_coll_name);

		// Fetching documents from the mongodb.
		log.info("Fetching existing documents from the collection");
		getAllDocuments(coll);

		// Updating a single document that matches a condition.
		int newAge = 31;
		result = coll.updateOne(Filters.eq("unit_tag_code", "payroll_1064"), new Document("$set", new Document("age", newAge)));
		log.info("Records updated?= " + result.getModifiedCount() + "\n");

		// Fetching documents from the mongodb.
		log.info("[UPDATE] Fetching all documents after updating a single record");
		getAllDocuments(coll);

		// Updating multiple documents that matches a condition.
		int incVal = 5;
		result = coll.updateMany(Filters.eq("unit_tag_code", "hr_1002"), new Document("$inc", new Document("age", incVal)));
		log.info("Records updated?= " + result.getModifiedCount() + "\n");

		// Fetching documents from the mongodb.
		log.info("[UPDATE] Fetching all documents after updating a multiple  record");
		getAllDocuments(coll);
	}
}
4. Run the Application
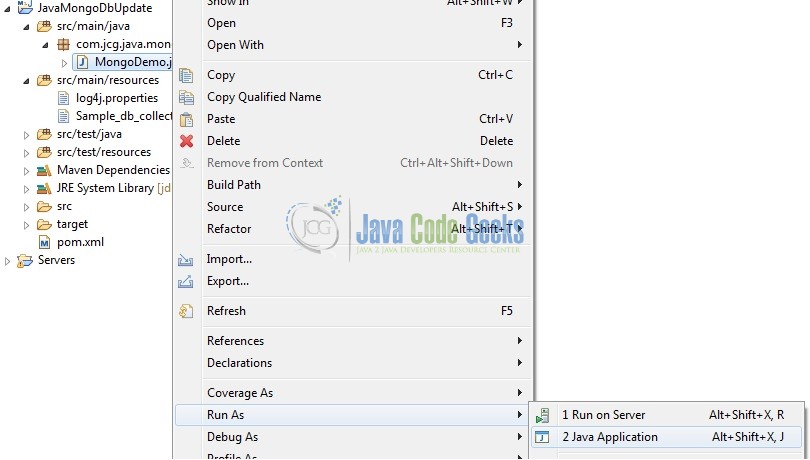
To run the application, developers will need to right click on the MongoDemo.java class, Run As -> Java Application.
5. Project Demo
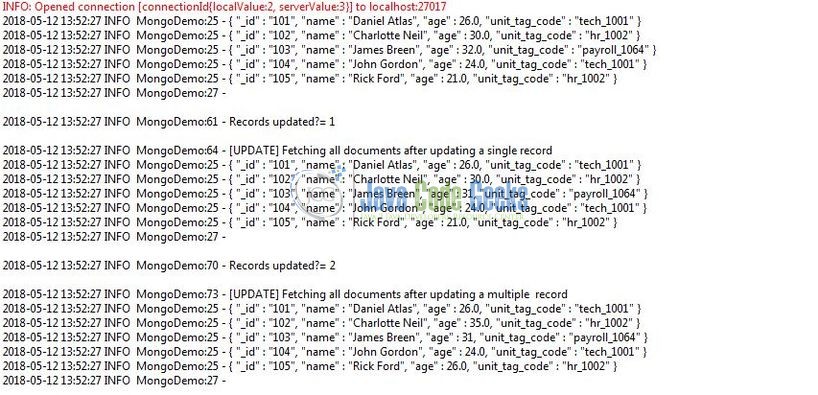
If everything is fine, the code shows the following logs as output.
That’s all for this post. Happy Learning!
6. Conclusion
In this section, developers learned how to update a Mongo document using Java. Developers can download the sample application as an Eclipse project in the Downloads section, and remember to update the database connection settings.
7. Download the Eclipse Project
This was an example of updating the documents of a Mongo collection using the Java driver.
You can download the full source code of this example here: JavaMongoDbUpdate

