Hello, in this tutorial we will see the installation of MongoDB on Ubuntu operating system.
Table Of Contents
1. Introduction
MongoDB is one of the most popular open source NoSQL database solutions available. Unlike relational databases that store rows of data, document-oriented databases like this one store data as documents. These types of databases are not constricted by rigid schemas and scale much easier and efficiently than relational databases, meaning it is a lot easier to store an unthinkable amount of application data.
MongoDB is able to achieve and maintain high performance – much greater than any relational database, such as Oracle or MySQL. This tutorial will help you to install MongoDB database on Ubuntu 16.04 LTS (Xenial), 14.04 LTS (Trusty) and 12.04 LTS (Precise Pangolin) systems.
1.1 Prerequisites
For this tutorial, we need:
- Ubuntu Operating System 16.04 LTS (64-bit)
- Root privileges
- Significant amount of RAM
1.2 Download Ubuntu Operating System
The download is straight forward. Go to Ubuntu website and download the .ISO image through the direct link. You can also check out the alternate download link.
1.3 Download & Install VMware Workstation
You can watch this video in order to download and install VMware Workstation on Windows operating system.
1.4 Install Ubuntu on VMware Workstation
You can watch this video in order to install the Ubuntu 16.04 LTS Operating System on VMware workstation.
2. Installation of MongoDB on Ubuntu
Below are steps which need to be executed on the Ubuntu operating system in order to successfully perform the MongoDB installation.
2.1 Adding MongoDB Repository
MongoDB is generally included in the Ubuntu package repositories. However, a legitimate MongoDB repository affords the most up to date version change in an endorsed manner.
To carry out this process, we first must import the key for the legitimate MongoDB repository using the following command:
Import Public Key
$ sudo apt-key adv --keyserver hkp://keyserver.ubuntu.com:80 --recv 0C49F3730359A14518585931BC711F9BA15703C6

After that, we now have to add a file containing the MongoDB repository details under our /etc/apt/sources.list.d/ from which the MongoDB package files will be fetched.
Now run the following command as per your version of Ubuntu:
Ubuntu 16.04
$ echo "deb [ arch=amd64,arm64 ] http://repo.mongodb.org/apt/ubuntu xenial/mongodb-org/3.4 multiverse" | sudo tee /etc/apt/sources.list.d/mongodb-org-3.4.list
Ubuntu 14.04
$ echo "deb [ arch=amd64 ] http://repo.mongodb.org/apt/ubuntu trusty/mongodb-org/3.4 multiverse" | sudo tee /etc/apt/sources.list.d/mongodb-org-3.4.list
Ubuntu 12.04
$ echo "deb [ arch=amd64 ] http://repo.mongodb.org/apt/ubuntu precise/mongodb-org/3.4 multiverse" | sudo tee /etc/apt/sources.list.d/mongodb-org-3.4.list
Next, update the system package list as follows:
Update System Package
$ sudo apt-get update
2.2 Installation of MongoDB Database
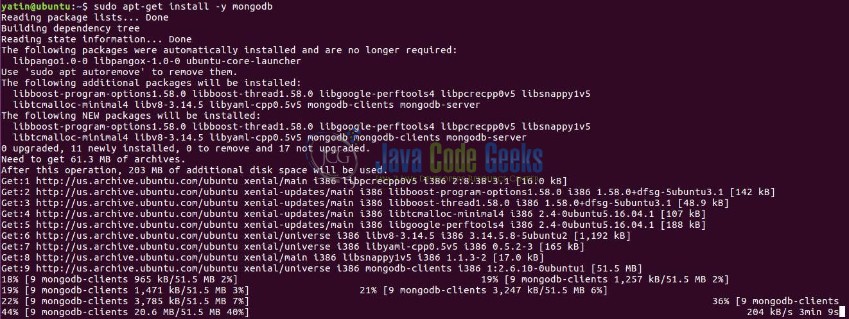
After adding the required APT repositories, use the below command to install MongoDB on your systems. It will also install all dependent packages required for MongoDB.
Install Stable MongoDB Package
$ sudo apt-get install -y mongodb
Note: If you want to install any specific version of MongoDB, define the version number like:
$ apt-get install mongodb-org=3.4.1 mongodb-org-server=3.4.1 mongodb-org-shell=3.4.1 mongodb-org-mongos=3.4.1 mongodb-org-tools=3.4.10
The installation command installs mongodb-org, a meta-package that includes the following:
- mongodb-org-server: The standard MongoDB daemon and relevant init scripts and configurations
- mongodb-org-mongos: The MongoDB Shard daemon
- mongodb-org-shell: The MongoDB shell, used to interact with MongoDB via the command line
- mongodb-org-tools: Contains a few basic tools to restore, import, and export data, as well as a variety of other functions
2.3 Start and Stop MongoDB Service
Now, that MongoDB has been successfully installed on your system, there are certain important things we are going to do in order to manage it under system unit.
The first thing is to create a systemd unit file which defines a unit, in this case, our MongoDB service. Systemd unit configuration files are stored in /etc/systemd/system directory and we shall create the mongodb.service file under it.
Use your editor of choice as follows:
VI Editor
$ sudo vi /etc/systemd/system/mongodb.service
Then add the following lines into that file:
MongoDB Service Code
[Unit]
Description=High-performance, schema-free document-oriented database
After=network.target
[Service]
User=mongodb
ExecStart=/usr/bin/mongod --quiet --config /etc/mongod.conf
[Install]
WantedBy=multi-user.target

A quick explanation of the file sections:
- Unit: Contains a human-readable description of the service and dependencies that need to be started for MongoDB service to work as required
- Service: Specifies how the system should start a service depending on the directives provided. The User directive specifies user to run the MongoDB server and ExecStart directive specifies the command to start MongoDB service
- Install: Directs systemd to start the service at boot time when required
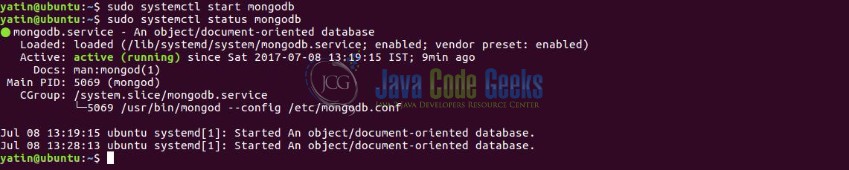
At this point, we can now start our new service by running the command below:
Start MongoDB Service
$ sudo systemctl start mongodb
To check the status of the service, issue the following command:
MongoDB Status
$ sudo systemctl status mongodb
To stop the MongoDB service, issue the following command:
Stop MongoDB Service
$ sudo systemctl stop mongodb
To make the MongoDB services start at boot time, use the following command:
$ sudo systemctl enable mongodbAll is now set for you to start using MongoDB for developing databases for your applications.
2.4 Verifying MongoDB Installation
Finally, use the below command to check installed MongoDB version on your system:
MongoDB Version
$ mongod -version

Also, connect MongoDB using the command line and execute some test commands for checking proper working.

3. Creating MongoDB User Accounts
The default installation provides you the access to the database using mongo command through command line without authentication.
3.1 Create MongoDB Admin User
Developers can follow the below steps to create a user with admin privileges in the MongoDB server.
Step 1: Before you set up a username and password for MongoDB, you need to open the MongoDB shell on your server. You can login by typing:
Open MongoDB Shell
$ mongo
Step 2: Once you are in the MongoDB shell, switch to the database named admin
Switch to the Database Admin
> use admin;
Step 3: Create the Root User
Root User
> db.createUser({user:"myadmin", pwd:"admin123", roles:[{role:"userAdminAnyDatabase",db:"admin"}]});The output will display all the information written to the database except the password.

Step 4: Exit the mongo shell
Exit
> exit
Step 5: Restart MongoDB service and try to connect.
Now, restart the MongoDB service.
Restart MongoDB Service
$ sudo systemctl restart mongodb
And test your connection to MongoDB instance with the credentials created in Step 3, using the admin database for authentication:
My Admin Credentials
$ mongo -u myadmin -p --authenticationDatabase admin
And you will see the output like this:
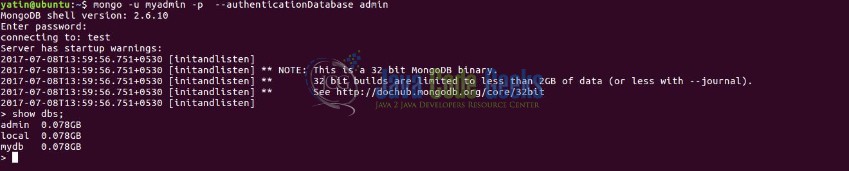
The -u, -p, and –authenticationDatabase options in the above command are required in order to authenticate connections to the shell.
3.2 Add User for Database
Developers can also create database specific users, i.e. the user will have access to that database only. They can also specify the access level for that user on the database.
For example, we are creating a user account with read-write access on mydb database:
Step 1: Create Specific User
Specific User
> db.createUser({user: "jcg", pwd: "jcg123", roles: [{role:"readWrite", db: "mydb"}]});And you will see the output like this:

Step 2: To verify authentication use the below command:
Validation Of Test User
$ mongo -u jcg -p --authenticationDatabase mydb
And you will see the output like this:

To list all users for a database, use following command:
db.getUsers();3.3 Drop User for Database
Developers may also remove a user from the database using the following command:
Validation Of Test User
> use mydb;

> db.dropUser("jcg");
4. Uninstalling MongoDB
To completely remove MongoDB from a system, developers must remove the MongoDB applications themselves, the configuration files, and any directories containing data and logs.
This process will completely remove MongoDB, its configuration, and all databases. This process is not reversible, so ensure that all of your configuration and data is backed up before proceeding.
The following section will guide through the necessary uninstallation steps:
Step 1: To stop the MongoDB service, issue the following command:
Stop MongoDB Service
$ sudo systemctl stop mongodb
Step 2: Remove the MongoDB packages that you had previously installed:
Removing MongoDB Packages
$ sudo apt-get purge mongodb
Step 3: Remove MongoDB databases and log files:
Removing MongoDB Configuration
$ sudo rm -r /var/log/mongodb

$ sudo rm -r /var/lib/mongodb
Hope this helped!
5. Conclusion
A well-known NoSQL database that offers high performance, high availability, and automatic scaling is MongoDB. It is different from the RDBMS such as Oracle, MySQL etc. as it does not use SQL query language to set and retrieve data.
MongoDB stores data in documents called BSON (Binary Representation of JSON). MongoDB is only available for 64-bit Long Term Support Ubuntu Release.
