1. Git What?
Welcome to the Git Tutorial for Beginners. What is Git? Git is a free and open source distributed version control system. It was originally developed by Linus Torvalds, the creator of the Linux operating system. Git is fast and can handle projects of different sizes. If you have a software project, chances are you will rely on Git for version control.
You can also check this tutorial in the following video:

Table Of Contents
- 1. Git what?
- 2. Starting a Fresh Repository
- 3. Repository Configuration
- 4. Tracking your File
- 5. Cloning a Repository
- 6. Modify the README.md file
- 7. Check the Log
- 8. Merge Conflicts
- 9. Branching
- 10. Ignoring Files
- 11. Finding When a Bug was Introduced
- 12. Merge/Pull Request
- 13. Git Tutorial – Additional Commands
- 14. Git Tutorial for Beginners Summary
The example here was tried and tested on a Windows machine. I suggest you download Git for Windows so that you can follow this tutorial. Follow the Git for Windows installation instructions there. Yes, there are Git GUI clients out there but in order to learn what the GUI does, we have to go to the command line. You’ll need to be familiar with the bash shell because Git for Windows emulates the Git bash shell.
Hopefully in this Git Tutorial for Beginners, you’ll find it easy to learn. I have always learned by doing, so enough talk and let’s get down and dirty with Git.
2. Starting a Fresh Repository
- Create a directory called “practice”.
- Create a file in that directory called “readme.txt”.
- Add the line “The quick brown fox jumped over the lazy dog.”.
- Save the file and exit.
- Right-click on the directory -> Git Bash Here
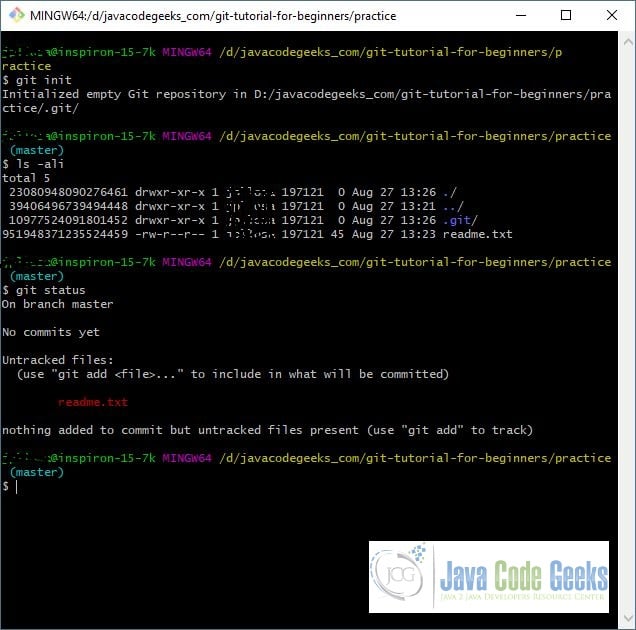
- Initialize the repository:
git init - Check directory structure:
ls -ali - Check the status of files:
git status
You should have something like this:
3. Repository Configuration
Still inside the “practice” directory.
- Configure your username:
git config user.name "{your usersname}"(if you have a GitHub/GitLab/Bitbucket username, use it here). You can use the option--globalaftergit configif you want the same configuration across all repositories. - Caching of your password:
git config credential.helper cache. Cache credentials for an hour:git config credential.helper "cache --timeout=3600"
4. Tracking your File
- Track readme.txt:
git add readme.txt - Tracking multiples files by using fileglobs:
git add *.txtorgit add . - Check status:
git statusYou should see something like this:git status$ git status On branch master No commits yet Changes to be committed: (use "git rm --cached ..." to unstage) new file: readme.txt - Commit the file:
git commit -m "{commit message}"(you commit message should describe the changes made on the file or files).For now just put “initial commit” as your commit message. - Check history:
git logYou shsould see something like this:git log$ git log commit 83076cf08945e39e49efddadfd74e518a794aa63 (HEAD -> master) Author: username Date: Mon Aug 27 13:46:57 2018 +0100 initial commit - Check the status. It should say working tree clean. Congratulations! You now have a Git repository.
5. Cloning a Repository
That’s all well and good but it is not fun if you are the only one working in your repository. Grab a friend and create a new project in GitHub/GitLab/Bitbucket. Follow the instructions in GitHub/GitLab/Bitbucket to push the local repository to the remote repository. This example will use GitLab. Inspect the GitLab project and add members to the project.

- Let your friend clone the repository using the URL from GitLab:
git clone {URL}. Git clone will get the entire history of the repository. Use the--depthoption to get a limited number of revisions:git clone --depth 5 https://gitlab.com/...You should see something like this when cloning:git clone$ git clone https://gitlab.com/username/practice.git Cloning into 'practice'... remote: Enumerating objects: 3, done. remote: Counting objects: 100% (3/3), done. remote: Total 3 (delta 0), reused 0 (delta 0) Unpacking objects: 100% (3/3), done.
6. Modify the README.md file
- Modify the file in turns. You and your friend will modify the file (add, edit or delete text in it).
- Add (
git add) and commit (git commit). Don’t forget the helpful commit message. Do this a couple of times. - Push the changes to the repository:
git push - After the push, the succeeding person will pull the project before editing the file:
git pull - Do this for at least a couple of round to experience the cycle.
7. Check the Log
The commit log should read like a story. Each commit should be a short step that makes sense together. It should have descriptive commit messages. It should be small steps so that commits are just minutes apart. Don’t start a new step without finishing an old one. Pull frequently so that you are always working on the latest copy of the project. When you take too long between pulls, changes from other people become harder to merge.
Here’s a real world example of a commit log:
git log
commit 91012a0c87d7e711c807af5df2f37c1e1e44d03c (HEAD -> javaee7-jsf22, origin/javaee7-jsf22)
Author: xxxxxxx
Date:   Fri May 11 11:05:29 2018 +0100

    trying out @ApplicationSetting

commit 9ffe695ddc9c4731717808fd543c1d3b04753121
Merge: e26cae5 cf73c32
Author: xxxxxxx
Date:   Sun Mar 11 13:35:07 2018 +0100

    Merge remote-tracking branch 'origin/javaee7-jsf23' into javaee7-jsf22

    Conflicts:
            pom.xml
            src/main/java/org/example/kickoff/business/service/UserService.java

commit cf73c32967deae9dce9c57ca00e641bc2bf62da6
Author: xxxxxxxx
Date:   Sun Mar 11 13:15:52 2018 +0100

    Update after backport

commit e39df28330caa36d2c6b59f6674cb0742ecc14e0
Author: xxxxxxxx
Date:   Sun Mar 11 12:47:14 2018 +0100

    Prepare Java EE 8 - JSF 2.3 branch with WF12 and fixed tests

commit fa5b9e6d9ee8a5958049adc50e212baac35650a7
Author: xxxxxxxx
Date:   Wed Feb 28 07:35:29 2018 +0100

    Improve authentication and exception handling

commit 0afdf1d0a492efa81d0d53397be535c2a73d32b3
Author: xxxxxxxx
Date:   Sun Feb 25 12:19:19 2018 +0100

    Fix faces-config.xml version

commit e26cae5e206c6404a9df9b12211de7b8e7d3912c
Author: xxxxxxxxx
Date:   Sun Feb 25 10:42:39 2018 +0100
8. Merge Conflicts
Edit README.md simultaneously. Make it as different as possible so that a merge conflict will happen. Commit your changes. Push your changes simultaneously. One of you will succeed and the other will be rejected. For the one that failed to push, do a pull. You will likely have a merge conflict in your README.md.
It would look something like this:

git merge
<<<<<< HEAD
your commit
=======
someone else's commit!
>>>>>> e26cae5e206c6404a9df9b12211de7b8e7d3912c
Resolve the conflict by editing the file and then git add, commit and push.
9. Branching
Repositories usually exist in multiple branches to allow continued support of old releases or to avoid introducing experimental code to a stable branch. Once a feature branch is finished, it should be merged back to the master branch.
- Create a branch called ComplexVersion:
git checkout -b ComplexVersion - Write your new changes on README.md and make several commits along the way.
- Pull to get the latest version of the repository.
- Go back to master branch:
git checkout master - Merge your changes:
git merge ComplexVersion - Delete the branch if you want:
git branch -d ComplexVersion
10. Ignoring Files
There are some files we don’t want to track. For example, we don’t want to track .classpath, .project, *.class, etc. We don’t want these files saved in the repository. To ignore these files, create a “.gitignore” file in the directory of your project.
Example .gitignore file:
.gitignore
# Compiled class file
*.class

# Log file
*.log

# BlueJ files
*.ctxt

# Mobile Tools for Java (J2ME)
.mtj.tmp/

# Package Files #
*.jar
*.war
*.nar
*.ear
*.zip
*.tar.gz
*.rar

# virtual machine crash logs, see http://www.java.com/en/download/help/error_hotspot.xml
hs_err_pid*
/bin/
.classpath
.project
11. Finding When a Bug was Introduced
The git bisect command determines the last known good commit, the first known bad commit, and then checkout the commit in the middle. If the commit in the middle is bad, then you know that the bug was introduced before that. If the commit in the middle is good, then the bug was introduced after that. Repeat the process until you find the revision where the bug was introduced.
git bisect start: Start the bisecting session.git bisect bad {commit ID}: Tell Git the commit ID where the bug was first detected.git bisect good {commit ID}: Tell Git the last known good commit.- Git will checkout the commit between the two commits.
- Test the checkedout commit and mark it accordingly (e.g.
git bisect bad, git bisect good). - Git will then checkout the next appropriate commit until you find where the bug was introduced.
git bisect rest: All done. Reset back to HEAD.
12. Merge/Pull Request
To create a merge request, you need to go to GitLab/GitHub/Bitbucket and go pick the branch we want to merge. A merge request is also called a pull request. In the merge request, you’ll provide a title, description, approvers and most important of all are the source and target branch. Submit your merge request when you are ready and once it is merged by the approver, your changes will be in the target branch.
A merge request looks like the images below:


13. Git Tutorial – Additional Commands
git commit -am "improve sort algorithm #99": Linking GitLab issues using commit messages. Include#{issue number}in the commit message.git commit -am "closes #99. code clean up.": Close an issue. Other keywords for closing an issue:close, closed, fix, fixes, fixed, resolve, resolves, resolved.git checkout -- README.md: Revert to version last committed.git reset HEAD README.md: Unstage a file (i.e. you don’t want to commit a file).git commit --amend: Amending a commit.git reset --hard HEAD: Bin all project changes. This is dangerous!git reset --hard {commit id}: Revert a project to a previous commit.git mv README.md README2.md: Rename and/or move a file.git tag -a v1.0: Tag a repository. Takes a snapshot of the repository (e.g. mark a release).git tag: List all tags.git show v1.0: Show information on a particular tag.git blame README.md: Shows who committed which lines of code.git remote add branch URL: Adds the remote branch named “branch” for the repository at URL.git push --set-upstream origin branch: Push the current branch and set the remote as upstream.git diff: Show changes between commits.
14. Git Tutorial for Beginners Summary
There you have it. You have just performed the most common operations in Git. When you join a team, you will do a git clone. At the start of your working day, you do a pull to get the latest copy. You then make your changes, commit it and then push. This is the most common cycle you will be doing. It’s okay to commit partial work but push only working builds.

What a useless tutorial! this is not for beginners but for intermediate users. Can’t even get by the first instruction “create a practice directory”. How do you do that in GitBash? I’m not familiar with the Linux commands which I presume you use. The use of Git with its commands was ok but get me there first.
Hi Tanya,
I’m sorry you feel that way. It clearly states in the last line of the paragraph after the table of contents that — You’ll need to be familiar with the bash shell because Git for Windows emulates the Git bash shell — which means you need to be familiar with Unix/Linux commands.
Cheers,
Joel