1. Introduction
Version Control Systems are one of the software tools that help developers manage the source code over time. They keep track of the modification, compared with different versions of the source code. As the number of lines increases, it could go up to thousands and thousands lines.
In real life, it could be a disaster if we make some irrecoverable mistakes without any backups. However, this will not happen in code-writing for the developers, especially with the help of Git, which is one of the most popular source code management system for software development. Git has been widely used among programmers.
Compared with other Version Control Systems, such as SVN (Apache Subversion) and CVS (Concurrent Version System), Git is more powerful by its distributed nature, fast operation and branch handling mechanism. The distributed system makes it easy and efficient for multiple developers work together towards the same project. Git works fast as its lightweight operations. Also every developer can work with the code as its own branch. Others can merge to different branches and this makes cooperation work quite easy. In addition, Git is free and open-source.
Because of the efficient of Git, Github, which is the web-based repository hosting service platform, is also popularly used. You can find many useful materials/codes in Github with the link here.
In this article, we will go over the basic principles and operations of Git. All the examples below is shown in MacOS EI Capitan Version 10.11.3 and the Git version is 2.5.4. Note all the operations below is working on local machine, without connecting to Github.
2. Git installation
Before we dig into the principles and operations of Git, we need to have the tool and install Git. To install Git, two ways could be used:
(1) Use the command line: For different operating systems, different command line may be used in terminal. For example, for linux, sudo yum install git-all could install Git successfully. For more detailed installation methods on other system, you can follow the tutorial here.
(2) Use the package: Also, it’s easier if you could find the installation packages for Git. Then you can download it and easily install it by click the package. It also provide the GUI for Git, which makes it user-friendly. The Git community provides information for different systems, such as MacOS, Windows, Linux and Solaris. For detailed packages download, you can refer to the link here.
3. Basic concepts and principles
Firstly, we need to get used to the repository concepts. In Git, there will be three repositories or areas. If we consider the usage of Github, then we need to understand the remote repository. To make it clear, we use the following flow to demonstrate how the git works.

- Workspace: it’s the place where you see in your computer system, or the directory where you check out your files. Files in the workspace could be added to the Git by using
git addcommand. Basically it could be any folders in your computer. - Index: it’s also called stating area. It’s an invisible space where you can add files that you want to commit. To add commit, you can use
git commitcommand. - Local repository: it’s also an invisible repository. Actually it’s stored in the .git folder, which is hidden in the folder you created.
- Remote repository: this could be another computer, or it could be the server of others, such as Github, which we can consider it as a remote repository. To access to the remote repository, git push or
git pullcould be used.
In addition, we also need to be familiar with some other common concepts in Git.
- Branch: it’s used to create another line of code. Usually it’s for creating another new feature. Once the new feature has completed, it can be merged back the the master branch.
- Master Branch: we can consider it as the main branch/code to work on. You can add other branches if needed. But the whole project can only have one master branch.
- Commit: it holds the current state of the repository. It can be considered as a node of a linked-list. Every commit has a pointer to the parent commit object. You can go back to the parent commit object by changing the pointer.
- HEAD: it is the pointer to the most recent commit on the current branch. It’s actually a hash value of current commit, which is calculated by SHA-1 hash on a file with a hash value of 160 bits that uniquely identifies the contents of the file.
4. Git operations
After we understand the repositories and basic concepts of Git, we will move to the operations of Git.
Before we go to the detailed example, make sure git is installed on your computer/laptop. Then open the terminal, try to run git --version, you will see the version of the Git you’ve installed as below:
WXMs-MacBook-Pro:~ WXM$ git --version
git version 2.6.4 (Apple Git-63)
To have a basic idea of what command you’re going to use, you can refer to the table below:
| git command | functions |
| git init | create a new local repository |
| git clone | download a project and its entire version history |
| git add | add file to the stating area |
| git commit | add file from staging area to local repository |
| git status | list all new or modified files to be commited |
| git diff | show files differences to be staged |
| git log | list version history for current branch |
| git rm | delete file from the working directory |
| git reset | undo commits and change back to specified one |
| git push | upload all local branch commits to github |
| git pull | download bookmark history and incoorparates changes |
4.1 git init command
After checking the installation of Git, we need to create a folder in our computer. So we create a blank folder named GitTutorial. Then go into the folder and type command git init. This command will change this folder to be a repository which you can manage. Also, the output after you type git init shows that you’ve successfully created and initialized an empty git repository. After running ls -ah, you will see there’s a .git folder inside the GitTutorial folder. This folder is utilized to track the git folder. Make sure you won’t change it, which may lead to errors happening to the whole git folder. Also note that .git folder is hidden by default, and you can use the previous ls -ah command to make it visible.
For all these operations, you can check the result below:
WXMs-MacBook-Pro:~ WXM$ cd Documents/
WXMs-MacBook-Pro:Documents WXM$ cd GitTutorial/
WXMs-MacBook-Pro:GitTutorial WXM$ ls
WXMs-MacBook-Pro:GitTutorial WXM$ git init
Initialized empty Git repository in /Users/WXM/Documents/GitTutorial/.git/
WXMs-MacBook-Pro:GitTutorial WXM$ ls -ah
.	..	.git
4.2 git add command
Secondly, we can use a text file as an example in usage of Git. Inside the GitTutorial folder, create an empty txt file with name GitExample.txt. Then add any words in it with: This is a txt file for Git Example.
Lastly, we need to add the GitExample file into the Git system. Then run git add GitExample.txt. This command will add the txt file to the staging area, which is a middle area between workspace and the local repository.
WXMs-MacBook-Pro:GitTutorial WXM$ vi GitExample.txt
WXMs-MacBook-Pro:GitTutorial WXM$ ls
GitExample.txt
WXMs-MacBook-Pro:GitTutorial WXM$ cat GitExample.txt
This is a txt file for Git Example.
WXMs-MacBook-Pro:GitTutorial WXM$ git add GitExample.txt
4.3 git commit command
Then, we need to add this file from staging area to local repository. To achieve this, we can run git commit -m "First time writing the txt file". Note the string after -m is the comment that we make by ourselves. It can be anything you want to comment. Below shows the results of all these operations.
WXMs-MacBook-Pro:GitTutorial WXM$ git commit -m "First time writing the txt file"
[master (root-commit) 9f3fca6] First time writing the txt file
 1 file changed, 1 insertion(+)
 create mode 100644 GitExample.txt
4.4 git status command
Afterward, we can check the status of the whole folder with command git status. Then it seems to be everything if fine until now.
WXMs-MacBook-Pro:GitTutorial WXM$ git status
On branch master
nothing to commit, working directory clean
4.5 git diff command
The main purpose for git diff command is to show changes of the file between commits, commit and working tree, etc.
To make it work, we need to create some differences. As a start, we modify the content in the GitExample.txt file and add one more line with “One more line”. The content in side the txt file now is:
This is a txt file for Git Example.
One more line.
After this, we can run command git diff to check the difference between the current version with the previous one, the output is:
WXMs-MacBook-Pro:GitTutorial WXM$ git diff
diff --git a/GitExample.txt b/GitExample.txt
index 30e6813..8c7c8d2 100644
--- a/GitExample.txt
+++ b/GitExample.txt
@@ -1 +1,2 @@
 This is a txt file for Git Example.
+One more line.
Then we can see that the sentence with “+” shows that where we add some contents to the file. Also we can predict that “-” operation shows we delete some contents from the file.
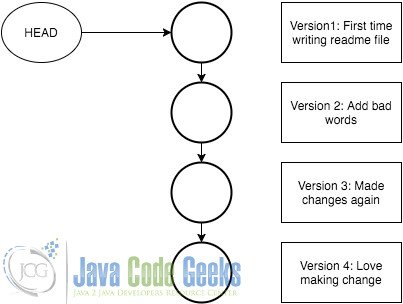
Then if we made another change to the the txt file and add another line with “I love changing things.” Until now we’ve made three changes – adding three lines compared with the first version. The four commits are : Love making changes <- Made changes again <- Add bad words <- First time writing readme file, where the arrow shows the order of the changes.
Another useful git diff command is git diff --cached, it’ll show the differences between the index and the most recent commit. After running this command in our example, it sows nothing. The reason for this, is that until now, there’s no difference between the index and most recent commit.
Then if we want to check the difference between the working directory and he most recent commit, git diff HEAD could be used.
Here, we check the status of our current system, with the help of git status:
WXMs-MacBook-Pro:GitTutorial WXM$ git status
On branch master
Changes not staged for commit:
  (use "git add ..." to update what will be committed)
  (use "git checkout -- ..." to discard changes in working directory)

	modified:   GitExample.txt

no changes added to commit (use "git add" and/or "git commit -a")
If we add the txt file to the index with command git add GitExample.txt, then run the git diff, it shows nothing. That’s because right now the content in the working directory and the index are the same. This time, we run the command git diff --cached, it shows the content below instead of showing nothing as previous.
WXMs-MacBook-Pro:GitTutorial WXM$ git diff --cached
diff --git a/GitExample.txt b/GitExample.txt
index 30e6813..8c7c8d2 100644
--- a/GitExample.txt
+++ b/GitExample.txt
@@ -1 +1,2 @@
 This is a txt file for Git Example.
+One more line.
To check the status, run command git status:
WXMs-MacBook-Pro:GitTutorial WXM$ git status
On branch master
Changes to be committed:
  (use "git reset HEAD ..." to unstage)

	modified:   GitExample.txt
Until now, there’s still difference between the index and the most recently commit. It can be proved by running git diff HEAD
WXMs-MacBook-Pro:GitTutorial WXM$ git diff HEAD
diff --git a/GitExample.txt b/GitExample.txt
index 30e6813..8c7c8d2 100644
--- a/GitExample.txt
+++ b/GitExample.txt
@@ -1 +1,2 @@
 This is a txt file for Git Example.
+One more line.
However, after we commit the file and rerun the previous command again, it shows nothing.
WXMs-MacBook-Pro:GitTutorial WXM$ git commit -m "Add one more line"
[master cb3db9a] Add one more line
 1 file changed, 1 insertion(+)
Also, the status is clear right now, if we run the command git status, it shows everything is clear:
WXMs-MacBook-Pro:GitDiffExample WXM$ git status
On branch master
nothing to commit, working directory clean
4.6 git log command
In real life of development, thousands lines of code could be changed. We can not remember it exactly. So git log should be useful right now, and it’ll show all the change history we have made. We can try it with our own example here after we made three commits in our previous part:
pcp352933pcs:GitTutorial WXM$ git log
commit 67713e5af45b67aa2628b12a73d4b493a16de159
Author: Jun
Date:   Sun Apr 24 17:19:12 2016 -0500

    Love making changes

commit 47640c18cf433c6f6c7ba26b34f886688d34a1d3
Author: Jun
Date:   Sun Apr 24 17:18:38 2016 -0500

    Made changes again

commit 1f50e80eb551e3ed7981251378d4609e30248d2f
Author: Jun
Date:   Sun Apr 24 16:58:21 2016 -0500

    Add bad words

commit d90715179d20e10c5d88fc8d8a58972605fb38c0
Author: Jun
Date:   Sun Apr 24 16:32:28 2016 -0500

    First time writing readme file
The above file shows every change we’ve made with specific date and time. You should notice the long sequence of strings after the commit. That’s the commit id, which corresponds to specific commit. Why it’s not in 1, 2, 3… order? That’s because Git is a distributed system. If every commit id is in order, when multiple changes happen, there should be conflict.
Sometimes, the changes are quite a lot and what we want is just to check the changes. Then git log --pretty=oneline could be utilized to show each commit in one line.

pcp352933pcs:GitTutorial WXM$ git log --pretty=oneline
67713e5af45b67aa2628b12a73d4b493a16de159 Love making changes
47640c18cf433c6f6c7ba26b34f886688d34a1d3 Made changes again
1f50e80eb551e3ed7981251378d4609e30248d2f Add bad words
d90715179d20e10c5d88fc8d8a58972605fb38c0 First time writing readme file
4.7 Git undo operation
In some cases, we want to change our minds and revert the commit we have made, then Git makes this easy to operate on. This is called git undo commit. To make this happen, we add another line to the GitExample.txt, with “Bad words for others”. Then we add the file to the stating area and to the local repository. The following is the process that we have done:
pcp352933pcs:GitTutorial WXM$ git add GitExample.txt
pcp352933pcs:GitTutorial WXM$ git commit -m "Add bad words"
[master 1f50e80] Add bad words
 1 file changed, 1 insertion(+)
pcp352933pcs:GitTutorial WXM$ cat GitExample.txt
This is a txt file for Git Example.
Bad words for others.
If we want to go back to the previous version, git reset command could be used. What we use here is git reset –hard HEAD^. HEAD is means the commit of current branch. Symbol “^” means go back to the previous one version, “^^” means the previous two version and so on so forth. While it’s hard to continue with multiple “^” symbols when there’s hundreds and thousands versions.
Then you can use the number directly. For example git reset –hard HEAD^ is the same as git reset –hard HEAD~1 and git reset –hard HEAD^^ is the same as git reset –hard HEAD~2. Pay attention to the symbol “~” before the numbers and do not forget to add it.
For our own example, right now the head is in 67713e5af45b67aa2628b12a73d4b493a16de159 Love making changes. If we want to go back to the previous version. Run the git reset –hard HEAD^ command and check the result.
pcp352933pcs:GitToturialWXM$ cat GitExample.txt
This is a txt file for Git Example.
Bad words for others.
I made changes again:)
I love changing things.
pcp352933pcs:GitTutorial WXM$ git reset --hard HEAD^
HEAD is now at 47640c1 Made changes again
pcp352933pcs:GitTutorial WXM$ cat GitExample.txt
This is a txt file for Git Example.
Bad words for others.
I made changes again:)
We can see from the above, that after we run the git reset command, it goes back to the previous version Made changes again. The 47640c1 is exactly the shortcut commit id for the previous commit.
Then if we want to go back to the initial status, we can go back twice with command git reset --hard HEAD~2
pcp352933pcs:GitTutorial WXM$ git reset --hard HEAD~2
HEAD is now at d907151 First time writing readme file
pcp352933pcs:GitTutorial WXM$ cat GitExample.txt
This is a txt file for Git Example.
Then run git log, it shows only the first version.
pcp352933pcs:GitTutorial WXM$ git log
commit d90715179d20e10c5d88fc8d8a58972605fb38c0
Author: Jun <wuxiaomin98@hotmail.com>
Date: Sun Apr 24 16:32:28 2016 -0500

First time writing readme file
pcp352933pcs:GitTutorial WXM$ cat GitExample.txt
This is a txt file for Git Example
However, if one day we find that the lines we added are useful, could we go further and get it back? Yes, we can! If the terminal is not closed, we need to find the commit number which the version is. For example, the commit number for Love making changes version is 67713e5af45b67aa2628b12a73d4b493a16de159. Then we can use the git reset --hard command with the commit id following it. Note that we can use the first few numbers of the commit id in most case.
pcp352933pcs:GitTutorial WXM$ git reset --hard 67713e5a
HEAD is now at 67713e5 Love making changes
pcp352933pcs:GitTutorial WXM$ cat GitExample.txt
This is a txt file for Git Example
Bad words for others.
I made changes again:)
I love changing things.
You see, it’s back. However, make sure you really want to go back and force. In some cases, if you don’t know the commit id, you won’t come back to the newest version.
In some cases, that you really want to come back to the newest version. Then git reflow could be useful for you, which will track every command you’ve made. Run the command and you’ll get something magic.
pcp352933pcs:GitTutorial WXM$ git reflog
d907151 HEAD@{0}: reset: moving to HEAD^^^
67713e5 HEAD@{1}: reset: moving to 67713e5a
d907151 HEAD@{2}: reset: moving to HEAD~2
47640c1 HEAD@{3}: reset: moving to HEAD^
67713e5 HEAD@{4}: commit: Love making changes
47640c1 HEAD@{5}: commit: Made changes again
1f50e80 HEAD@{6}: commit: Add bad words
d907151 HEAD@{7}: commit: First time writing readme file
Here we have all the commit number to each commit and each reset/undo operation. So you don’t need to worry about where you’re now.
To make it more clear to understand, we can use the following figure to show how it work. The HEAD works as a pointer to point to specific version. For example, if HEAD is pointer to the last version. Then after using the reset command, we can go back the initial version.
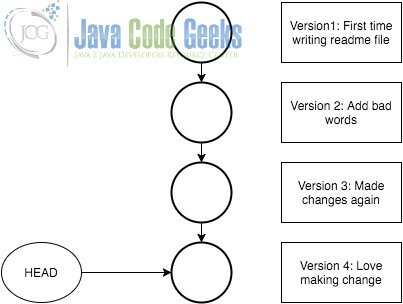
As we can see from the previous figure, it’s quite easy for us to change to different versions of our code. It’s just an operation of command.
4.8 git rm operation
Also, it could be possible for us to delete the code in our directory. For example, git rm with the file name following the command. This command will delete the file from the working directory and stages the deletion.
If we use the git rm --cached with the file name following the command, it will remove the file from the version control but preserves the file locally.
Notice that we do not recommend it to use this command often. The reason for this is that this deletion may be unrecoverable. A better approach could be make a different branch and work on that branch.
5. Github connection
Lastly, we introduce Github briefly. To connect with Github, we need to have a Github account firstly. You can go to github.com and register one for yourself.
After this, you can follow the link to connect to Github. Then you can upload/push and download/pull the changes to the Github server.
After the previous operations of git add, git commit, use git push command, it will publish the local changes to the remote repository. For example, the following shows how it looks after we push our code to the server:
pcp352933pcs:GitTutorial WXM$ git push
Counting objects: 3, done.
Delta compression using up to 4 threads.
Compressing objects: 100% (2/2), done.
Writing objects: 100% (3/3), 309 bytes | 0 bytes/s, done.
Total 3 (delta 1), reused 0 (delta 0)
To https://github.com/******/GitTutorial.git
   5a5a9ea..d907151  master -> master
Now, other developers can view the changes by performing pull/clone operation or updating their local repository. This will download the code in server to local directory and work on it. It can be achieved by git clone with the URL that on the server.
The following will show you how it works:
Cloning into 'test_repo'...
remote: Counting objects: 3, done.
remote: Total 3 (delta 0), reused 3 (delta 0)
Unpacking objects: 100% (3/3), done.
6. Conclusion
In conclusion, Git is a very useful tool for software developers. One should understand the principle of it and use it often. Also, you can find many useful materials in Github and you may want to contribute to some open sources.
