Git Tree Viewer Example
As we know, Git has been popularly used by software developers recently. In comparison with SVN (Apache Subversion) and CVS (Concurrent Version System), Git is more powerful.
That lies in its properties of distributed nature, fast operation and branch handling mechanism. In addition, it’s very convenient for multiple workers to work together with Git. Especially with the usage of Github, it makes cooperation easier than ever.
1. Introduction
As a version control platform, we cannot say anything without versions. Basically, Git is powerful for its version management. With the versions expand, they form a structure similar to a tree. And in this article, we focus on the tree structure and it’s viewer.
In the following example, all are shown in MacOS EI Capitan Version 10.11.5 and the Git version is 2.7.4. In addition, you may want to have GitKraken 1.5.2.
2. Git workflow
2.1 Basic settings
Before we move forward, make sure you’ve download Git and install it. In addition, make sure you have a Github account. Furthermore, be sure that you’ve set up the global configuration for both of them. All these download and setup issues could refer to my previous posts on Git.
Then, open the terminal. You can check the Git version via command git --version. Mine is like below after the version checking command:
WXMs-MacBook-Pro:~ WXM$ git --version
git version 2.7.4 (Apple Git-66)
2.2 Git repository
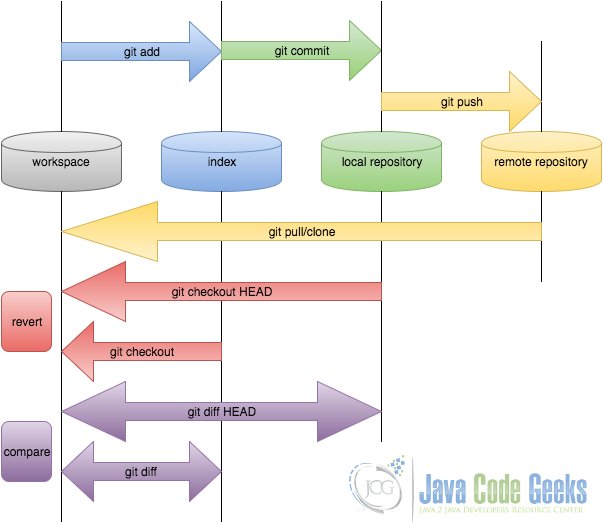
Then, we need to get used to some basic concepts about repository. In Git, there will be three repositories or areas. If we consider the usage of Github, then we need to understand the remote repository. To make it clear, we use the following flow to demonstrate how the git works.
- Workspace: it’s the place where you see in your computer system, or the directory where you check out your files. Files in the workspace could be added to the Git by using
git addcommand. Basically it could be any folders in your computer. - Index: it’s also called stating area. It’s an invisible space where you can add files that you want to commit. To add commit, you can use
git commitcommand. - Local repository: it’s also an invisible repository. Actually it’s stored in the .git folder, which is hidden in the folder you created.
- Remote repository: this could be another computer, or it could be the server of others, such as Github, which we can consider it as a remote repository. To access to the remote repository, git push or
git pullcould be used.
2.3 Other concepts
In addition, we also need to be familiar with some other common concepts in Git.
- Branch: it’s used to create another line of code. Usually it’s for creating another new feature. Once the new feature has completed, it can be merged back in the master branch.
- Master Branch: we can consider it as the main branch/code to work on. You can add other branches if needed. But the whole project can only have one master branch.
- Commit: it holds the current state of the repository. It can be considered as a node of a linked-list. Every commit has a pointer to the parent commit object. You can go back to the parent commit object by changing the pointer.
- HEAD: it is the pointer to the most recent commit on the current branch. It’s actually a hash value of current commit, which is calculated by SHA-1 hash on a file with a hash value of 160 bits that uniquely identifies the contents of the file.
3. Git tree viewer
In this part, I’ll introduce the concept of Git tree. Meanwhile, I’ll show you the GUI viewer for the tree structure.
In Git, we can connect our local repository with remote repository, like Github. The most-often used Git commands are git add, git commit and git push. git add command is to add file contents to the index repository. git commit is used for recording changes to the repository. And git push is for uploading the local file to Github.
Normally, when you make changes to your local file, you may go through the whole process of git-add-commit-push. And this will update the changes and save it in Github. Along the whole process, it forms a tree structure. The tree start from the original file you created. Here we can call it version 0 of this file. Then, it’ll follow up to version 1, 2, 3 etc, with every change.
3.1 A simple Git example
To make it clear, we create a very simple text file and manipulate with it. Firstly, we create a folder called GitTreeViewExample. Meanwhile, we create a txt file named README. Then we add content of “Hi there!” in the txt file.
WXMs-MacBook-Pro:~ WXM$ cd Documents/JCG/
WXMs-MacBook-Pro:JCG WXM$ ls
GitDiffExample	GitLearning	Git_repository
WXMs-MacBook-Pro:JCG WXM$ mkdir GitTreeViewExample
WXMs-MacBook-Pro:JCG WXM$ cd GitTreeViewExample/
WXMs-MacBook-Pro:GitTreeViewExample WXM$ cat README.txt
Hi there!
After this, we run the command git init to initialize the project/folder.
WXMs-MacBook-Pro:GitTreeViewExample WXM$ git init
Initialized empty Git repository in /Users/WXM/Documents/JCG/GitTreeViewExample/.git/
Then, we check the status of the whole project:
WXMs-MacBook-Pro:GitTreeViewExample WXM$ git status
On branch master
Initial commit
Untracked files:
  (use "git add ..." to include in what will be committed)
	README.txt
nothing added to commit but untracked files present (use "git add" to track)
Furthermore, you need to create a repository under your Github account. Here, we name it the same as the project name GitTreeViewExample. Then you need to get the link for that repository and push you local changes to the remote repository.
WXMs-MacBook-Pro:GitTreeViewExample WXM$ git remote add origin https://github.com/wuxiaomin98/GitTreeViewExample.git
WXMs-MacBook-Pro:GitTreeViewExample WXM$ git push -u origin master
Counting objects: 3, done.
Writing objects: 100% (3/3), 225 bytes | 0 bytes/s, done.
Total 3 (delta 0), reused 0 (delta 0)
To https://github.com/wuxiaomin98/GitTreeViewExample.git
 * [new branch]      master -> master
Branch master set up to track remote branch master from origin.
WXMs-MacBook-Pro:GitTreeViewExample WXM$ git status
On branch master
Your branch is up-to-date with 'origin/master'.
nothing to commit, working directory clean
Then, we make changes to the txt file, adding the name. It shows like below:
WXMs-MacBook-Pro:GitTreeViewExample WXM$ cat README.txt
Hi there!

I'm Steve.
Afterwords, push the changes to the remote repository.
WXMs-MacBook-Pro:GitTreeViewExample WXM$ git add README.txt
WXMs-MacBook-Pro:GitTreeViewExample WXM$ git commit -m "add name"
[master 2307d89] add name
 1 file changed, 2 insertions(+)
WXMs-MacBook-Pro:GitTreeViewExample WXM$ git push
Counting objects: 3, done.
Writing objects: 100% (3/3), 260 bytes | 0 bytes/s, done.
Total 3 (delta 0), reused 0 (delta 0)
To https://github.com/wuxiaomin98/GitTreeViewExample.git
   f615f6d..2307d89  master -> master
3.2 Git tree
To make a Git tree structure, you may want to make multiple different changes. This includes making changes to original file. Also, you may want to create different branches.
Each time you make the changes, you can use the git status to check the status. Then you may get some hints, like to add and commit the changes. This could be like below:
WXMs-MacBook-Pro:GitTreeViewExample WXM$ git status
On branch master
Your branch is up-to-date with 'origin/master'.
Changes not staged for commit:
  (use "git add ..." to update what will be committed)
  (use "git checkout -- ..." to discard changes in working directory)

	modified:   README.txt

no changes added to commit (use "git add" and/or "git commit -a")
WXMs-MacBook-Pro:GitTreeViewExample WXM$ git add README.txt
WXMs-MacBook-Pro:GitTreeViewExample WXM$ git commit -m "nice to meet you"
[master 0534eff] nice to meet you
 1 file changed, 3 insertions(+), 1 deletion(-)
WXMs-MacBook-Pro:GitTreeViewExample WXM$ git push
Counting objects: 3, done.
Writing objects: 100% (3/3), 290 bytes | 0 bytes/s, done.
Total 3 (delta 0), reused 0 (delta 0)
To https://github.com/wuxiaomin98/GitTreeViewExample.git
   2307d89..0534eff  master -> master
WXMs-MacBook-Pro:GitTreeViewExample WXM$ git status
On branch master
Your branch is up-to-date with 'origin/master'.
nothing to commit, working directory clean
Finally, I get something like below.
WXMs-MacBook-Pro:GitTreeViewExample WXM$ cat README.txt
Hi there!

I'm Steve.

Nice to meet you here.

It's easy to use Git.

I'm in a test branch.

I'm in a master branch now.
Furthermore, you can get through git log command.
WXMs-MacBook-Pro:GitTreeViewExample WXM$ git log
commit c0dcbb248590501db40ba286e52ec4ca6aa2d372
Author: Jun
Date:   Fri Aug 5 22:08:06 2016 -0500

    master branch

commit a439d39a9f5e7ac4274b55a0923f0e6d3716c971
Author: Jun
Date:   Fri Aug 5 22:03:13 2016 -0500

    a new branch test

commit 94de23feeda610e1b8e15e66e2d5712ccb547189
Author: Jun
Date:   Fri Aug 5 22:00:22 2016 -0500

    Easy to learn git

commit 0534eff571470c409ad16102807796619899f63a
Author: Jun
Date:   Fri Aug 5 21:56:15 2016 -0500

    nice to meet you
3.3 Git tree viewer – through default Git command
To get the tree viewer of your project, one way is to use the command git log. Specifically, you can use the –graph add-on with the command. You can check out this like below:
WXMs-MacBook-Pro:GitTreeViewExample WXM$ git log --graph --full-history --all --pretty=format:"%h%x09%d%x20%s"
* b9f2630        (HEAD -> new_branch, origin/new_branch) another branch
* c0dcbb2        (origin/master, master) master branch
* a439d39        (origin/branch_test, branch_test) a new branch test
* 94de23f        Easy to learn git
* 0534eff        nice to meet you
* 2307d89        add name
* f615f6d        first readme file
In addition, to make it simple, you can just use the command git log --graph --oneline. And this will have all updates to be in one line.
WXMs-MacBook-Pro:GitTreeViewExample WXM$ git log --graph --oneline
* b9f2630 another branch
* c0dcbb2 master branch
* a439d39 a new branch test
* 94de23f Easy to learn git
* 0534eff nice to meet you
* 2307d89 add name
* f615f6d first readme file
Notice here, it seems there’s no tree structure showing up. The reason for this is that I’m the only one to work on this project. Therefore, the tree is just one consecutive line up. However, if you have more than one person to work on this, you’ll see very structural format, just like a tree.
3.4 Git tree viewer – through other Git GUI software
Sometimes, you may be tired by the command line operation. If that’s the case, probably you may take a look at the GUI for Git. And there’re various options for your choice, like GitX, Gitbox, SmartGit, GitKraken etc. For more other softwares, you can refer to the Git GUI page. All these provide quite powerful GUI interface for Git.
Here, I choose GitKraken to show the tree structure. First of all, it’s free. Then, it’s cross-platform and could be used in Windows, MacOS and Linux. Finally, it’s easy to operate on it and connect it with both Git and Github.
You can download it from the official site. Then, install it. Open the GitKraken, you can connect your local repository with your Github account. You can go to preferences/authentication/Github.com. Then input your Github account user name and password. In the end, you may see successful connection like below:
One feature for GitKraken is that it can scan the Git repository on your local machine. This could be very convenient. Then what you need to do is to go to specific project, which you want to work on.
For example, coming back to our GitViewExample. You can see all the information for each commit like below:
The figure above is actually a Git tree viewer.
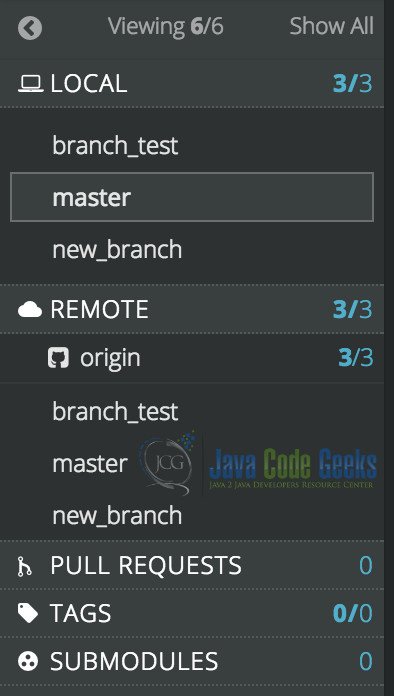
In addition, you can also find the basic information for your local and remote repository like below:
4. Conclusion
In conclusion, every commit change you made can form a leaf for your Git tree. You can check out the tree structure through both the command line and also the GUI software. Both of them can be chosen according to your own preference.


