If you are a software developer, there is a pretty good chance that you must have used version control software in one form or the other. Git has surged in popularity over the past few years succeeding SVN and CVS. With almost every open source project migrated to Git as a version control of choice, it currently seems like a de-facto standard for the version control in the programming community.
You may skip the introductory part and jump directly to the commands tutorial below.
Table Of Contents
- 1. What is version control?
- 2. Why Git?
- 3. Installing Git Client
- 4. Git Commands
-
- 4.1 Initial Git Configuration [git config]
- 4.2 Asking Git for help [git help]
- 4.3 Creating a new repository [git init]
- 4.4 Checking out existing repository [git clone]
- 4.5 Check the status of your project [git status]
- 4.6 Start tracking new files [git add]
- 4.7 Files never to be committed [git ignore]
- 4.8 What exactly got changed [git diff]
- 4.9 Commit your changes [git commit]
- 4.10 Removing and Deleting tracked files [git rm]
- 4.11 Tracking renamed files [git mv]
- 4.12 Show me the history [git log]
- 4.13 Show me the remote location [git remote]
- 4.14 Get Remote Data/Files [git fetch, git pull]
- 4.15 Send local changes to remote [git push]
- 5. Summary
- 6. References
1. What is version control?
Version control (a.k.a Version Control System or VCS) is a system that records changes to a file or set of files over time so that you can recall specific versions later. It keeps the entire change history of your project file by file which you call changeset.
1.1 Benefits of VCS:
You need version control so that:
- you can revert back to to last working edition of the file or the complete code in the event of a failure or error
- multiple parties can work in a collaborative way over one code base; they don’t need to share pieces of code or patches. VCS helps merging the code from many developers easier.
- developers don’t need to comment out certain pieces of code to disable certain functionality. They can maintain different versions of the same codebase containing different changes which can be merged with the main repository when desired.
1.2 Centralized Vs Distributed VCS
VCS like SVN and CVS are examples of Centralized VCS (CVCS) while Git is a Distributed VCS (DVCS).
CVCS has only one single place where full version history of the software is maintained. In DVCS, every developer’s working copy of the code is also a repository that can contain the full history of all changes.
CVCS being centralized has single point of failure. If that server goes down for an hour, then during that hour nobody can collaborate at all or save versioned changes to anything they’re working on.
In a DVCS (such as Git, Mercurial, Bazaar or Darcs), clients don’t just check out the latest snapshot of the files: they fully mirror the repository. Thus if any server dies, and these systems were collaborating via it, any of the client repositories can be copied back up to the server to restore it. Every clone is really a full backup of all the data.
Furthermore, many of these systems deal pretty well with having several remote repositories they can work with, so you can collaborate with different groups of people in different ways simultaneously within the same project. This allows you to set up several types of workflows that aren’t possible in centralized systems, such as hierarchical models.[1]
2. Why Git?
While many VCS are in existence today, Git has fast picked up pace as a version control of choice especially by the open source programming community.
- Distributed – This is at the heart of Git and is a fundamental concept in Git. In CVCS like SVN, SVN keeps the track of all the changes in a central repository and all the clients contain no change history, if the master repository is lost all the history is lost. Git, on the other hand, is a DVCS. Every client has the complete history of all the changes.
- Speed (Fast branching and merging) – In Subversion, branch creation was easy but it used to get created as another directory. When you need to switch to a different branch, it is like switching to a different codebase which consumes a lot of time and also a lot of space on your local machine. Unlike SVN, Git contains just a single copy for all the branches and switching from one branch to another happens in a breeze; saves both time and space.
- Strong support for non-linear development (thousands of parallel branches) – Git stores all the information of different branches locally as well in a single copy and not creating a cloned copy for every branch results in a lot of space saving. Thus developers have come up with unique development models like creating a new branch for every enhancement and/or bugfix annotating them as such; thus making the release management process easier.
3. Installing Git Client
For the purpose of this tutorial we are going to use the following tools on a Windows 10 platform:
- Git Bash – It is the command line tool for Git. We will use all our commands for the purpose of this tutorial from this tool. The most official build is available for download on the Git website. Just go to http://git-scm.com/download/win and the download will start automatically. Note that this is a project called Git for Windows, which is separate from Git itself; for more information on it, go to https://git-for-windows.github.io/. You may refer this page for installation on other platforms. Please note, irrespective of the platform used, the git commands remain the same.
- GitHub – This is going to serve as the remote location where we will keep our code/files for this tutorial. Go to https://github.com/ and create an account. You can create public and private repositories here which can then be accessed from anywhere as long as you have an internet connection.
4. Git Commands
There are a lot of different ways to use Git. There are the original command line tools, and there are many graphical user interfaces of varying capabilities. This tutorial provides a succinct overview of the most important Git commands.
All the commands will be run in Git Bash.
Before beginning with the commands, let’s create our first repository on Github:
- Once you have created your account, you should see this page on https://github.com/.

Github Welcome Page - Click on “Start a project” and you will taken to screen with the following options.
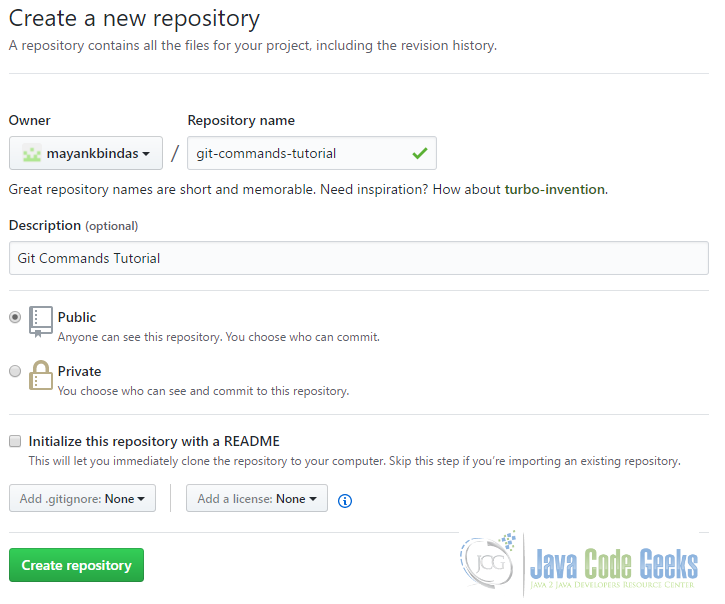
Create New Repository on Github - Put repository name as “git-commands-tutorial” and a description. You may mark the repository as public or private. If marked private, it will be accessible only to those you want to. Click on create repository, you will see screen like this.
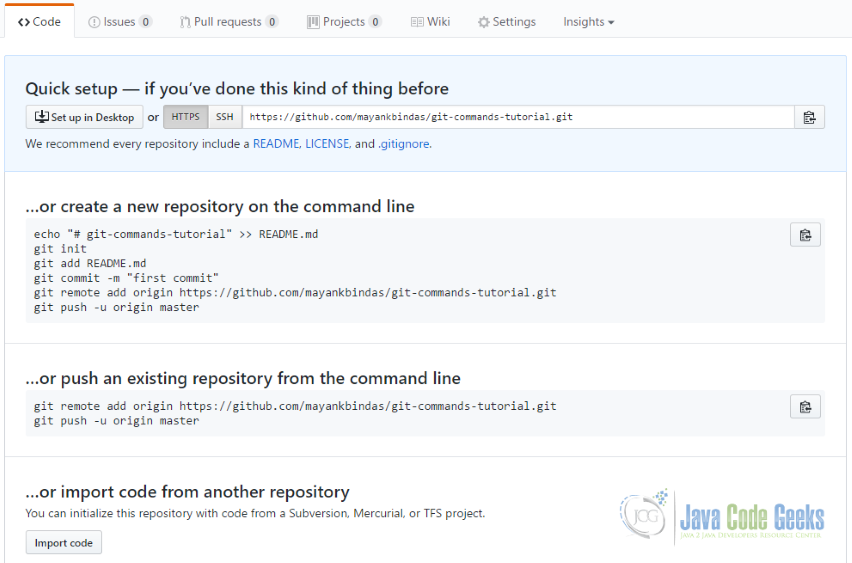
Repository Created Screen - Click on README link and it will take you to another page. Rename README.md to project-plan.txt. Scroll down a bit and put comments for the commit – “creating project-plan.txt”. Click “Commit New File” and your first commit to git repository will be there. We will later do the same through command.


4.1 Initial Git Configuration [git config]
Git comes with a tool called git config that lets you get and set configuration variables that control all aspects of how Git looks and operates.
The first thing you should do when you install Git is to set your user name and email address. This is important because every Git commit uses this information.
git config --global user.name "Mayank Gupta"

git config --global user.email "mayankbindas@gmail.com"
You can set global settings or project specific settings with the help of this command. If you want to override this with a different name or email address for specific projects, you can run the command without the --global option when you’re in that project.
If you want to check your settings, you can use the git config --list command to list all the settings Git can find at that point.
You can also check what Git thinks a specific key’s value is by typing git config <key>.
4.2 Asking Git for help [git help]
There are three ways to get the manual help page or manpage for any git command:
git help <verb>

git <verb> --help

man git-<verb>
For example, if we want help on config command, we have the following three options:
git help config

git config --help

man git-help
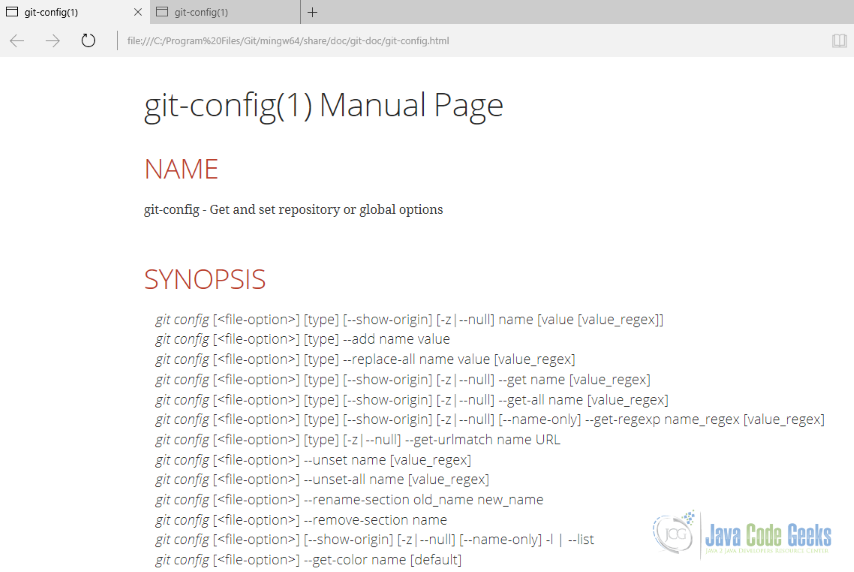
Try all of them out before proceeding further. Running this command on Windows will open a very long help page dedicated to this particular command in your default browser even if you are offline something like this.
4.3 Creating a new repository [git init]
git init is used to convert a project or a file system into a Git project. Go to an existing directory on your file system and type git init.
The git init command creates a new Git repository. It can be used to convert an existing, unversioned project to a Git repository or initialize a new empty repository.
Executing git init creates a .git subdirectory in the project root, which contains all of the necessary metadata for the repo. Aside from the .git directory, an existing project remains unaltered (unlike SVN, Git doesn’t require a .git folder in every subdirectory).
However, for most projects, git init only needs to be executed once to create a central repository—developers typically don’t use git init to create their local repositories.
Since we have created our project using Github, we will skip to run this command.
4.4 Checking out existing repository [git clone]
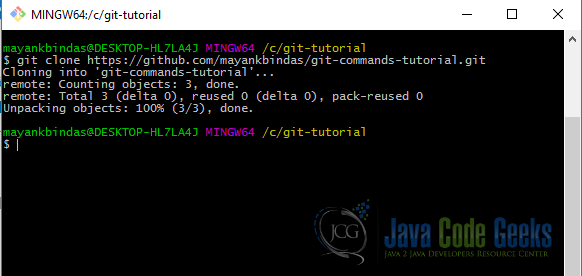
Create a folder called “git-repository” on your Windows machine. Go inside this folder and right click, you will see “Git Bash Here” as one of the option. Click on it. Git Bash will open and we will run all our git commands in it.
Type the following command and this will checkout our project created on github.
In the lifecycle of a project, git init, git clone are mostly one time operations. git config (with global settings) is also mostly a one time operation on your system.
4.5 Check the status of your project [git status]
Run git status in Git Bash. You will see an output like this

Running git status shows you which files are ignored (untracked files), which files are modified and needs to be committed. Currently we don’t have a clean directory with no modified tracked files and nop untracked files. We will continue to explore git status more as we use other commands.
Let’s create a new file called “README.txt” and run git status again.

README.txt is untracked file for now.
4.6 Start tracking new files [git add]
Untracked file means they are new files (weren’t present in the last snapshot or commit). Git won’t start tracking it unless it is explicitly told to do so. To start tracking new files, you run
git add README.txt
Git will start tracking changes to README.txt from now on. Let’s run git status now.
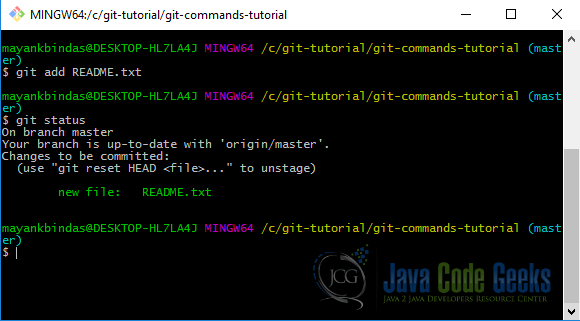
The git add command takes a path name for either a file or a directory; if it’s a directory, the command adds all the files in that directory recursively.
git add is also used to stage an existing file which was being tracked previously and has been modified. It is often called termed as “add this content to the next commit” rather than “add this file to the project”.
Let’s modify the project-plan.txt file by adding a new line “dummy project plan” to it. Let’s run git status now.
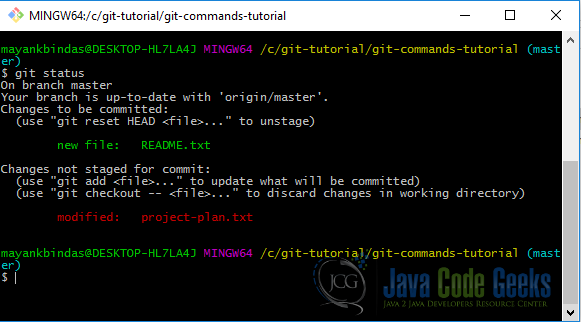
Run git add project-plan.txt and hit git status again
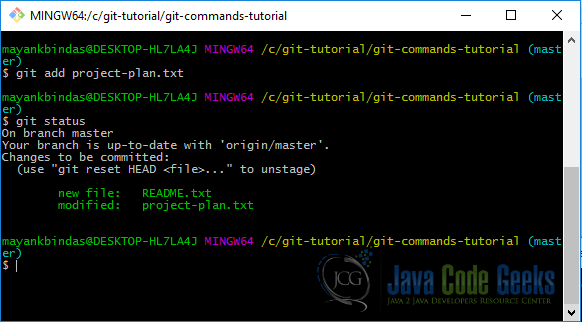
Suppose you modify any of these file again then you have to stage them again by running git add otherwise the last snapshot will be committed (this can be checked by running git status before a commit which is always a good idea). We have two staged files now which can be committed.
4.7 Files never to be committed [git ignore]
Create project.temp file in your local git project directory. This is the file which we want to keep on our local and never want to commit.
Run git status now, you will see an output like this
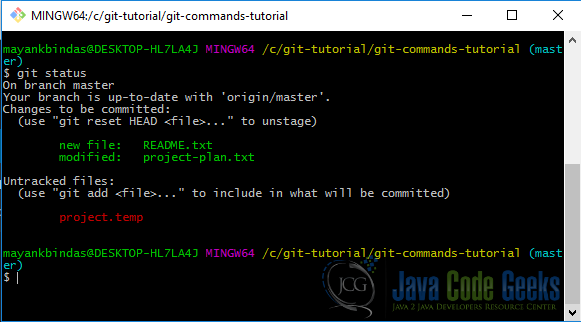
Git has tracked files and untracked files. There are some files (compiled code files, system generated temp files, build files etc.) which you may not ever want to check-in into the repository and also don’t want git to show you that they needs to be added.

cat .gitignore
*_
*.temp
First line tells git to ignore files ending with an underscore (_). Second line tells git to ignore files with temp extension.
NOTE: Windows don’t let you create .gitignore file. Manually create gitignore.txt and put ignore patterns there. Open Command window to this location and type ren gitignore.txt .gitignore and you are done.
The rules for the patterns you can put in the .gitignore file are as follows:[1]
- Blank lines or lines starting with # are ignored.
- Standard glob patterns work.
- You can start patterns with a forward slash (/) to avoid recursivity.
- You can end patterns with a forward slash (/) to specify a directory.
- You can negate a pattern by starting it with an exclamation point (!).
4.8 What exactly got changed [git diff]
Currently we have three files; one new addition, one modified and one that we want to ignore. Let’s run git status

If you want to know exactly what you changed, not just which files were changed – you can use the git diff command. This command compares what is in your working directory with what is in your staging area. The result tells you the changes you’ve made that you haven’t yet staged.
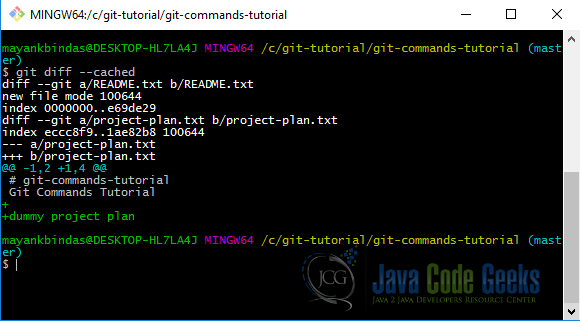
If you want to see what you’ve staged that will go into your next commit, you can use git diff –staged. This command compares your staged changes to your last commit:
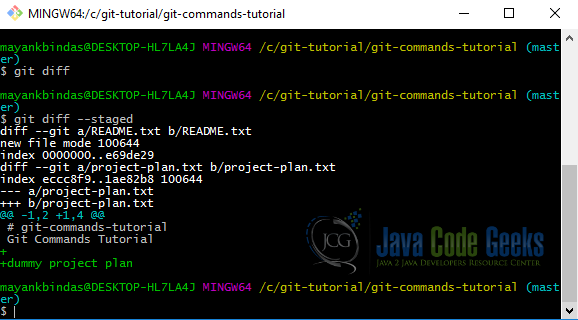
git diff by itself doesn’t show all changes made since your last commit – only changes that are still unstaged. This can be confusing, because if you’ve staged all of your changes, git diff will give you no output.
Run git diff –cached to see what you’ve staged so far.
4.9 Commit your changes [git commit]
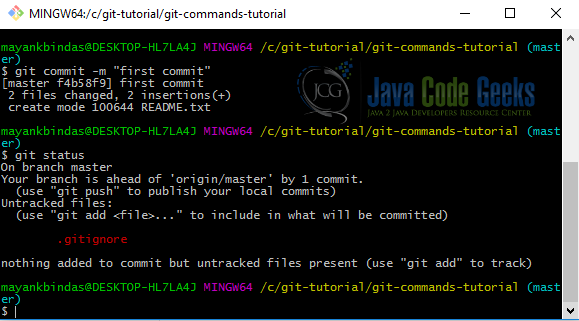
Remember that anything that is still unstaged – any files you have created or modified that you haven’t run git add on since you edited them – won’t go into this commit. Tha’s why it is always a good idea to run git status before you commit your changes.
To commit your changes run
git commit -m <commit_message>
git commit -m "first commit"
Commit creates a snapshot of the project’s changes which were staged by using git add command. Anything you didn’t stage is still sitting there modified; you can do another commit to add it to your history. Every time you perform a commit, you’re recording a snapshot of your project that you can revert to or compare to later.
Run git status again and you will again see a clean workarea.
4.10 Removing and Deleting tracked files [git rm]
There are two ways to delete files from your workarea and remove it from staging so that it won’t be tracked anymore:
1) Run git rm <filename> which will remove the file from being tracked and also from your working area.
2) Delete the file and then run git rm <filename>. Removing the file from your working directory will show the file as changed and not deleted. Hence, it is necessary to run git rm to remove it from being tracked.
Note, you have to run git commit in both the cases so that git stops tracking them.
You can use the same command even when you don’t want to delete the file but want to untrack it.
git rm --cached <filename>
4.11 Tracking renamed files [git mv]
If you rename a file, Git would have no idea that it happened. You would have to run git rm old_file and git add new_file. However, with this approach git would lose all the previous history of the old file. Run git mv <old_file> <new_file> to do it correctly. Try it as shown below.

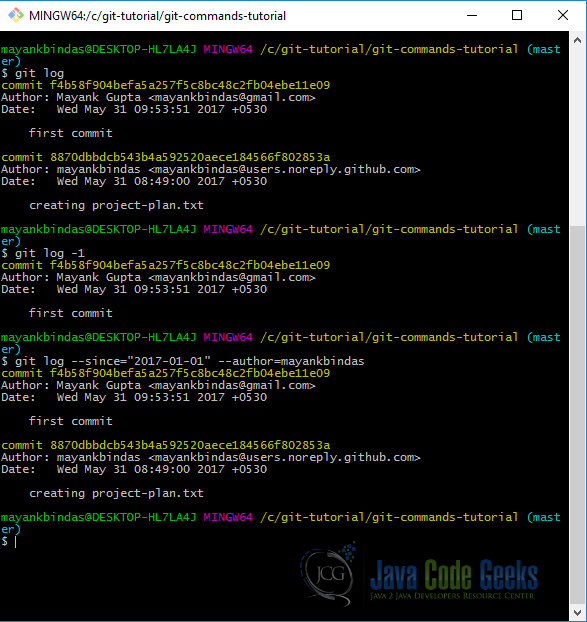
4.12 Show me the history [git log]
git log by default shows the commit history in the reverse chronological order. There are variety of options available to filter out the results.
For example, git log -3 will show you last 3 commits only. (git log -<n>). git log –since=2.weeks will show the commits made in the past 2 weeks.
You can also filter the list to commits that match some search criteria. The –author option allows you to filter on a specific author, and the –grep option lets you search for keywords in the commit messages. (Note that if you want to specify both author and grep options, you have to add –all-match or the command will match commits with either.)
4.13 Show me the remote location [git remote]
This command shows you from where you have cloned your repository. “origin” is the default name Git gives to the server you cloned your repository from.
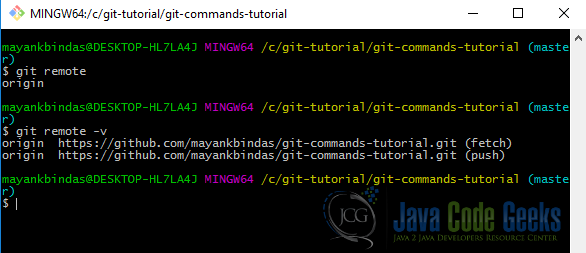
“-v” option shows the remote URL of the repository. Notice (fetch) and (pull) against the remote URL. This shows the permission the author has on the repository. Having both means you have write access to the remote repository.
4.14 Get Remote Data/Files [git fetch, git pull]
The syntax is like:
git fetch [remote-name]
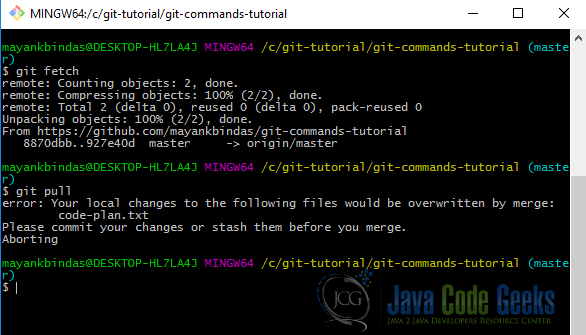
The command git fetch automatically adds the remote repository under the name “origin”. It’s the same as git fetch origin.
NOTE: git fetch only downloads the data to your local repository and doesn’t merge it with any file that has changed locally. The changes have to be merged manually.
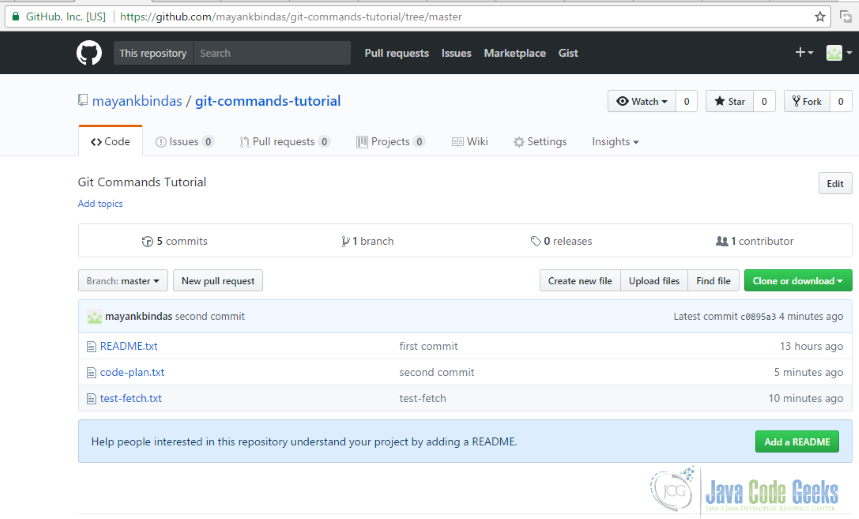
Running git pull merges the code as well. Let’s create a new file remotely on github “test-fetch.txt” and run git fetch.
4.15 Send local changes to remote [git push]
Unless you do a git push, all the changes wether staged or committed happens locally on your machine and remote is not aware of it. Git creates the snapshot for all these changes and you push this snapshot to the remote.
The command for this is: git push [remote-name] [branch-name]. If you want to push your master branch to your origin server, then you can run this to push any commits you’ve done back up to the server:
git push origin master
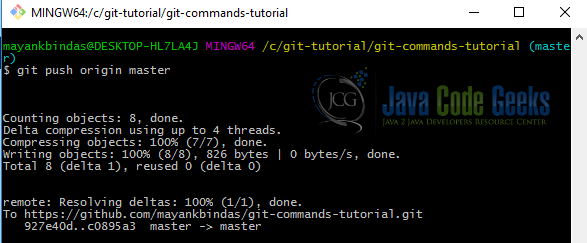
Now all our local changes should be pushed to remote and anyone else tracking our project from remote can pull these changes.
This is how remote repository looked like before pushing the changes:
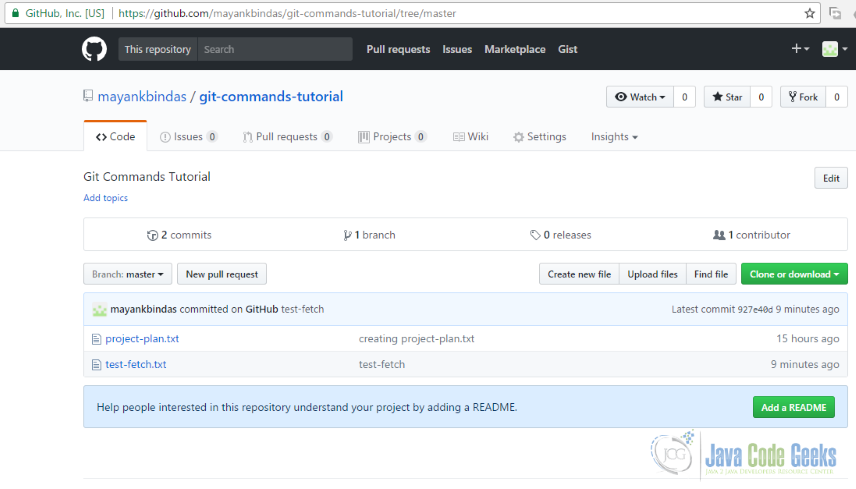
After pushing the changes:
NOTE: git push command will only work if you have write access on remote. Also, if there are changes on the remote that you don’t have locally, you would have to pull them first before pushing yours.
5. Summary
Here is a list of all the commands we learnt in this tutorial. Git has a very long list of commands. Here we have learnt the most important ones that can easily get you started with Git.
- Initial Git Configuration [git config]
- Asking Git for help [git help]
- Creating a new repository [git init]
- Checking out existing repository [git clone]
- Check the status of your project [git status]
- Start tracking new files [git add]
- Files never to be committed [git ignore]
- What exactly got changed [git diff]
- Commit your changes [git commit]
- Removing and Deleting tracked files [git rm]
- Tracking renamed files [git mv]
- Show me the history [git log]
- Show me the remote location [git remote]
- Get Remote Data/Files [git fetch, git pull]
- Send local changes to remote [git push]
6. References
- https://git-scm.com/book/en/v2/Getting-Started-About-Version-Control
- https://git-scm.com/book/en/v2/Getting-Started-Installing-Git
