1. What is RMI
In this article, we will talk about RMI java examples and remote procedure call. (Remote Method Invocation) is an object-oriented way of RPC (Remote Procedure Call) to realize communication between distributed objects in a distributed computing environment. It allows an object to invoke methods on a remote object.
Java RMI, a Java implementation of remote method invocation which is an object-oriented way of a remote procedure call, consists of several APIs under java.rmi package. It allows a Java program running on one Java virtual machine (client) to invoke methods on another Java virtual machine (server). Especially it supports transferring serialized Java objects from machine to machine over the network which makes automatic management of distributed objects come true. With the help of Java RMI, the complexity of working with local and remote objects becomes minimal. The type safety is preserved and distributed garbage collection (DGC) becomes possible.
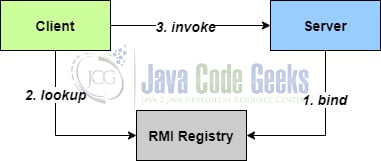
The diagram below shows the core components of Java RMI and how Java RMI works. We have simplified the diagram and will go through all the technical details in section 3 when building an example.
2. When is Java RMI used
From the diagram above we can see that Java RMI is basically a client-server model. It can be used when we want to communicate with different Java virtual machines. These Java virtual machines can be on different hosts or on the same host. In addition to the benefits mentioned in the previous section, one advantage of Java RMI is that we don’t need to re-invent the wheel. The business logic can be implemented and maintained in one place and be re-used in other places. But as the invocation process involves serialization/deserialization and network transport, it is slow and not very reliable. Unexpected errors such as network error could happen during the invocation.
3. Building a simple product information service by using Java RMI
Imagine we have a product inventory for an e-commerce website. The product inventory contains ten thousand products. Each of them has a unique id and name. Our staff needs to look up product information on different devices from different places such as desktops, mobile phones, or handheld terminals. To meet these requirements, we can build a product information server holding the lookup logic and product information clients deployed on different devices to look up product information from the server. Let’s start building it step by step using Java RMI.
3.1 Defining the Contract
In order to communicate between an RMI server and an RMI client, we need to define a contract known to both ends. Java interfaces are used for this purpose. RMI remote interfaces must extend java.rmi.Remote interface. The ProductInfoService interface defines methods we would like to expose to clients remotely. To make things simple, we define one method getProductInfoById(int id) which will return the product info by the given product Id. Note that the method must throw java.rmi.RemoteException.
ProductInfoService.java
public interface ProductInfoService extends Remote {
    /**
     * The name used in the RMI registry.
     */
    static final String SERVICE_NAME = "ProductInfoService";

    /**
     * Get product info by the given Id.
     *
     * @param id the product id
     * @return a ProductInfo instance
     * @throws RemoteException
     */
    ProductInfo getProductInfoById(int id) throws RemoteException;
}
3.2 Creating the Product Information Server
Once we have defined the contract, we can start building the Product Information server. There are two parts that need to be built: the service implementation and the RMI server.
In our example, the ProductInfoServiceImpl class implements ProductInfoService and extends java.rmi.server.UnicastRemoteObject class. By extending java.rmi.server.UnicastRemoteObject class, the ProductInfoServiceImpl can export a remote object with JRMP (Java Remote Method Protocol) and obtain a stub that communicates to the remote object. Firstly, we define a POJO ProductInfo with two fields: id and name. Note that ProductInfo must implement java.io.Serializable and we need to make sure the ProductInfo class on both server and client sides has the same serialVersionUID. Otherwise serialization and deserialization will fail during the remote invocation.
ProductInfo.java
public class ProductInfo implements Serializable {
    // important: make sure the class on both client and server sides have the same value
    private static final long serialVersionUID = 1L;

    private int id;

    private String name;

    /**
     * Constructor.
     *
     * @param id
     * @param name
     */
    public ProductInfo(int id, String name) {
        super();
        this.id = id;
        this.name = name;
    }

    /**
     * @return the id
     */
    public int getId() {
        return id;
    }

    /**
     * @param id the id to set
     */
    public void setId(int id) {
        this.id = id;
    }

    /**
     * @return the name
     */
    public String getName() {
        return name;
    }

    /**
     * @param name the name to set
     */
    public void setName(String name) {
        this.name = name;
    }

    @Override
    public String toString() {
        return "ProductInfo [id=" + id + ", name=" + name + "]";
    }

    @Override
    public int hashCode() {
        final int prime = 31;
        int result = 1;
        result = prime * result + id;
        result = prime * result + ((name == null) ? 0 : name.hashCode());
        return result;
    }

    @Override
    public boolean equals(Object obj) {
        if (this == obj)
            return true;
        if (obj == null)
            return false;
        if (getClass() != obj.getClass())
            return false;
        ProductInfo other = (ProductInfo) obj;
        if (id != other.id)
            return false;
        if (name == null) {
            if (other.name != null)
                return false;
        } else if (!name.equals(other.name))
            return false;
        return true;
    }
}
Then in the implementation of getProductInfoById(int id) method, we simply return a new ProductInfo instance with the id and the name.
ProductInfoServiceImpl.java
public class ProductInfoServiceImpl extends UnicastRemoteObject implements ProductInfoService {

    private static final long serialVersionUID = 1L;

    /**
     * Constructs the service.
     *
     * @throws RemoteException
     */
    protected ProductInfoServiceImpl() throws RemoteException {
        super();
    }

    /**
     * Get the product info by the given id.
     *
     * @param id the product id
     * @return a ProductInfo instance
     */
    public ProductInfo getProductInfoById(int id) throws RemoteException {
        return new ProductInfo(id, "Sample Product");
    }
}
The product information server will construct an instance of the ProductInfoService and registers it with the RMI registry. The RMI registry is a separate program shipped with the JDK and you can run it from the command line by typing rmiregistry. It will run at port 1099 by default. For your convenience, we will start the RMI registry programmatically on the localhost at port 1099. The RMI server will run for about 10 seconds waiting for any RMI request from clients. Then it will shut down the RMI registry and quit.
ProductInfoServer.java
public class ProductInfoServer {
    /**
     * @param args
     */
    public static void main(String[] args) {
        System.out.println("ProductInfoServer is starting...");

        try {
            // create a RMI registry on localhost at port 1099
            Registry registry = LocateRegistry.createRegistry(1099);

            System.out.println("RMI registry is running on port 1099");

            // create an instance of the service object
            ProductInfoService service = new ProductInfoServiceImpl();

            System.out.println("Binding ProductInfoService...");

            // bind it in the RMI registry
            registry.rebind(ProductInfoService.SERVICE_NAME, service);

            System.out.println("ProductInfoService is ready.");

            System.out.println("Wait for 10 seconds for any incoming client call before terminating the RMI registry...");

            // sleep 10 seconds
            Thread.sleep(10000);

            // unbind the service object
            registry.unbind(ProductInfoService.SERVICE_NAME);

            // remove the service object from the registry
            UnicastRemoteObject.unexportObject(service, true);

            System.out.println("Shutting down the RMI registry...");

            // shut down the registry
            UnicastRemoteObject.unexportObject(registry, true);

            System.out.println("ProductInfoServer has stopped.");
        } catch (Exception e) {
            e.printStackTrace();
            System.exit(-1);
        }
    }
}
Compile and run the product information server from the IDE or the command line, we can see the following output on standard output.
ProductInfoServer is starting...
RMI registry is running on port 1099
Binding ProductInfoService...
ProductInfoService is ready.
Wait for 10 seconds for any incoming client call before terminating the RMI registry...
Shutting down the RMI registry...
ProductInfoServer has stopped.
3.3 Creating an RMI Client
After the product information server is up and running, how can we use the product information service provided by the server? An RMI client comes into play. We create an RMI client named ProductInfoClient to locate the remote service object and call its method. In the client we use java.rmi.Naming class to obtaining a reference to the ProductInfoService remote object in the RMI registry running on the localhost at port 1099. Then we can simply call the getProductInfoById(int id) method with an id “123” and print the returned product information to standard output.
ProductInfoClient.java
public class ProductInfoClient {
    /**
     * @param args
     */
    public static void main(String[] args) {
        try {
            System.out.println("ProductInfoClient> get product info with id '123'...");
            // looks up the registry by service name and returns a stub
            ProductInfoService productInfoService = (ProductInfoService) Naming.lookup(ProductInfoService.SERVICE_NAME);
            // invoke the remote method via the stub
            ProductInfo productInfo = productInfoService.getProductInfoById(123);
            System.out.println("ProductInfoClient> production info received: " + productInfo.toString());
        } catch (Exception e) {
            System.err.println("ProductInfoClient> RemoteDate exception: " + e.getMessage());
            e.printStackTrace();
        }
    }
}
Compile and run the product information client from the IDE or the command line, we can see the following output on standard output.
ProductInfoClient> get product info with id '123'...
ProductInfoClient> production info received: ProductInfo [id=123, name=Sample Product]
4. Java RemoteException
Since there is a chance of network issues during remote invocations, an exception named RemoteException may occur. If the method invocation results in an exception being thrown, the exception is indicated to the caller. For more information about Java RMI RemoteException and how to handle it properly, please see this example: java.rmi.RemoteException – How to solve RemoteException
5. Download the Source Code
You can download the full source code of this example here: Java RMI – Java Remote Method Invocation Example

Thank you very useful for the updated information.