This article is a beginner’s tutorial on Java NIO (New IO). We will take a high-level look at this API which provides an alternative to Java IO. The Java NIO API can be viewed here. The example code demonstrates the use of the core abstractions in this topic.
Java nio tutorials examples in this article was built and run using:
- Java 1.8.101 (1.8.x will do fine)
- Maven 3.3.9 (3.3.x will do fine)
- Spring source tool suite 4.6.3 (Any Java IDE would work)
- Ubuntu 16.04 (Windows, Mac or linux)
1. Introduction
Since Java 1.4 the Java NIO API has provided an alternate method of dealing with IO operations. Why did we need an alternate method for doing IO? As time progresses new problem sets arrive and new approaches to solving these problems are thought of. To understand the need for an alternate means of IO handling one should probably understand the core differences between the two approaches.
IO |
NIO |
|---|---|
| Core differences: | Core differences: |
| Stream oriented processing | Uses buffers |
| Blocking in processing | Non blocking in processing |
| Good for: | Good for: |
| High data volume with low simultaneous open file descriptor counts
(eg: less client connections with more data chunks per connection) |
Less data volume with high simultaneous open file descriptor counts
(eg: More connections with smaller / infrequent “chunks” of data) |
NIO puts us in a position to make more judicious use of server / machine resources. By bringing us closer to the metal with an intelligent selection of abstractions we are able to better apply finite server resources to meet the increasing demands of modern day scale.
2. Java NIO
A quick glance at the summary of the Java NIO API reveals to us the core abstractions one should be familiar with when working with Java NIO. These are:
- Buffers : A container to hold data for the purposes of reading and or writing.
- Channels : An abstraction for dealing with an open connection to some component that is performing some kind of IO operation at a hardware level.
- Charsets : Contains charsets, decoders and encoders for translating between bytes and unicode.
- Selectors : A means to work with multiple channels via one abstraction.
2.1 Buffers
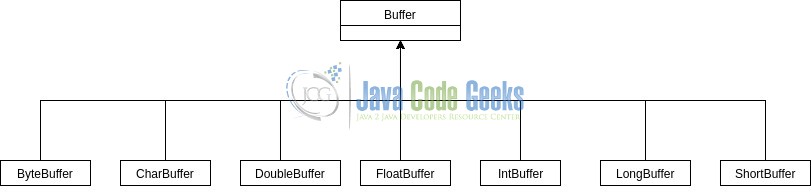
A Buffer is a container for a fixed size of data of a specific primitive type (char, byte, int, long, float etc). A Buffer has content, a position, a limit and capacity. It can flip, rewind, mark and reset its position reinforcing the core differences between NIO and IO (buffer vs stream).
- Capacity = number of elements it contains.
- Limit = index of element that must not be read or written.
- Position = index of next element to read or write.
- Flip = invert position and limit when toggling the IO operation on a Buffer. (eg: write out to console what we just read from a Channel into the Buffer).
- Rewind = sets position to 0 and leaves limit unchanged in order to re-read the Buffer.
- Mark = bookmarks a position in the Buffer.
- Reset = resets the position to the previous mark.
What does all that mean? Well basically we put content into a Buffer (either read it from a Channel or put it directly into the Buffer with the intent to write it to a Channel).
We then advance the cursor through the content of the Buffer as we read or write. We flip a Buffer to change our IO operation on the Buffer (ie: go from reading to writing).
The capacity represents the total capacity the Buffer can hold with regard to content. The actual metric used for measurement depends on the type of the Buffer. (eg: CharBuffer capacity measured in characters and ByteBuffer capacity measured in Bytes).
2.1.1 Java nio tutorial Example usage of a ByteBuffer
Reading from Channel into ByteBuffer
|
01
02
03
04
05
06
07
08
09
10
11
|
... final ByteBuffer buffer = createBuffer(); while (fileChannel.read(buffer) != -1) { contents.append(new String(buffer.array())); buffer.clear(); } ... private ByteBuffer createBuffer() { return ByteBuffer.allocate(BYTE_BUFFER_LENGTH); }... |
- line 2: A ByteBuffer is created with a defined capacity. (BYTE_BUFFER_LENGTH)
- line 3: Data is read from the specified FileChannel into the ByteBuffer.
- line 4: The ByteBuffer’s current contents are added to the StringBuilder. This is done via convenience method
array()as a result of the way the ByteBuffer was created in the example (viaallocate()). - line 5: The ByteBuffer is cleared to prepare for reading more data from the channel, this will set the position cursor back to 0 and allow contents to be read from the FileChannel back into the ByteBuffer repeating the process until no more data is available.
Alternate method for reading from Channel into ByteBuffer
|
1
2
3
4
5
6
7
8
|
... buffer.flip(); if (buffer.hasRemaining()) { byte [] src = new byte[buffer.limit()]; buffer.get(src); contents.append(new String(src)); } .... |
- line 2: Invert the position and limit of the Buffer to retrieve what has been read from the Channel.
- line 3: Ensure there is something to read, ie: The difference between limit and position is > 0.
- line 4: Create a byte array to be the size of the data in the Buffer.
- line 5: Retrieve the contents of the Buffer into the byte array.
- line 6: Create a String array from the contents of the byte array.
It is important to also note that the instantiation of a new String to hold the bytes implicitly uses the default Charset to decode the bytes from their byte values to their corresponding unicode characters. If the default Charset was not what we were looking for, then instantiating a new String with the appropriate Charset would be required.
2.2 Channels

A Channel is a proxy (open connection proxy) to a component that is responsible for native IO (file or network socket). By acting as a proxy to some native IO component we are able to write and / or read from a Channel. Some Channel implementations allow us to put them into non-blocking mode allowing read and write operations to be non-blocking. The same Channel can be used for both reading and writing.
A Channel is open upon creation and remains that way until it is closed.
2.2.1 Example usage of a FileChannel
Creating a FileChannel
|
1
2
3
4
5
6
|
...final File file = new File(FileChannelReadExample.class.getClassLoader().getResource(path).getFile());return fileOperation == FileOperation.READ ? new FileInputStream(file).getChannel() : new FileOutputStream(file).getChannel();... |
- line 3: Create a File Object
- line 4: Depending on the type of File operation (read or write) we create the necessary Stream and get the Channel from the Stream.
2.3 Charsets
A Charset is a mapping between 16 bit unicode characters and bytes. Charsets work with decoders and encoders which facilitate the adaption from bytes to characters and vice versa.
- Encoding: The process of transforming a sequence of characters into bytes
- Decoding: The process of transforming bytes into character buffers.
Charset provides other utility methods for looking up a Charset by name, creating coders (encoder or decoders) and getting the default Charset. Typically when one works with ByteBuffer and String as is the case in the example, the default Charset is what we would normally use if we do not explicitly specify one. This would suffice most of the time.
Charset usage
|
01
02
03
04
05
06
07
08
09
10
11
12
13
|
...final Charset defaultCharset = Charset.defaultCharset();final String text = "Lorem ipsum"; final ByteBuffer bufferA = ByteBuffer.wrap(text.getBytes()); final ByteBuffer bufferB = defaultCharset.encode(text); final String a = new String(bufferA.array());final CharBuffer charBufferB = defaultCharset.decode(bufferB); System.out.println(a);System.out.println(new String(charBufferB.array()));... |
- line 2: The default Charset is retrieved.
- line 5: The sample text is wrapped in a ByteBuffer. The default Charset is used implicitly when encoding the characters into bytes.
- line 6: The sample text is encoded explicitly using the default Charset encoder.
- line 8: A String is created using the default Charset decoder implicitly .
- line 9: A Character Buffer (ultimately a String) is created using the default Charset decoder explicitly.
2.4 Selectors
Selectors as the name implies, select from multiple SelectableChannel types and notify our program when IO has happened on one of those channels. It is important to note that during the registration process (registering a SelectableChannel with a Selector) we declare the IO events we are interested in, termed the “interest set” This can be:
- Connect
- Accept
- Read
- Write
With this proxy in place and the added benefit of setting those SelectableChannel types into non-blocking mode we are able to multiplex over said channels in a very efficient way, typically with very few threads, even as little as one.
Selector usage with SelectableChannel
|
01
02
03
04
05
06
07
08
09
10
11
12
13
14
15
|
try (final Selector selector = Selector.open(); final ServerSocketChannel serverSocket = ServerSocketChannel.open();) { final InetSocketAddress hostAddress = new InetSocketAddress(Constants.HOST, Constants.PORT); serverSocket.bind(hostAddress); serverSocket.configureBlocking(false); serverSocket.register(selector, serverSocket.validOps(), null); while (true) { final int numSelectedKeys = selector.select(); if (numSelectedKeys > 0) { handleSelectionKeys(selector.selectedKeys(), serverSocket); } }} |
- line 1: We create a Selector using the systems default SelectorProvider.
- line 2: We create a ServerSocketChannel which is a SelectableChannel.
- line 6: We configure the ServerSocketChannel for non-blocking mode.
- line 7: We then register the ServerSocketChannel with the Selector, we receive a SelectionKey from the registration although I discard it, having no use for it. The
serverSocket.validOps()call will return an operation set that is supported by the Channel, which in this case is only the “Accept Connection” event. The returned SelectionKey contains an “interest set” which indicates the set of IO events the Selector must monitor the Channel for. - line 10: We call
select()on the Selector which is blocking until some IO occurs on any of the SelectableChannel instances that are registered with it. It will return the number of keys which are ready for IO activity.
The following code snippet demonstrates iterating through all the SelectionKey instances that indicate IO “ready” events from Channel instances managed by the single Selector. We are only interested in “Accept” and Readable” events. For every new connection accepted an “Accept” event is signaled and we can act on it. Likewise with a “read” ready event we can read incoming data. It is important to remove the SelectionKey from the set after handling it, as the Selector does not do this and you will continue to process that stale event.
Working with SelectionKeys
|
01
02
03
04
05
06
07
08
09
10
11
12
13
14
|
final Iterator<SelectionKey> selectionKeyIterator = selectionKeys.iterator();while (selectionKeyIterator.hasNext()) { final SelectionKey key = selectionKeyIterator.next(); if (key.isAcceptable()) { acceptClientSocket(key, serverSocket); } else if (key.isReadable()) { readRequest(key); } else { System.out.println("Invalid selection key"); } selectionKeyIterator.remove();} |
- line 13: Remember to remove the SelectionKey from the selected set as the Selector does not do this for us, if we don’t do it, we will continue to process stale events.
The following code snippet demonstrates the use of registration of a SocketChannel with the same Selector that manages the ServerSocketChannel. Here, however, the interest set is only for IO “read” events.
Registering a Channel with a Selector
|
1
2
3
|
final SocketChannel client = serverSocket.accept();client.configureBlocking(false);client.register(key.selector(), SelectionKey.OP_READ); |
3. Summary
In this beginners tutorial we understood some of the differences between IO and NIO and reasons for NIO’s existence and applicability. We have also covered the 4 main abstractions when working with NIO. Those are:
- Buffers
- Channels
- Selectors
- Charsets
We have seen how they can be used and how they work in tandem with each other. With this tutorial in hand, you understand the basics of creating Channels and using them with Buffers. How to interact with Buffers and the rich API it provides for traversing buffer content. We have also learnt how to register Channels with Selectors and interact with the Selector via its SelectionKey abstraction.
4. Working with Java NIO tutorial example source code
The source code contains the following examples:
- Charset example.
- FileChannel example. This example reads from a classpath resource file
src/main/resources/file/input.txtand writes a String literal to a classpath resourcesrc/main/resources/file/output.txt.Be sure to check the foldertarget/classes/filewhen wanting to view the output of the write example. - Client Server example. Start the server first, then start the client. The client will attempt 10 connections to the server and write the same text 10 times to the server which will simply write the contents to console.
5. Download the source code
This was a Java Nio Tutorial for Beginners Example.
You can download the full source code of this example here: Java Nio tutorial for beginners
Last updated on May 27th, 2020
