The grid layout Java represents a layout manager with a specified number of rows and columns. Every rectangle cell at Gridlayout java has the same size and contains a component, which fills in the entire size of the cell. In this example, we are going to design a simple calculator using GridLayout, where the grid will contain simple components.
1. Syntax of the Java GridLayout
GridLayout has two constructors:
GridLayout():empty constructor with one column and as many rows as the components.GridLayout(int rows, int cols):a constructor with specified rows and columns.GridLayout(int rows, int cols, int hgap, int vgap):a constructor with specified rows, columns, horizontal and vertical gaps.
The arguments that are used are:
rows:is the number of rows in the grid.cols:represents the number of columns in the grid.hgap:is the horizontal space between the cells.vgap:is the vertical space between the cells
2. Grid Layout Java example
Before showing how to implement a GridLayout, it is important to mention that we should initialize a Jframe, which is the window that contains the components.
Create GridLayoutTest.java file and paste the following code.
GridLayoutTest.java
|
01
02
03
04
05
06
07
08
09
10
11
12
13
14
15
16
17
18
19
20
21
22
23
24
25
26
27
28
29
30
31
32
33
34
35
36
37
38
39
40
41
42
43
44
45
46
|
package com.javacodegeeks.desktop.gridlayout;import java.awt.GridLayout;import javax.swing.JButton;import javax.swing.JFrame;import javax.swing.JTextArea;public class GridLayoutTest { private static JButton[] arrayBtn; public static void main(String[] args) { // the frame that contains the components JFrame frame = new JFrame("GridLayoutTest from JCG"); frame.setDefaultCloseOperation(JFrame.EXIT_ON_CLOSE); // set the size of the frame frame.setSize(350, 350); // set the rows and cols of the grid, as well the distances between them GridLayout grid = new GridLayout(5, 3, 10, 10); // what layout we want to use for our frame frame.setLayout(grid); // add a text field with a specified text to the frame JTextArea text = new JTextArea(); text.setText("Result"); text.setEditable(false); frame.add(text); // add buttons to the frame frame.add(new JButton("+")); frame.add(new JButton("=")); arrayBtn = new JButton[10]; // add JButtons dynamically for(int i=0; i < arrayBtn.length; i++) { arrayBtn[i] = new JButton(Integer.toString(i)); frame.add(arrayBtn[i]); } frame.setVisible(true); }} |
Lets explain the code above. After we instantiate and set Jframe, we create the GridLayout by declaring its rows, columns and its horizontal and vertical gaps. After that we set the instantiated GridLayout as the layout of our container by calling setLayout() method. In order to include the components to our layout, we have to add them to the JFrame and not to the GridLayout. In our example we add some components (JtextArea and JButton) directly to the frame and some others dynamically, as an array of that type (array of JButtons).
The execution of this example is shown in the next image.
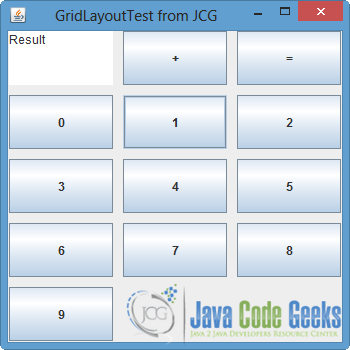
You can notice that the orientation of the components is horizontal and left-to-right, because that is the default value of the ComponentOrientation property.
3. Download the source code
This was an example of Grid Layout in Java.
Download the source code of this example: Java GridLayout Example
Last updated on May 8th, 2020
