Vaadin Https Setup Example
HTTPS is a protocol for secure communication over a computer network which is widely used on the Internet. HTTPS consists of communication over Hypertext Transfer Protocol (HTTP) within a connection encrypted by Transport Layer Security or its predecessor, Secure Sockets Layer.
1. The tools
- Java JDK 8
- Latest Eclipse Mars
- Vaadin 7.6.6
- Tomcat Server 8
2. Introduction
Vaadin UI is inherited from a servlet or a portlet class and you can distribute your application as a WAR file or Web application ARchive. This WAR is a JAR file used to distribute a collection of Java Servlets, Java classes, XML files, tag libraries, static web pages and other resources that together constitute a web application.
3. Prerequisites
- JDK installed
- Eclipse Mars installed and working
- Vaadin plug-in installed
- Tomcat 8 installed and running
4. Set up the project
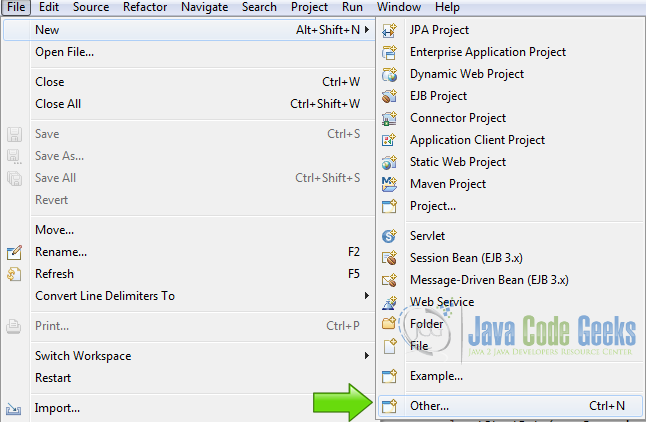
In the file menu choose File -> New -> Other
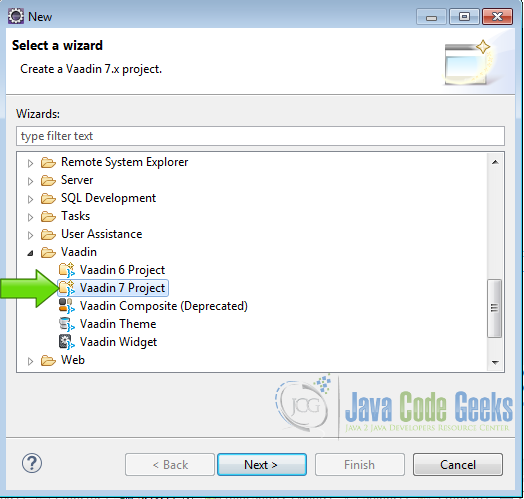
Now from the list choose Vaadin 7 project
Hit next and name your project then hit finish.
5. Coding the example
5.1 Production mode
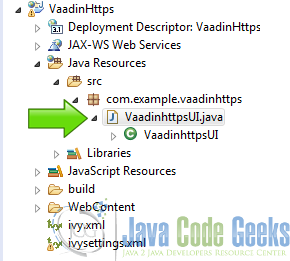
Edit the generated UI file [project-name]->[Java Resources]->[src]->[package-name]->[UI-file]
In this file we are going to change the productionMode servlet parameter to true.
UI file
package com.example.vaadinhttps;

import javax.servlet.annotation.WebServlet;

import com.vaadin.annotations.Theme;
import com.vaadin.annotations.VaadinServletConfiguration;
import com.vaadin.server.VaadinRequest;
import com.vaadin.server.VaadinServlet;
import com.vaadin.ui.Button;
import com.vaadin.ui.Button.ClickEvent;
import com.vaadin.ui.Label;
import com.vaadin.ui.UI;
import com.vaadin.ui.VerticalLayout;

@SuppressWarnings("serial")
@Theme("vaadinhttps")
public class VaadinhttpsUI extends UI {

	@WebServlet(value = "/*", asyncSupported = true)
	@VaadinServletConfiguration(productionMode = true, ui = VaadinhttpsUI.class)
	public static class Servlet extends VaadinServlet {
	}

	@Override
	protected void init(VaadinRequest request) {
		final VerticalLayout layout = new VerticalLayout();
		layout.setMargin(true);
		setContent(layout);

		Button button = new Button("Click Me");
		button.addClickListener(new Button.ClickListener() {
			public void buttonClick(ClickEvent event) {
				layout.addComponent(new Label("Thank you for clicking"));
			}
		});
		layout.addComponent(button);
	}

}
5.2 Compile the Vaadin Widgetset
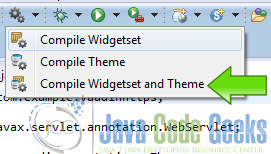
Compile the Vaadin Widgetset and theme. In the eclipse toolbar click in the Vaadin button and click on Compile Widgetset and Theme.
You should get the following output in the console.
Compile widgetset and theme
   Compiling 1 permutation
      Compiling permutation 0...
   Compile of permutations succeeded
   Compilation succeeded -- 124,423s
Link succeeded
   Linking succeeded -- 0,812s
5.3 Export WAR file
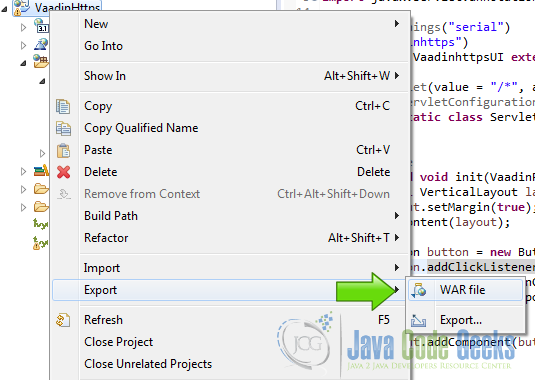
Right click on the project folder and choose Export->WAR File
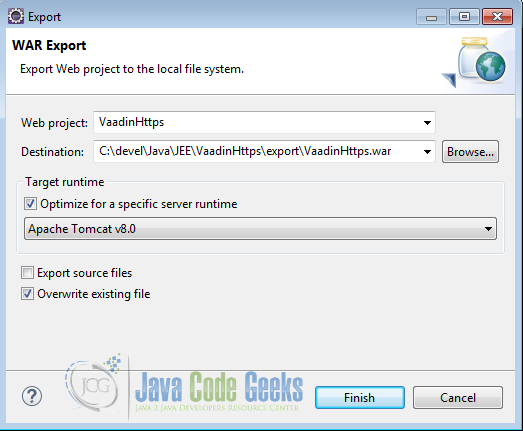
Choose the destination folder and the server runtime, in this case we are going to use Tomcat 8.
5.4 Define tomcat user
Edit the file [Tomcat install dir]->conf->tomcat-users.xml
In this file we are going to create a username and a password to access the tomcat web admin.
If you didn’t define the user, add the following lines to the end of the xml file, inside the tomcat-users tag.
Tomcat Users
  <role rolename="admin"/>
  <role rolename="admin-gui"/>
  <role rolename="manager-gui"/>
  <user password="admin" roles="admin,admin-gui,manager-gui" username="admin"/>
We defined the user admin with the password admin, this user is only for the purpose of this tutorial.
5.5 Start Tomcat
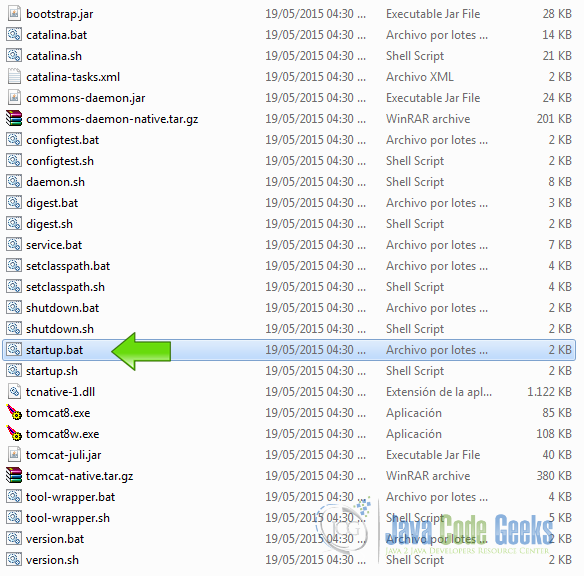
Start tomcat using the provided startup script in the tomcat bin directory, in Windows the script is startup.bat, in Linux and Mac is startup.sh
when you start tomcat a console log file is displayed:
Tomcat log
18-Jun-2016 13:34:22.356 INFO [localhost-startStop-1] org.apache.catalina.startup.HostConfig.deployDescriptor Deployment of configuration descriptor C:\Java\apache-tomcat-8.0.23\conf\Catalina\localhost\WebAppNB.xml has finished in 33 ms
18-Jun-2016 13:34:22.389 INFO [localhost-startStop-1] org.apache.catalina.startup.HostConfig.deployDirectory Despliegue del directorio C:\Java\apache-tomcat-8.0.23\webapps\docs de la aplicaci¾n web
18-Jun-2016 13:34:23.083 INFO [localhost-startStop-1] org.apache.catalina.util.SessionIdGeneratorBase.createSecureRandom Creation of SecureRandom instance for session ID generation using [SHA1PRNG] took [176] milliseconds.
18-Jun-2016 13:34:23.166 INFO [localhost-startStop-1] org.apache.catalina.startup.HostConfig.deployDirectory Deployment of web application directory C:\Java\apache-tomcat-8.0.23\webapps\docs has finished in 777 ms
18-Jun-2016 13:34:23.168 INFO [localhost-startStop-1] org.apache.catalina.startup.HostConfig.deployDirectory Despliegue del directorio C:\Java\apache-tomcat-8.0.23\webapps\examples de la aplicaci¾n web
18-Jun-2016 13:34:25.619 INFO [localhost-startStop-1] org.apache.catalina.startup.HostConfig.deployDirectory Deployment of web application directory C:\Java\apache-tomcat-8.0.23\webapps\examples has finished in 2.451 ms
18-Jun-2016 13:34:25.620 INFO [localhost-startStop-1] org.apache.catalina.startup.HostConfig.deployDirectory Despliegue del directorio C:\Java\apache-tomcat-8.0.23\webapps\host-manager de la aplicaci¾n web
18-Jun-2016 13:34:25.719 INFO [localhost-startStop-1] org.apache.catalina.startup.HostConfig.deployDirectory Deployment of web application directory C:\Java\apache-tomcat-8.0.23\webapps\host-manager has finished in 99 ms
18-Jun-2016 13:34:25.722 INFO [localhost-startStop-1] org.apache.catalina.startup.HostConfig.deployDirectory Despliegue del directorio C:\Java\apache-tomcat-8.0.23\webapps\manager de la aplicaci¾n web
18-Jun-2016 13:34:25.833 INFO [localhost-startStop-1] org.apache.catalina.startup.HostConfig.deployDirectory Deployment of web application directory C:\Java\apache-tomcat-8.0.23\webapps\manager has finished in 111 ms
18-Jun-2016 13:34:25.835 INFO [localhost-startStop-1] org.apache.catalina.startup.HostConfig.deployDirectory Despliegue del directorio C:\Java\apache-tomcat-8.0.23\webapps\ROOT de la aplicaci¾n web
18-Jun-2016 13:34:25.930 INFO [localhost-startStop-1] org.apache.catalina.startup.HostConfig.deployDirectory Deployment of web application directory C:\Java\apache-tomcat-8.0.23\webapps\ROOT has finished in 95 ms
18-Jun-2016 13:34:25.937 INFO [main] org.apache.coyote.AbstractProtocol.start Starting ProtocolHandler ["http-apr-8080"]
18-Jun-2016 13:34:25.981 INFO [main] org.apache.coyote.AbstractProtocol.start Starting ProtocolHandler ["ajp-apr-8009"]
18-Jun-2016 13:34:25.985 INFO [main] org.apache.catalina.startup.Catalina.start
Server startup in 4475 ms
In this log you can see the port that tomcat is using to start the server. In this case the port is 8080 as stated here 18-Jun-2016 13:34:25.937 INFO [main] org.apache.coyote.AbstractProtocol.start Starting ProtocolHandler ["http-apr-8080"]
5.6 Test Tomcat
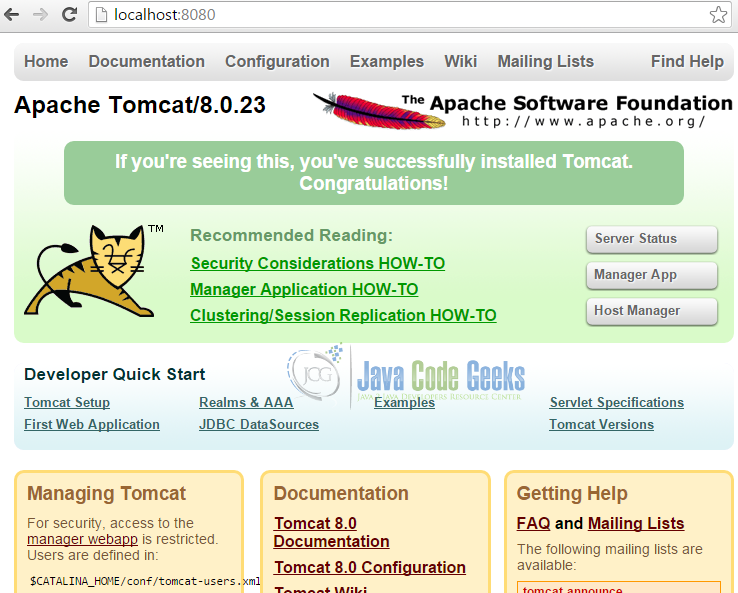
Open your browser in the URL http://localhost:8080 and you should see the following page:
5.7 Add the Vaadin Application
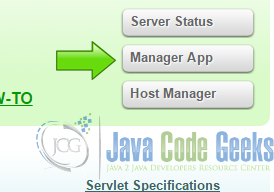
Click on Manager App
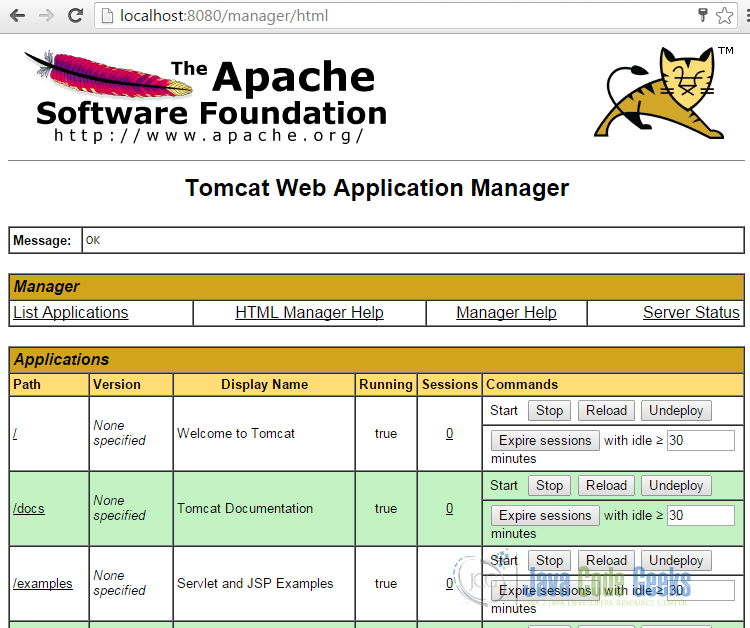
Write the username and the password defined before and you should see the following page:
Scroll down the page to the section WAR file to deploy, click on Select File, find the Vaadin War file created before, select it and then click on Deploy.
Now you can see the Vaadin file deployed under the Applications section.

5.8 Create a SSL Certificate
Run the following command to generate the certificate to make Tomcat support SSL.
Generate Certificate
keytool -genkey -alias tomcat -keyalg RSA -keystore C:\Java\apache-tomcat-8.0.23\keystore\tomcat
The tool is going to ask some questions to feed the certificate.
The certificate is going to be in the folder C:\Java\apache-tomcat-8.0.23\keystore\ and the name of the certificate is tomcat.
You Can check the certificate with the command keytool -list -keystore C:\Java\apache-tomcat-8.0.23\keystore\tomcat
5.9 Use the certificate in Tomcat
Edit the file [Tomcat Dir]->conf->server.xml and add a SSL connector.
Connector
    <Connector port="8443" protocol="org.apache.coyote.http11.Http11NioProtocol"
               maxThreads="150" SSLEnabled="true" scheme="https" secure="true"
               clientAuth="false" sslProtocol="TLS"
			   keystoreFile="C:\Java\apache-tomcat-8.0.23\keystore\tomcat"
	           keystorePass="changeit" />
Restart tomcat and you are done.
Now you can run your Vaadin Application using HTTPS.
6. The complete source code
tomcat-users.xml
<?xml version="1.0" encoding="UTF-8"?>
<tomcat-users xmlns="http://tomcat.apache.org/xml" xmlns:xsi="http://www.w3.org/2001/XMLSchema-instance" version="1.0" xsi:schemaLocation="http://tomcat.apache.org/xml tomcat-users.xsd">
  <role rolename="admin"/>
  <role rolename="admin-gui"/>
  <role rolename="manager-gui"/>
  <user password="admin" roles="admin,admin-gui,manager-gui" username="admin"/>
</tomcat-users>
server.xml
<?xml version='1.0' encoding='utf-8'?>
<Server port="8005" shutdown="SHUTDOWN">
  <Listener className="org.apache.catalina.startup.VersionLoggerListener"/>
  <Listener SSLEngine="on" className="org.apache.catalina.core.AprLifecycleListener"/>
  <Listener className="org.apache.catalina.core.JreMemoryLeakPreventionListener"/>
  <Listener className="org.apache.catalina.mbeans.GlobalResourcesLifecycleListener"/>
  <Listener className="org.apache.catalina.core.ThreadLocalLeakPreventionListener"/>
  <GlobalNamingResources>
    <Resource auth="Container" description="User database that can be updated and saved" factory="org.apache.catalina.users.MemoryUserDatabaseFactory" name="UserDatabase" pathname="conf/tomcat-users.xml" type="org.apache.catalina.UserDatabase"/>
  </GlobalNamingResources>
  <Service name="Catalina">
    <Connector connectionTimeout="20000" port="8080" protocol="HTTP/1.1" redirectPort="8443"/>
    <Connector port="8443" protocol="org.apache.coyote.http11.Http11NioProtocol"
               maxThreads="150" SSLEnabled="true" scheme="https" secure="true"
               clientAuth="false" sslProtocol="TLS"
			   keystoreFile="C:\Java\apache-tomcat-8.0.23\keystore\tomcat"
	           keystorePass="changeit" />
    <Connector port="8009" protocol="AJP/1.3" redirectPort="8443"/>
    <Engine defaultHost="localhost" name="Catalina">
      <Realm className="org.apache.catalina.realm.LockOutRealm">
        <Realm className="org.apache.catalina.realm.UserDatabaseRealm" resourceName="UserDatabase"/>
      </Realm>
      <Host appBase="webapps" autoDeploy="true" name="localhost" unpackWARs="true">
        <Valve className="org.apache.catalina.valves.AccessLogValve" directory="logs" pattern="%h %l %u %t "%r" %s %b" prefix="localhost_access_log" suffix=".txt"/>

      </Host>
    </Engine>
  </Service>
</Server>
VaadinhttpsUI.java
package com.example.vaadinhttps;

import javax.servlet.annotation.WebServlet;

import com.vaadin.annotations.Theme;
import com.vaadin.annotations.VaadinServletConfiguration;
import com.vaadin.server.VaadinRequest;
import com.vaadin.server.VaadinServlet;
import com.vaadin.ui.Button;
import com.vaadin.ui.Button.ClickEvent;
import com.vaadin.ui.Label;
import com.vaadin.ui.UI;
import com.vaadin.ui.VerticalLayout;

@SuppressWarnings("serial")
@Theme("vaadinhttps")
public class VaadinhttpsUI extends UI {

	@WebServlet(value = "/*", asyncSupported = true)
	@VaadinServletConfiguration(productionMode = true, ui = VaadinhttpsUI.class, widgetset = "com.example.vaadinhttps.widgetset.VaadinhttpsWidgetset")
	public static class Servlet extends VaadinServlet {
	}

	@Override
	protected void init(VaadinRequest request) {
		final VerticalLayout layout = new VerticalLayout();
		layout.setMargin(true);
		setContent(layout);

		Button button = new Button("Click Me");
		button.addClickListener(new Button.ClickListener() {
			public void buttonClick(ClickEvent event) {
				layout.addComponent(new Label("Thank you for clicking"));
			}
		});
		layout.addComponent(button);
	}

}
7. Running the example
In the tomcat bin directory, run the script startup.bat.
In the log of tomcat now you can see the line:
HTTPS
18-Jun-2016 17:18:52.557 INFO [main] org.apache.coyote.AbstractProtocol.start Starting ProtocolHandler ["http-nio-8443"]
This line is telling you that the port 8443 used in the server configuration file is used by tomcat and now you can know that SSL is working in tomcat and you can use the HTTPS protocol.
8. Results
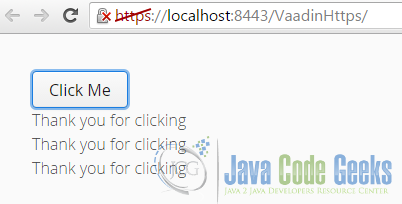
Open your browser in the URL https://localhost:8443/VaadinHttps/ and you can see the Vaadin application running in HTTPS
The red line over the HTTPS indicates that the certificate in not recognized by the browser because this certificate was generated by yourself, to get the browser recognize the certificate you need to get a certificate from a recognized authority.
9. Download the Source Code
This was an example of: Vaadin HTTPS Setup.

