Vaadin Form Example
In this example I am going to show you how to make a Vaadin form. A form is a common HTML element to collect user input and send the data to a server, most of the time using the POST http method.
1. The tools
- Java JDK 8
- Latest Eclipse Mars
- Vaadin 7.6.3
- Tomcat Server 8
2. Introduction
Vaadin goes beyond the basic HTML form by adding field validation and data binding, in Vaadin you can make your form with Java code, validate the data and put the data into a Vaadin data source ready to send to the persistence layer of your application.
3. Prerequisites
- JDK installed
- Eclipse Mars installed and working
- Vaadin 7.6.3 plugin installed
- Tomcat 8 installed and running
4. Set up the project
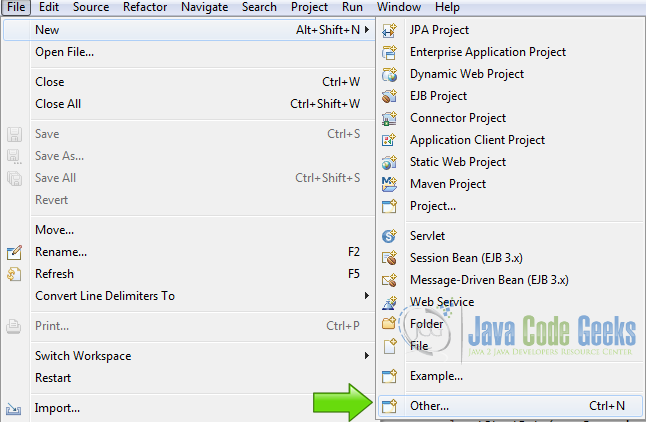
In the file menu choose File -> New -> Other:
Now from the list choose Vaadin 7 project:
Hit next and name your project then hit finish.
5. Coding the example
Edit the entry point Vaadin file in my case the autogenerated VaadinFormUI.java file, and inside the init method begin coding the example.
Create the layout
	    final FormLayout layout = new FormLayout();
	    layout.setMargin(true);
	    setContent(layout);
I created a new FormLayout, called layout, enable the margins and set as the main content layout, I am going to use the form as the main content.
Property set
	    PropertysetItem myfields = new PropertysetItem();
	    myfields.addItemProperty("name", new ObjectProperty(""));
	    myfields.addItemProperty("age", new ObjectProperty(0));
	    myfields.addItemProperty("email", new ObjectProperty(""));
I created a property set to make the form data source, for every field in my form I created an item property associated with the field in the UI, in this example I have in my form the fields name, age and email.
Error label
Label errLabel = new Label();
This label is used to show the validation errors of my form.
Name field
	    TextField nameText = new TextField("Name");
	    nameText.setValidationVisible(false);
	    nameText.setIcon(FontAwesome.AMBULANCE);
	    StringLengthValidator slv = new StringLengthValidator("The name must be 3-10 letters (was {0})", 3, 10, true);
	    nameText.addValidator(slv);
	    layout.addComponent(nameText);
I created a text field called nameText with a caption “Name” then hide the validation feedback to manually use it later, set an icon to my text field from the Fontawesome package that is bundled with Vaadin, Fontawesome is a widely known open source toolkit to use lightweight css and font icons for web pages and other applications as well, you can get more information here Font Awesome and you can use it out of the box without any configuration with Vaadin.
I also created a StringLengthValidator that validate the text in the nameText field and ensure that the text have more that 3 characters and less that 10, then I added the validator to the field and add the field to the layout to show it.
Age field
	    TextField ageText = new TextField("Age");
	    ageText.setValidationVisible(false);
	    IntegerRangeValidator ir = new IntegerRangeValidator("Age must be between 21 and 30", 21, 30);
	    ageText.addValidator(ir);
	    layout.addComponent(ageText);
In this field I have an IntegerRangeValidator that validate the field as an integer between 21 and 30 inclusive, the data source do the trick here with the integer value, if you don’t use a binded data-source you need to use a converter to make the field an integer before use the validator. I created the field, created the validator, add the validator to the field and the added the field to the layout.
Email field
	    TextField emailText = new TextField("email");
	    emailText.setValidationVisible(true);
	    emailText.setRequired(true);
	    EmailValidator ev = new EmailValidator("You must provide a valid email");
	    emailText.addValidator(ev);
	    layout.addComponent(emailText);
With this field, I make the field required to force the user fill the field, this is an email field that need to be validated as a valid email, this is usually done with regular expressions but in this case you can use the validator that is provided out of the box with Vaadin.
FieldGroup
	    FieldGroup fieldGroup = new FieldGroup(myfields);
	    fieldGroup.bind(nameText, "name");
	    fieldGroup.bind(ageText, "age");
	    fieldGroup.bind(emailText, "email");
The FieldGroup make the bind between the fields and the data source PropertysetItem so you can have your fields directly connected into the data source, easy as you see.
6. The submit button
Submit button
	    Button button = new Button("Submit");
	    button.addClickListener(new Button.ClickListener()
	    {
	      public void buttonClick(ClickEvent event)
	      {
	        Boolean failed = false;
	        errLabel.setValue("");
              }
            }
I created a button to validate and submit the form data, inside the click listener, I declared a variable to use in the validation process also clean the label that shows the errors in the form.
7. Inside the click listener
nameText validation
	        try
	        {
	          nameText.validate();
	        }
	        catch (InvalidValueException e)
	        {
	          errLabel.setValue(" - " + e.getMessage());
	          nameText.setValidationVisible(true);
	          failed = true;
	        }
the validation process is done within a try/catch block, the nameText.validate(); checks for the validation rules previously added to the field and capture a InvalidValueException, if the field have an invalid value according to the definition then an exception is raised and captured in the catch block, in this case the error label is updated and the validation is set to visible to a better feedback to the user and failed is set to true for use later.
ageText validation
	        try
	        {
	          ageText.validate();
	        }
	        catch (Exception e)
	        {
	          errLabel.setValue(errLabel.getValue() + " - " + e.getMessage());
	          ageText.setValidationVisible(true);
	          failed = true;
	        }
Validates the age field using the defined rules, age must be between 21 and 30 inclusive.
emailText Validate
	        try
	        {
	          emailText.validate();
	        }
	        catch (InvalidValueException e)
	        {
	          String emsg = e.getMessage();
	          if(emsg == "")
	          {
	            emsg = "email is required";
	          }
	          errLabel.setValue(errLabel.getValue() + " - " + emsg);
	          failed = true;
	        }
The email field is required and must be a valid email, the email validator provided by Vaadin follows the rules according to RFC 822 that validates most of emails, not all but a lot of them, if you need most specific validation rules you can use a regex validator that also is build-in in Vaadin.
Success validation
	        if (!failed)
	        {
	          Notification.show("Everythig is OK !", Notification.Type.TRAY_NOTIFICATION);
	        }
Here I use the Boolean failed; declared inside the listener to check that all validations are ok and show a notification. In this place you know that the form data is validated with the rules.
8. The complete source code
VaadinformUI.java
package com.example.vaadinform;

import javax.servlet.annotation.WebServlet;

import com.vaadin.annotations.Theme;
import com.vaadin.annotations.VaadinServletConfiguration;
import com.vaadin.data.Validator.InvalidValueException;
import com.vaadin.data.fieldgroup.FieldGroup;
import com.vaadin.data.util.ObjectProperty;
import com.vaadin.data.util.PropertysetItem;
import com.vaadin.data.validator.EmailValidator;
import com.vaadin.data.validator.IntegerRangeValidator;
import com.vaadin.data.validator.StringLengthValidator;
import com.vaadin.server.FontAwesome;
import com.vaadin.server.VaadinRequest;
import com.vaadin.server.VaadinServlet;
import com.vaadin.ui.Button;
import com.vaadin.ui.Button.ClickEvent;
import com.vaadin.ui.FormLayout;
import com.vaadin.ui.Label;
import com.vaadin.ui.Notification;
import com.vaadin.ui.TextField;
import com.vaadin.ui.UI;

@SuppressWarnings("serial")
@Theme("vaadinform")
public class VaadinformUI extends UI {

	@WebServlet(value = "/*", asyncSupported = true)
	@VaadinServletConfiguration(productionMode = false, ui = VaadinformUI.class)
	public static class Servlet extends VaadinServlet {
	}

	@Override
	protected void init(VaadinRequest request)
	  {
	    final FormLayout layout = new FormLayout();
	    layout.setMargin(true);
	    setContent(layout);

	    PropertysetItem myfields = new PropertysetItem();
	    myfields.addItemProperty("name", new ObjectProperty(""));
	    myfields.addItemProperty("age", new ObjectProperty(0));
	    myfields.addItemProperty("email", new ObjectProperty(""));

	    Label errLabel = new Label();

	    TextField nameText = new TextField("Name");
	    nameText.setValidationVisible(false);
	    nameText.setIcon(FontAwesome.AMBULANCE);
	    StringLengthValidator slv = new StringLengthValidator("The name must be 3-10 letters (was {0})", 3, 10, true);
	    nameText.addValidator(slv);
	    layout.addComponent(nameText);

	    TextField ageText = new TextField("Age");
	    ageText.setValidationVisible(false);
	    IntegerRangeValidator ir = new IntegerRangeValidator("Age must be between 21 and 30", 21, 30);
	    ageText.addValidator(ir);
	    layout.addComponent(ageText);

	    TextField emailText = new TextField("email");
	    emailText.setValidationVisible(true);
	    emailText.setRequired(true);
	    EmailValidator ev = new EmailValidator("You must provide a valid email");
	    emailText.addValidator(ev);
	    layout.addComponent(emailText);

	    FieldGroup fieldGroup = new FieldGroup(myfields);
	    fieldGroup.bind(nameText, "name");
	    fieldGroup.bind(ageText, "age");
	    fieldGroup.bind(emailText, "email");

	    Button button = new Button("Submit");
	    button.addClickListener(new Button.ClickListener()
	    {
	      public void buttonClick(ClickEvent event)
	      {
	        Boolean failed = false;
	        errLabel.setValue("");
	        try
	        {
	          nameText.validate();
	        }
	        catch (InvalidValueException e)
	        {
	          errLabel.setValue(" - " + e.getMessage());
	          nameText.setValidationVisible(true);
	          failed = true;
	        }

	        try
	        {
	          ageText.validate();
	        }
	        catch (Exception e)
	        {
	          errLabel.setValue(errLabel.getValue() + " - " + e.getMessage());
	          ageText.setValidationVisible(true);
	          failed = true;
	        }

	        try
	        {
	          emailText.validate();
	        }
	        catch (InvalidValueException e)
	        {
	          String emsg = e.getMessage();
	          if(emsg == "")
	          {
	            emsg = "email is required";
	          }
	          errLabel.setValue(errLabel.getValue() + " - " + emsg);
	          failed = true;
	        }

	        if (!failed)
	        {
	          Notification.show("Everythig is OK !", Notification.Type.TRAY_NOTIFICATION);
	        }
	      }
	    });
	    layout.addComponent(button);
	    layout.addComponent(errLabel);
	  }
}
9. Running the example
Right click on the project folder and choose Run as -> Run on server choose Tomcat 8 server and hit finish.
10. Results
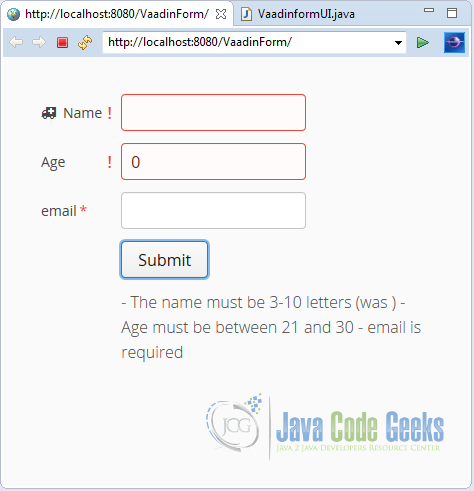
All fields need to validate:
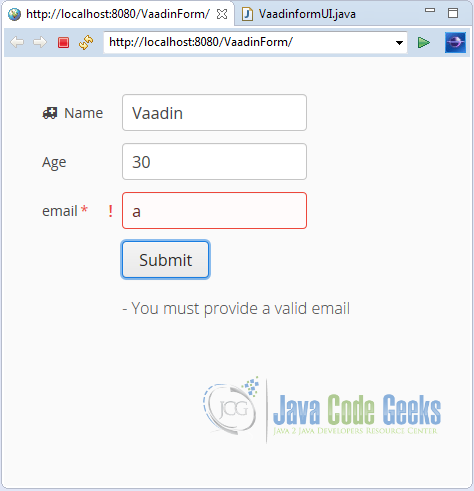
The email field needs validation:
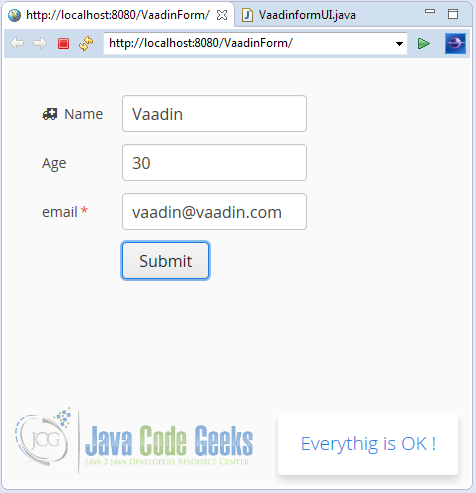
Everything is ok:
11. Download the Source Code
This was an example about Vaadin Form.
You can download the Eclipse project here: VaadinForm


