Vaadin Combobox Example
A combo box is a graphical user interface widget, a combination of a drop-down list or list box and a single-line editable textbox, allowing the user to either type a value directly or select a value from the list. Vaadin offers a convenient Combobox out of the box for selecting a value in a list or collection.
The Combobox is widely used in web applications to simplify the user interface and restrict the user input to a predefined list of values. In this example I am going to make tree simple Combobox to show the functionality of this useful UI control in Vaadin.
Most cases of the use of a Combobox limit the values that user can choose, values that are invariable. You, as a developer need to fix these values, cause and don’t want unexpected surprises in your data.
1. The tools
- Java JDK 8
- Latest Eclipse Mars
- Vaadin 7.6.1
2. Introduction
With Vaadin Combobox you get out of the box a filter in the textbox that restrict the values showed in the drop-down listbox. Also you can allow the user to add values to the list on the fly, the filter functionality is disabled by default so you need to enable it in your code and you can also choose how the filter works.
3. Prerequisites
- JDK installed
- Eclipse Mars installed and working
- Vaadin plugin installed
4. Create the project
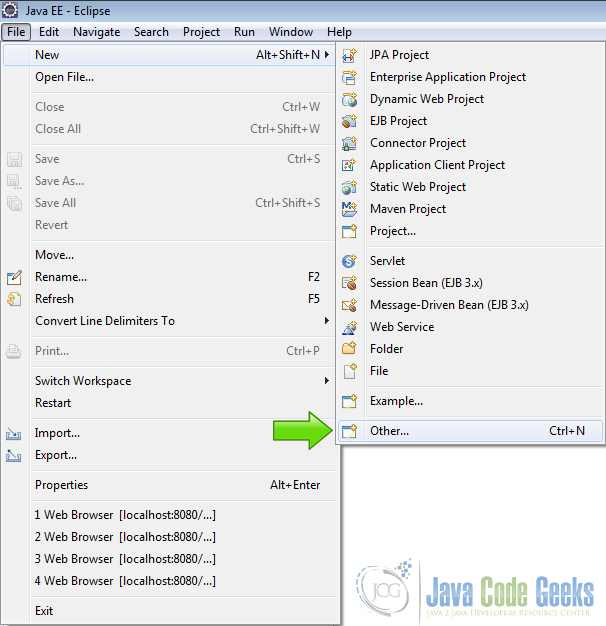
Launch eclipse and in the menu choose File->New->Other
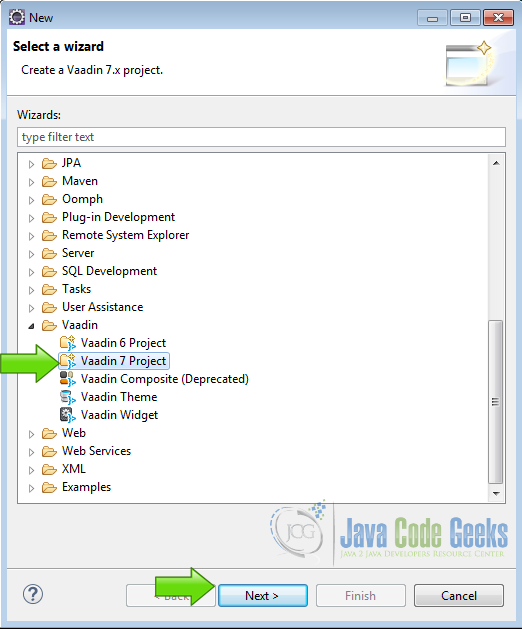
Choose Vaadin 7 project and click next.
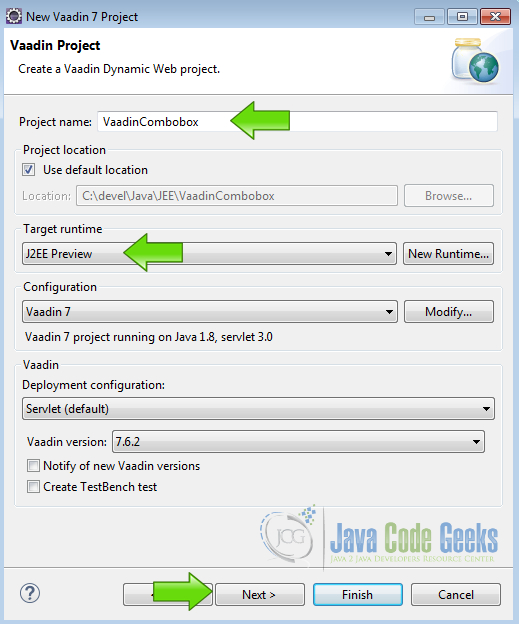
Write a name for the project and choose your server. In this case I am using J2EE preview for simplicity, then hit next twice.
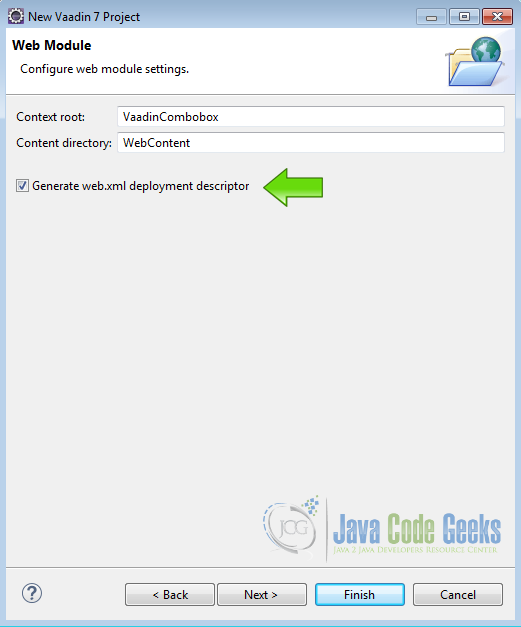
Select the option “Generate web.xml deployment descriptor”, is not needed and you can use annotations instead, so is your choice to use it. Then hit next.
Now select “Create project template”, choose the Vaadin version you want to use and click finish.
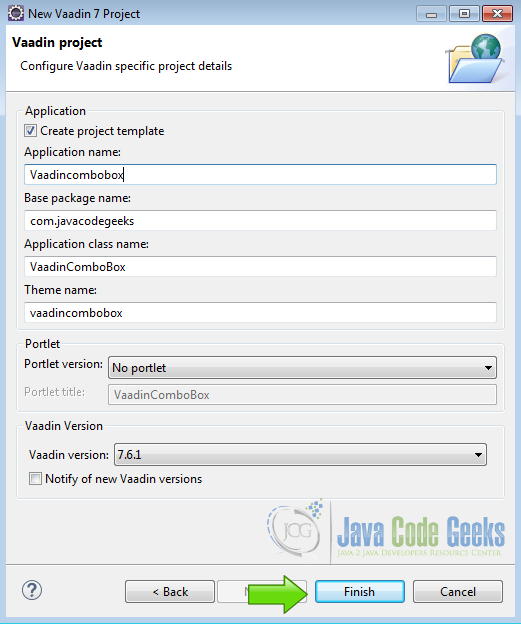
Now the project is created and you are ready to code.
5. First ComboBox
Inside Vaadin Init function, create the layout and attach it to the main content.
First Combobox
		final VerticalLayout layout = new VerticalLayout();
		layout.setMargin(true);
		setContent(layout);

		ComboBox cb1 = new ComboBox("cb1");
		cb1.setItemCaptionMode(ItemCaptionMode.EXPLICIT);
		Object itemID1 = cb1.addItem();
		cb1.setItemCaption(itemID1, "cb1-it1");
		cb1.setItemIcon(itemID1, new ThemeResource("../runo/icons/16/attention.png"));
		Object itemID2 = cb1.addItem();
		cb1.setItemCaption(itemID2, "cb1-it2");
		cb1.setItemIcon(itemID2, new ThemeResource("../runo/icons/16/cancel.png"));
		Object itemID3 = cb1.addItem();
		cb1.setItemCaption(itemID3, "cb1-it3");
		cb1.setItemIcon(itemID3, new ThemeResource("../runo/icons/32/folder.png"));
		cb1.setValue(itemID1);
		layout.addComponent(cb1);
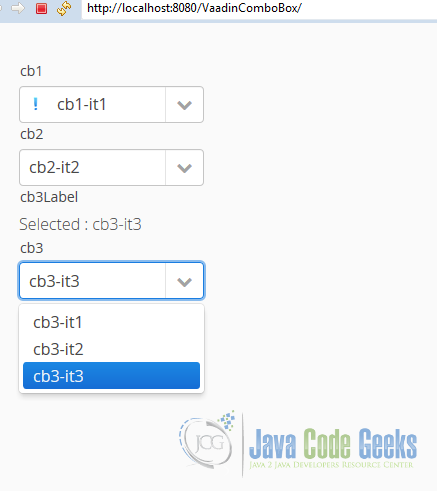
Create the combobox and then change the caption mode to explicit, with that command you are ensuring that the id and the name that you see in the drop-down list of the combobox not are the same, for each item added to the combobox you have a caption that is showed on the list. Also here you can see how to set an icon in each item of the combobox, at last when all items are added you add the combobox to the container.
6. Second ComboBox
Second ComboBox
		ComboBox cb2 = new ComboBox("cb2");
		cb2.addItem("cb2-it1");
		cb2.addItem("cb2-it2");
		cb2.addItem("cb2-it3");
		cb2.setValue("cb2-it2");
		layout.addComponent(cb2);
The most simple combobox, the id is used as caption in the drop-down list, is the default caption mode, also the default value is set with cb2.setValue("cb2-it2");, we create 3 items and add it to the drop-down list and the we add the combobox to the layout.
7. Third ComboBox
Third ComboBox
		Label cb3Label = new Label();
		cb3Label.setCaption("cb3Label");

		ComboBox cb3 = new ComboBox("cb3");
		cb3.addItems("cb3-it1", "cb3-it2", "cb3-it3");

		cb3.addValueChangeListener(new ValueChangeListener() {

			@Override
			public void valueChange(ValueChangeEvent event) {

				cb3Label.setValue("Selected : " + event.getProperty().getValue());
			}
		});
		cb3.setValue("cb3-it3");
		cb3.setNullSelectionAllowed(false);
		cb3.setFilteringMode(FilteringMode.CONTAINS);
		layout.addComponent(cb3Label);
		layout.addComponent(cb3);
With this example we create a label, this label is used by the combobox to set the value of the current selected item, we define a listener for the change event to capture when the value of the combobox changed, cb3.setValue("cb3-it3"); shows the initial value of the combobox, cb3.setNullSelectionAllowed(false); force a value selected in the combobox, cb3.setFilteringMode(FilteringMode.CONTAINS); change the default filter mode to contain any sub-string typed on the textbox.
8. Complete source code
VaadinComboBox.java
package com.javacodegeeks;

import com.vaadin.annotations.Theme;
import com.vaadin.data.Property.ValueChangeEvent;
import com.vaadin.data.Property.ValueChangeListener;
import com.vaadin.server.ThemeResource;
import com.vaadin.server.VaadinRequest;
import com.vaadin.server.VaadinServlet;
import com.vaadin.shared.ui.combobox.FilteringMode;
import com.vaadin.ui.AbstractSelect.ItemCaptionMode;
import com.vaadin.ui.ComboBox;
import com.vaadin.ui.Label;
import com.vaadin.ui.UI;
import com.vaadin.ui.VerticalLayout;

@SuppressWarnings("serial")
@Theme("vaadincombobox")
public class VaadinComboBox extends UI {

	public static class Servlet extends VaadinServlet {
	}

	@Override
	protected void init(VaadinRequest request) {

		final VerticalLayout layout = new VerticalLayout();
		layout.setMargin(true);
		setContent(layout);

		ComboBox cb1 = new ComboBox("cb1");
		cb1.setItemCaptionMode(ItemCaptionMode.EXPLICIT);
		Object itemID1 = cb1.addItem();
		cb1.setItemCaption(itemID1, "cb1-it1");
		cb1.setItemIcon(itemID1, new ThemeResource("../runo/icons/16/attention.png"));
		Object itemID2 = cb1.addItem();
		cb1.setItemCaption(itemID2, "cb1-it2");
		cb1.setItemIcon(itemID2, new ThemeResource("../runo/icons/16/cancel.png"));
		Object itemID3 = cb1.addItem();
		cb1.setItemCaption(itemID3, "cb1-it3");
		cb1.setItemIcon(itemID3, new ThemeResource("../runo/icons/32/folder.png"));
		cb1.setValue(itemID1);
		layout.addComponent(cb1);

		ComboBox cb2 = new ComboBox("cb2");
		cb2.addItem("cb2-it1");
		cb2.addItem("cb2-it2");
		cb2.addItem("cb2-it3");
		cb2.setValue("cb2-it2");
		layout.addComponent(cb2);

		Label cb3Label = new Label();
		cb3Label.setCaption("cb3Label");

		ComboBox cb3 = new ComboBox("cb3");
		cb3.addItems("cb3-it1", "cb3-it2", "cb3-it3");

		cb3.addValueChangeListener(new ValueChangeListener() {

			@Override
			public void valueChange(ValueChangeEvent event) {

				cb3Label.setValue("Selected : " + event.getProperty().getValue());
			}
		});
		cb3.setValue("cb3-it3");
		cb3.setNullSelectionAllowed(false);
		cb3.setFilteringMode(FilteringMode.CONTAINS);
		layout.addComponent(cb3Label);
		layout.addComponent(cb3);

	}

}
9. Web deployment descriptor
web.xml
<?xml version="1.0" encoding="UTF-8"?>
<web-app xmlns:xsi="http://www.w3.org/2001/XMLSchema-instance" xmlns="http://java.sun.com/xml/ns/javaee" xsi:schemaLocation="http://java.sun.com/xml/ns/javaee http://java.sun.com/xml/ns/javaee/web-app_3_0.xsd" id="WebApp_ID" version="3.0">
  <display-name>VaadinComboBox</display-name>
  <servlet>
    <servlet-name>myservlet</servlet-name>
    <servlet-class>
		com.vaadin.server.VaadinServlet
	</servlet-class>
    <init-param>
      <param-name>UI</param-name>
      <param-value>com.javacodegeeks.VaadinComboBox</param-value>
    </init-param>
  </servlet>
  <servlet-mapping>
    <servlet-name>myservlet</servlet-name>
    <url-pattern>/*</url-pattern>
  </servlet-mapping>
</web-app>
10. Run The project
Righ click on the project folder and click on “Run as” -> “Run on server” and you get something similar to this:
11. Final worlds
As you can see the Vaadin combobox is an easy to use widget for your web applications, it’s very customizable and useful when you want to display fixed list of data.
12. Download the source code
This was an example about Vaadin Combobox.
You can download the Eclipse project here: Vaadin ComboBox

