Vaadin Architecture Tutorial
The design is the most important part of a program, because a bad design produces bad software. A solid rock design increases the chance of getting good results, of course you still need good programmers but it’s easier to correct clumsy code with a good design.
Anyway how do you define code quality or clumsy code? If the code works and no bugs arise in the final product, could it be improved?. Is the language we are using the best to solve my problem?. Am i using the right platform to deploy my software?.
All these questions are the nightmare of software architects. The design produces the architecture of the software and the amount of parts my system has. The architecture refers to the high level structures of a software system, it’s a discipline. Each structure has software elements. The architecture of a software system is similar to the architecture in buildings.
Where the design is the blueprint of the building, the architecture is the technique used to build and each part of the building is a piece of software. In the architecture of the software it’s recommended for a lot of architects to have a rigid division of concerns like Model-View-Presenter, Model-View-Controller, etc.
But in the end if you are the architect of the system, all of these choices are up to you, just build your software in the best way you can and live with the consequences. In my own experience in pro of the peace of mind is better to use some kind of separation of concerns in the software architecture.
Table Of Contents
 ;
1. The tools
- Java JDK 8
- Latest Eclipse Mars
- Vaadin 7.6.5
- Tomcat Server 8
2. Introduction
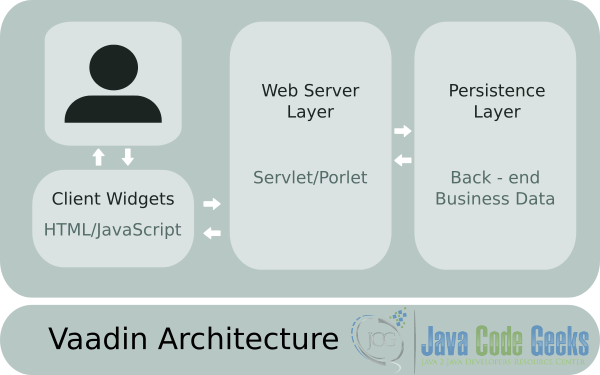
Vaadin Framework 7 is a server side web framework that uses Ajax to keep the UI synchronized with the server. Usually on each user interaction, Vaadin makes one or more Ajax calls against the server to “keep the server informed” whats going on with the UI. You can change this behavior but it’s better to keep the server side nature of Vaadin. This design was done to secure your data, so it’s better to keep it that way. Vaadin consists of three separate layers.
In this tutorial we are going to see with a simple application how the Vaadin architecture works and where is every part of the architecture when you are coding.
3. Prerequisites
- JDK installed
- Eclipse Mars installed and working
- Vaadin plug-in installed
- Tomcat 8 installed and running
4. Set up the project
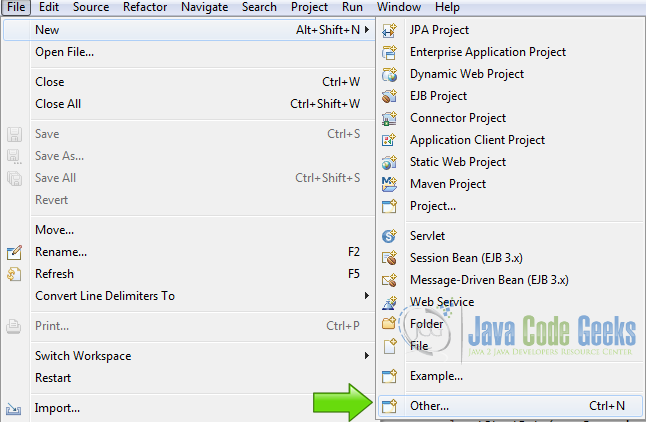
In the file menu choose File -> New -> Other
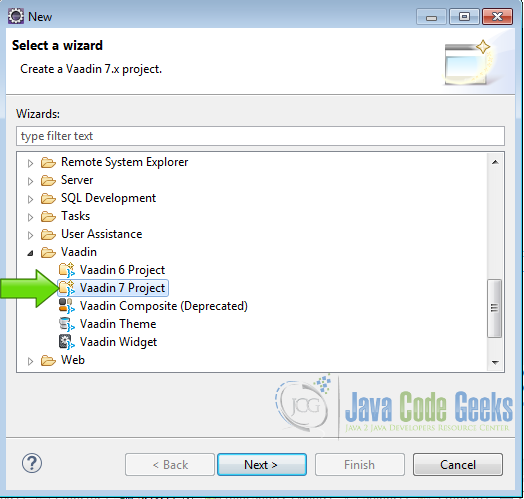
Now from the list choose Vaadin 7 project
Hit next and name your project, then hit finish.
5. The Architecture
5.1 The layers
- Client widgets
- Web Server layer
- Persistence layer
5.1.1 Client Widgets
The client widgets are the user interface elements that are shown in the browser. These widgets are a combination of HTML and JavaScript, the native execution environment for browsers. Vaadin makes extensive use of GWT – Google Widget Toolkit, while GWT is an open source set of tools that allows web developers to create complex JavaScript applications in Java. With Vaadin you can also create your widgets using HTML, JavaScript and CSS directly. The client widgets compose the user interface in a regular Vaadin application and usually each widget has a server counterpart that keeps the user interaction always server side, preventing data loss.
5.1.2 Web Server Layer
This layer is a Java servlet or a portlet that is in charge of intercept the requests of the widgets and send a response to update the UI. Moreover, it can make asynchronous calls to the widgets like server push calls to update the UI without user interaction.
5.1.2.1 Java Servlet
A Java servlet is a Java program that runs within a Web server. Servlets usually use the Request–response message exchange pattern defined by the HyperText Transfer Protocol. Servlets are also capable of make asynchronous server push on any time required.
5.1.2.2 Portlets
Portlets are pluggable user interface software components. A portlet UI is just like a regular Vaadin application, and is used like pieces of a web page with complete and concise functionality. Like a weather gadget that has a well known function, porlets are commonly used in enterprise portals like Liferay.
5.1.3 Persistence Layer
The persistence layer is in charge of the data in the application. This layer usually has an interface with a database or an in-memory datasets or a library to store data in the file-system or whatever persistence method you have. If your application needs to store data this is the place where you put the code to manage all you need to save the data.
5.2 Our project explained
We created a Vaadin project to show the Vaadin layers.
5.2.1 Persistence
We are going to simulate persistence with an ArrayList, this is for the purpose of this tutorial. But you can plug here a database or write files on disk or connect to the cloud and save your data there.
Persistence
	private ArrayList myArrayList;

	public VaadinArchPersistence(){
		myArrayList = new ArrayList();
	}

	public void addItem(String item){
		if(!item.isEmpty()){
			myArrayList.add(item);
		}
	}

	public String getItems(){
		StringBuilder sb = new StringBuilder();
		Iterator myIterator = myArrayList.iterator();
		while(myIterator.hasNext()){
			String element = myIterator.next();
			sb.append(element+" ");
		}
		return sb.toString();
	}
We have here a private ArrayList called myArrayList to store our data, in this case a string.
A constructor public VaadinArchPersistence() to initialize our ArrayList, this only lasts until you refresh the page. On every page refresh all data is lost. A persistence container should save the data in a more durable media.
public void addItem(String item) is a method to add an item to our collection. This method also checks that the item is not empty. This is the place to validate your data, when you send the data to a external medium that data must be validated before. Also here you need to check the security to avoid database exploits, because a malicious user could found vulnerabilities in your application if you didn’t put a filter between layers.
public String getItems() is a method to get all our items into a big string to show all items.
With that we can simulate a persistence fully working layer.
5.2.2 Web Server Layer
The Web Server layer is our servlet:
Vaadin Servlet
public class VaadinarchitectureUI extends UI {

	@WebServlet(value = "/*", asyncSupported = true)
	@VaadinServletConfiguration(productionMode = false, ui = VaadinarchitectureUI.class, widgetset = "com.example.vaadinarchitecture.widgetset.VaadinarchitectureWidgetset")
	public static class Servlet extends VaadinServlet {
	}
The Vaadin servlet extends javax.servlet.http.HttpServlet and implements java.io.Serializable, javax.servlet.Servlet, javax.servlet.ServletConfig, which is a subclass of the standard HttpServlet. Is in charge of processing the requests from the client. When a client requests a page in a Vaadin servlet, the first thing it does is to look the compiled version of that page and send it to the client. In a Vaadin application, exists multiple versions of the compiled client, one for each browser instructed to compile. That is a technique used by GWT to reduce the overhead. For example if you open the page with Firefox, the servlet only sends the compiled version of Firefox, and when you open the page with chrome you get a different version compiled and optimized for chrome. The GWT compiler uses the Google closure compiler to compile each version of the client widgets.
Init
	@Override
	protected void init(VaadinRequest request)
When you start a Vaadin application opening a web page the VaadinServlet calls the Init method. In the Init method we create the components. These components are server side with a client side counterpart. This example has a textbox to input text from the client to the persistence layer, a button to send the text in the textbox to the server, a button to retrieve all items added from the server and a label to show the items.
The layout
		final VerticalLayout layout = new VerticalLayout();
		layout.setMargin(true);
		setContent(layout);
Create the layout of the page.
Connect the layout to the persistence
VaadinArchPersistence vap = new VaadinArchPersistence();
Create an instance of the data-store.
TextField
		TextField tf = new TextField("Data");
		tf.setWidth("200px");
The TextField to input items.
Label
		Label lItems = new Label("");
		lItems.addStyleName("mylabelstyle");
		lItems.setWidth("200px");
The Label to show the items stored, we need to create mylabelstyle on the client CSS.
Add Item
		Button bAddItem = new Button("Add Item");
		bAddItem.setWidth("200px");
		bAddItem.addClickListener(new Button.ClickListener() {
			public void buttonClick(ClickEvent event) {
				vap.addItem(tf.getValue());
				tf.clear();
			}
		});
The Button to send the items to the server.
Show all
		Button bShowItems = new Button("Show all items");
		bShowItems.setWidth("200px");
		bShowItems.addClickListener(new Button.ClickListener() {
			public void buttonClick(ClickEvent event) {
				lItems.setValue(vap.getItems());
			}
		});
The Button to retrieve the items from the server.
Add components to the layout
		layout.addComponent(tf);
		layout.addComponent(bAddItem);
		layout.addComponent(bShowItems);
		layout.addComponent(lItems);
Add the items to the layout.
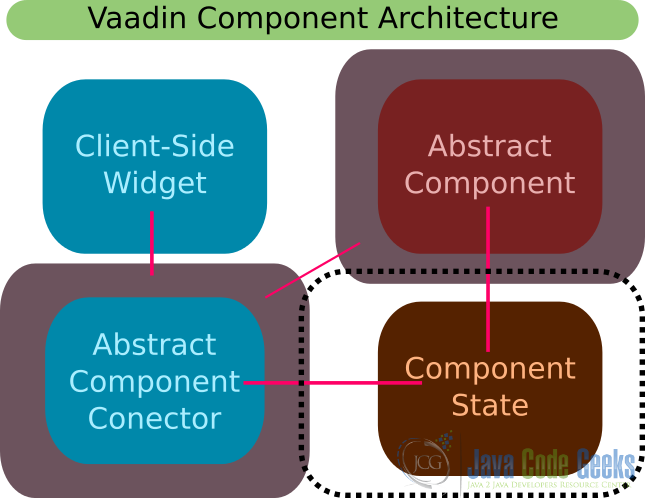
The Abstract component shares the state with the abstract component connector in order to keep the state synchronized between the client and the server part of the component/widget. GWT creates the client widget with the closure compiler. The widget calls the Abstract component connector. The abstract component connector then updates the state and make Ajax calls to the Abstract component that is server side.
5.2.3 Client Tier
The client uses the GWT compiler to convert the Java code into JavaScript and the JavaScript is also compiled with the Google closure compiler to optimize it. Now let’s compile the widgetset. Click on the Vaadin toolbar menu and compile the widgetset:
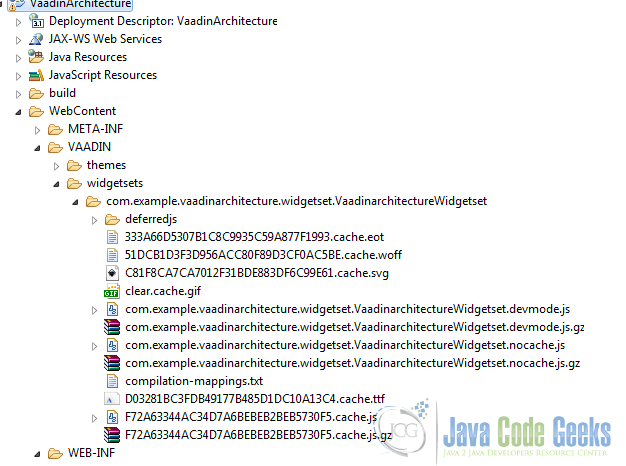
Open the folder WebContent -> Widgetsets
In this folder you have the compiled widget-sets into JavaScript, you have a version for each browser supported and you also have “gz” compressed versions to send it instead when is supported. Vaadin take in charge of all these details for you. So you only need to know how to write the Java code and forget about these details until you need to write your own components.
6. Complete Source Code
VaadinarchitectureUI.java
package com.example.vaadinarchitecture;

import javax.servlet.annotation.WebServlet;

import com.vaadin.annotations.Theme;
import com.vaadin.annotations.VaadinServletConfiguration;
import com.vaadin.server.VaadinRequest;
import com.vaadin.server.VaadinServlet;
import com.vaadin.ui.Button;
import com.vaadin.ui.Button.ClickEvent;
import com.vaadin.ui.Label;
import com.vaadin.ui.TextField;
import com.vaadin.ui.UI;
import com.vaadin.ui.VerticalLayout;

@SuppressWarnings("serial")
@Theme("vaadinarchitecture")
public class VaadinarchitectureUI extends UI {

	@WebServlet(value = "/*", asyncSupported = true)
	@VaadinServletConfiguration(productionMode = false, ui = VaadinarchitectureUI.class, widgetset = "com.example.vaadinarchitecture.widgetset.VaadinarchitectureWidgetset")
	public static class Servlet extends VaadinServlet {
	}

	@Override
	protected void init(VaadinRequest request) {
		final VerticalLayout layout = new VerticalLayout();
		layout.setMargin(true);
		setContent(layout);
		VaadinArchPersistence vap = new VaadinArchPersistence();

		TextField tf = new TextField("Data");
		tf.setWidth("200px");

		Label lItems = new Label("");
		lItems.addStyleName("mylabelstyle");
		lItems.setWidth("200px");

		Button bAddItem = new Button("Add Item");
		bAddItem.setWidth("200px");
		bAddItem.addClickListener(new Button.ClickListener() {
			public void buttonClick(ClickEvent event) {
				vap.addItem(tf.getValue());
				tf.clear();
			}
		});

		Button bShowItems = new Button("Show all items");
		bShowItems.setWidth("200px");
		bShowItems.addClickListener(new Button.ClickListener() {
			public void buttonClick(ClickEvent event) {
				lItems.setValue(vap.getItems());
			}
		});


		layout.addComponent(tf);
		layout.addComponent(bAddItem);
		layout.addComponent(bShowItems);
		layout.addComponent(lItems);
	}

}
VaadinArchPersistence.java
package com.example.vaadinarchitecture;

import java.util.ArrayList;
import java.util.Iterator;

public class VaadinArchPersistence {

	private ArrayList myArrayList;

	public VaadinArchPersistence(){
		myArrayList = new ArrayList();
	}

	public void addItem(String item){
		if(!item.isEmpty()){
			myArrayList.add(item);
		}
	}

	public String getItems(){
		StringBuilder sb = new StringBuilder();
		Iterator myIterator = myArrayList.iterator();
		while(myIterator.hasNext()){
			String element = myIterator.next();
			sb.append(element+" ");
		}
		return sb.toString();
	}

}
vaadinarchitecture.scss
@import "../valo/valo.scss";

@mixin vaadinarchitecture {
  @include valo;

  // Insert your own theme rules here

.v-label-mylabelstyle {
    color: white;
    text-align: left;
    background-color: black;
    border-color: white;
    font-weight: bold;
}
}
7. Running the example
Right click on the project folder and choose Run as -> Run on server choose Tomcat 8 server and hit finish.
8. Results
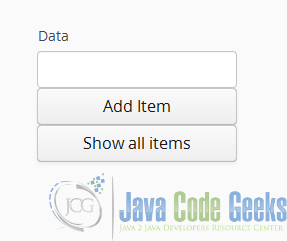
As you run the application you get a text box with two buttons
Press [CONTROL+SHIFT+i] key combination in the browser window to get to the console. Locate the Network tab and press the buttons of the application. As you can see, every time you press a button the client tier makes an Ajax call to the server.
9. Download the Source Code
This was a tutorial of: Vaadin Architecture.

