1. Introduction
To develop web applications these days, we use Modern View Controller architecture. Spring provides MVC framework with ready components that can be used to develop flexible and loosely coupled web applications. MVC framework provides separation between input logic, business logic and UI logic.
- Model encapsulates the application data
- View is responsible for rendering the model data
- Controller is responsible for processing user requests and building model and passing it to view for rendering
Table Of Contents
2. Environment
We will use the following environment for demo of Spring MVC with Hibernate example.
- Windows 7
- Java version 8
- Eclipse Kepler 4.3
- Maven 3.0.4
- MySQL 5.0.86
- Hibernate 4.3.6 Final
- Tomcat 7.0.64
- Spring 4.1.9 Release
- MySQL JDBC Connector 5.0.4
3. Spring MVC Framework
As stated in introduction of this section, Spring MVC framework comprised of three logical sections of Model, View and Controller. This framework is designed around a DispatcherServlet that receives and sends all HTTP requests and responses. The sequence of events to an incoming HTTP request to DispatcherServlet is
- DispatcherServlet communicates with
HandlerMappingto call the appropriate Controller once it receives an HTTP request. - Controller takes the request and calls the appropriate service methods based on used GET or POST method. The service method using Model data will return view name to DispatcherServlet
- DispatcherServlet will send that view name to ViewResolver to return the appropriate view for the request.
- In selected View, DispatcherServlet will send the model data to display rendered page in browser
4. Hibernate For Model
Hibernate maps Java classes to database tables and from Java data types to SQL data types. Hibernate lies between relational database and Java objects to handle all the work in persisting those objects based on accurate O/R configuration.
Hibernate provides following advantages
- Hibernate handles all the mapping of java classes to database tables using XML configuration without writing any code.
- It provides APIs for storing and retrieving objects directly to and from the database.
- If there is a change in database or in any table, you only need to change in XML configuration file.
- Hibernate does not require an application server to operate.
- Minimize database access with smart fetching strategies.
- Provides simply querying of data.
For this example, we will use hibernate to build our model. Our model for this example will be based on Employee and Company.
5. Example
In this example, we will configure Spring with Hibernate. We will be writing a simple CRUD web application with a web form asking user input to save information in MySQL database using Hibernate. We will have few options to show the database data on webpage.
5.1 Maven Project and POM dependencies
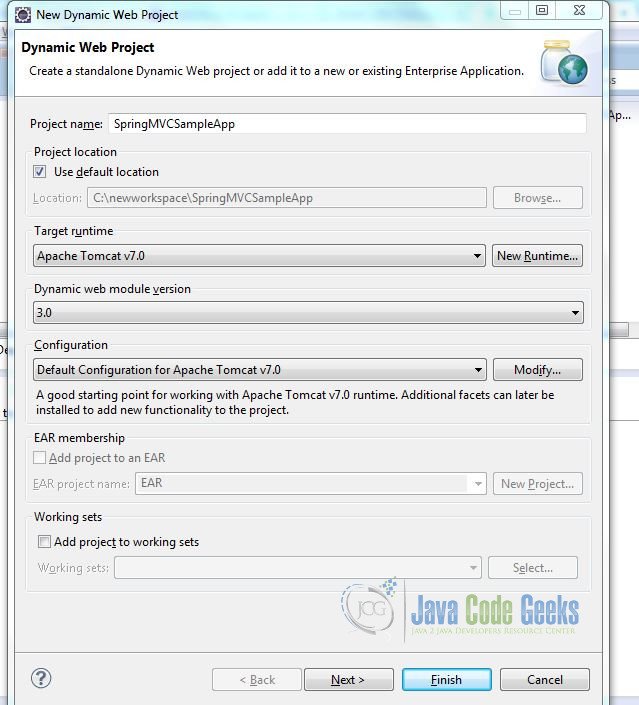
For this example, we will create a Dynamic Web project and then convert that into Maven Project. In eclipse, create a new Dynamic Web Project with name SpringMVCSampleApp and select Apache Tomcat 7.0 for Target Runtime as shown in below picture.
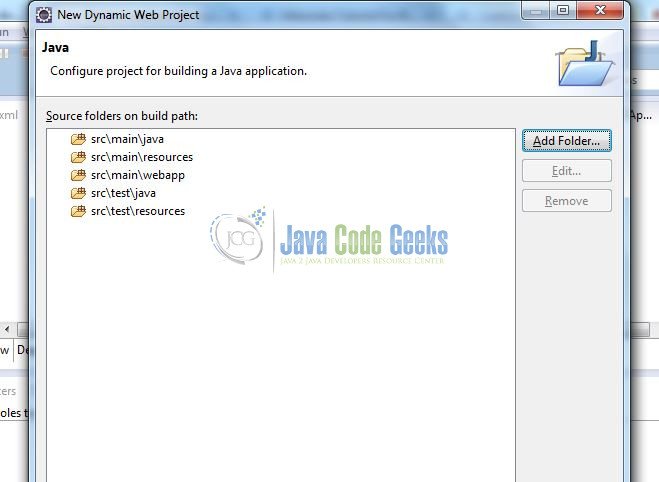
To convert this Dyanmic Web Project to Maven Web Project, on next screen, create a directory structure as shown in picture below. This is required for Maven project.
On next screen, select Generate web.xml deployment descriptor option and click Finish. Now right click on the project in eclipse and select option Configure -> Convert To Maven Project. Select the default option of WAR for packaging. This will create a POM dependencies xml file in the project. Move all the contents from WebContent folder in project directory in eclipse to src/main/webapp directory. You can delete the WebContent folder.
We will update pom.xml file to add the required dependencies for this project. This is how the final pom.xml file will look:
pom.xml
<project xmlns="http://maven.apache.org/POM/4.0.0" xmlns:xsi="http://www.w3.org/2001/XMLSchema-instance" xsi:schemaLocation="http://maven.apache.org/POM/4.0.0 http://maven.apache.org/xsd/maven-4.0.0.xsd">
  <modelVersion>4.0.0</modelVersion>
  <groupId>SpringMVCSampleApp</groupId>
  <artifactId>SpringMVCSampleApp</artifactId>
  <version>0.0.1-SNAPSHOT</version>
  <packaging>war</packaging>
  <build>
    <plugins>
      <plugin>
        <artifactId>maven-compiler-plugin</artifactId>
        <version>3.1</version>
        <configuration>
          <source>1.7</source>
          <target>1.7</target>
        </configuration>
      </plugin>
      <plugin>
        <artifactId>maven-war-plugin</artifactId>
        <version>2.3</version>
        <configuration>
          <warSourceDirectory>WebContent</warSourceDirectory>
          <failOnMissingWebXml>false</failOnMissingWebXml>
        </configuration>
      </plugin>
    </plugins>
  </build>
  <properties>
        <springframework.version>4.1.9.RELEASE</springframework.version>
        <hibernate.version>4.3.6.Final</hibernate.version>
        <mysql.connector.version>5.0.4</mysql.connector.version>
        <joda-time.version>2.3</joda-time.version>
        <testng.version>6.9.4</testng.version>
  </properties>
  <dependencies>
  <!-- Spring -->
        <dependency>
            <groupId>org.springframework</groupId>
            <artifactId>spring-core</artifactId>
            <version>${springframework.version}</version>
        </dependency>
        <dependency>
            <groupId>org.springframework</groupId>
            <artifactId>spring-web</artifactId>
            <version>${springframework.version}</version>
        </dependency>
        <dependency>
            <groupId>org.springframework</groupId>
            <artifactId>spring-webmvc</artifactId>
            <version>${springframework.version}</version>
        </dependency>
        <dependency>
            <groupId>org.springframework</groupId>
            <artifactId>spring-tx</artifactId>
            <version>${springframework.version}</version>
        </dependency>
        <dependency>
            <groupId>org.springframework</groupId>
            <artifactId>spring-orm</artifactId>
            <version>${springframework.version}</version>
        </dependency>

                <!-- Hibernate -->
        <dependency>
            <groupId>org.hibernate</groupId>
            <artifactId>hibernate-core</artifactId>
            <version>${hibernate.version}</version>
        </dependency>

        <!-- jsr303 validation -->
        <dependency>
            <groupId>javax.validation</groupId>
            <artifactId>validation-api</artifactId>
            <version>1.1.0.Final</version>
        </dependency>
        <dependency>
            <groupId>org.hibernate</groupId>
            <artifactId>hibernate-validator</artifactId>
            <version>5.1.3.Final</version>
        </dependency>

        <!-- MySQL -->
        <dependency>
            <groupId>mysql</groupId>
            <artifactId>mysql-connector-java</artifactId>
            <version>${mysql.connector.version}</version>
        </dependency>

        <!-- Joda-Time -->
        <dependency>
            <groupId>joda-time</groupId>
            <artifactId>joda-time</artifactId>
            <version>${joda-time.version}</version>
        </dependency>

        <!-- To map JodaTime with database type -->
        <dependency>
            <groupId>org.jadira.usertype</groupId>
            <artifactId>usertype.core</artifactId>
            <version>3.0.0.CR1</version>
        </dependency>

        <!-- Servlet+JSP+JSTL -->
        <dependency>
            <groupId>javax.servlet</groupId>
            <artifactId>javax.servlet-api</artifactId>
            <version>3.1.0</version>
        </dependency>

        <dependency>
            <groupId>javax.servlet.jsp</groupId>
            <artifactId>javax.servlet.jsp-api</artifactId>
            <version>2.3.1</version>
        </dependency>
        <dependency>
            <groupId>javax.servlet</groupId>
            <artifactId>jstl</artifactId>
            <version>1.2</version>
        </dependency>


        <!-- Testing dependencies -->
        <dependency>
            <groupId>org.springframework</groupId>
            <artifactId>spring-test</artifactId>
            <version>${springframework.version}</version>
            <scope>test</scope>
        </dependency>
        <dependency>
            <groupId>org.testng</groupId>
            <artifactId>testng</artifactId>
            <version>${testng.version}</version>
            <scope>test</scope>
        </dependency>
  </dependencies>
</project>
5.2 Configure Hibernate
To configure hibernate, we will be using annotation rather than usual hibernate.cfg.xml. Let’s create a class HibernateConfiguration in src folder with package name com.javacodegeeks.configuration . The code will look like below
HibernateConfiguration.java
package com.javacodegeeks.configuration;

import java.util.Properties;

import javax.sql.DataSource;

import org.hibernate.SessionFactory;
import org.springframework.beans.factory.annotation.Autowired;
import org.springframework.context.annotation.Bean;
import org.springframework.context.annotation.ComponentScan;
import org.springframework.context.annotation.Configuration;
import org.springframework.context.annotation.PropertySource;
import org.springframework.core.env.Environment;
import org.springframework.orm.hibernate4.HibernateTransactionManager;
import org.springframework.orm.hibernate4.LocalSessionFactoryBean;
import org.springframework.transaction.annotation.EnableTransactionManagement;
import org.springframework.jdbc.datasource.DriverManagerDataSource;


@Configuration
@EnableTransactionManagement
@ComponentScan({ "com.javacodegeeks.configuration" })
@PropertySource(value = { "classpath:application.properties" })

public class HibernateConfiguration {

    @Autowired
    private Environment environment;

    @Bean
    public LocalSessionFactoryBean sessionFactory() {
        LocalSessionFactoryBean sessionFactory = new LocalSessionFactoryBean();
        sessionFactory.setDataSource(dataSource());
        sessionFactory.setPackagesToScan(new String[] { "com.javacodegeeks.model" });
        sessionFactory.setHibernateProperties(hibernateProperties());
        return sessionFactory;
     }

    @Bean
    public DataSource dataSource() {
        DriverManagerDataSource dataSource = new DriverManagerDataSource();
        dataSource.setDriverClassName(environment.getRequiredProperty("jdbc.driverClassName"));
        dataSource.setUrl(environment.getRequiredProperty("jdbc.url"));
        return dataSource;
    }

    private Properties hibernateProperties() {
        Properties properties = new Properties();
        properties.put("hibernate.dialect", environment.getRequiredProperty("hibernate.dialect"));
        properties.put("hibernate.show_sql", environment.getRequiredProperty("hibernate.show_sql"));
        properties.put("hibernate.format_sql", environment.getRequiredProperty("hibernate.format_sql"));
        return properties;
    }

    @Bean
    @Autowired
    public HibernateTransactionManager transactionManager(SessionFactory s) {
       HibernateTransactionManager txManager = new HibernateTransactionManager();
       txManager.setSessionFactory(s);
       return txManager;
    }

}
From this, we still have to configure properties file in classpath. This file will be application.properties and it will look like below
application.properties
#DB properties:
jdbc.driverClassName=org.gjt.mm.mysql.Driver
jdbc.url=jdbc:mysql://localhost:3306/springmvc

#Hibernate Configuration:
hibernate.dialect=org.hibernate.dialect.MySQL5InnoDBDialect
hibernate.show_sql=true
hibernate.format_sql=true
#entitymanager.packages.to.scan=com.javacodegeeks
5.3 Domain Entity Class
In this section, we will create our domain entity class (POJO). This is the object we will use to modify through our sample web application. We will create an Employee entity object and we will use Hibernate annotation and JPA (Java persistence API) annotations to map it to employee database table. Along with creating entity class, make sure to create a database SpringMVC and a table employee.
Employee.java
package com.javacodegeeks.model;

import java.math.BigDecimal;

import javax.persistence.Column;
import javax.persistence.Entity;
import javax.persistence.GeneratedValue;
import javax.persistence.GenerationType;
import javax.persistence.Id;
import javax.persistence.Table;
import javax.validation.constraints.Digits;
import javax.validation.constraints.NotNull;
import javax.validation.constraints.Size;

import org.hibernate.annotations.Type;
import org.hibernate.validator.constraints.NotEmpty;
import org.joda.time.LocalDate;
import org.springframework.format.annotation.DateTimeFormat;


@Entity
@Table(name="EMPLOYEE")
public class Employee {

	@Id
    @GeneratedValue(strategy = GenerationType.IDENTITY)
    private int id;

    @Size(min=3, max=50)
    @Column(name = "NAME", nullable = false)
    private String name;

    @NotNull
    @DateTimeFormat(pattern="dd/MM/yyyy")
    @Column(name = "JOINING_DATE", nullable = false)
    @Type(type="org.jadira.usertype.dateandtime.joda.PersistentLocalDate")
    private LocalDate joiningDate;

    @NotNull
    @Digits(integer=8, fraction=2)
    @Column(name = "SALARY", nullable = false)
    private BigDecimal salary;

    @NotEmpty
    @Column(name = "SSN", unique=true, nullable = false)
    private String ssn;

    public int getId() {
        return id;
    }

    public void setId(int id) {
        this.id = id;
    }

    public String getName() {
        return name;
    }

    public void setName(String name) {
        this.name = name;
    }

    public LocalDate getJoiningDate() {
        return joiningDate;
    }

    public void setJoiningDate(LocalDate joiningDate) {
        this.joiningDate = joiningDate;
    }

    public BigDecimal getSalary() {
        return salary;
    }

    public void setSalary(BigDecimal salary) {
        this.salary = salary;
    }

    public String getSsn() {
        return ssn;
    }

    public void setSsn(String ssn) {
        this.ssn = ssn;
    }

    @Override
    public int hashCode() {
        final int prime = 31;
        int result = 1;
        result = prime * result + id;
        result = prime * result + ((ssn == null) ? 0 : ssn.hashCode());
        return result;
    }

    @Override
    public boolean equals(Object obj) {
        if (this == obj)
            return true;
        if (obj == null)
            return false;
        if (!(obj instanceof Employee))
            return false;
        Employee other = (Employee) obj;
        if (id != other.id)
            return false;
        if (ssn == null) {
            if (other.ssn != null)
                return false;
        } else if (!ssn.equals(other.ssn))
            return false;
        return true;
    }

    @Override
    public String toString() {
        return "Employee [id=" + id + ", name=" + name + ", joiningDate="
                + joiningDate + ", salary=" + salary + ", ssn=" + ssn + "]";
    }

}
5.4 Service Layer
We will create a Service interface and its implementation. This layer will provide a cohesive and high-level logic to application. Controller of MVC invokes this layer.
EmployeeService.java
package com.javacodegeeks.service;

import java.util.List;

import com.javacodegeeks.model.Employee;

public interface EmployeeService {

	Employee findById(int id);

    void saveEmployee(Employee employee);

    void updateEmployee(Employee employee);

    void deleteEmployeeBySsn(String ssn);

    List findAllEmployees();

    Employee findEmployeeBySsn(String ssn);

    boolean isEmployeeSsnUnique(Integer id, String ssn);

}
We will create a implementation class to add the logic for all these methods which will access the persistent layer.
EmployeeServiceImpl.java
package com.javacodegeeks.service;

import java.util.List;

import org.springframework.beans.factory.annotation.Autowired;
import org.springframework.stereotype.Service;
import org.springframework.transaction.annotation.Transactional;

import com.javacodegeeks.dao.EmployeeDAO;
import com.javacodegeeks.model.Employee;

@Service("employeeService")
@Transactional
public class EmployeeServiceImpl implements EmployeeService {

	@Autowired
    private EmployeeDAO dao;

	@Override
	public void deleteEmployeeBySsn(String ssn) {
		// TODO Auto-generated method stub
		dao.deleteEmployeeBySsn(ssn);
	}

	@Override
	public Employee findById(int id) {
		return dao.findById(id);
	}

	@Override
	public void saveEmployee(Employee employee) {
		// TODO Auto-generated method stub
		 dao.saveEmployee(employee);
	}

	@Override
	public void updateEmployee(Employee employee) {
		// TODO Auto-generated method stub
		Employee entity = dao.findById(employee.getId());
        if(entity!=null){
            entity.setName(employee.getName());
            entity.setJoiningDate(employee.getJoiningDate());
            entity.setSalary(employee.getSalary());
            entity.setSsn(employee.getSsn());
        }

	}

	@Override
	public List findAllEmployees() {
		return dao.findAllEmployees();
	}

	@Override
	public Employee findEmployeeBySsn(String ssn) {
		return dao.findEmployeeBySsn(ssn);
	}

	public boolean isEmployeeSsnUnique(Integer id, String ssn) {
        Employee employee = findEmployeeBySsn(ssn);
        return ( employee == null || ((id != null) && (employee.getId() == id)));
    }

}
In your eclipse, you will see number of build errors at this moment and that is because, we have not added DAO layer yet. That we will see in next section.
5. DAO Layer
DAO (data access object) layer provides access to persistence layer. Service objects invoke this layer. For our application, we will create an abstract class for AbstractDAO which will provide us createEntityCriteria when we will implement EmployeeDAO . This is a generic base class for DAO implementation.
AbstractDAO.java
package com.javacodegeeks.dao;

import java.io.Serializable;
import java.lang.reflect.ParameterizedType;

import org.hibernate.Criteria;
import org.hibernate.Session;
import org.hibernate.SessionFactory;
import org.springframework.beans.factory.annotation.Autowired;

public abstract class AbstractDAO {

	private final Class persistentClass;

    @SuppressWarnings("unchecked")
    public AbstractDAO(){
        this.persistentClass =(Class) ((ParameterizedType) this.getClass().getGenericSuperclass()).getActualTypeArguments()[1];
    }

    @Autowired
    private SessionFactory sessionFactory;

    protected Session getSession(){
        return sessionFactory.getCurrentSession();
    }

    @SuppressWarnings("unchecked")
    public T getByKey(PK key) {
        return (T) getSession().get(persistentClass, key);
    }

    public void persist(T entity) {
        getSession().persist(entity);
    }

    public void delete(T entity) {
        getSession().delete(entity);
    }

    protected Criteria createEntityCriteria(){
        return getSession().createCriteria(persistentClass);
    }
}
Now, we will create EmployeeDAO interface.
EmployeeDAO.java
package com.javacodegeeks.dao;

import java.util.List;

import com.javacodegeeks.model.Employee;

public interface EmployeeDAO {

	Employee findById(int id);

    void saveEmployee(Employee employee);

    void deleteEmployeeBySsn(String ssn);

    List findAllEmployees();

    Employee findEmployeeBySsn(String ssn);
}
To implement EmployeeDAO , we will extend our abstract class and implement interface.
EmployeeDAOImpl.java
package com.javacodegeeks.dao;

import java.util.List;
import org.hibernate.Criteria;
import org.hibernate.Query;
import org.hibernate.criterion.Restrictions;
import org.springframework.stereotype.Repository;

import com.javacodegeeks.model.Employee;

@Repository("employeeDao")
public class EmployeeDAOImpl extends AbstractDAO implements EmployeeDAO {

	@Override
	public void deleteEmployeeBySsn(String ssn) {
		Query query = getSession().createSQLQuery("delete from Employee where ssn = :ssn");
        query.setString("ssn", ssn);
        query.executeUpdate();
	}

	@Override
	public Employee findById(int id) {
		return getByKey(id);
	}

	@Override
	public void saveEmployee(Employee employee) {

		persist(employee);
	}

	@Override
	public List findAllEmployees() {
		Criteria criteria = createEntityCriteria();
        return (List) criteria.list();
	}

	@Override
	public Employee findEmployeeBySsn(String ssn) {
		Criteria criteria = createEntityCriteria();
        criteria.add(Restrictions.eq("ssn", ssn));
        return (Employee) criteria.uniqueResult();
	}
}
5.6 Configure Spring MVC
In AppConfig , we will implement a method to get a ViewResolver which handles our jsp view. We will also be adding ways to handle our error messages through messages.properties.

ApConfig.java
package com.javacodegeeks.configuration;

import org.springframework.context.MessageSource;
import org.springframework.context.annotation.Bean;
import org.springframework.context.annotation.ComponentScan;
import org.springframework.context.annotation.Configuration;
import org.springframework.context.support.ResourceBundleMessageSource;
import org.springframework.web.servlet.ViewResolver;
import org.springframework.web.servlet.config.annotation.EnableWebMvc;
import org.springframework.web.servlet.view.InternalResourceViewResolver;
import org.springframework.web.servlet.view.JstlView;

@Configuration
@EnableWebMvc
@ComponentScan(basePackages = "com.javacodegeeks")
public class AppConfig {

	@Bean
    public ViewResolver viewResolver() {
        InternalResourceViewResolver viewResolver = new InternalResourceViewResolver();
        viewResolver.setViewClass(JstlView.class);
        viewResolver.setPrefix("/WEB-INF/views/");
        viewResolver.setSuffix(".jsp");
        return viewResolver;
    }

    @Bean
    public MessageSource messageSource() {
        ResourceBundleMessageSource messageSource = new ResourceBundleMessageSource();
        messageSource.setBasename("messages");
        return messageSource;
    }

}
In resources folder, we will create messages.properties file.
messages.properties
Size.employee.name=Name must be between {2} and {1} characters long
NotNull.employee.joiningDate=Joining Date can not be blank
NotNull.employee.salary=Salary can not be blank
Digits.employee.salary=Only numeric data with max 8 digits and with max 2 precision is allowed
NotEmpty.employee.ssn=SSN can not be blank
typeMismatch=Invalid format
non.unique.ssn=SSN {0} already exist. Please fill in different value.
5.7 Initializer Class
This is the class where our web application’s request will be sent to handle. DispatcherServlet will handle our request.
AppInitializer.java
package com.javacodegeeks.configuration;

import javax.servlet.ServletContext;
import javax.servlet.ServletException;
import javax.servlet.ServletRegistration;

import org.springframework.web.WebApplicationInitializer;
import org.springframework.web.context.support.AnnotationConfigWebApplicationContext;
import org.springframework.web.servlet.DispatcherServlet;

public class AppInitializer implements WebApplicationInitializer {

    public void onStartup(ServletContext container) throws ServletException {

        AnnotationConfigWebApplicationContext ctx = new AnnotationConfigWebApplicationContext();
        ctx.register(AppConfig.class);
        ctx.setServletContext(container);

        ServletRegistration.Dynamic servlet = container.addServlet(
                "dispatcher", new DispatcherServlet(ctx));

        servlet.setLoadOnStartup(1);
        servlet.addMapping("/");
    }

}
5.8 Application Controller
In this section, we will add Controller which will server GET and POST requests. This is a Spring based controller with annotation based handling of requests .
AppController.java
package com.javacodegeeks.controller;

import java.util.List;
import java.util.Locale;

import javax.validation.Valid;

import org.springframework.beans.factory.annotation.Autowired;
import org.springframework.context.MessageSource;
import org.springframework.context.annotation.ComponentScan;
import org.springframework.stereotype.Controller;
import org.springframework.ui.ModelMap;
import org.springframework.validation.BindingResult;
import org.springframework.validation.FieldError;
import org.springframework.web.bind.annotation.PathVariable;
import org.springframework.web.bind.annotation.RequestMapping;
import org.springframework.web.bind.annotation.RequestMethod;

import com.javacodegeeks.model.Employee;
import com.javacodegeeks.service.EmployeeService;


@Controller
@RequestMapping("/")
@ComponentScan("com.javacodegeeks")
public class AppController {

    @Autowired
    EmployeeService service;

    @Autowired
    MessageSource messageSource;

     // This method will list all existing employees.
    @RequestMapping(value = { "/", "/list" }, method = RequestMethod.GET)
    public String listEmployees(ModelMap model) {

        List employees = service.findAllEmployees();
        model.addAttribute("employees", employees);
        return "allemployees";
    }

    // This method will provide the medium to add a new employee.
    @RequestMapping(value = { "/new" }, method = RequestMethod.GET)
    public String newEmployee(ModelMap model) {
        Employee employee = new Employee();
        model.addAttribute("employee", employee);
        model.addAttribute("edit", false);
        return "registration";
    }

     // This method will be called on form submission, handling POST request for
     // saving employee in database. It also validates the user input
    @RequestMapping(value = { "/new" }, method = RequestMethod.POST)
    public String saveEmployee(@Valid Employee employee, BindingResult result,
            ModelMap model) {

        if (result.hasErrors()) {
            return "registration";
        }

         // Preferred way to achieve uniqueness of field [ssn] should be implementing custom @Unique annotation
         // and applying it on field [ssn] of Model class [Employee].Below mentioned peace of code [if block] is
          // to demonstrate that you can fill custom errors outside the validation
         // framework as well while still using internationalized messages.


        if(!service.isEmployeeSsnUnique(employee.getId(), employee.getSsn())){
            FieldError ssnError =new FieldError("employee","ssn",messageSource.getMessage("non.unique.ssn", new String[]{employee.getSsn()}, Locale.getDefault()));
            result.addError(ssnError);
            return "registration";
        }

        service.saveEmployee(employee);

        model.addAttribute("success", "Employee " + employee.getName() + " registered successfully");
        return "success";
    }

     // This method will provide the medium to update an existing employee.
    @RequestMapping(value = { "/edit-{ssn}-employee" }, method = RequestMethod.GET)
    public String editEmployee(@PathVariable String ssn, ModelMap model) {
        Employee employee = service.findEmployeeBySsn(ssn);
        model.addAttribute("employee", employee);
        model.addAttribute("edit", true);
        return "registration";
    }


     // This method will be called on form submission, handling POST request for
     // updating employee in database. It also validates the user input

    @RequestMapping(value = { "/edit-{ssn}-employee" }, method = RequestMethod.POST)
    public String updateEmployee(@Valid Employee employee, BindingResult result,
            ModelMap model, @PathVariable String ssn) {

        if (result.hasErrors()) {
            return "registration";
        }

        if(!service.isEmployeeSsnUnique(employee.getId(), employee.getSsn())){
            FieldError ssnError =new FieldError("employee","ssn",messageSource.getMessage("non.unique.ssn", new String[]{employee.getSsn()}, Locale.getDefault()));
            result.addError(ssnError);
            return "registration";
        }

        service.updateEmployee(employee);

        model.addAttribute("success", "Employee " + employee.getName()  + " updated successfully");
        return "success";
    }

     // This method will delete an employee by it's SSN value.
    @RequestMapping(value = { "/delete-{ssn}-employee" }, method = RequestMethod.GET)
    public String deleteEmployee(@PathVariable String ssn) {
        service.deleteEmployeeBySsn(ssn);
        return "redirect:/list";
    }

}
5.9 Views
We will write our Views of MVC in java server pages (jsp). We will need a registration page, showing all employees page and a page to confirm our action to add an employee to our database. Under src -> java -> webapp -> WEB-INF, create a folder views. Inside views , we will write our views.
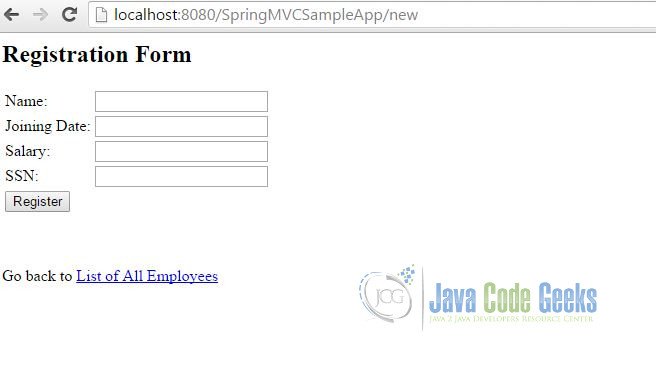
registration.jsp
<%@ page language="java" contentType="text/html; charset=ISO-8859-1"
    pageEncoding="ISO-8859-1"%>
<%@ taglib prefix="form" uri="http://www.springframework.org/tags/form"%>
<%@ taglib prefix="c" uri="http://java.sun.com/jsp/jstl/core" %>

<html>

<head>
    <meta http-equiv="Content-Type" content="text/html; charset=ISO-8859-1">
    <title>Employee Registration Form</title>

<style>

    .error {
        color: #ff0000;
    }
</style>

</head>

<body>

    <h2>Registration Form</h2>

    <form:form method="POST" modelAttribute="employee">
        <form:input type="hidden" path="id" id="id"/>
        <table>
            <tr>
                <td><label for="name">Name: </label> </td>
                <td><form:input path="name" id="name"/></td>
                <td><form:errors path="name" cssClass="error"/></td>
            </tr>

            <tr>
                <td><label for="joiningDate">Joining Date: </label> </td>
                <td><form:input path="joiningDate" id="joiningDate"/></td>
                <td><form:errors path="joiningDate" cssClass="error"/></td>
            </tr>

            <tr>
                <td><label for="salary">Salary: </label> </td>
                <td><form:input path="salary" id="salary"/></td>
                <td><form:errors path="salary" cssClass="error"/></td>
            </tr>

            <tr>
                <td><label for="ssn">SSN: </label> </td>
                <td><form:input path="ssn" id="ssn"/></td>
                <td><form:errors path="ssn" cssClass="error"/></td>
            </tr>

            <tr>
                <td colspan="3">
                    <c:choose>
                        <c:when test="${edit}">
                            <input type="submit" value="Update"/>
                        </c:when>
                        <c:otherwise>
                            <input type="submit" value="Register"/>
                        </c:otherwise>
                    </c:choose>
                </td>
            </tr>
        </table>
    </form:form>
    <br/>
    <br/>
    Go back to <a href="<c:url value='/list' />">List of All Employees</a>
</body>
</html>
To show all employees, we will need allemployees.jsp .
allemployees.jsp
<%@ page language="java" contentType="text/html; charset=ISO-8859-1"
    pageEncoding="ISO-8859-1"%>
<%@ taglib prefix="c" uri="http://java.sun.com/jsp/jstl/core" %>
<html>
<head>
    <meta http-equiv="Content-Type" content="text/html; charset=ISO-8859-1">
    <title>University Enrollments</title>

    <style>
        tr:first-child{
            font-weight: bold;
            background-color: #C6C9C4;
        }
    </style>

</head>


<body>
    <h2>List of Employees</h2>
    <table>
        <tr>
            <td>NAME</td><td>Joining Date</td><td>Salary</td><td>SSN</td><td></td>
        </tr>
        <c:forEach items="${employees}" var="employee">
            <tr>
            <td>${employee.name}</td>
            <td>${employee.joiningDate}</td>
            <td>${employee.salary}</td>
            <td><a href="<c:url value='/edit-${employee.ssn}-employee' />">${employee.ssn}</a></td>
            <td><a href="<c:url value='/delete-${employee.ssn}-employee' />">delete</a></td>
            </tr>
        </c:forEach>
    </table>
    <br/>
    <a href="<c:url value='/new' />">Add New Employee</a>
</body>
</html>
For a confirmation page, we will create a success.jsp
sucess.jsp
<%@ page language="java" contentType="text/html; charset=ISO-8859-1"
    pageEncoding="ISO-8859-1"%>
<%@ taglib prefix="c" uri="http://java.sun.com/jsp/jstl/core" %>

<html>
<head>
<meta http-equiv="Content-Type" content="text/html; charset=ISO-8859-1">
<title>Registration Confirmation Page</title>
</head>
<body>
    message : ${success}
    <br/>
    <br/>
    Go back to <a href="<c:url value='/list' />">List of All Employees</a>

</body>

</html>
5.10 Deploy and running the app
Once we are done with coding, right click on the project in eclipse to maven clean and then maven install. If you face the error saying can not find symbol: method addServlet , ignore the error and export the project as a WAR file. Now copy this WAR file in your $TOMCAT_HOME/webapps directory. Go to commandline in $TOMCAT_HOME/bin directory and run start.bat . This will start our webserver. Now we can go to browser and access our web application. You might run into the below error
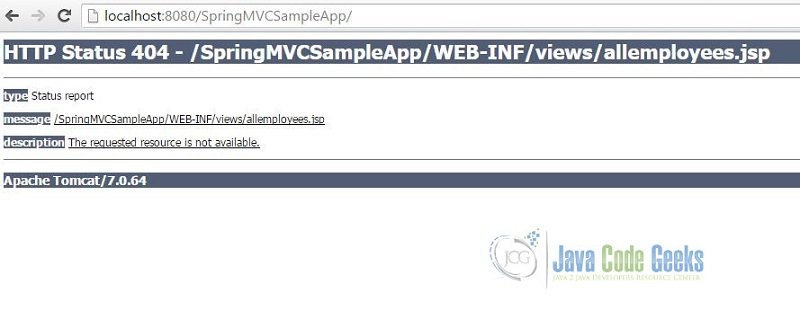
To correct that error, go into $TOMCAT_HOME/webapps/SpringMVCSampleApp/WEB-INF/classes/WEB-INF directory and copy views folder and paste into $TOMCAT_HOME/webapps/SpringMVCSampleApp/WEB-INF directory. Basically, we have mis-configured our views on classpath.
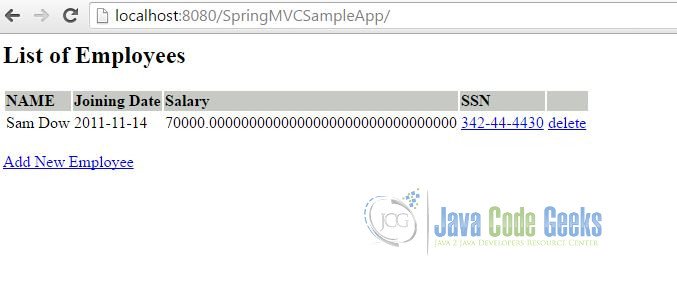
Now access the webapplication http://localhost:8080/SpringMVCSampleApp/ in browser, and you will see below output
6. Download
In this tutorial, we showed how to create a simple CRUD MVC web application using Spring and Hibernate technologies.
You can download the full source code of this example here: SpringMVCSampleApp
7. Related Articles
Following articles were referred to prepare this tutorial.
