1. Introduction
Hibernate is a high performance Object/Relational mapping (ORM) framework completely used in Java. Hibernate also provides query service along with persistence. This gives developers a way to map the object structures in Java classes to relational database tables.
ORM framework eases to store the data from object instances into persistence data store and load that data back into the same object structure. ORM is actually a programming technique for converting data between relational databases and object oriented programming languages.
Table of Contents
Some pros of using ORM are the followings
- Hides details of SQL queries from object orientation logic
- Database implementation is sorted out on its own
- Fast development in application and easy code generation
- Transaction management and automatic key generation
Hibernate has three different components:
- Entities – Entities are classes mapped by Hibernate to relational database tables. These are simple Java classes.
- Configuration Metadata – This contains the information about how to map the entities to relational database tables. Java provides the way of annotations, but traditional hibernate configuration provides an XML based configuration file. This information is used at runtime to map the data store and back to Java objects.
- Hibernate Query Language (HQL) – Queries send to database in hibernate can be formulated in Native SQL or Hibenate’s own query language. These queries are translated at runtime into the currently used dialect of the chosen product.
2. Environment
We will use following environment
- Windows 7
- Java version 7
- Eclipse Kepler 4.3
- Maven 3.0.4
- MySQL 5.0.86
- Hibernate Plugin 4.1.2 for Eclipse
We will create a maven project for this tutorial in our eclipse.
3. Basics of Hibernate
Hibernate maps Java classes to database tables and from Java data types to SQL data types. Hibernate lies between relational database and Java objects to handle all the work in persisting those objects based on accurate O/R configuration.
Hibernate provides following advantages
- Hibernate handles all the mapping of java classes to database tables using XML configuration without writing any code.
- It provides APIs for storing and retrieving objects directly to and from the database.
- If there is a change in database or in any table, you only need to change in XML configuration file.
- Hibernate does not require an application server to operate.
- Minimize database access with smart fetching strategies.
- Provides simply querying of data.
3.1 SessionFactory and Sessions
SessionFactory is thread-safe and provides an immutable cache for the mappings. For each database you use in your configuration, there is one session factory. Session factory can also provide session’s first level cache and an application wide second level cache.
Session is used to get a physical connection with a database. Persistent objects are retrieved through a Session object. The main function of Session objects is to create, read and delete operations for instances of mapped entity classes.
Typical transaction with session will look like below
		Session session = factory.openSession();
		Transaction tx = null;
		Integer empIdSaved = null;
		try {
			tx = session.beginTransaction();
			// Some persistence work to save object in session
			tx.commit();
		} catch(HibernateException ex) {
			if(tx != null)
			   tx.rollback();
			ex.printStackTrace();
		} finally {
			session.close();
		}
3.2 Configuration
Hibernate needs to know where it can look for mapping between Java classes and relational database tables. Along with this mapping, Hibernate needs some database configuration settings and parameters. This information is provided through hibernate.cfg.xml .
Below is a sample configuration file
hibernate.cfg.xml
<?xml version="1.0" ?>
<!DOCTYPE hibernate-configuration PUBLIC
		"-//Hibernate/Hibernate Configuration DTD 3.0//EN"
		"http://hibernate.sourceforge.net/hibernate-configuration-3.0.dtd">
<hibernate-configuration>
    <session-factory>
        <property name="hibernate.connection.driver_class">org.gjt.mm.mysql.Driver</property>
        <property name="hibernate.connection.url">jdbc:mysql://127.0.0.1:3306/ConfigDB</property>
        <property name="hibernate.dialect">org.hibernate.dialect.MySQLDialect</property>
    </session-factory>
   <mapping resource="Employee.hbm.xml"/>
</hibernate-configuration>
From this file, we can see some of the required configuration properties and mapping file for mapping database to java class.
- hibernate.connection.driver_class – This is a JDBC driver used for connection.
- hibernate.connection.url – This is a JDBC URL to database instance. At the end,we specify database we are connecting to, like
ConfigDBin this case. - hibernate.dialect – Hibernate generates appropriate SQL dialect for chosen database.
- mapping – This tag includes a resource file which will be used for mapping database table to classes.
4. Mapping
Hibernate provides a way to map Java objects to relational database tables through an XML file. This mapping file tells hibernate how to map the defined class or classes to the database table.
For the example, we have been showing above, there was a file Employee.hbm.xml mentioned in configuration xml file. This mapping file will look like below
Employee.hbm.xml
<?xml version="1.0"?>
<!DOCTYPE hibernate-mapping PUBLIC "-//Hibernate/Hibernate Mapping DTD 3.0//EN"
"http://hibernate.sourceforge.net/hibernate-mapping-3.0.dtd">
<!-- Generated Jun 18, 2016 1:29:07 PM by Hibernate Tools 3.4.0.CR1 -->
<hibernate-mapping>
    <class name="com.javacodegeeks.example.Employee" table="employee">
        <id name="id" type="int">
            <column name="ID" />
            <generator class="assigned" />
        </id>
        <property name="first_name" type="java.lang.String">
            <column name="FIRSTNAME" />
        </property>
        <property name="last_name" type="java.lang.String">
            <column name="LASTNAME" />
        </property>
        <property name="dept_id" type="int">
            <column name="DEPT_ID" />
        </property>
    </class>
</hibernate-mapping>
Some key points from this file are
<class>element is used to indicate mapping of Java class to database table.<id>element maps the unique ID to primary key of database table.<property>element maps Java class property to column in database table
5. Annotations
There is an alternative way to provide all the mappings and configurations using annotations in Java POJO file. The metadata is used for mapping. This helps developer to understand the table structure and POJO.
The above example of employee will look like below with annotations
Employee.java
package com.javacodegeeks.example;

@Entity
@Table(name = "EMPLOYEE")
public class Employee {
   @Id @GeneratedValue
   @Column(name = "id")
   private int id;
   @Column(name = "first_name")
   private String first_name;
   @Column(name = "last_name")
   private String last_name;
   @Column(name = "dept_id")
   private int dept_id;

    public Employee(){

    }

    public Employee(int empId, String firstname, String lastname, int deptId) {
		// TODO Auto-generated constructor stub
		this.id = empId;
		this.first_name = firstname;
		this.last_name = lastname;
		this.dept_id = deptId;
    }

    public int getId() {
		return id;
    }

    public void setId(int id) {
		this.id = id;
    }

    public String getFirst_name() {
		return first_name;
    }

	public void setFirst_name(String first_name) {
		this.first_name = first_name;
	}

	public String getLast_name() {
		return last_name;
	}

	public void setLast_name(String last_name) {
		this.last_name = last_name;
	}

	public int getDept_id() {
		return dept_id;
	}

	public void setDept_id(int dept_id) {
		this.dept_id = dept_id;
	}
}
6. Query Language
Hibernate provides Hibernate Query Language (HQL) which is an object oriented query language, very similar to SQL. HQL does not work with tables or columns, but instead it operates on objects and their properties. Hibernate provides SQL generation and caching. In HQL, keywords of SQL are not case sensitive, but table names and column names are.
Here is the example on how to use Hibernate Query Language.
String hqlStr = "SELECT E.first_name FROM Employee E";
Query query = session.createQuery(hqlStr);
List results = query.list();
7. Example
In this section, we will show an example of Hibernate.
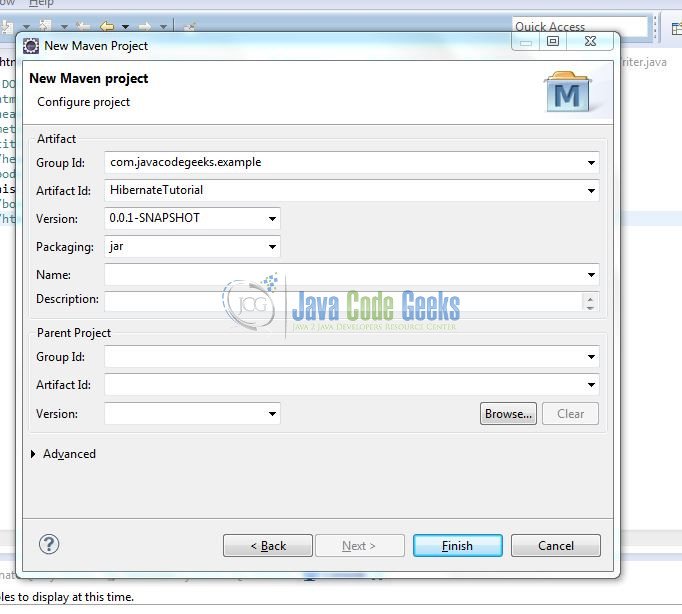
7.1 Create a project with Maven
First, let’s create a maven project with ArtifactId as HibernateTutorial as shown below
7.2 Add Hibernate dependencies
To make sure we have hibernate in project, we will add hibernate dependencies through pom.xml. The dependencies’ configuration will look like below
pom.xml
<project xmlns="http://maven.apache.org/POM/4.0.0" xmlns:xsi="http://www.w3.org/2001/XMLSchema-instance" xsi:schemaLocation="http://maven.apache.org/POM/4.0.0 http://maven.apache.org/xsd/maven-4.0.0.xsd">
  <modelVersion>4.0.0</modelVersion>
  <groupId>com.javacodegeeks.example</groupId>
  <artifactId>HibernateTutorial</artifactId>
  <version>0.0.1-SNAPSHOT</version>
  <dependencies>
  	<dependency>
  		<groupId>org.hibernate</groupId>
  		<artifactId>hibernate-core</artifactId>
  		<version>4.3.11.Final</version>
  	</dependency>
  </dependencies>
</project>
7.3 Modify hibernate configuration
Next we will create a hibernate configuration file. Under resources directory, right click and select New -> Hibernate Configuration XML File. Fill in the details as shown below
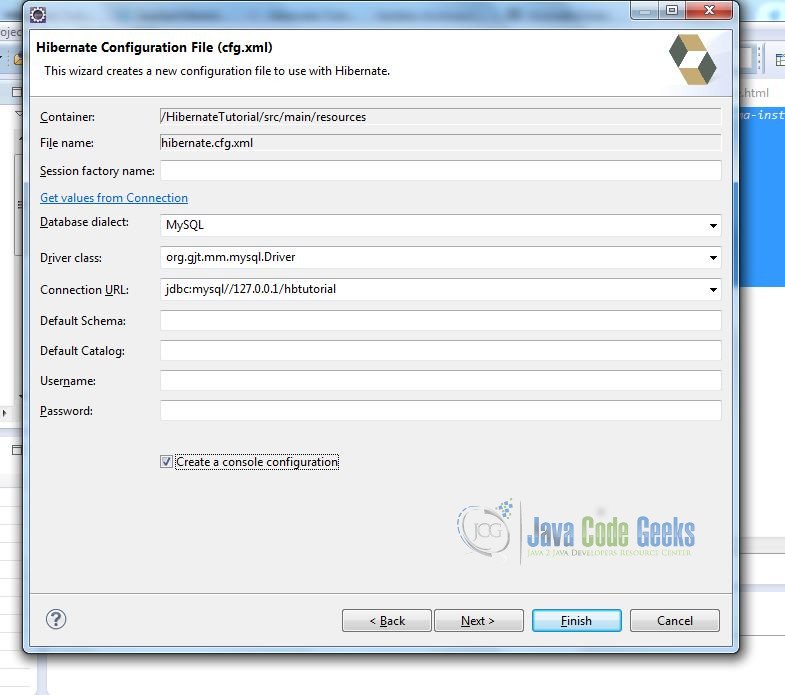

Also do not forget to select the checkbox “Create a console configuration”. The hibernate.cfg.xml file will look like below:
hibernate.cfg.xml
<?xml version="1.0" encoding="UTF-8"?>
<!DOCTYPE hibernate-configuration PUBLIC
		"-//Hibernate/Hibernate Configuration DTD 3.0//EN"
		"http://hibernate.sourceforge.net/hibernate-configuration-3.0.dtd">
<hibernate-configuration>
    <session-factory>
        <property name="hibernate.connection.driver_class">org.gjt.mm.mysql.Driver</property>
        <property name="hibernate.connection.url">jdbc:mysql://127.0.0.1/hbtutorial</property>
        <property name="hibernate.dialect">org.hibernate.dialect.MySQLDialect</property>
    </session-factory>
</hibernate-configuration>
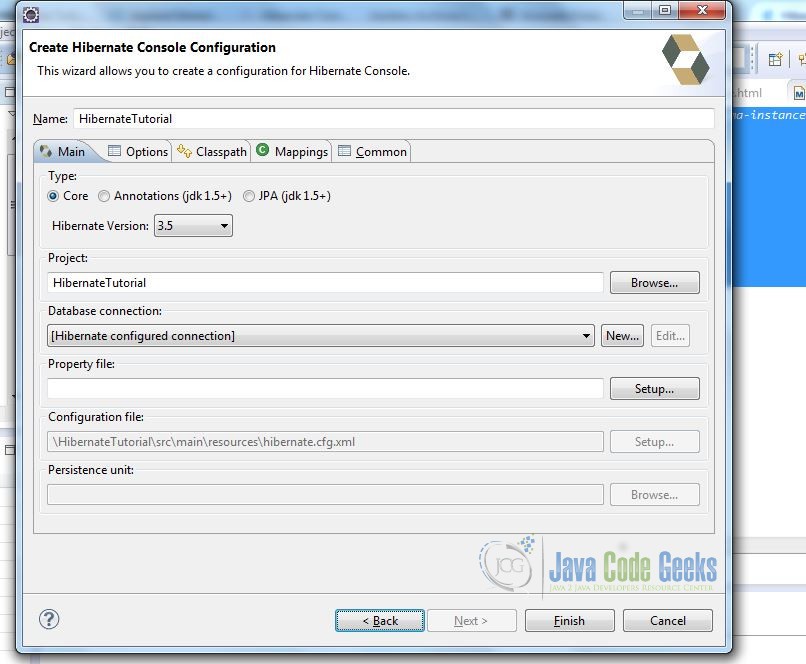
7.4 Hibernate console configuration
In earlier step while creating hibernate configuration file, we selected “Create a console configuration” checkbox. Console configuration will look like below:
That step will generate a console configuration and if you have already created a database and tables, it will display all these tables in hibernate console as shown below:
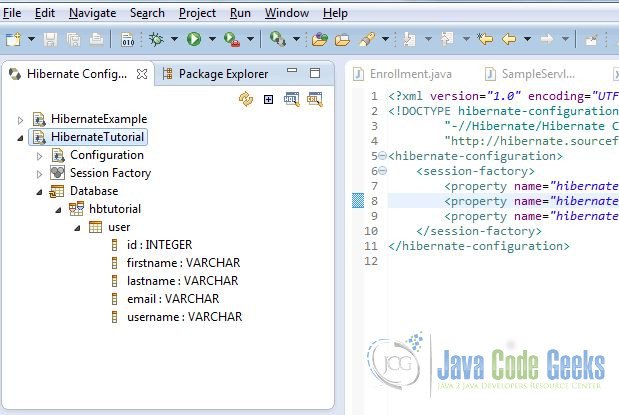
7.5 Create Java Class
Now before mapping this relational database table to Java class, we will have to create a java class.
As shown in the code below, these fields id,firstname,lastname,email,username are our columns in database table User.
User.java
package com.javacodegeeks.example;

public class User {

	private int id;
	private String firstname;
	private String lastname;
	private String email;
	private String username;

	public User()
	{

	}

	public User(int userid, String firstname, String lastname, String email, String username)
	{
		this.setId(userid);
		this.setFirstname(firstname);
		this.setLastname(lastname);
		this.setEmail(email);
		this.setUsername(username);
	}

	public int getId() {
		return id;
	}

	public void setId(int id) {
		this.id = id;
	}

	public String getFirstname() {
		return firstname;
	}

	public void setFirstname(String firstname) {
		this.firstname = firstname;
	}

	public String getLastname() {
		return lastname;
	}

	public void setLastname(String lastname) {
		this.lastname = lastname;
	}

	public String getEmail() {
		return email;
	}

	public void setEmail(String email) {
		this.email = email;
	}

	public String getUsername() {
		return username;
	}

	public void setUsername(String username) {
		this.username = username;
	}


}
7.6 Mapping Java objects to database tables
To map our java object to database table, under src->main->resources, create a file with option Hibernate XML Mapping file(hbm.xml) as shown below
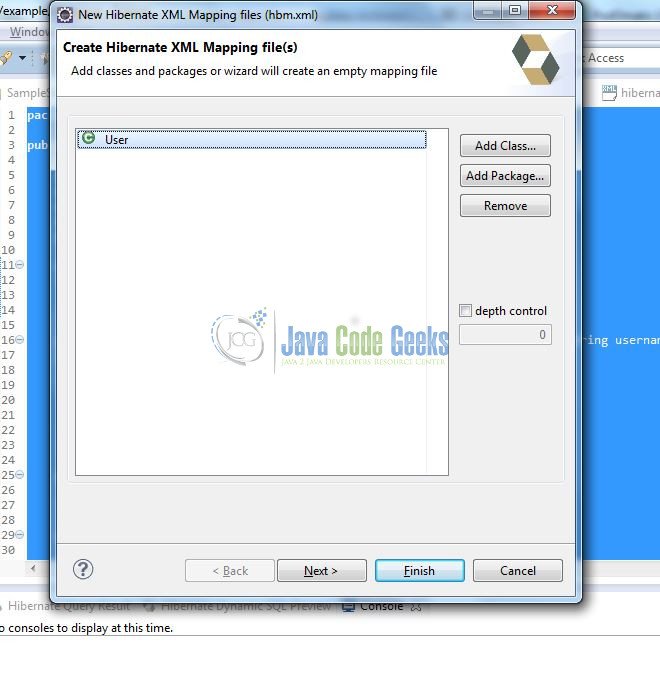
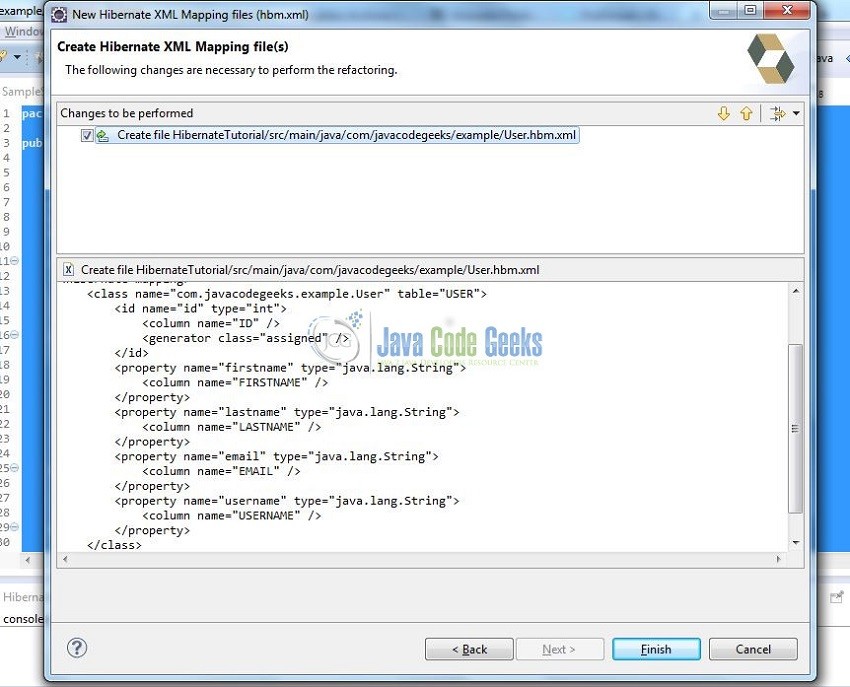
Click Next and wizard will show you mapping fields along with Java class properties as below
7.7 Sample Program to test hibernate
Now we will create a test program to insert and fetch user data in database table.
HibernateTutorialTest.java
package com.javacodegeeks.example;

import java.util.ArrayList;
import java.util.List;

import org.hibernate.HibernateException;
import org.hibernate.Session;
import org.hibernate.SessionFactory;
import org.hibernate.Transaction;
import org.hibernate.boot.registry.StandardServiceRegistryBuilder;
import org.hibernate.cfg.Configuration;
import org.hibernate.service.ServiceRegistry;

public class HibernateTutorialTest {
	private static SessionFactory factory;
	private static ServiceRegistry serviceRegistry;

	public static void main(String[] args) {
		// TODO Auto-generated method stub

		Configuration config = new Configuration();
		config.configure();
		config.addAnnotatedClass(User.class);
		config.addResource("User.hbm.xml");
		serviceRegistry = new StandardServiceRegistryBuilder().applySettings(config.getProperties()).build();
		factory = config.buildSessionFactory(serviceRegistry);

		HibernateTutorialTest hbTest = new HibernateTutorialTest();
		hbTest.insertUser(1,"Mark","Johnson","mark.johnson@gmail.com","mjohnson");
		hbTest.insertUser(2,"Samuel","Johnson","sam.johnson@gmail.com","sjohnson");

		List users = hbTest.listUsers();
		for(User u : users){
			System.out.print(u.getId() + " ");
			System.out.print(u.getFirstname() + " ");
			System.out.print(u.getLastname() + " ");
			System.out.print(u.getEmail() + " ");
			System.out.print(u.getUsername() + " ");
			System.out.println();
		}

	}

	private int insertUser(int id, String fname, String lname, String email, String username)
	{
		Session session = factory.openSession();
		Transaction tx = null;
		Integer userIdSaved = null;
		try {
			tx = session.beginTransaction();
			User u = new User(id,fname,lname,email,username);
			userIdSaved = (Integer) session.save(u);
			tx.commit();
		} catch(HibernateException ex) {
			if(tx != null)
				tx.rollback();
			ex.printStackTrace();
		} finally {
			session.close();
		}

		return userIdSaved;

	}

	private List listUsers()
	{
		Session sesn = factory.openSession();
		Transaction tx = null;
		List users = new ArrayList();
		try{
			tx = sesn.beginTransaction();
			users = (List)sesn.createQuery("From User").list();
			tx.commit();
		} catch(HibernateException e) {
			e.printStackTrace();
		} finally {
			sesn.close();
		}

		return users;
	}

}
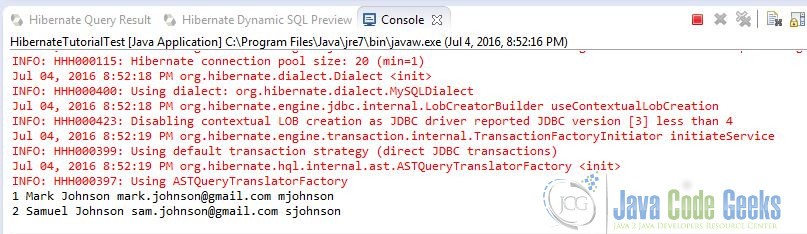
Eclipse will show following output once you run this program:
8. Download
This was a Hibernate Tutorial for beginners.
You can download the full source code of this example here: HibernateTutorial

nice content clearly explained
Thank you, it was very helpfull for me to start with Hibernate.