Java Servlet Websocket Example
In this article we illustrate a simple chat program using a Websocket endpoint.
The Java API for websocket provides both client and server api’s and can be found in the javax.websocket javax.websocket.server packages accordingly.
The example article will do a brief dive into the mechanics of Websockets from a Java perspective and then it will demonstrate some of it’s mechanics via a simple browser based chat program.
The sample browser program will be driven from the command line using maven and in particular the maven cargo plugin.
1. Introduction
As a standard solution (born from JSR 356) to previous comet / long polling solutions, websockets provide a more efficient desktop-like experience for the end user.
With long polling, a client requests data from the server (infrequently) and in the event of data being available, it is sent back to the client, only for the client to open another connection some time later to repeat said cycle.
Should data not be available, the server hangs on to the connection until data is available and then responds, with the cycle repeating itself again.
Websockets, allow for a single persistent, bidirectional connection to exist between server and client where either party can push data / requests to each other in near real time.
2. Technologies used
The example code in this article was built and run using:
- Java 8
- Maven 3.3.9
- STS (3.9.0.RELEASE)
- Ubuntu 16.04 (Windows, Mac or Linux will do fine)
3. Setup
To ensure that Maven and Java are installed you can execute the following:
Confirming Setup
jean-jay@jeanjay-SATELLITE-L750D:~$ java -version
java version "1.8.0_101"
Java(TM) SE Runtime Environment (build 1.8.0_101-b13)
Java HotSpot(TM) 64-Bit Server VM (build 25.101-b13, mixed mode)
jean-jay@jeanjay-SATELLITE-L750D:~$ javac -version
javac 1.8.0_101
jean-jay@jeanjay-SATELLITE-L750D:~$ mvn -version
Apache Maven 3.3.9
Maven home: /usr/share/maven
Java version: 1.8.0_101, vendor: Oracle Corporation
Java home: /home/jean-jay/runtimes/jdk1.8.0_101/jre
Default locale: en_ZA, platform encoding: UTF-8
OS name: "linux", version: "4.10.0-37-generic", arch: "amd64", family: "unix"
jean-jay@jeanjay-SATELLITE-L750D:~$
4. Maven Cargo Plugin
Cargo is a wrapper that allows us to do programmatic manipulation of Containers, in our case servlet containers, in a standardized way.
The maven cargo plugin allows us to easily, and as part of the maven build process, deploy and run our application from the command line.
Below follows our maven cargo plugin configuration: (Using version 1.6.4)
Maven Cargo Plugin Configuration
<plugin>
				<groupId>org.codehaus.cargo</groupId>
				<artifactId>cargo-maven2-plugin</artifactId>
				<configuration>
					<container>
						<containerId>tomcat8x</containerId>
						<artifactInstaller>
							<groupId>org.apache.tomcat</groupId>
							<artifactId>tomcat</artifactId>
							<version>${tomcat.version}</version>
						</artifactInstaller>
					</container>
					<configuration>
						<type>standalone</type>
						<home>
							${project.build.directory}/apache-tomcat-${tomcat.version}
						</home>
						<properties>
							<cargo.servlet.port>8080</cargo.servlet.port>
							<cargo.logging>high</cargo.logging>
						</properties>
					</configuration>
					<deployables>
						<deployable>
							<groupId>${project.groupId}</groupId>
							<artifactId>${project.artifactId}</artifactId>
							<type>war</type>
							<properties>
								<context>/chat</context>
							</properties>
						</deployable>
					</deployables>
				</configuration>
</plugin>- lines 7-11: Uses maven to find and download the relevant version of Tomcat (8.x) we want.
- line 16: Configure our container to be a standalone instance and place it in a specific directory.
- lines 24-31: We specify the artifact to deploy, type of packaging and the context path.
5. Defining a Websocket Endpoint
WebSocket endpoints can be defined via the following two methods:
- By extending the Endpoint class
- By annotations
Annotations are far more pervasive thus we will focus on that approach in the example. The following snippet of code shows our simple Endpoint class definition.
ChatEndPoint
@ServerEndpoint(value = "/{username}", encoders = MessageEncoder.class, decoders = MessageDecoder.class)
public final class ChatEndPoint {

    @OnOpen
    public void onOpen(@PathParam(Constants.USER_NAME_KEY) final String userName, final Session session) {
        if (Objects.isNull(userName) || userName.isEmpty()) {
            throw new RegistrationFailedException("User name is required");
        } else {
            session.getUserProperties().put(Constants.USER_NAME_KEY, userName);
            if (ChatSessionManager.register(session)) {
                System.out.printf("Session opened for %s\n", userName);

                ChatSessionManager.publish(new Message((String) session.getUserProperties().get(Constants.USER_NAME_KEY), "***joined the chat***"), session);
            } else {
                throw new RegistrationFailedException("Unable to register, username already exists, try another");
            }
        }
    }

    @OnError
    public void onError(final Session session, final Throwable throwable) {
        if (throwable instanceof RegistrationFailedException) {
            ChatSessionManager.close(session, CloseCodes.VIOLATED_POLICY, throwable.getMessage());
        }
    }

    @OnMessage
    public void onMessage(final Message message, final Session session) {
        ChatSessionManager.publish(message, session);
    }

    @OnClose
    public void onClose(final Session session) {
        if (ChatSessionManager.remove(session)) {
            System.out.printf("Session closed for %s\n", session.getUserProperties().get(Constants.USER_NAME_KEY));

            ChatSessionManager.publish(new Message((String) session.getUserProperties().get(Constants.USER_NAME_KEY), "***left the chat***"), session);
        }
    }

    private static final class RegistrationFailedException extends RuntimeException {

        private static final long serialVersionUID = 1L;

        public RegistrationFailedException(final String message) {
            super(message);
        }
    }
}
- line 1: We use the
@ServerEndPointannotation to indicate our class will act as a websocket endpoint. We also specify the URL (together with a@PathParamusername) and someencodersanddecodersfor handling content marshaling in requests and responses. - line 4 & 5: The
@OnOpenannotation and the subsequent@PathParamannotation facilitate the connection initiation anduserNamecapture of a new incoming websocketSession. - line 7: Should the
userNamebe missing we fail fast and delegate off to the error handling logic by way of aRegistrationFailedExceptioninstance. - line 9: Should the
userNamebe valid we make use of a convenientMapfor client state to store theuserNameon the specificSession. - line 13: We let everyone know we have a new person joining the chat.
- line 15: Should the
userNameoverlap with someone else we reject the registration. - lines 20-25: The
@OnErrorflags our method for use as an error handler where we ultimately close theSessioninvolved. - line 27: The
@OnMessageannotation flags our method as a message handling method. - line 32: The
@OnCloseannotation flags our method as a close handler method. - line 34: Should the removal of the
Sessionsucceed, we let everyone know that theSession/ person concerned has left the chat.
Endpoints by default are stateful and are instantiated per connection / Session. To create a single shared, Endpoint , one can override the getEndpointInstance(...)method of ServerEndpointConfig.Configurator class.
6. Communication
To establish a websocket connection, the client (in our case the browser) will send a handshake request (mimicking HTTP). Because this runs on top of TCP, the famous 3 way handshake is done (guaranteed delivery and all that).
The server will then respond with a status code of 101(switch protocol). Once negotiated (server sends response to handshake ), the communication will switch to bidirectional binary protocol (Connection: Upgrade).
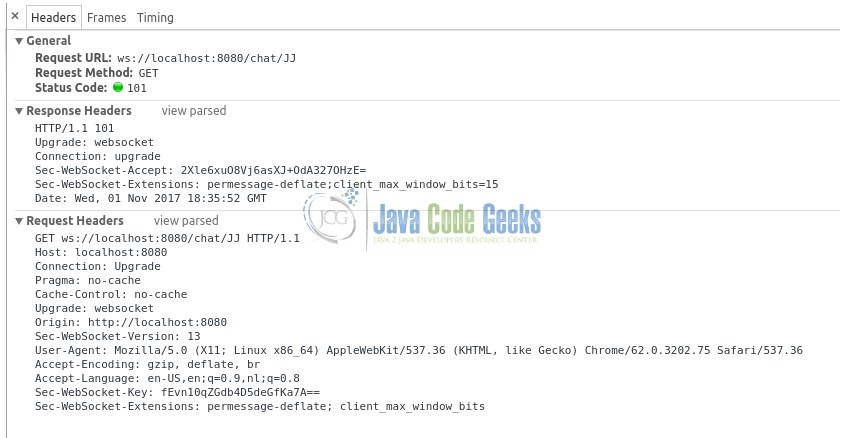
The following figure showcases the request and response (chrome developer console) from our sample chat application when negotiating a websocket connection between the browser and the server.

Here we can clearly see the Upgradeand Sec-Web*headers of the request with the subsequent server response headers Upgrade, Sec-Web* and response code 101.
7. Encoders and Decoders
Simply put, we use these abstractions to facilitate the serialization and deserialization of Java objects over the “wire”.
The following snippet showcases the encoder and decoder used by the sample application.
Encoders and Decoders
public final class MessageDecoder implements Decoder.Text<Message> {

    @Override
    public void destroy() {
    }

    @Override
    public void init(final EndpointConfig arg0) {
    }

    @Override
    public Message decode(final String arg0) throws DecodeException {
        try {
            return Constants.MAPPER.readValue(arg0, Message.class);
        } catch (IOException e) {
            throw new DecodeException(arg0, "Unable to decode text to Message", e);
        }
    }

    @Override
    public boolean willDecode(final String arg0) {
        return arg0.contains(Constants.USER_NAME_KEY) && arg0.contains(Constants.MESSAGE_KEY);
    }
}
...
public final class MessageEncoder implements Encoder.Text<Message> {

    @Override
    public void destroy() {
    }

    @Override
    public void init(final EndpointConfig arg0) {
    }

    @Override
    public String encode(final Message message) throws EncodeException {
        try {
            return Constants.MAPPER.writeValueAsString(message);
        } catch (JsonProcessingException e) {
            throw new EncodeException(message, "Unable to encode message", e);
        }
    }
}
8. Running the Program
Once downloaded and unzipped you can navigate to the project root folder. Once in the project root folder you can execute the following:
- Build:
mvn clean install package - Run:
mvn cargo:run
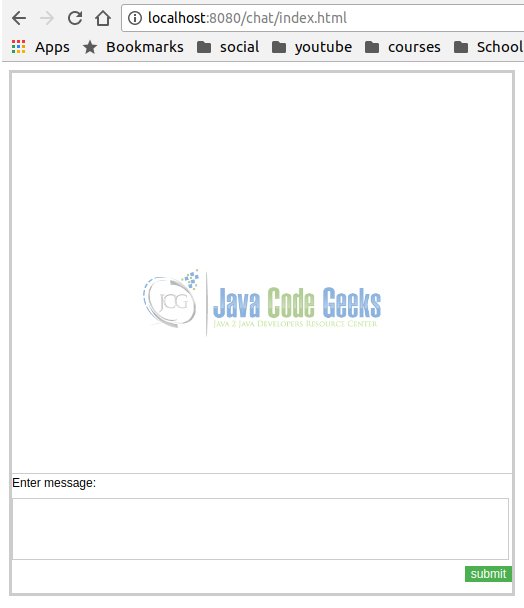
Once started, you can navigate to http:localhost:8080/chat/index.html this will relentlessly prompt you for a user name, after which it will load a very simple chat screen.
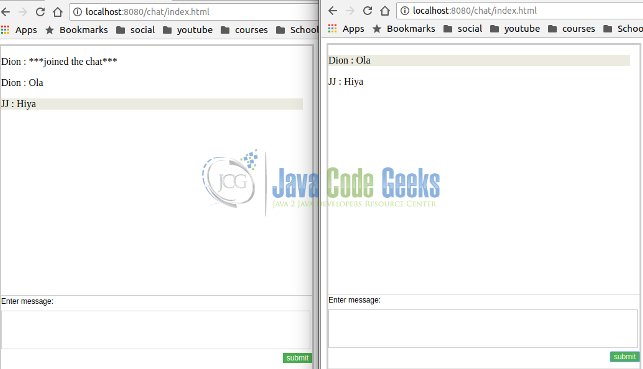
Feel free to open another window / tab to register another user to chat with. The persistent connection between browser and server will facilitate the push notifications of chat messages to all chat participants.
Below follows screen shots of using the chat program.
Once finished you can simply close the window and the user will leave the chat and the Session will subsequently be closed.
9. Summary
In this example we illustrated the mechanics of websockets and the usage of a Websocket enabled application for the purposes of a chat program.
We also illustrated how to setup and run our application using maven and more specifically the maven cargo plugin which allowed us to run our application without the need for explicitly installing and setting up a servlet 3.1 compliant container.
10. Download the Source Code
This was a Java Servlet Websocket Example.
You can download the full source code of this example here: Java Servlet Websocket Example


its not working when i started it in server
A very poor description. A very confusing example.