In this example, I will explain how to perform authentication using a servlet running on WildFly application server and Eclipse. We will not be using any database to store user credentials.
Table Of Contents
1. Introduction
Servlet is a program running on a server responding to user requests. Depending on what the user has requested, servlets will fetch the corresponding data from database and create an html response which will eventually be displayed in browser as a webpage. We will be using WildFly application server to run our web application and use Eclipse to write the servlets and control the application deployment. Every servlet has its own context path and can respond to various types of requests. GET, POST, PUT are examples of such requests. You should have eclipse installed at the least. Download WildFly from here. Download the latest version, by the time of writing this tutorial, 10.1.0.Final is the latest one. Download and extract it into any folder of your choice.
2. Configure WildFly in Eclipse
Open Eclipse and click on new server creation link in Servers tab of eclipse. If the Servers tab is not visible make sure you are in Java EE perspective, Select Servers option in Window -> Show View from eclipse menu bar.

This will bring up a New Server wizard as shown below. Choose WildFly 10. If WildFly is not available in the list, you should be able to find a link Download additional server adapters link instead of Show downloadable server adapters checkbox in top right of the wizard. Click that link and select wild fly. You may have to restart eclipse once that process is finished. Reopen new server wizard.
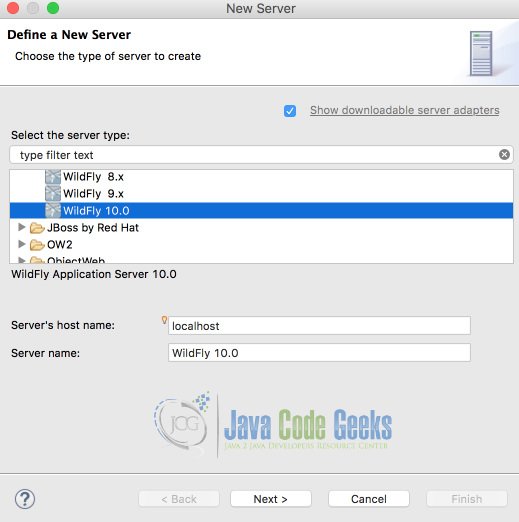
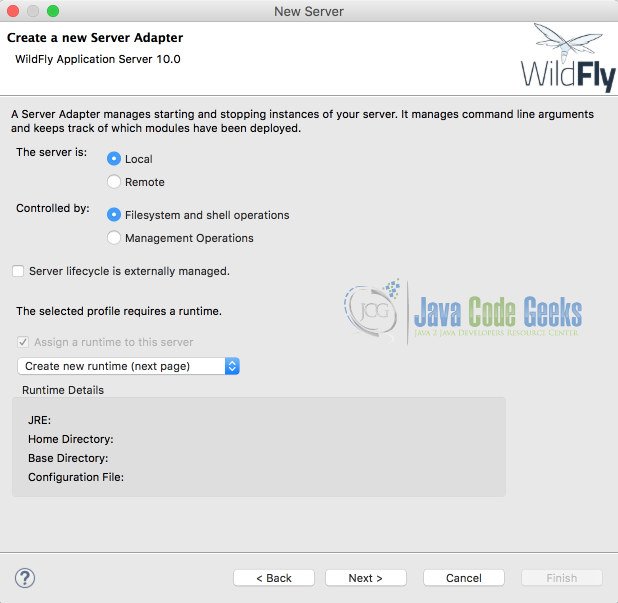
Choose WildFly 10.0 in the servers list and click Next and leave the default options in the new wizard page. They are just intended for you to mention when the server is local installation or if the server startup and shutdown is maintained outside of eclipse. We will be maintaining the appserver through eclipse, hence do not select the checkbox server life cycle is externally maintained. So, click Next.
Next page gives you option to Give a name to your server connection and locate the wildfly server installation. Click Browse and navigate to the folder where bin folder can be found in wildfly installation directory. For me the path is /users/buddha/programs/wildfly-10.1.0.Final. Pick the path applicable to you. You can leave rest of the settings alone and click Finish. 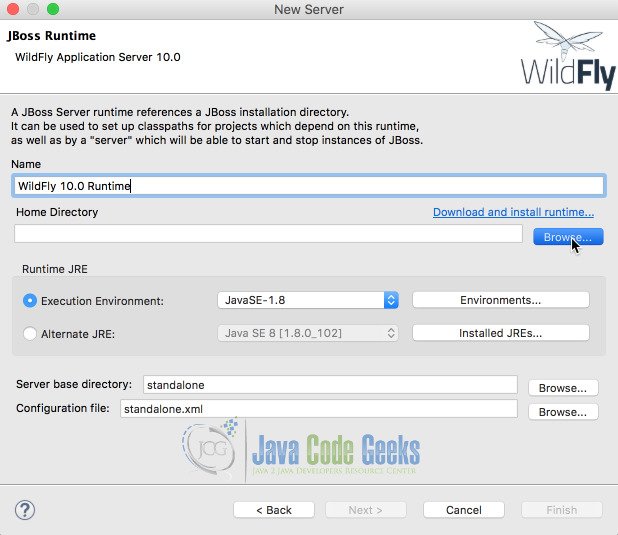
This finishes the configuration of wildfly server in eclipse. You should be able to see the server in servers tab of eclipse as shown below. 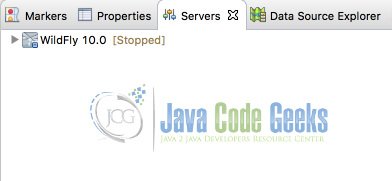
3. Create New Dynamic Web Project
We are now ready to start creating the project. Right click in the project explorer tab of eclipse and Choose New -> Dynamic Web Project. If Dynamic Web Project is not visible, make sure you are in Java EE perspective. Alternatively, you can also choose New -> Other and in the wizard, you can choose Web -> Dynamic Web Project. You will be presented with a New Dynamic Web Project wizard. Make sure you choose the target runtime to be the one we created just now and leave other options as it is and click Next. 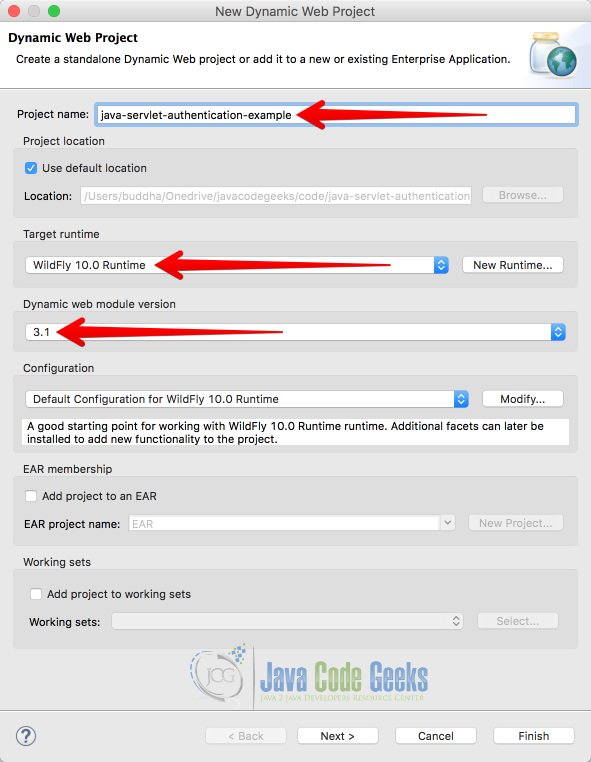
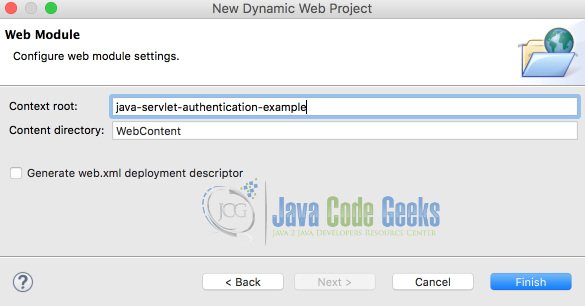
In the second page you will be asked to source folders and output folders, leave it as it is and click next. The new page asks you for context root and content directory. Context root is the url path you will be using to access our application through webbrowser, give it as java-servlet-authentication-example or anything of your choice. Content directory is the folder where we will be placing all html and other static assets that are to be publicly accessible. Once given, click finish.
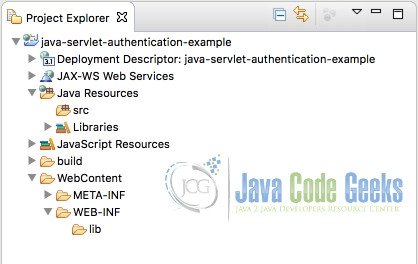
This will create an empty project inside your eclipse workspace. Look at the below screenshot for reference.
4. Create Authentication Helper Class
To keep the example simple, we will not be using any database to store username and password. Instead, we will simply create a class named AuthHelper which will have just one method isAllowed which will take user name and password and return true or false whether to allow the user or not. Following is the code for the authenticator.
package org.jcg;

public class AuthHelper {
  public static boolean isAllowed(String username, String password) {
    return username.contentEquals("admin") && password.contentEquals("password");
  }
}
This simply tests the given username and password with the predefined values.
5. Home Servlet
Let us now create a Servlet for handling authentication and redirect to application servlet. If the authentication fails the servlet will redirect to another login page with error message. To create a servlet, we can use the WebServlet annotation. Path for the servlet can be provided along with the annotation. Let us give /home as the path. One important point to be noted is that Class name can be anything, it doesn’t have to be same as the path value.
package org.jcg;

import java.io.*;
import javax.servlet.*;
import javax.servlet.annotation.WebServlet;
import javax.servlet.http.*;

@WebServlet("/home")
public class LoginServlet extends HttpServlet {

  protected void doPost(HttpServletRequest request, HttpServletResponse response) throws ServletException, IOException {
    String uname=request.getParameter("username");
    String pword=request.getParameter("password");
    response.setContentType("text/html");
    PrintWriter out = response.getWriter();

    if(AuthHelper.isAllowed(uname, pword)) {
      RequestDispatcher dispatcher=request.getRequestDispatcher("app");
      dispatcher.forward(request,response);
    }
    else{
      RequestDispatcher rd=request.getRequestDispatcher("/WEB-INF/loginWithError.html");
      rd.include(request,response);
    }
  }
}
When the user submits the username and password, doPost method will be triggered. Username and password can be passed as request parameters, we shall see how to pass the parameters when creating html page. In servlet class, we can read these request parameters using request object. We can pass the user name and password to AuthHelper and if successful, we can forward the request to another servlet named app. If the authentication fails, get the request dispatcher of another html (loginWithError.html ) containing error message which is located inside WEB-INF folder. Include this in the current dispatcher using include method and pass the same request and response objects that have been passed as parameters to doPost method.
6. Application Servlet
If the authentication is successful, Home servlet will be forwarding the request, to app servlet. AppServlet takes care of presenting the functionalities to the user. For our example, we will just display the username to indicate that the user has logged in successfully.

package org.jcg;

import java.io.*;

import javax.servlet.ServletException;
import javax.servlet.annotation.WebServlet;
import javax.servlet.http.*;

@WebServlet("/app")
public class AppServlet extends HttpServlet {
  protected void doPost(HttpServletRequest request, HttpServletResponse response) throws ServletException, IOException {
    response.setContentType("text/html");
    PrintWriter out = response.getWriter();

    String uname=request.getParameter("username");
    out.print("Hello "+ uname);
    out.close();
  }
}
7. Login Html
Login html page in its simplest form, has to contain a form whose action should be the servlet’s path and method should be post. This way, when we click submit button, this will call Home servlet’s doPost method.
<!DOCTYPE html>
<html>
<head>
<meta charset="UTF-8">
<title>Login Page</title>
</head>
<body>
  <form action="home" method="post">
    <table>
      <tr>
        <td>Name:</td>
        <td><input type="text" name="username" /></td>
      <tr>
        <td>Password:</td>
        <td><input type="password" name="password" /></td>
      <tr>
        <td></td>
        <td><input type="submit" value="login" /></td>
      </tr>
    </table>
  </form>
</body>
</html>
Our html form contains three input fields, two of them are accepting username and password and the final one is submit button which will trigger home servlet’s doPost method. This file has to be saved in WebContent folder with the name index.html.
8. Error Login Html
Ideally, we can use JSP or javascript or some other mechanism to use index.html and display an error, however as we are using static html files, we can create another html file that contains an error message to keep this example simple. However we don’t want want this error message html file to be accessible to public but only through Home servlet when user provides incorrect credentials. To do that, save this file in WEB-INF folder inside WebContent folder. Following is the source code for loginWithError.html
<!DOCTYPE html>
<html>
<head>
<meta charset="UTF-8">
<title>Login Page</title>
</head>
<body>
  <form action="home" method="post">
    <table>
      <tr>
        <td></td>
        <td style="color: red">Invalid Credentials</td>
      </tr>
      <tr>
        <td>Name:</td>
        <td><input type="text" name="username" /></td>
      <tr>
        <td>Password:</td>
        <td><input type="password" name="password" /></td>
      <tr>
        <td></td>
        <td><input type="submit" value="login" /></td>
      </tr>
    </table>
  </form>
</body>
</html>
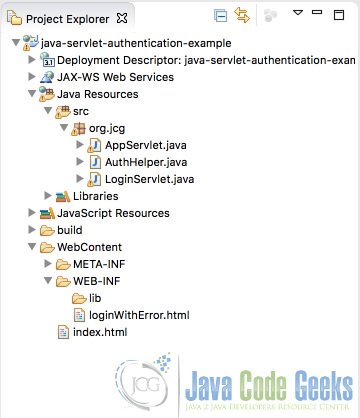
Once done, your project should look like below.
9. Deploying and Running the Project
In order to run our web application, we need to deploy it in the server we created and start the server. First step is to Right click on the project and Choose Run As -> Run On Server.
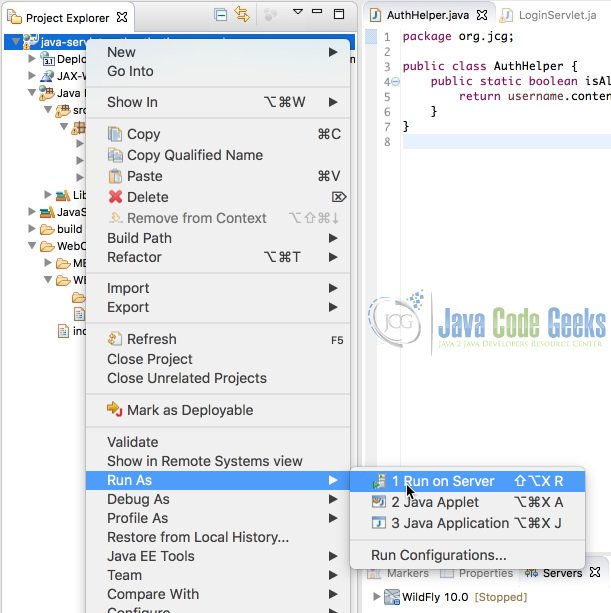
In the Run On server wizard, select the server we have created earlier and click finish. Eclipse console will display log of the running application server. Wait until you see a message like below.
[box type=”shadow” ]WildFly Full 10.1.0.Final (WildFly Core 2.2.0.Final) started in 23210ms – Started 485 of 741 services (415 services are lazy, passive or on-demand)[/box]
Once the above message is displayed in eclipse console, you should be able to access the application using the following hyperlink.
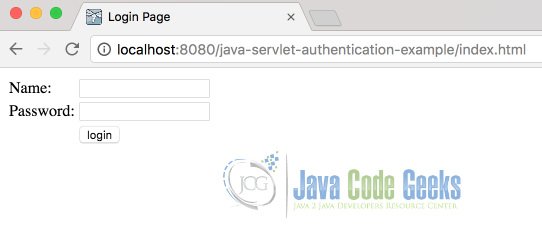
[box type=”shadow”]http://localhost:8080/java-servlet-authentication-example/index.html[/box]
This will open the following login page.
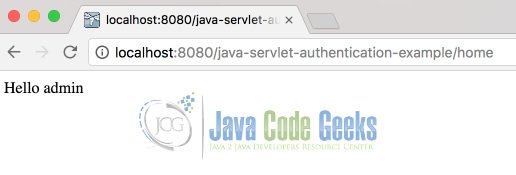
Enter user name as admin and password as password and click submit. Login must be successful and the application’s home page must be displayed. Of course it doesn’t contain anything except for Hello admin.
If the login failed, you should be presented with Invalid Credentials page as shown below.

10. Important Points
- Even though we have implemented the authentication using servlets to show how it can be done, this is very basic and should not be done in real projects, there are better ways to perform authentication especially using container’s security features.
- If we use javascript or jsp, we can easily display the error without resorting to create another html
- We generally use Filters to ensure the login is successful across session. Hence use this example as a beginning and continue forward learning about more secure ways of implementing authentication
