Using this example, we will be learning about Apache ActiveMQ BrokerService and various other ways in which a broker in ActiveMQ can be started and configured. But before we begin with our example, it is expected that we have a basic understanding of JMS concepts, ActiveMQ and Java/J2EE. JMS stands for Java Messaging API and Apache ActiveMQ is an open source message broker written in Java together with a full Java Message Service (JMS) client.
Apache ActiveMQ is packed up with enormous features but via this example, we will see how we embed a broker inside a connection and the usage of ActiveMQ BrokerService API.
1. Introduction
ActiveMQ has a BrokerService API that manages the lifecycle of an ActiveMQ Broker. In order to exchange messages, producers and consumers need to connect to the broker. If one wants to connect to the broker over the network then a transport connector is needed. If the client is within the same application as the broker and both are sharing the same JVM, then the broker can be connected using Virtual Machine Protocol. Based on the configured transport connector, broker knows how to accept and listen to connections from clients.
The org.apache.activemq.broker.BrokerService class implements the Service interface and has two subclasses:
- SslBrokerService
- XBeanBrokerService
The org.apache.activemq.broker.SslBrokerService is a BrokerService that allows access to the key and trust managers used by SSL connections. There is no reason to use this class unless SSL is being used AND the key and trust managers need to be specified from within the code. In fact, if the URI passed to this class does not have an “ssl” scheme, this class will pass all the work on to its superclass.
The org.apache.activemq.broker.XBeanBrokerService is an ActiveMQ Message Broker. It consists of a number of transport connectors, network connectors and a bunch of properties which can be used to configure the broker as its lazily created.
Lets see few examples on how to use BrokerService API and how to embed a broker in ActiveMQ.
2. Embed a broker in ActiveMQ
In many messaging topologies there are JMS Brokers (server side) and a JMS client side. Often it makes sense to deploy a broker within your JVM to optimise away a network hop; making the networking of JMS as efficient as pure RMI, but with all the usual JMS features of location independence, reliability, load balancing etc.
There are various ways to embed a broker in ActiveMQ depending on if we are using Java, Spring, XBean or using the BrokerFactory.
2.1 Embed a broker in ActiveMQ using Java code (using BrokerService API)
We can use embedded ActiveMQ which means we can create object of BrokerService class and then use java code to configure it instead of regular approach of using activemq.xml file. Lets try that by creating a sample application.
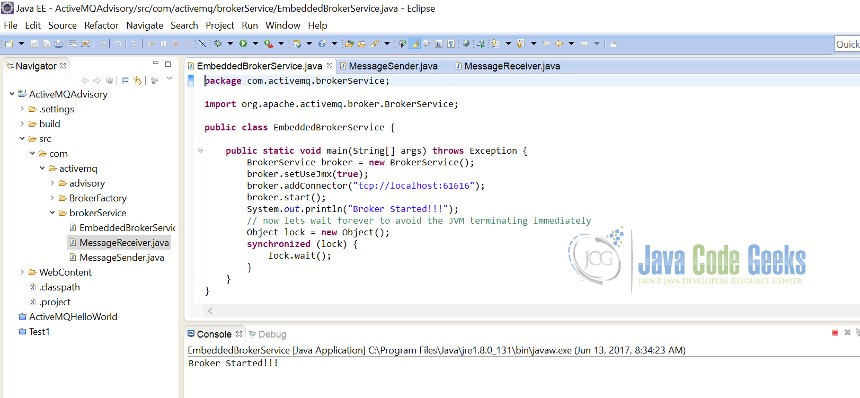
First create EmbeddedBrokerService class. In this class we will just create object of BrokerService. Add a connector and then call brokerService.start() to start the broker. After that we will use our MessageSender and MessageReceiver classes to send and receive a text message.
Please refer the code snippet below for our EmbeddedBrokerService class. The MessageSender and MessageReceiver classes can be referred from here.
EmbeddedBrokerService.java
import org.apache.activemq.broker.BrokerService;

public class EmbeddedBrokerService {

	public static void main(String[] args) throws Exception {
		BrokerService broker = new BrokerService();
		broker.setUseJmx(true);
		broker.addConnector("tcp://localhost:61616");
		broker.start();
                System.out.println("Broker Started!!!");
		// now lets wait forever to avoid the JVM terminating immediately
		Object lock = new Object();
		synchronized (lock) {
			lock.wait();
		}
	}
}
Output:
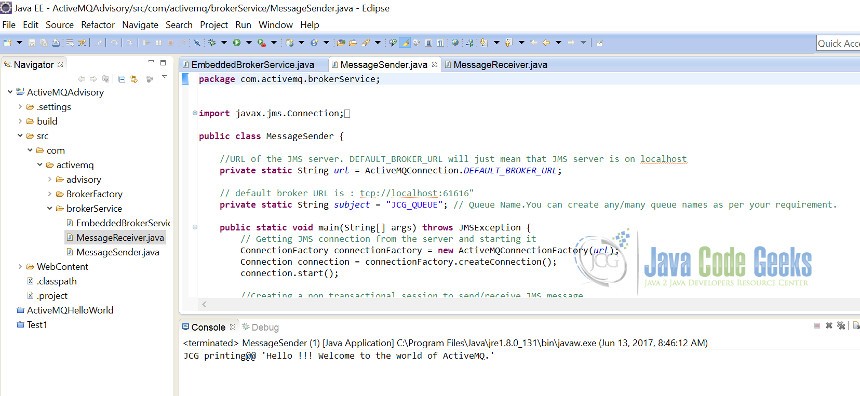
We will be running our EmbeddedBrokerServiceclass which starts the broker and then run the MessageSender and MessageReceiver classes to see how a message is exchanged.
Please follow the steps below:
- In the eclipse Right Click on EmbeddedBrokerService.java -> Run As->Java Application, to start the broker.
- In the same way run the
MessageSenderandMessageReceiverclasses by Right Click on the class -> Run As->Java Application to see if our message is sent to the queue. The Hello message after being successfully sent to the queue gets printed in eclipse output console. - The same message after being received from the queue gets printed in eclipse output console.
- Please refer images below to check the output of all the three classes.

2.2 Embed a broker in ActiveMQ using Spring 2.0
We can embed the ActiveMQ broker XML inside any regular Spring.xml file, if we are using the new XML Schema-based configuration of Spring. Here is an example of a regular Spring 2.0 XML file which also configures a broker. This allows us to configure JMS artifacts like destinations and connection factories together with the entire broker.
Spring.xml
<beans
 xmlns="http://www.springframework.org/schema/beans"
 xmlns:amq="http://activemq.apache.org/schema/core"
 xmlns:xsi="http://www.w3.org/2001/XMLSchema-instance"
 xsi:schemaLocation="http://www.springframework.org/schema/beans http://www.springframework.org/schema/beans/spring-beans-2.0.xsd
 http://activemq.apache.org/schema/core http://activemq.apache.org/schema/core/activemq-core.xsd">

 <amq:broker useJmx="false" persistent="false">
 <amq:transportConnectors>
 <amq:transportConnector uri="tcp://localhost:0" />
 </amq:transportConnectors>
 </amq:broker>

 <amq:connectionFactory id="jmsFactory" brokerURL="vm://localhost"/>
</beans>
2.3 Embed a broker in ActiveMQ using XBean
If we are already using XBean then we can just mix and match our Spring/XBean XML configuration with ActiveMQ’s configuration.
Spring.xml
<beans
xmlns="http://www.springframework.org/schema/beans"
xmlns:amq="http://activemq.apache.org/schema/core"
xmlns:xsi="http://www.w3.org/2001/XMLSchema-instance"
xsi:schemaLocation="http://www.springframework.org/schema/beans http://www.springframework.org/schema/beans/spring-beans-2.0.xsd
http://activemq.apache.org/schema/core http://activemq.apache.org/schema/core/activemq-core.xsd">

<bean class="org.springframework.beans.factory.config.PropertyPlaceholderConfigurer"/>

<broker useJmx="true" xmlns="http://activemq.apache.org/schema/core">

<persistenceFactory>
<kahaDB directory="${basedir}/target" />
</persistenceFactory>

<transportConnectors>
<transportConnector uri="tcp://localhost:61636" />
</transportConnectors>

</broker>
</beans>
2.4 Embed a broker in ActiveMQ using BrokerFactory
There is a helper class called BrokerFactory which can be used to create a broker via URI for configuration. Instead of explicitly instantiating a broker service, we can use BrokerFactory to create a broker. All we need to do is pass the URI configuration.

- Let us now create a
BrokerFactoryExample.java. - The URI passed is
broker://(tcp://localhost:61616)?brokerName=myJCGBroker. It will use the broker scheme to instantiate the specificBrokerFactory. It uses the brokerURI to extract the configuration parameters for the broker service. It internally instantiates aBrokerServiceand then directly configures the pojo model. - Please refer the code snippet below for details.
BrokerFactoryExample.java
package com.activemq.BrokerFactory;

public class BrokerFactoryExample {
	public static void main(String[] args) throws Exception {
        String brokerName = "myJCGBroker";
        String brokerSchemeUrl = "broker://(tcp://localhost:61616)?brokerName="
                + brokerName;
        Utility.createBrokerSendReceiveMessage(brokerSchemeUrl, brokerName);
    }
}
- Next we create a Utility class, in order to connect to the broker and create a connection factory first.
- If the client is within the same JVM as that of broker then we need to use
vm://brokerNamevirtual machine protocol scheme. - Then we just create connection and start it. After that just create a session and send and receive a message.
- Please refer the code snippet below for details.
Utility.java
package com.activemq.BrokerFactory;

import javax.jms.Connection;
import javax.jms.Message;
import javax.jms.MessageConsumer;
import javax.jms.MessageProducer;
import javax.jms.Queue;
import javax.jms.Session;
import javax.jms.TextMessage;

import org.apache.activemq.ActiveMQConnectionFactory;
import org.apache.activemq.broker.BrokerFactory;
import org.apache.activemq.broker.BrokerRegistry;
import org.apache.activemq.broker.BrokerService;

public class Utility {
	 public static void createBrokerSendReceiveMessage(String brokerSchemeUrl,
	            String brokerName) throws Exception {
	        BrokerService brokerService = BrokerFactory
	                .createBroker(brokerSchemeUrl);
	        startBrokerSendReceiveMessage(brokerService);
	    }

	 public static void startBrokerSendReceiveMessage(BrokerService brokerService) throws Exception {
	        brokerService.start();
	        String brokerName = brokerService.getBrokerName();
	        System.out.println("Broker " + brokerName
	                + " started? " + brokerService.isStarted());

	        ActiveMQConnectionFactory connectionFactory = new ActiveMQConnectionFactory(
	                "vm://" + brokerService.getBrokerName() + "?create=false");
	        Connection connection = connectionFactory.createConnection();
	        connection.start();

	        Session session = connection.createSession(false,
	                Session.AUTO_ACKNOWLEDGE);
	        try {
	            Queue destination = session.createQueue("Q");
	            MessageProducer producer = session.createProducer(destination);
	            Message message = session.createTextMessage("Hi!");
	            System.out.println("Sending Hi!....");
	            producer.send(message);
	            MessageConsumer consumer = session.createConsumer(destination);
	            System.out.println("Message received "
	                    + ((TextMessage) consumer.receive()).getText());
	        } finally {
	            session.close();
	            connection.close();
	            BrokerRegistry.getInstance().lookup(brokerName).stop();
	        }
	    }
}
Output:
We will be running our BrokerFactoryExample class which starts the broker and then use utility class to send and receive a message.
Please follow the steps below:
- In the eclipse Right Click on BrokerFactoryExample.java -> Run As->Java Application, to start the broker.
- The utility class methods are called to create a connection and exchange a text message.
- The same message after being received from the queue gets printed in eclipse output console.
- Please refer the image below to check the output.

3. Conclusion
Through this example, we have learned various ways to embed a broker in ActiveMQ depending on if we are using Java, Spring, XBean or using the BrokerFactory. We have also seen the usage of BrokerService API.

Does this approach provide the ActiveMQ web console? If not how can we attach the web console?