In this example, we shall show you how to make use of ActiveMQ as a message broker for exchanging messages between applications connected via a network. Before starting with our example, it is expected that we have a basic understanding of JMS concepts and Java/J2EE. JMS stands for Java Messaging Service, which is a JAVA API that helps communication between two applications connected via a network or two components within an application that communicate by exchanging messages. The messages are exchanged in an asynchronous and reliable manner.
There are several JMS providers like TIBCO EMS, JBOSSMQ etc., which act as Message Oriented Middleware (MOM) and ActiveMQ (Apache) is one of them. The software versions that we will be using to build this example is Java v8 and ActiveMQ v 5.14.5.
1. Introduction
ActiveMQ is an open source, message broker (MOM-Message Oriented Middleware) that implements the JMS API. It is lightweight and open source. In this example, we will see how to use ActiveMQ as a JMS provider.
2. How to setup ActiveMQ
- Download ActiveMQ from Download ActiveMQ
- Extract the ActiveMQ downloaded zip file to any location in your computer.
- Open command prompt and go to the bin directory of extracted activemq folder.
- Type activemq.bat start, to start activemq.
- The command prompt will state that activemq has been started by this statement- INFO | Apache ActiveMQ 5.14.5 (localhost, ID:xxxx) started (please refer screenshot). Please refer the activeMQ image below.

6. You can also try to open ActiveMQ console using the link “http://localhost:8161/admin/” with ‘admin’/’admin’ as username and password. It should open as below.
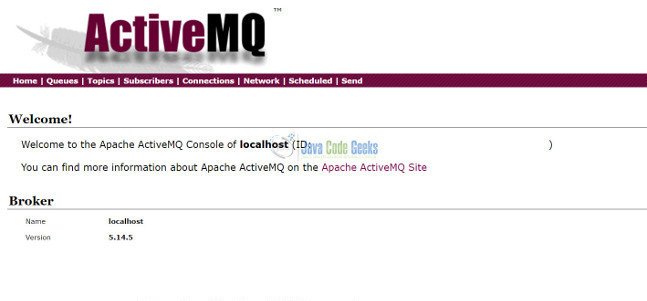
7. The ActiveMQ console gives us information about the queue and the topic which we can monitor when we exchange messages.
3. Using ActiveMQ in a Java project (example using eclipse)
- Let us now create a dynamic web project in eclipse and create our MessageSender and MessageReceiver classes to see how a message is exchanged using ActiveMQ.
- Copy the jar files from extracted ActiveMQ/lib folder in your system to the lib folder of dynamic web project just created in eclipse.
- Create two classes one for sending the message (MessageSender.java) and another for receiving the message (MessageReceiver.java). Please refer code snippets below.
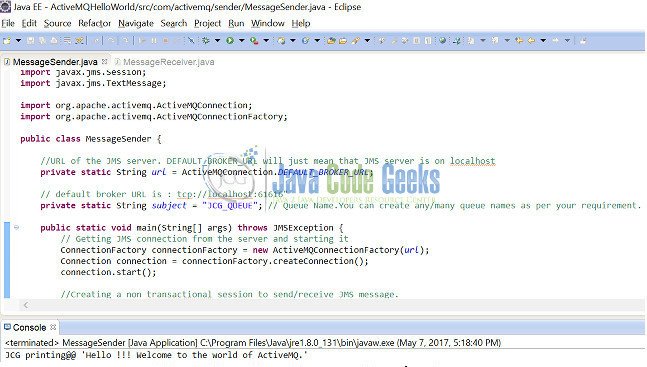
This class is used to send a text message to the queue. The JMS class MessageProducer.java has a method send(), which will be used here to send the message.
MessageSender.java
package com.activemq.sender;

import javax.jms.Connection;
import javax.jms.ConnectionFactory;
import javax.jms.Destination;
import javax.jms.JMSException;
import javax.jms.MessageProducer;
import javax.jms.Session;
import javax.jms.TextMessage;

import org.apache.activemq.ActiveMQConnection;
import org.apache.activemq.ActiveMQConnectionFactory;

public class MessageSender {

	//URL of the JMS server. DEFAULT_BROKER_URL will just mean that JMS server is on localhost
	private static String url = ActiveMQConnection.DEFAULT_BROKER_URL;

	// default broker URL is : tcp://localhost:61616"
	private static String subject = "JCG_QUEUE"; // Queue Name.You can create any/many queue names as per your requirement.

	public static void main(String[] args) throws JMSException {
		// Getting JMS connection from the server and starting it
		ConnectionFactory connectionFactory = new ActiveMQConnectionFactory(url);
		Connection connection = connectionFactory.createConnection();
		connection.start();

		//Creating a non transactional session to send/receive JMS message.
		Session session = connection.createSession(false,
				Session.AUTO_ACKNOWLEDGE);

		//Destination represents here our queue 'JCG_QUEUE' on the JMS server.
		//The queue will be created automatically on the server.
		Destination destination = session.createQueue(subject);

		// MessageProducer is used for sending messages to the queue.
		MessageProducer producer = session.createProducer(destination);

		// We will send a small text message saying 'Hello World!!!'
		TextMessage message = session
				.createTextMessage("Hello !!! Welcome to the world of ActiveMQ.");

		// Here we are sending our message!
		producer.send(message);

		System.out.println("JCG printing@@ '" + message.getText() + "'");
		connection.close();
	}
}
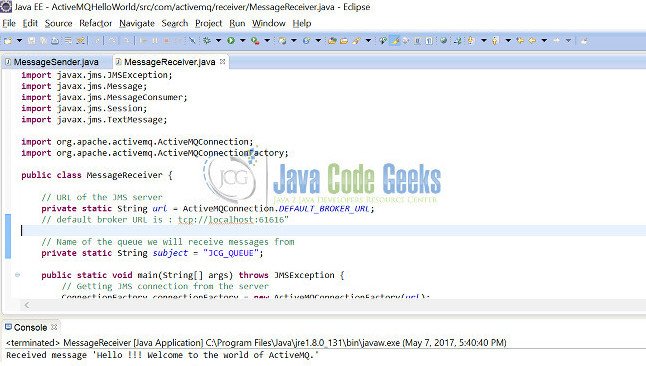
This class is used to receive the text message from the queue. The JMS class MessageConsumer.java has a method receive(), which will be used here to receive the message.
MessageReceiver.java
package com.activemq.receiver;

import javax.jms.Connection;
import javax.jms.ConnectionFactory;
import javax.jms.Destination;
import javax.jms.JMSException;
import javax.jms.Message;
import javax.jms.MessageConsumer;
import javax.jms.Session;
import javax.jms.TextMessage;

import org.apache.activemq.ActiveMQConnection;
import org.apache.activemq.ActiveMQConnectionFactory;

public class MessageReceiver {

	// URL of the JMS server
	private static String url = ActiveMQConnection.DEFAULT_BROKER_URL;
	// default broker URL is : tcp://localhost:61616"

	// Name of the queue we will receive messages from
	private static String subject = "JCG_QUEUE";

	public static void main(String[] args) throws JMSException {
		// Getting JMS connection from the server
		ConnectionFactory connectionFactory = new ActiveMQConnectionFactory(url);
		Connection connection = connectionFactory.createConnection();
		connection.start();

		// Creating session for seding messages
		Session session = connection.createSession(false,
				Session.AUTO_ACKNOWLEDGE);

		// Getting the queue 'JCG_QUEUE'
		Destination destination = session.createQueue(subject);

		// MessageConsumer is used for receiving (consuming) messages
		MessageConsumer consumer = session.createConsumer(destination);

		// Here we receive the message.
		Message message = consumer.receive();

		// We will be using TestMessage in our example. MessageProducer sent us a TextMessage
		// so we must cast to it to get access to its .getText() method.
		if (message instanceof TextMessage) {
			TextMessage textMessage = (TextMessage) message;
			System.out.println("Received message '" + textMessage.getText() + "'");
		}
		connection.close();
	}
}
So now we have the following things:

- A JMS provider is running (Running ActiveMQ as shown in image above.)
- We have our MessageSender and MessageReceiver classes.
- Next we will see how a message is exchanged using Active MQ but before that here is a brief about the classes that we have used in our code.
Connection -> It represents the connection with the JMS provider – ActiveMQ. It is not a database connection.
Destination -> It represents a destination on our message provider ActiveMQ i.e. it represents a queue where we will be sending our messages. In our case we are sending it to queue “JCG_QUEUE” which will be automatically created once the MessageSender class is executed.
MessageProducer -> It represents a producer to send a message to the queue.
MessageConsumer -> It represents a receiver to receive a message from the queue.
4. Output
We will be running our java classes written above to check how the message is exchanged.
Please follow the steps below:
- In the eclipse Right Click on MessageSender.java -> Run As->Java Application to see if our message is sent to the queue. The Hello message after being successfully sent to the queue gets printed in eclipse output console.
2. We can also check our ActiveMQ console->Queues tab, to see the number of pending messages in our queue after running the MessageSender.java
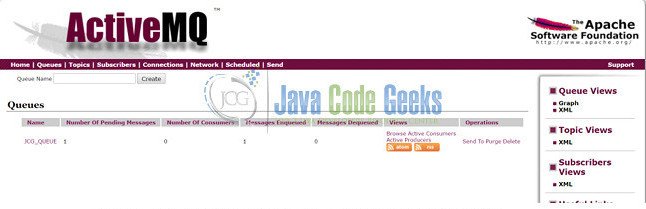
The producer task is done. It will just create a queue and send a message to it. Now who is going to read that message, it will not be mentioned in the producer.
Next comes our MessageReceiver class which has a connection and a destination same as explained earlier. Here we also mention the same queue name that we have used in the MessageSender class to know that we are going to pick the message from the same queue. The consumer.receive() is used to receive the message. Once the class is run, the message is received from the queue and gets printed in eclipse output console when we will execute the class.
3. In the eclipse Right Click on MessageReceiver.java -> Run As->Java Application to see if our message is received from the queue. The hello message after being successfully received gets printed in eclipse output console.
4. We can also check our ActiveMQ console->Queues tab, to see the number of dequeued messages from our queue after running the MessageReceiver.java

5. Conclusion
Through this example, we have learned how to configure ActiveMQ and use it to exchange any text message in an asynchronous manner. Both the sender and receiver classes are independent and we just have to configure the queue name that we want to send message to and receive message from.

very helpful and very nice explanation….
thanks a lot.
could you please explain something about MQ message channel.
Thanks very useful.
Assalamu’alaikum!
Thank you for sharing this code and explanation. It is pretty useful.
It works!
Very Nice Explanation..
could you please explain more about the console..
It was a good “Hello Word” in JMS.
Thank You.
Hello Neha
It was exactly what I was looking for, very much needed steps
Error occurred during initialization of boot layer
java.lang.module.ResolutionException: Module activemq.all contains package javax.transaction.xa, module java.transaction.xa exports package javax.transaction.xa to activemq.all
I am getting the above error while connecting to activemq.
What could be a probable solution for this?
You’re using Java 11 or later most likely, and those things are now no longer part of the standard library. You’ll need to add implementations to your classpath at startup.
Wonderful article. Thanks for adding it here.
Its pretty clear, and it tells that default port is 61616 which is not the same as the port number of admin console of active MQ.
Also if will be great if you can add, what can be done if this port is not available on some machine or being used by some other process. How can we change this default port.
The ports used can all be configured in the ActiveMQ configuration files.
Which file and setting depends on the exact version of ActiveMQ you’re using but they should be in the etc or conf subdirectory.
Just go through the config files, look for the port number you want to change, and change it.
Do restart ActiveMQ for the changes to take effect.