This is a JavaFX Stage Example. A Stage in JavaFX is a top-level container that hosts a Scene, which consists of visual elements. The Stage class in the javafx.stage package represents a stage in a JavaFX application. The primary stage is created by the platform and passed to the start(Stage s) method of the Application class. You can create additional stages as needed.
A Stage object must be created and modified on the JavaFX Application Thread. Recall that the start() method of the Application class is called on the JavaFX Application Thread, and a primary Stage is created and passed to this method.
Note that the primary stage that is passed the start() method is not shown. You need to call the show() method to show it.
The following table shows an overview of the whole article:
Table Of Contents
The following examples use Java SE 7 and JavaFX 2.2.
1. Knowing the Details of Your Screens
1.1 The Code
FxStageExample1.java
import javafx.application.Application;
import javafx.application.Platform;
import javafx.collections.ObservableList;
import javafx.geometry.Rectangle2D;
import javafx.stage.Screen;
import javafx.stage.Stage;

public class FxStageExample1 extends Application
{
	public static void main(String[] args)
	{
		Application.launch(args);
	}

	public void start(Stage stage)
	{
		// Create the ScreenList
		ObservableList<Screen> screenList = Screen.getScreens();

		System.out.println("Screens Count: " + screenList.size());
		// Print the details of all screens
		for(Screen screen: screenList)
		{
			print(screen);
		}

		// Exit the Program
		Platform.exit();
	}

	public void print(Screen s)
	{
		// Print the DPI
		System.out.println("DPI: " + s.getDpi());
		// Print the Bounds
		System.out.print("Screen Bounds: ");
		Rectangle2D bounds = s.getBounds();
		print(bounds);
		// Print the Visual Bounds
		System.out.print("Screen Visual Bounds: ");
		Rectangle2D visualBounds = s.getVisualBounds();
		print(visualBounds);
	}

	public void print(Rectangle2D r)
	{
		// Format the Output
		System.out.format("minX=%.2f, minY=%.2f, width=%.2f, height=%.2f%n",
		r.getMinX(), r.getMinY(), r.getWidth(), r.getHeight());
	}
}
The Screen class in the javafx.stage package is used to get the details, for example, dots-per-inch (DPI) setting and dimensions of user screens (or monitors). If multiple screens are hooked up to a computer, one of the screens is known as the primary screen and others as nonprimary screens. You can get the reference of the Screen object for the primary monitor using the static getPrimary() method of the Screen class with the following code:
// Get the reference to the primary screen
Screen primaryScreen = Screen.getPrimary();
The static getScreens() method returns an ObservableList of Screen objects:
ObservableList screenList = Screen.getScreens();
You can get the resolution of a screen in DPI using the getDpi() method of the Screen class as follows:
Screen primaryScreen = Screen.getPrimary();
double dpi = primaryScreen.getDpi();
You can use the getBounds() and getVisualBounds() methods to get the bounds and visual bounds, respectively. Both methods return a Rectangle2D object, which encapsulates the (x, y) coordinates of the upper-left and the lower-right corners, the width, and the height of a rectangle.
The getMinX() and getMinY() methods return the x and y coordinates of the upper-left corner of the rectangle, respectively.
The getMaxX() and getMaxY() methods return the x and y coordinates of the lower-right corner of the rectangle, respectively.
The getWidth() and getHeight() methods return the width and height of the rectangle, respectively.
// Format the Output
System.out.format("minX=%.2f, minY=%.2f, width=%.2f, height=%.2f%n",
r.getMinX(), r.getMinY(), r.getWidth(), r.getHeight());
The bounds of a screen cover the area that is available on the screen. The visual bounds represent the area on the screen that is available for use, after taking into account the area used by the native windowing system such as task bars and menus. Typically, but not necessarily, the visual bounds of a screen represents a smaller area than its bounds.
If a desktop spans multiple screens, the bounds of the nonprimary screens are relative to the primary screen.
1.2 The Output
Screens Count: 1
DPI: 100.0
Screen Bounds: minX=0,00, minY=0,00, width=1366,00, height=768,00
Screen Visual Bounds: minX=0,00, minY=0,00, width=1366,00, height=728,00
2. Showing the Primary Stage
2.1 The Code
FxStageExample2.java
import javafx.application.Application;
import javafx.stage.Stage;

public class FxStageExample2 extends Application
{
	public static void main(String[] args)
	{
		Application.launch(args);
	}

	public void start(Stage stage)
	{
		// Display the Stage
		stage.show();
		// Close the Stage
		stage.close();
	}

}
The start() method has no code. When you run the application, you do not see a window, nor do you see output on the console. The application runs forever. You will need to use the system-specific keys to cancel the application.
@Override
public void start(Stage stage)
{
	stage.close(); // Close the only stage you have
}
If you are using Windows, use your favorite key combination Ctrl + Alt + Del to activate the task manager! If you are using the command prompt, use Ctrl + C.
Recall that JavaFX Application Thread is terminated when the Platform.exit() method is called or the last shown stage is closed.
@Override
public void start(Stage stage)
{
	Platform.exit(); // Exit the application
}
The JVM terminates when all nondaemon threads die. JavaFX Application Thread is a nondaemon thread. The Application.launch() method returns when
the JavaFX Application Thread terminates.
The close() method does not close the stage if the stage is not showing.
@Override
public void start(Stage stage)
{
	stage.close(); // Close the only stage you have
}
The following code will show and close the stage:
// Display the Stage
stage.show();
// Close the Stage
stage.close();
3. Setting the Bounds of a Stage
3.1 The Code
FxStageExample3.java
import javafx.application.Application;
import javafx.scene.Scene;
import javafx.scene.control.Button;
import javafx.scene.layout.VBox;
import javafx.stage.Stage;

public class FxStageExample3 extends Application
{
	public static void main(String[] args)
	{
		Application.launch(args);
	}

	public void start(Stage stage)
	{
		// Set the title of the Stage
		stage.setTitle("Stage with a Button in the Scene");
		// Create the Button
		Button button = new Button("Hello");
		// Create the VBox
		VBox root = new VBox(button);
		// Create the Scene
		Scene scene = new Scene(root, 200, 100);
		// Add the Scene to the Stage
		stage.setScene(scene);
		// Set the width and height of the Stage
		stage.setWidth(400);
		stage.setHeight(100);
		// Display the Stage
		stage.show();
	}

}
The bounds of a Stage consist of four properties: x, y, width, and height. The x and y properties determine the location (or position) of the upper-left corner of the stage. The width and height properties determine its size. You can use the getters and setters for these properties to get and set their values.
Let’s add a Button to the Scene and set the scene width and height to 300 and 100, respectively, as follows:
@Override
public void start(Stage stage)
{
		// Set the title of the Stage
		stage.setTitle("Stage with a Button in the Scene");
		// Create the Button
		Button button = new Button("Hello");
		// Create the VBox
		VBox root = new VBox(button);
		// Create the Scene
		Scene scene = new Scene(root, 200, 100);
		// Add the Scene to the Stage
		stage.setScene(scene);
		// Set the width and height of the Stage
		stage.setWidth(400);
		stage.setHeight(100);
		// Display the Stage
		stage.show();
}
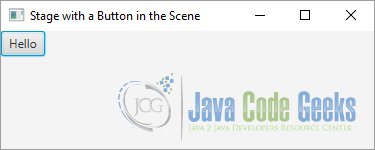
3.2 The GUI
The following image shows a Stage with a Scene that contains a Button where the size of the Scene is not specified.
4. Initializing the Style of a Stage
4.1 The Code
FxStageExample4.java
import javafx.application.Application;
import javafx.event.ActionEvent;
import javafx.event.EventHandler;
import javafx.scene.Scene;
import javafx.scene.control.Button;
import javafx.scene.control.Label;
import javafx.scene.layout.VBox;
import javafx.scene.paint.Color;
import javafx.stage.Stage;
import javafx.stage.StageStyle;

public class FxStageExample4 extends Application
{
	public static void main(String[] args)
	{
		Application.launch(args);
	}

	public void start(final Stage stage)
	{
		// Create the Label
		Label styleLabel = new Label("Stage Style");
		// Create the Button
		Button closeButton = new Button("Close");
		// Add an EventHandler to the Button
		closeButton.setOnAction(new EventHandler <ActionEvent>()
		{
            public void handle(ActionEvent event)
            {
            	stage.close();
            }
        });

		// Create the VBOx
		VBox root = new VBox();
		// Add the Children to the VBox
		root.getChildren().addAll(styleLabel, closeButton);

		// Create the Scene
		Scene scene = new Scene(root, 200, 100);
		// Add the Scene to the Stage
		stage.setScene(scene);
		// Set the Title of the Stage
		stage.setTitle("The Style of a Stage");
		// Display the Stage
		this.show(stage, styleLabel, StageStyle.DECORATED);
		//this.show(stage, styleLabel, UNDECORATED);
		//this.show(stage, styleLabel, TRANSPARENT);
		//this.show(stage, styleLabel, UNIFIED);
		//this.show(stage, styleLabel, UTILITY);
	}

	private void show(Stage stage, Label styleLabel, StageStyle style)
	{
		// Set the text for the label to match the style
		styleLabel.setText(style.toString());
		// Set the style
		stage.initStyle(style);

		// For a transparent style, set the scene fill to null. Otherwise, the
		// content area will have the default white background of the scene.
		if (style == StageStyle.TRANSPARENT)
		{
			stage.getScene().setFill(null);
			stage.getScene().getRoot().setStyle("-fx-background-color: transparent");
		}
		else if(style == StageStyle.UNIFIED)
		{
			stage.getScene().setFill(Color.TRANSPARENT);
		}

		// Display the stage
		stage.show();
	}
}
The area of a Stage can be divided into two parts: content area and decorations.
The content area displays the visual content of its Scene. Typically, decorations consist of a title bar and borders. The presence of a title bar and its content varies depending on the type of decorations provided by the platform. Some decorations provide additional features rather than just an aesthetic look.
For example, a title bar may be used to drag a stage to a different location. Different buttons in a title bar may be used to minimize, maximize, restore, and close a Stage.
In JavaFX, the style attribute of a Stage determines its background color and decorations. Based on styles, you can have the following five types of stages in JavaFX:
- Decorated
- Undecorated
- Transparent
- Unified
- Utility
A decorated Stage has a solid white background and platform decorations.
An undecorated Stage has a solid white background and no decorations.
A transparent Stage has a transparent background and no decorations.
A unified Stage has platform decorations and no border between the client area and decorations. The client area background is unified with the decorations. To see the effect of the unified stage style, the Scene should be filled with Color.TRANSPARENT. Unified style is a conditional feature. A utility stage has a solid white background and minimal platform decorations.
You can set the style of a stage using the initStyle(StageStyle style) method of the Stage class. The style of a stage must be set before it is shown for the first time. Setting it the second time, after the stage has been shown, throws a runtime exception.
By default, a stage is decorated.
The five types of styles for a stage are defined as five constants in the StageStyle enum:
- StageStyle.DECORATED
- StageStyle.UNDECORATED
- StageStyle.TRANSPARENT
- StageStyle.UNIFIED
- StageStyle.UTILITY
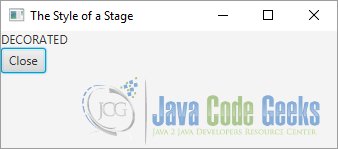
4.2 The GUI
The following figure shows the Stage using the StageStyle.DECORATED style.
5. Moving an Undecorated Stage
5.1 The Code
FxStageExample5.java
import javafx.application.Application;
import javafx.event.ActionEvent;
import javafx.event.EventHandler;
import javafx.scene.Scene;
import javafx.scene.control.Button;
import javafx.scene.control.Label;
import javafx.scene.input.MouseEvent;
import javafx.scene.layout.VBox;
import javafx.stage.Stage;
import javafx.stage.StageStyle;

public class FxStageExample5 extends Application
{
	private Stage stage;
	private double dragOffsetX;
	private double dragOffsetY;

	public static void main(String[] args)
	{
		Application.launch(args);
	}

	public void start(final Stage stage)
	{
		// Store the stage reference in the instance variable to
		// use it in the mouse pressed event handler later.
		this.stage = stage;
		// Create the Label
		Label msgLabel = new Label("Press the mouse button and drag.");
		// Create the Button
		Button closeButton = new Button("Close");
		// Add the EventHandler to the Button
		closeButton.setOnAction(new EventHandler <ActionEvent>()
		{
            public void handle(ActionEvent event)
            {
            	stage.close();
            }
        });

		// Create the VBox
		VBox root = new VBox();
		// Add the children to the VBox
		root.getChildren().addAll(msgLabel, closeButton);

		// Create the Scene
		Scene scene = new Scene(root, 300, 200);
		// Set mouse pressed and dragged even handlers for the scene
		scene.setOnMousePressed(new EventHandler<MouseEvent>()
		{
	        @Override
	        public void handle(MouseEvent event)
	        {
	        	handleMousePressed(event);
	        }
	    });
		scene.setOnMouseDragged(new EventHandler<MouseEvent>()
		{
	        @Override
	        public void handle(MouseEvent event)
	        {
	        	handleMouseDragged(event);
	        }
	    });

		// Add the Scene to The Stager
		stage.setScene(scene);
		// Set the Title
		stage.setTitle("Moving a Stage");
		// Set the Style for the Stage
		stage.initStyle(StageStyle.UNDECORATED);
		// Display the Stage
		stage.show();
	}

	protected void handleMousePressed(MouseEvent e)
	{
		// Store the mouse x and y coordinates with respect to the
		// stage in the reference variables to use them in the drag event
		this.dragOffsetX = e.getScreenX() - stage.getX();
		this.dragOffsetY = e.getScreenY() - stage.getY();
	}

	protected void handleMouseDragged(MouseEvent e)
	{
		// Move the stage by the drag amount
		stage.setX(e.getScreenX() - this.dragOffsetX);
		stage.setY(e.getScreenY() - this.dragOffsetY);
	}
}
You can move a stage to a different location by dragging its title bar. In an undecorated or transparent stage, a title bar is not available. You need to write a few lines of code to let the user move this kind of stage by dragging the mouse over the scene area.
The above example show how to write the code to support dragging of a Stage. If you change the Stage to be transparent, you will need to drag the stage by dragging the mouse over only the message label, as the transparent area will not respond to the mouse events.
The following snippet of code adds the mouse pressed and mouse dragged event handlers to the Scene:
// Set mouse pressed and dragged even handlers for the scene
scene.setOnMousePressed(new EventHandler<MouseEvent>()
{
	@Override
	public void handle(MouseEvent event)
	{
		handleMousePressed(event);
	}
});
scene.setOnMouseDragged(new EventHandler<MouseEvent>()
{
	@Override
	public void handle(MouseEvent event)
	{
		handleMouseDragged(event);
	}
});
When you press the mouse in the scene, the handleMousePressed() method is called. The getScreenX() and getScreenY() methods of the MouseEvent object return the x and y coordinates of the mouse with respect to the upper-left corner of the screen.
When you drag the mouse, the handleMouseDragged() method is called. The method computes and sets the position of the Stage using the position of the mouse when it was pressed and its position during the drag.
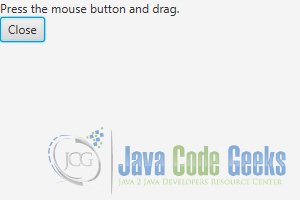
5.2 The GUI
The following image shows a Stage, which can be moved by the mouse handlers.
6. Initializing Modality of a Stage
6.1 The Code
FxStageExample6.java
import javafx.application.Application;
import javafx.event.ActionEvent;
import javafx.event.EventHandler;
import javafx.scene.Scene;
import javafx.scene.control.Button;
import javafx.scene.control.Label;
import javafx.scene.layout.VBox;
import javafx.stage.Modality;
import javafx.stage.Stage;
import javafx.stage.Window;

public class FxStageExample6 extends Application
{
	public static void main(String[] args)
	{
		Application.launch(args);
	}

	public void start(final Stage stage)
	{
		/* Create the Buttons to display each kind of modal stage */
		Button ownedNoneButton = new Button("Owned None");
		ownedNoneButton.setOnAction(new EventHandler <ActionEvent>()
		{
            public void handle(ActionEvent event)
            {
            	showDialog(stage, Modality.APPLICATION_MODAL);
            }
        });

		Button nonOwnedNoneButton = new Button("Non-owned None");
		nonOwnedNoneButton.setOnAction(new EventHandler <ActionEvent>()
		{
            public void handle(ActionEvent event)
            {
            	showDialog(stage, Modality.APPLICATION_MODAL);
            }
        });

		Button ownedWinButton = new Button("Owned Window Modal");
		ownedWinButton.setOnAction(new EventHandler <ActionEvent>()
		{
            public void handle(ActionEvent event)
            {
            	showDialog(stage, Modality.APPLICATION_MODAL);
            }
        });

		Button nonOwnedWinButton = new Button("Non-owned Window Modal");
		nonOwnedWinButton.setOnAction(new EventHandler <ActionEvent>()
		{
            public void handle(ActionEvent event)
            {
            	showDialog(stage, Modality.APPLICATION_MODAL);
            }
        });

		Button ownedAppButton = new Button("Owned Application Modal");
		ownedAppButton.setOnAction(new EventHandler <ActionEvent>()
		{
            public void handle(ActionEvent event)
            {
            	showDialog(stage, Modality.APPLICATION_MODAL);
            }
        });

		Button nonOwnedAppButton = new Button("Non-owned Application Modal");
		nonOwnedAppButton.setOnAction(new EventHandler <ActionEvent>()
		{
            public void handle(ActionEvent event)
            {
            	showDialog(stage, Modality.APPLICATION_MODAL);
            }
        });

		// Create the VBox
		VBox root = new VBox();
		// Add the children to the VBox
		root.getChildren().addAll(ownedNoneButton, nonOwnedNoneButton,
		ownedWinButton, nonOwnedWinButton,ownedAppButton, nonOwnedAppButton);

		// Create the Scene
		Scene scene = new Scene(root, 300, 200);
		// Add the Scene to the Stage
		stage.setScene(scene);
		// Set the Title of the Stage
		stage.setTitle("The Primary Stage");
		// Display the Stage
		stage.show();
	}

	private void showDialog(Window owner, Modality modality)
	{
		// Create a Stage with specified owner and modality
		final Stage stage = new Stage();
		stage.initOwner(owner);
		stage.initModality(modality);

		// Create the Label
		Label modalityLabel = new Label(modality.toString());
		// Create the Button
		Button closeButton = new Button("Close");
		// Add the EventHandler to the Button
		closeButton.setOnAction(new EventHandler <ActionEvent>()
		{
            public void handle(ActionEvent event)
            {
            	stage.close();
            }
        });

		// Create the VBox
		VBox root = new VBox();
		// Add the Children to the VBox
		root.getChildren().addAll(modalityLabel, closeButton);

		// Create the Scene
		Scene scene = new Scene(root, 200, 100);
		// Add the Scene to the Stage
		stage.setScene(scene);
		// Set the Title of the Stage
		stage.setTitle("A Dialog Box");
		// Display the Stage
		stage.show();
	}
}
In a GUI application, you can have two types of windows: modal and modeless. When a modal window is displayed, the user cannot work with other windows in the application until the modal window is dismissed. If an application has multiple modeless windows showing, the user can switch between them at any time.

JavaFX has three types of modality for a stage:
- None
- Window modal
- Application modal
Modality of a Stage is defined by one of the following three constants in the Modality enum in the javafx.stage package:
- NONE
- WINDOW_MODAL
- APPLICATION_MODAL
You can set the modality of a stage using the initModality(Modality m) method of the Stage class as follows:
// Create a Stage object and set its modality
Stage stage = new Stage();
stage.initModality(Modality.WINDOW_MODAL);

/* More code goes here.*/

// Show the stage
stage.show();
A Stage can have an owner. An owner of a Stage is another Window. You can set an owner of a Stage using the initOwner(Window owner) method of the Stage class.
The owner of a Stage must be set before the stage is shown. The owner of a Stage may be null, and in this case, it is said that the Stage does not have an owner. Setting an owner of a Stage creates an owner-owned relationship. For example, a Stage is minimized or hidden if its owner is minimized or hidden, respectively.
The default modality of a Stage is NONE. When a Stage with the modality NONE is displayed, it does not block any other windows in the application. It behaves as a modeless window. A Stage with the WINDOW_MODAL modality blocks all windows in its owner hierarchy.
If a Stage with its modality set to APPLICATION_MODAL is displayed, you must work with the Stage and dismiss it before you can work with any other windows in the application.
Notice that an APPLICATION_MODAL stage blocks all other windows in the same application, irrespective of the owner-owned relationships.
6.2 The GUI
The following image displays the primary stage with six buttons. Each button opens a secondary stage with a specified modality and owner. The text of the buttons tells you what kind of secondary stage they will open.
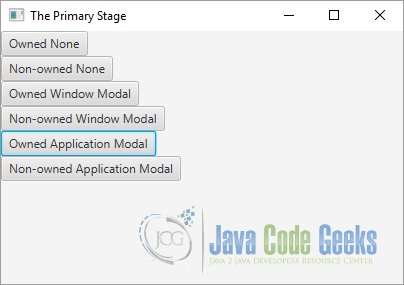
When the secondary stage is shown, try clicking on the primary stage. When the modality of the secondary stage blocks the primary stage, you will not be able to
work with the primary stage; clicking the primary stage will set the focus back to the secondary stage.

7. Resizing a Stage
7.1 The Code
FxStageExample7.java
import javafx.application.Application;
import javafx.geometry.Rectangle2D;
import javafx.scene.Group;
import javafx.scene.Scene;
import javafx.stage.Screen;
import javafx.stage.Stage;

public class FxStageExample7 extends Application
{
	public static void main(String[] args)
	{
		Application.launch(args);
	}

	public void start(Stage stage)
	{
		// Create the Group
		Group group = new Group();
		// Create the Scene
		Scene scene = new Scene(group);
		// Add the Scene to the Stage
		stage.setScene(scene);
		// Set the Title of the Stage
		stage.setTitle("A Maximized Stage");
		// Set the position and size of the stage equal to the position and
		// size of the screen
		Rectangle2D visualBounds = Screen.getPrimary().getVisualBounds();
		stage.setX(visualBounds.getMinX());
		stage.setY(visualBounds.getMinY());
		stage.setWidth(visualBounds.getWidth());
		stage.setHeight(visualBounds.getHeight());
		// Display the Stage
		stage.show();
	}

}
You can set whether a user can or cannot resize a stage by using its setResizable(boolean resizable) method.
Note that a call to the setResizable() method is a hint to the implementation to make the stage resizable. By default, a stage is resizable.
Sometimes, you may want to restrict the use to resize a stage within a range of width and height. The setMinWidth(), setMinHeight(), setMaxWidth(), and setMaxHeight() methods of the Stage class let you set the range within which the user can resize a stage.
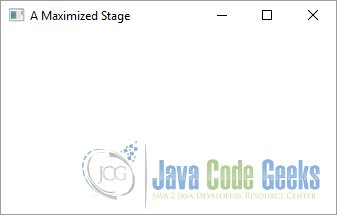
7.2 The GUI
The following image shows resizeable Stage.
8. Showing a Stage and Waiting for It to Close
8.1 The Code
FxStageExample8.java
import javafx.application.Application;
import javafx.event.ActionEvent;
import javafx.event.EventHandler;
import javafx.scene.Scene;
import javafx.scene.control.Button;
import javafx.scene.control.TextArea;
import javafx.scene.layout.VBox;
import javafx.stage.Stage;

public class FxStageExample8 extends Application
{
	// Create the counter
	protected static int counter = 0;
	// Create the Stage
	protected Stage lastOpenStage;
	// Create the TextArea
	protected TextArea area = new TextArea();

	public static void main(String[] args)
	{
		Application.launch(args);
	}

	public void start(Stage stage)
	{
		// Create the VBox
		VBox root = new VBox();
		// Create the Button
		Button openButton = new Button("Open");
		// Add the EventHandler to the button
		openButton.setOnAction(new EventHandler <ActionEvent>()
		{
            public void handle(ActionEvent event)
            {
            	open(++counter);
            }
        });

		// Add the children to the VBox
		root.getChildren().addAll(openButton,area);

		// Create the Scene
		Scene scene = new Scene(root, 400, 400);
		// Add the Scene to the Stage
		stage.setScene(scene);
		// Set the Title of the Stage
		stage.setTitle("The Primary Stage");
		// Display the Stage
		stage.show();
		// Set the Stage as the last opened Stage
		this.lastOpenStage = stage;
	}

	private void open(final int stageNumber)
	{
		// Create a new Stage
		Stage stage = new Stage();
		// Set the Title of the Stage
		stage.setTitle("#" + stageNumber);
		// Create a Say-Hello-Button
		Button sayHelloButton = new Button("Say Hello");
		// Add the EventHandler to the Button
		sayHelloButton.setOnAction(new EventHandler <ActionEvent>()
		{
            public void handle(ActionEvent event)
            {
            	area.appendText("Hello from #" + stageNumber + "\n");
            }
        });

		// Create an Open Button
		Button openButton = new Button("Open");
		// Add the EventHandler to the Button
		openButton.setOnAction(new EventHandler <ActionEvent>()
		{
            public void handle(ActionEvent event)
            {
            	open(++counter);
            }
        });

		// Create the VBox
		VBox root = new VBox();
		// Add the children to the VBox
		root.getChildren().addAll(sayHelloButton, openButton);

		// Create the Scene
		Scene scene = new Scene(root, 200, 200);
		// Add the Scene to the Stage
		stage.setScene(scene);
		// Set the Position of the Stage
		stage.setX(this.lastOpenStage.getX() + 50);
		stage.setY(this.lastOpenStage.getY() + 50);
		// Set the current Stage as the last opened Stage
		this.lastOpenStage = stage;
		area.appendText("Before stage.showAndWait(): " + stageNumber + "\n");
		// Show the Stage and wait for it to close
		stage.showAndWait();
		area.appendText("After stage.showAndWait(): " + stageNumber + "\n");
	}
}
You often want to display a dialog box and suspend further processing until it is closed. For example, you may want to display a message box to the user with options to click yes and no buttons, and you want different actions performed based on which button is clicked by the user. In this case, when the message box is displayed to the user, the program must wait for it to close before it executes the next sequence of logic.
Consider the following pseudo-code:
Option userSelection = messageBox("Close", "Do you want to exit?", YESNO);
if (userSelection == YES)
{
        stage.close();
}
In this pseudo-code, when the messageBox() method is called, the program needs to wait to execute the subsequent if statement until the message box is dismissed.
The show() method of the Window class returns immediately, making it useless to open a dialog box in the above example. You need to use the showAndWait() method, which shows the stage and waits for it to close before returning to the caller. The showAndWait() method stops processing the current event temporarily and starts a nested event loop to process other events.
You can have multiple stages open using the showAndWait() method. Each call to the method starts a new nested event loop. A specific call to the method returns to the caller when all nested event loops created after this method call have terminated.
This rule may be confusing in the beginning. Let’s look at an example to explain this in detail. Suppose you have three stages: s1, s2, and s3. Stage s1 is opened using the call s1.showAndWait(). From the code in s1, stage s2 is opened using the call s2.showAndWait(). At this point, there are two nested event loops: one created by s1.showAndWait() and another by s2.showAndWait(). The call to s1.showAndWait() will return only after both s1 and s2 have been closed, irrespective of the order they were closed. The s2.showAndWait() call will return after s2 has been closed.
8.2 The GUI
The following image shows a program that will allow you to play with the showAndWait() method call using multiple stages.
The primary stage is opened with an Open button. Clicking the Open button opens a
secondary Stage using the showAndWait() method.
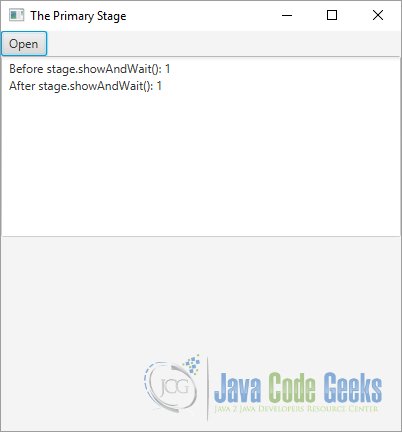
The secondary stage has two buttons—Say Hello and Open—which will, respectively, will print a message on the console and open another secondary Stage.
A message is printed on the console before and after the call to the showAndWait() method.

You need to open multiple secondary stages, print messages by clicking the Say Hello Button, close them in any order you want, and then look at the output on the console.
9. Download Java Source Code
This was an example of avafx.stage
You can download the full source code of this example here: JavaFxStageExample.zip
