The JavaFX Concurrent Framework
This is an article about the JavaFX Concurrent Framework API. Java 5 added a comprehensive concurrency framework to the Java programming language through the libraries in the java.util.concurrent package. The JavaFX Concurrency Framework is very small.
It is built on top of the Java language Concurrency Framework keeping in mind that it will be used in a GUI environment.
The following table shows an overview of the whole article:
Table Of Contents
The following examples use Java SE 8 and JavaFX 2.2.
1. Introduction
The framework consists of one interface, four classes, and one enum.
An instance of the Worker interface represents a Task that needs to be performed in one or more background threads. The state of the Task is observable from the JavaFX Application Thread.
The Task, Service, and ScheduledService classes implement the Worker interface. They represent different types of tasks. They are abstract classes. An instance of the Task class represents a one-shot task.
A Task cannot be reused. An instance of the Service class represents a reusable task. The ScheduledService class inherits from the Service class. A ScheduledService is a Task that can be scheduled to run repeatedly after a specified interval.
The constants in the Worker.State enum represent different states of a Worker.
An instance of the WorkerStateEvent class represents an event that occurs as the state of a Worker changes. You can add event handlers to all three types of tasks to listen to the change in their states.
2. Understanding the Worker Interface
The Worker<V> interface provides the specification for any task performed by the JavaFX Concurrency Framework. A Worker is a Task that is performed in one or more background threads. The generic parameter V is the data type of the result of the Worker.
The state of the Task is observable. The state of the Task is published on the JavaFX Application Thread, making it possible for the Task to communicate with the Scene Graph, as is commonly required in a GUI application.
2.1 Utility Classes
Let us create the reusable GUI and non-GUI parts of the programs to use in examples in the following sections.
The WorkerStateGUI class builds a GridPane to display all properties of a Worker.
It is used with a Worker<ObservableList<Long>>. It displays the properties of a Worker by UI elements to them. You can bind properties of a Worker to the UI elements by passing a Worker to the constructor or calling the bindToWorker() method.
WorkerStateGUI.java
import javafx.beans.binding.When;
import javafx.collections.ObservableList;
import javafx.concurrent.Worker;
import javafx.scene.control.Label;
import javafx.scene.control.ProgressBar;
import javafx.scene.control.TextArea;
import javafx.scene.layout.GridPane;
import javafx.scene.layout.HBox;
import javafx.beans.value.ChangeListener;
import javafx.beans.value.ObservableValue;

public class WorkerStateGUI extends GridPane
{
	// Create the Labels
	private final Label title = new Label("");
	private final Label message = new Label("");
	private final Label running = new Label("");
	private final Label state = new Label("");
	private final Label totalWork = new Label("");
	private final Label workDone = new Label("");
	private final Label progress = new Label("");

	// Create the TextAreas
	private final TextArea value = new TextArea("");
	private final TextArea exception = new TextArea("");

	// Create the ProgressBar
	private final ProgressBar progressBar = new ProgressBar();

	public WorkerStateGUI()
	{
		addGUI();
	}

	public WorkerStateGUI(Worker<ObservableList<Long>> worker)
	{
		addGUI();
		bindToWorker(worker);
	}

	private void addGUI()
	{
		value.setPrefColumnCount(20);
		value.setPrefRowCount(3);
		exception.setPrefColumnCount(20);
		exception.setPrefRowCount(3);

		this.setHgap(5);
		this.setVgap(5);

		addRow(0, new Label("Title:"), title);
		addRow(1, new Label("Message:"), message);
		addRow(2, new Label("Running:"), running);
		addRow(3, new Label("State:"), state);
		addRow(4, new Label("Total Work:"), totalWork);
		addRow(5, new Label("Work Done:"), workDone);
		addRow(6, new Label("Progress:"), new HBox(2, progressBar, progress));
		addRow(7, new Label("Value:"), value);
		addRow(8, new Label("Exception:"), exception);
	}

	public void bindToWorker(final Worker<ObservableList<Long>> worker)
	{
		// Bind Labels to the properties of the worker
		title.textProperty().bind(worker.titleProperty());
		message.textProperty().bind(worker.messageProperty());
		running.textProperty().bind(worker.runningProperty().asString());
		state.textProperty().bind(worker.stateProperty().asString());

		totalWork.textProperty().bind(
			new When(worker.totalWorkProperty().isEqualTo(-1)).then("Unknown")
			.otherwise(worker.totalWorkProperty().asString()));

		workDone.textProperty().bind(
			new When(worker.workDoneProperty().isEqualTo(-1)).then("Unknown")
			.otherwise(worker.workDoneProperty().asString()));

		progress.textProperty().bind(
			new When(worker.progressProperty().isEqualTo(-1)).then("Unknown")
			.otherwise(worker.progressProperty().multiply(100.0).asString("%.2f%%")));

		progressBar.progressProperty().bind(worker.progressProperty());
		value.textProperty().bind(worker.valueProperty().asString());

		worker.exceptionProperty().addListener(new ChangeListener<Throwable>()
		{
			public void changed(ObservableValue<? extends Throwable> prop,
		            final Throwable oldValue, final Throwable newValue)
			{
				if (newValue != null)
				{
					exception.setText(newValue.getMessage());
				}
				else
				{
					exception.setText("");
				}
			}
		});
	}
}
The PrimeUtil class is a utility class to check whether a number is a prime number.
PrimeUtil.java
public class PrimeUtil
{
	public static boolean isPrime(long num)
	{
		if (num <= 1 || num % 2 == 0)
		{
			return false;
		}

		int upperDivisor = (int)Math.ceil(Math.sqrt(num));

		for (int divisor = 3; divisor <= upperDivisor; divisor += 2)
		{
			if (num % divisor == 0)
			{
				return false;
			}
		}

		return true;
	}
}
2.2 State Transitions for a Worker
During the life cycle, a Worker transitions through different states. The constants in the Worker.State enum represent the valid states of a Worker.
- Worker.State.READY
- Worker.State.SCHEDULED
- Worker.State.RUNNING
- Worker.State.SUCCEEDED
- Worker.State.CANCELLED
- Worker.State.FAILED
When a Worker is created, it is in the READY state. It transitions to the SCHEDULED state, before it starts executing. When it starts running, it is in the RUNNING state. Upon successful completion, a Worker transitions from the RUNNING state to the SUCCEEDED state. If the Worker throws an exception during its execution, it transitions to the FAILED state. A Worker may be cancelled using the cancel() method.
It may transition to the CANCELLED state from the READY, SCHEDULED, and RUNNING states. These are the normal state transitions for a one-shot Worker.
A reusable Worker may transition from the CANCELLED, SUCCEEDED, and FAILED states to the READY state.
2.3 Properties of a Worker
The Worker interface contains nine read-only properties that represent the internal state of the Task.
- title
- message
- running
- state
- progress
- workDone
- totalWork
- value
- exception
When you create a Worker, you will have a chance to specify these properties. The properties can also be updated as the task progresses.
The title property represents the title for the task.
The message property represents a detailed message during the task processing.
The running property tells whether the Worker is running. It is true when the Worker is in the SCHEDULED or RUNNING states. Otherwise, it is false.
The state property specifies the state of the Worker. Its value is one of the constants of the Worker.State enum.
The totalWork, workDone, and progress properties represent the progress of the task. The totalWork is the total amount of work to be done. The workDone is the amount of work that has been done. The progress is the ratio of workDone and totalWork.
The value property represents the result of the task. Its value is non-null only when the Worker finishes successfully reaching the SUCCEEDED state.
A task may fail by throwing an exception. The exception property represents the exception that is thrown during the processing of the task. It is non-null only when the state of the Worker is FAILED.
Typically, when a Task is in progress, you want to display the task details in a Scene Graph.
The Concurrency Framework makes sure that the properties of a Worker are updated on the JavaFX Application Thread. Therefore, it is fine to bind the properties of the UI elements in a Scene Graph to these properties.
3. Using the Task Class
An instance of the Task<V> class represents a one-time task. Once the task is completed, cancelled, or failed, it cannot be restarted.
The Task<V> class implements the Worker<V> interface. Therefore, all properties and methods specified by the Worker<V> interface are available in the Task<V> class.
The Task<V> class inherits from the FutureTask<V> class, which is part of the Java Concurrency Framework.
The FutureTask<V> implements the Future<V>, RunnableFuture<V>, and Runnable interfaces.
Therefore, a Task<V> also implements all these interfaces.
3.1 The Code
PrimeFinderTask.java
import javafx.collections.FXCollections;
import javafx.collections.ObservableList;
import javafx.concurrent.Task;

public class PrimeFinderTask extends Task<ObservableList<Long>>
{
	// Define the Limits
	private long lowerLimit = 1;
	private long upperLimit = 30;
	private long sleepTimeInMillis = 500;

	public PrimeFinderTask()
	{
	}

	public PrimeFinderTask(long lowerLimit, long upperLimit)
	{
		this.lowerLimit = lowerLimit;
		this.upperLimit = upperLimit;
	}

	public PrimeFinderTask(long lowerLimit,long upperLimit,long sleepTimeInMillis)
	{
		this(lowerLimit, upperLimit);
		this.sleepTimeInMillis = sleepTimeInMillis;
	}

	// The task implementation
	@Override
	protected ObservableList<Long> call()
	{
		// An observable list to represent the results
		final ObservableList<Long> results = FXCollections.<Long>observableArrayList();

		// Update the title
		this.updateTitle("Prime Number Finder Task");
		long count = this.upperLimit - this.lowerLimit + 1;
		long counter = 0;

		// Find the prime numbers
		for (long i = lowerLimit; i <= upperLimit; i++)
		{
			// Check if the task is cancelled
			if (this.isCancelled())
			{
				break;
			}

			// Increment the counter
			counter++;

			// Update message
			this.updateMessage("Checking " + i + " for a prime number");

			// Sleep for some time
			try
			{
				Thread.sleep(this.sleepTimeInMillis);
			}
			catch (InterruptedException e)
			{
				// Check if the task is cancelled
				if (this.isCancelled())
				{
					break;
				}
			}

			// Check if the number is a prime number
			if (PrimeUtil.isPrime(i))
			{
				// Add to the list
				results.add(i);

				// Publish the read-only list to give the GUI
				// access to the partial results
				updateValue(FXCollections.<Long>unmodifiableObservableList(results));
			}

			// Update the progress
			updateProgress(counter, count);
		}

		return results;
	}

	@Override
	protected void cancelled()
	{
		super.cancelled();
		updateMessage("The task was cancelled.");
	}

	@Override
	protected void failed()
	{
		super.failed();
		updateMessage("The task failed.");
	}

	@Override
	public void succeeded()
	{
		super.succeeded();
		updateMessage("The task finished successfully.");
	}
}
The above program is an implementation of the Task<ObservableList<Long>>. It checks for prime numbers between the specified lowerLimit and upperLimit. It returns all the numbers in the range. Notice that the task thread sleeps for a short time before checking a number for a prime number. This is done to give the user an impression of a long-running task.
It is not needed in a real world application. The call() method handles an InterruptedException and finishes the task if the task was interrupted as part of a cancellation request. The call to the method updateValue() needs little explanation.
updateValue(FXCollections.<Long>unmodifiableObservableList(results));
Every time a prime number is found, the results list is updated. The foregoing statement wraps the results list in an unmodifiable observable list and publishes it for the client. This gives the client access to the partial results of the task. This is a quick and dirty way of publishing the partial results. If the call() method returns a primitive value, it is fine to call the updateValue() method repeatedly.
The following program contains the complete code to build a GUI using your PrimeFinderTask class.
FxConcurrentExample1.java
import javafx.application.Application;
import javafx.event.ActionEvent;
import javafx.event.EventHandler;
import javafx.scene.Scene;
import javafx.scene.control.Button;
import javafx.scene.layout.BorderPane;
import javafx.scene.layout.GridPane;
import javafx.scene.layout.HBox;
import javafx.stage.Stage;
import static javafx.concurrent.Worker.State.READY;
import static javafx.concurrent.Worker.State.RUNNING;

public class FxConcurrentExample1 extends Application
{
	// Create the Buttons
	Button startButton = new Button("Start");
	Button cancelButton = new Button("Cancel");
	Button exitButton = new Button("Exit");

	// Create the task
	PrimeFinderTask task = new PrimeFinderTask();

	public static void main(String[] args)
	{
		Application.launch(args);
	}

	@Override
	public void start(final Stage stage)
	{
		// Create the Event-Handlers for the Buttons
		startButton.setOnAction(new EventHandler <ActionEvent>()
		{
            public void handle(ActionEvent event)
            {
            	startTask();
            }
        });

		exitButton.setOnAction(new EventHandler <ActionEvent>()
		{
            public void handle(ActionEvent event)
            {
            	stage.close();
            }
        });

		cancelButton.setOnAction(new EventHandler <ActionEvent>()
		{
            public void handle(ActionEvent event)
            {
            	task.cancel();
            }
        });

		// Enable/Disable the Start and Cancel buttons
		startButton.disableProperty().bind(task.stateProperty().isNotEqualTo(READY));
		cancelButton.disableProperty().bind(task.stateProperty().isNotEqualTo(RUNNING));

		// Create the GridPane
		GridPane pane = new WorkerStateGUI(task);

		// Create the ButtonBox
		HBox buttonBox = new HBox(5, startButton, cancelButton, exitButton);

		// Create the BorderPane
		BorderPane root = new BorderPane();
		root.setCenter(pane);
		root.setBottom(buttonBox);

		// Set the Style-properties of the BorderPane
		root.setStyle("-fx-padding: 10;" +
				"-fx-border-style: solid inside;" +
				"-fx-border-width: 2;" +
				"-fx-border-insets: 5;" +
				"-fx-border-radius: 5;" +
				"-fx-border-color: blue;");

		// Create the Scene
		Scene scene = new Scene(root,500,400);
		// Add the scene to the Stage
		stage.setScene(scene);
		// Set the title of the Stage
		stage.setTitle("A Prime Number Finder Task");
		// Display the Stage
		stage.show();
	}

	public void startTask()
	{
		// Schedule the task on a background thread
		Thread backgroundThread = new Thread(task);
		backgroundThread.setDaemon(true);
		backgroundThread.start();
	}
}
3.2 Creating a Task
Creating a Task<V> is easy. You need to subclass the Task<V> class and provide an implementation for the abstract method call(). The call() method contains the logic to perform the Task.
The following snippet of code shows the skeleton of a Task implementation:
// The task implementation
@Override
protected ObservableList<Long> call()
{
	// An observable list to represent the results
	final ObservableList<Long> results = FXCollections.<Long>observableArrayList();

	// Update the title
	this.updateTitle("Prime Number Finder Task");
	long count = this.upperLimit - this.lowerLimit + 1;
	long counter = 0;

	// Find the prime numbers
	for (long i = lowerLimit; i <= upperLimit; i++)
	{
		// Check if the task is cancelled
		if (this.isCancelled())
		{
			break;
		}

		// Increment the counter
		counter++;

		// Update message
		this.updateMessage("Checking " + i + " for a prime number");

		// Sleep for some time
		try
		{
			Thread.sleep(this.sleepTimeInMillis);
		}
		catch (InterruptedException e)
		{
			// Check if the task is cancelled
			if (this.isCancelled())
			{
				break;
			}
		}

		// Check if the number is a prime number
		if (PrimeUtil.isPrime(i))
		{
			// Add to the list
			results.add(i);

			// Publish the read-only list to give the GUI
			// access to the partial results
			updateValue(FXCollections.<Long>unmodifiableObservableList(results));
		}

		// Update the progress
		updateProgress(counter, count);
	}

	return results;
}
3.3 Updating Task Properties
Typically, you would want to update the properties of the Task as it progresses. The properties must be updated and read on the JavaFX Application Thread, so they can be observed safely in a GUI environment. The Task<V> class provides special methods to update some of its properties.
- protected void updateMessage(String message)
- protected void updateProgress(double workDone, double totalWork)
- protected void updateProgress(long workDone, long totalWork)
- protected void updateTitle(String title)
- protected void updateValue(V value)
You provide the values for the workDone and the totalWork properties to the updateProgress() method. The progress property will be set to workDone/totalWork. The method throws a runtime exception if the workDone is greater than the totalWork or both are less than -1.0.
Sometimes, you may want to publish partial results of a task in its value property. The updateValue() method is used for this purpose. The final result of a task is the return value of its call() method.
All updateXxx() methods are executed on the JavaFX Application Thread. Their names indicate the property they update. They are safe to be called from the call() method of the Task.
If you want to update the properties of the Task from the call() method directly, you need to wrap the code inside a Platform.runLater() call.
3.4 Listening to Task Transition Events
The Task class contains the following properties to let you set event handlers for its state transitions:
- onCancelled
- onFailed
- onRunning
- onScheduled
- onSucceeded
3.5 Cancelling a Task
Use one of the following two cancel() methods to cancel a task:
- public final boolean cancel()
- public boolean cancel(boolean mayInterruptIfRunning)
The first version removes the Task from the execution queue or stops its execution.
The second version lets you specify whether the thread running the Task be interrupted.
Make sure to handle the InterruptedException inside the call() method. Once you detect this exception, you need to finish the call() method quickly. Otherwise, the call to cancel(true) may not cancel the task reliably. The cancel() method may be called from any thread.
The following methods of the Task are called when it reaches a specific state:
- protected void scheduled()
- protected void running()
- protected void succeeded()
- protected void cancelled()
- protected void failed()
Their implementations in the Task class are empty. They are meant to be overridden by the subclasses.
3.6 Running a Task
A Task is Runnable as well as a FutureTask. To run it, you can use a background thread or an ExecutorService.
// Schedule the task on a background thread
Thread backgroundThread = new Thread(task);
backgroundThread.setDaemon(true);
backgroundThread.start();
3.7 The GUI
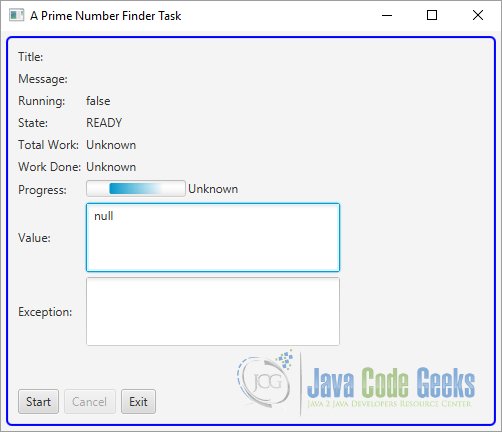
The following image shows the window after starting the program
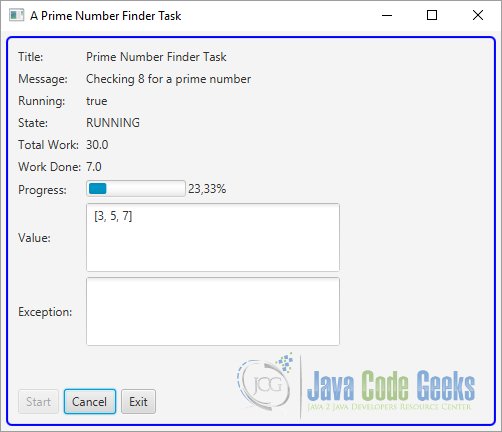
The following Figure shows the window when the task is running. You will need to click the Start button to start the task.
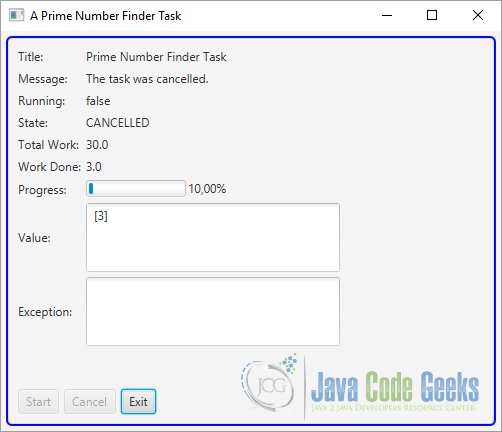
Clicking the Cancel button cancels the task. Once the task finishes, it is cancelled or it fails; you cannot restart it and both the Start and Cancel buttons are disabled.
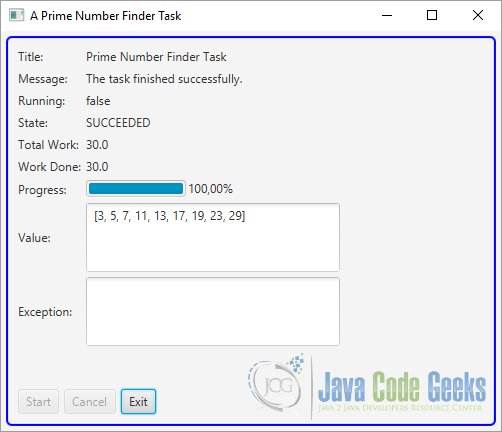
Notice that when the task finds a new prime number, it is displayed on the window immediately.
After execution of the Task, the result will be shown:
4. Using the Service Class
The Service<V> class is an implementation of the Worker<V> interface. It encapsulates a Task<V>. It makes the Task<V> reusable by letting it be started, cancelled, reset, and restarted.
4.1 The Code
The following program shows how to use a Service. The Service object is created and stored as an instance variable. The Service object manages a PrimeFinderTask object, which is a Task to find prime numbers between two numbers.
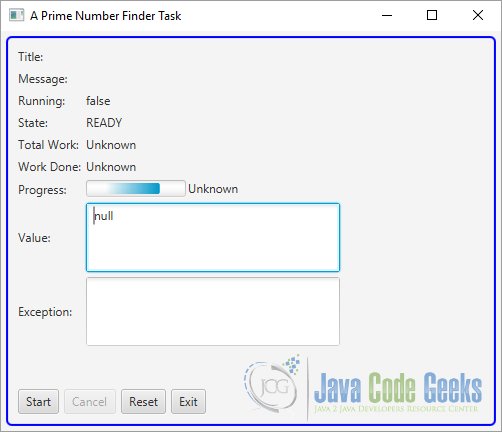
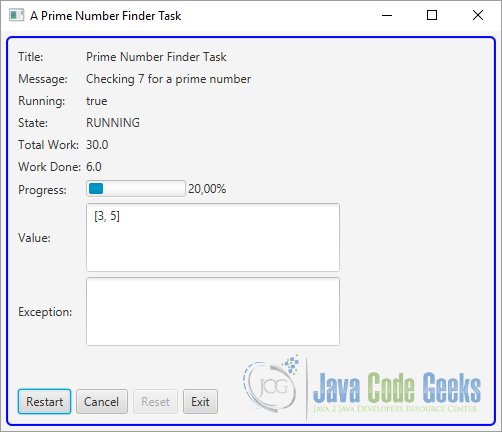
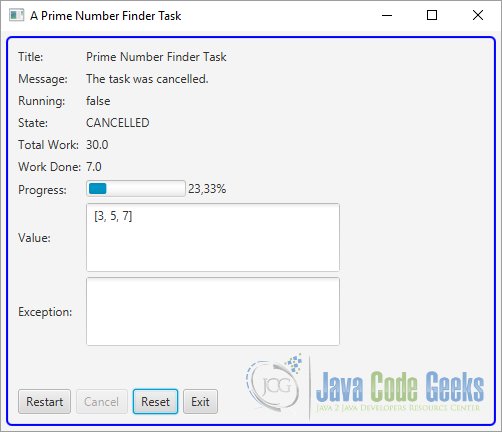
Four buttons are added: Start/Restart, Cancel, Reset, and Exit. The Start Button is labeled Restart after the Service is started for the first time. The buttons do what their labels indicate. Buttons are disabled when they are not applicative.
FxConcurrentExample2.java
import javafx.application.Application;
import javafx.application.Platform;
import javafx.beans.binding.Bindings;
import javafx.collections.ObservableList;
import javafx.concurrent.Service;
import javafx.concurrent.Task;
import javafx.event.ActionEvent;
import javafx.event.EventHandler;
import static javafx.concurrent.Worker.State.RUNNING;
import static javafx.concurrent.Worker.State.SCHEDULED;
import javafx.scene.Scene;
import javafx.scene.control.Button;
import javafx.scene.layout.BorderPane;
import javafx.scene.layout.GridPane;
import javafx.scene.layout.HBox;
import javafx.stage.Stage;

public class FxConcurrentExample2 extends Application
{
	// Create the Buttons
	Button startButton = new Button("Start");
	Button cancelButton = new Button("Cancel");
	Button exitButton = new Button("Exit");
	Button resetButton = new Button("Reset");
	boolean onceStarted = false;

	public static void main(String[] args)
	{
		Application.launch(args);
	}

	@Override
	public void start(Stage stage)
	{
		// Create the Event-Handlers for the Buttons
		startButton.setOnAction(new EventHandler <ActionEvent>()
		{
            public void handle(ActionEvent event)
            {
            	if (onceStarted)
            	{
            		service.restart();
            	}
            	else
            	{
            		service.start();
            		onceStarted = true;
            		startButton.setText("Restart");
            	}
            }
        });

		exitButton.setOnAction(new EventHandler <ActionEvent>()
		{
            public void handle(ActionEvent event)
            {
            	Platform.exit();
            }
        });

		cancelButton.setOnAction(new EventHandler <ActionEvent>()
		{
            public void handle(ActionEvent event)
            {
            	service.cancel();
            }
        });

		resetButton.setOnAction(new EventHandler <ActionEvent>()
		{
            public void handle(ActionEvent event)
            {
            	service.reset();
            }
        });

		// Enable/Disable the Reset and Cancel buttons
		cancelButton.disableProperty().bind(service.stateProperty().isNotEqualTo(RUNNING));
		resetButton.disableProperty().bind(Bindings.or(service.stateProperty().isEqualTo(RUNNING),
				service.stateProperty().isEqualTo(SCHEDULED)));

		// Create the GridPane
		GridPane pane = new WorkerStateGUI(service);

		// Create the ButtonBox
		HBox buttonBox = new HBox(5, startButton, cancelButton, resetButton, exitButton);

		// Create the BorderPane
		BorderPane root = new BorderPane();
		root.setCenter(pane);
		root.setBottom(buttonBox);

		// Set the Style-properties of the BorderPane
		root.setStyle("-fx-padding: 10;" +
				"-fx-border-style: solid inside;" +
				"-fx-border-width: 2;" +
				"-fx-border-insets: 5;" +
				"-fx-border-radius: 5;" +
				"-fx-border-color: blue;");

		// Create the Scene
		Scene scene = new Scene(root,500,400);
		// Add the scene to the Stage
		stage.setScene(scene);
		// Set the title of the Stage
		stage.setTitle("A Prime Number Finder Task");
		// Display the Stage
		stage.show();
	}

	// Create the service
	Service<ObservableList<Long>> service = new Service<ObservableList<Long>>()
	{
		@Override
		protected Task<ObservableList<Long>> createTask()
		{
			return new PrimeFinderTask();
		}
	};
}
4.2 Creating a Service
Remember that a Service<V> encapsulates a Task<V>. Therefore, you need a Task<V> to have a Service<V>.
The Service<V> class contains an abstract protected createTask() method that returns a Task<V>.
To create a service, you need to subclass the Service<V> class and provide an implementation for the createTask() method.
The following snippet of code creates a Service that encapsulates a PrimeFinderTask, which you have created earlier:
// Create the service
Service<ObservableList<Long>> service = new Service<ObservableList<Long>>()
{
	@Override
	protected Task<ObservableList<Long>> createTask()
	{
		return new PrimeFinderTask();
	}
};
The createTask() method of the service is called whenever the service is started or restarted.
4.3 Updating Service Properties
The Service class contains all properties that represent the internal
state of a Worker. It adds an executor property, which is a java.util.concurrent.Executor.
The property is used to run the Service. If it is not specified, a daemon thread is created to run the Service.
Unlike the Task class, the Service class does not contain updateXxx() methods for updating its properties. Its properties are bound to the corresponding properties of the underlying Task<V>.
When the Task updates its properties, the changes are reflected automatically to the Service and to the client.
4.4 Cancelling the Service
Use the cancel() methods to cancel a Service. The method sets the state of the Service to CANCELLED.
The following snippet of code shows an example:
service.cancel();
4.5 Starting the Service
Calling the start() method of the Service class starts a Service. The method calls the createTask() method to get a Task instance and runs the Task. The Service must be in the READY state when its start() method is called.
The following snippet of code shows an example:
service.start();
4.6 Resetting the Service
Calling the reset() method of the Service class resets the Service. Resetting puts all the Service properties back to their initial states. The state is set to READY.
Resetting a Service is allowed only when the Service
is in one of the finish states: SUCCEEDED, FAILED, CANCELLED, or READY. Calling the reset() method throws a runtime exception if the Service is in the SCHEDULED or RUNNING state.
The following snippet of code shows an example:
service.reset();
4.7 Restarting the Service
Calling the restart() method of the Service class restarts a Service. It cancels the task if it exists, resets the service, and starts it. It calls the three methods on the Service object in sequence.
- cancel()
- reset()
- start()
The following snippet of code shows an example:
service.restart();
4.8 The GUI
The following window shows the program after starting:
The following GUI shows the program after pressing the Start Button:
After pressing the Cancel Button, the following window will appear:
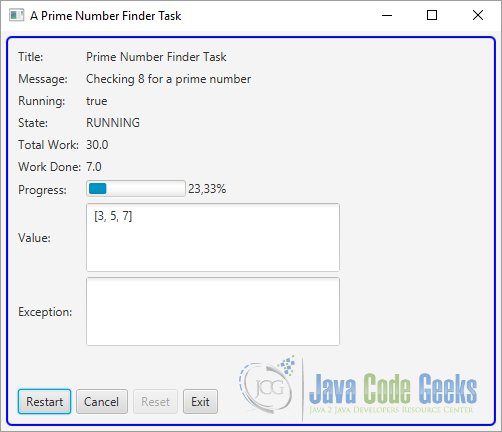
The following GUI shows the program after pressing the Restart Button:

5. Using the ScheduledService Class
The ScheduledService<V> is a Service<V>, which automatically restarts. It can restart when it finishes successfully or when it fails. Restarting on a failure is configurable. The ScheduledService<V> class inherits from the Service<V> class. The ScheduledService is suitable for tasks that use polling.
5.1 The Code
FxConcurrentExample3.java
import javafx.application.Application;
import javafx.application.Platform;
import javafx.beans.binding.Bindings;
import javafx.collections.ObservableList;
import javafx.concurrent.ScheduledService;
import javafx.concurrent.Task;
import javafx.event.ActionEvent;
import javafx.event.EventHandler;
import static javafx.concurrent.Worker.State.RUNNING;
import static javafx.concurrent.Worker.State.SCHEDULED;
import javafx.scene.Scene;
import javafx.scene.control.Button;
import javafx.scene.layout.BorderPane;
import javafx.scene.layout.GridPane;
import javafx.scene.layout.HBox;
import javafx.stage.Stage;
import javafx.util.Duration;

public class FxConcurrentExample3  extends Application
{
	// Create the Buttons
	Button startButton = new Button("Start");
	Button cancelButton = new Button("Cancel");
	Button exitButton = new Button("Exit");
	Button resetButton = new Button("Reset");
	boolean onceStarted = false;

	// Create the scheduled service
	ScheduledService<ObservableList<Long>> service =
		new ScheduledService<ObservableList<Long>>()
		{
			@Override
			protected Task<ObservableList<Long>> createTask()
			{
				return new PrimeFinderTask();
			}
		};

	public static void main(String[] args)
	{
		Application.launch(args);
	}

	@Override
	public void start(Stage stage)
	{
		// Configure the scheduled service
		service.setDelay(Duration.seconds(5));
		service.setPeriod(Duration.seconds(30));
		service.setMaximumFailureCount(5);

		// Create the Event-Handlers for the Buttons
		startButton.setOnAction(new EventHandler <ActionEvent>()
		{
            public void handle(ActionEvent event)
            {
            	if (onceStarted)
            	{
            		service.restart();
            	}
            	else
            	{
            		service.start();
            		onceStarted = true;
            		startButton.setText("Restart");
            	}
            }
        });

		exitButton.setOnAction(new EventHandler <ActionEvent>()
		{
            public void handle(ActionEvent event)
            {
            	Platform.exit();
            }
        });

		cancelButton.setOnAction(new EventHandler <ActionEvent>()
		{
            public void handle(ActionEvent event)
            {
            	service.cancel();
            }
        });

		resetButton.setOnAction(new EventHandler <ActionEvent>()
		{
            public void handle(ActionEvent event)
            {
            	service.reset();
            }
        });

		// Enable/Disable the Reset and Cancel buttons
		cancelButton.disableProperty().bind(service.stateProperty().isNotEqualTo(RUNNING));
		resetButton.disableProperty().bind(Bindings.or(service.stateProperty().isEqualTo(RUNNING),
			service.stateProperty().isEqualTo(SCHEDULED)));

		// Create the GridPane
		GridPane pane = new WorkerStateGUI(service);

		// Create the ButtonBox
		HBox buttonBox = new HBox(5, startButton, cancelButton, resetButton, exitButton);

		// Create the BorderPane
		BorderPane root = new BorderPane();
		root.setCenter(pane);
		root.setBottom(buttonBox);

		// Set the Style-properties of the BorderPane
		root.setStyle("-fx-padding: 10;" +
				"-fx-border-style: solid inside;" +
				"-fx-border-width: 2;" +
				"-fx-border-insets: 5;" +
				"-fx-border-radius: 5;" +
				"-fx-border-color: blue;");

		// Create the Scene
		Scene scene = new Scene(root,500,400);
		// Add the scene to the Stage
		stage.setScene(scene);
		// Set the title of the Stage
		stage.setTitle("A Prime Number Finder Task");
		// Display the Stage
		stage.show();
	}
}
5.2 Creating a ScheduledService
The process of creating a ScheduledService is the same as that of creating a Service. You need to subclass the ScheduledService<V> class and provide an implementation for the createTask() method.
The following snippet of code creates a ScheduledService that encapsulates a PrimeFinderTask, which you have created earlier:
// Create the scheduled service
ScheduledService<ObservableList<Long>> service =
new ScheduledService<ObservableList<Long>>()
{
	@Override
	protected Task<ObservableList<Long>> createTask()
	{
		return new PrimeFinderTask();
	}
};
The createTask() method of the service is called when the service is started or restarted manually or automatically.
Note that a ScheduledService is automatically restarted. You can start and restart it manually by calling the start() and restart() methods.
5.3 Updating ScheduledService Properties
The ScheduledService<V> class inherits properties from the Service<V> class. It adds the following properties that can be used to configure the scheduling of the Service.
- lastValue
- delay
- period
- restartOnFailure
- maximumFailureCount
- backoffStrategy
- cumulativePeriod
- currentFailureCount
- maximumCumulativePeriod
A ScheduledService<V> is designed to run several times. The current value computed by the Service is not very meaningful. Your class adds a new property lastValue, which is of the type V, and it is the last value computed by the Service.
The delay is a duration, which specifies a delay between when the Service is started and when it begins running. The Service stays in the SCHEDULED state for the specified delay. The delay is honored only when the Service is started manually calling the start() or restart() method. When the Service is restarted automatically, honoring the delay property depends on the current state of the Service.
The period is a duration, which specifies the minimum amount of time between the last run and the next run. The default period is zero.
The restartOnFailure specifies whether the Service restarts automatically when it fails. By default, it is set to true.
The currentFailureCount is the number of times the scheduled Service has failed. It is reset to zero when the scheduled Service is restarted manually.
The maximumFailureCount specifies the maximum number of times the Service can fail before it is transitioned into the FAILED state and it is not automatically restarted again.
The backoffStrategy is a Callback<ScheduledService<?>,Duration> that computes the duration to add to the period on each failure. Typically, if a Service fails, you want to slow down before retrying it.
Suppose a Service runs every 10 minutes.
The rerun gaps are computed based on the non-zero period and the current failure count.
The cumulativePeriod is a duration, which is the time between the current failed run and the next run.
5.4 Listening to ScheduledService Transition Events
The ScheduledService goes through the same transition states as the Service. It goes through the READY, SCHEDULED, and RUNNING states automatically after a successful run. Depending on how the scheduled service is configured, it may go through the same state transitions automatically after a failed run.
You can listen to the state transitions and override the transition-related methods as you can for a Service. When you override the transition-related methods in a ScheduledService subclass, make sure to call the super method to keep your ScheduledService working properly.
5.5 The GUI
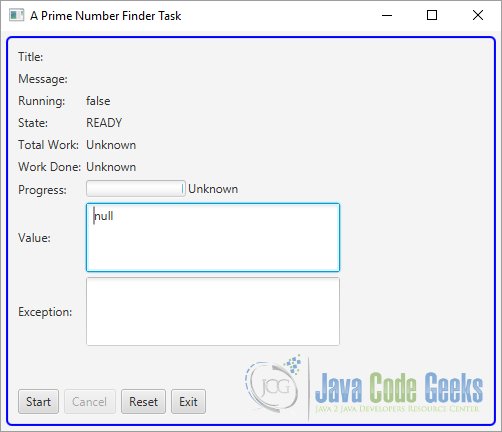
The following image show the state of the ScheduledService when it is not started:
The next image shows the Service, when it is running:
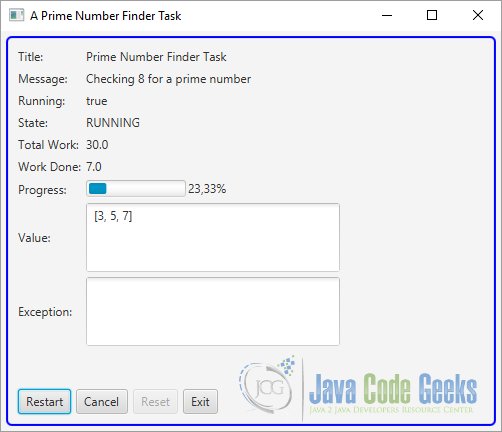
The following imgae shows the program after cancelling:
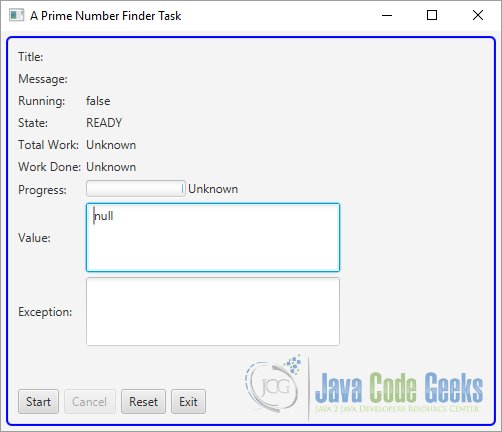
The last image shows the application after restarting:
6. Download Java Source Code
This was an example of javafx.concurrent
You can download the full source code of this example here: JavaFxConcurrentExample.zip


Excellent article!
this is a wonderful article