This article shows examples of JavaFX 8 dialogs. The Dialog class is defined in the javafx.scene.control package. The Dialog is the base class and it has three specialized subclasses: Alert, ChoiceDialog and TextInputDialog.
1. Overview
A Dialog in JavaFX wraps a DialogPane and provides the necessary API to present it to end users. From the API’s javadoc – DialogPane should be considered to be the root node displayed within a Dialog instance. In this role, the DialogPane is responsible for the placement of headers, graphics, content, and buttons.
The Dialog<R> class has a generic type R, which is used to represent the type of the result property. By default the result type is ButtonType.
1.1. Configuring a Dialog
A dialog can be configured to add buttons, add content, set modality and define the blocking (and non-blocking) nature of the dialog. Various properties can be accessed and set using the dialog’s API – title, header text, content text, location, width/height, resizable and the graphic on the header or content.
Note some properties are set by default; for example all dialog’s are modal and not resizable by default.
1.2. Dialog Events
There are events related to dialog showing and hiding actions. These are defined as DialogEvent class: DIALOG_CLOSE_REQUEST, DIALOG_HIDDEN, DIALOG_HIDING, DIALOG_SHOWING, DIALOG_SHOWN.
There are dialog methods that can be used to capture the event actions. For example, the dialog’s setOnShown(EventHandler<DialogEvent> value) method is run as the DIALOG_SHOWN event occurs on dialog, just after it is shown.
1.3. Result Type Converter
A converter is used to convert the result type. This can be used with custom dialogs. Also, a result converter must be set whenever the dialog’s R type is not Void or ButtonType.
1.4. Other
There are methods to close and hide the dialog.
1.5. Examples
This article has four examples demonstrating the usage of Alert, ChoiceDialog, TextInputDialog and Dialog classes. The examples use pre-built dialogs, except the example with Dialog class has added controls. The example dialogs are configured with some of the above mentioned properties and features.
Note that JavaFX 8u40 (Java SE 8u40) is required to run the examples in this article. The following sections show example code snippets and screenshots. The complete code for all examples is included in the section 6. Download Java Source Code at the bottom of this post.
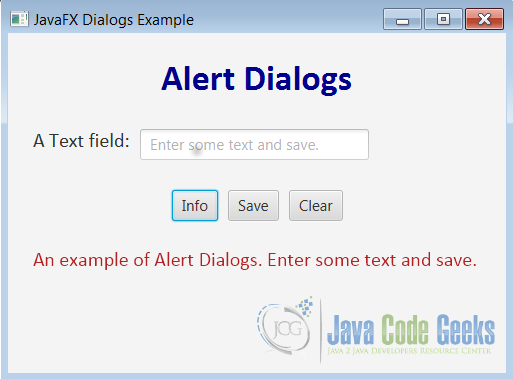
2. Alert Dialog Example
Alert extends Dialog<ButtonType> class.
The alert dialogs are built using pre-built alert types to pre-populate various properties. The alert types are defined as an enum AlertType. The enum constant values are: CONFIRMATION, ERROR, INFORMATION, NONE and WARNING.
The example details the CONFIRMATION, ERROR and INFORMATION alerts.
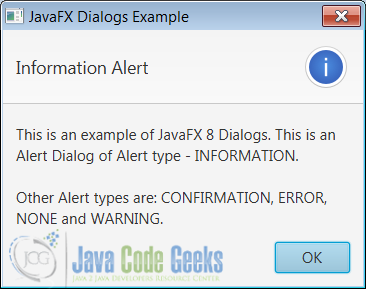
2.1. Information Alert
From the Alert Dialogs window: Click the Info button to show an information type alert dialog.
The following code shows how the dialog is created and displayed:
Alert alert = new Alert(AlertType.INFORMATION);
alert.setTitle(titleTxt);
alert.setHeaderText("Information Alert");
String s ="This is an example of JavaFX 8 Dialogs... ";
alert.setContentText(s);
alert.show();
Note the Alert‘s constructor takes the AlertType as an argument. The show() method displays the dialog; this is a non-blocking method.
Note that the dialog is not modal and is not re-sizeable; this is the dialog’s default behaviour.
Note the header text is set for this alert. The setHeaderText("some text") method sets the specified text as shown in the example’s picture above. In case this is not set, and a default value is set as “Information”.
2.2. Error Alert
From the Alert Dialogs window: Enter some text less than 5 characters in length in the input text field and click the Save button. This shows an error type alert dialog.
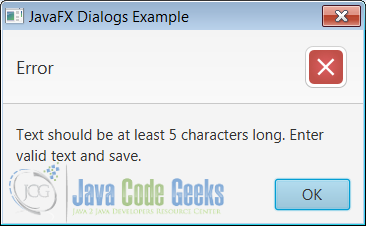
After closing error alert, note the status message shows “Invalid text entered: …”. The following code shows how the dialog is created and displayed:
String txt = textFld.getText().trim();
String msg = "Text saved: ";
boolean valid = true;

if ((txt.isEmpty()) || (txt.length() < 5)) {

    valid = false;
    Alert alert = new Alert(AlertType.ERROR);
    alert.setTitle(titleTxt);
    String s = "Text should be at least 5 characters long. " + "Enter valid text and save. ";
    alert.setContentText(s);
    alert.showAndWait();
    msg = "Invalid text entered: ";
}

actionStatus.setText(msg + txt);

if (! valid) {

    textFld.requestFocus();
}
The dialog is displayed using the showAndWait() method. This is a blocking method; the code after this method statement does not execute until the dialog is closed. The status message text is set only after the dialog is closed.
2.3. Confirmation Alert
From the Alert Dialogs window: Click the Clear button to show a confirmation type alert dialog.
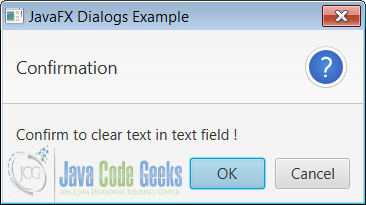
Click either OK or Cancel (or ‘X’ in title bar for cancel). If OK is clicked, the input text field in Alert Dialogs window is cleared and gets focus. If Cancel is clicked, the input text field is as before. Note that both the actions close the alert dialog.
The following code shows how the dialog is created, displayed and the dialog result is captured:
Alert alert = new Alert(AlertType.CONFIRMATION);
alert.setTitle(titleTxt);
String s = "Confirm to clear text in text field !";
alert.setContentText(s);

Optional<ButtonType> result = alert.showAndWait();

if ((result.isPresent()) && (result.get() == ButtonType.OK)) {

    textFld.setText("");
    actionStatus.setText("An example of Alert Dialogs. Enter some text and save.");
    textFld.requestFocus();
}
In the above code the showAndWait() method returns Optional<T>; a container object and T is result type. The optional’s isPresent() returns true if a value is present and get() returns the result value – the ButtonType (this is the dialog’s default result). The result value in this case is the dialog’s ButtonType‘s value.
3. Choice Dialog Example
A choice dialog shows a list of choices to the user, from which one item can be picked. The ChoiceDialog<T> extends Dialog<T> class – where T is the type of the items to show to the user, and the type that is returned via Dialog‘s getResult() method when the dialog is dismissed.
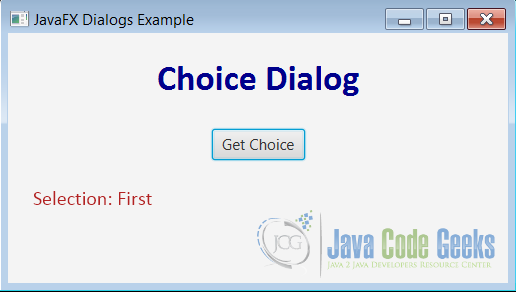
From the Choice Dialog window: Click the Get Choice button to show a choice dialog.
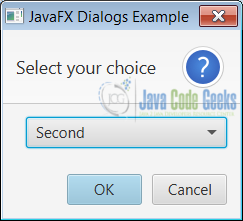
Select an item from the choice list. Click OK or Cancel. This closes the dialog. The status message shows your selected choice or cancellation of choice dialog.
The following code shows how the dialog is created, displayed and the result is captured:
The two variables define the dialog’s the choice list data:
private final String [] arrayData = {"First", "Second", "Third", "Fourth"};
private List<String> dialogData;
The code:
dialogData = Arrays.asList(arrayData);

dialog = new ChoiceDialog(dialogData.get(0), dialogData);
dialog.setTitle(titleTxt);
dialog.setHeaderText("Select your choice");

Optional<String> result = dialog.showAndWait();
String selected = "cancelled.";

if (result.isPresent()) {

    selected = result.get();
}

actionStatus.setText("Selection: " + selected);
The choice dialog is constructed using a List collection of type String. The constructor’s first argument defines the choice list’s default value and the second argument is the list item data.
The showAndWait() method returns an optional of type String; this is because the dialog type is String.
4. Text Input Dialog Example
A text input dialog shows an input text field, into which the user can enter some text. TextInputDialog extends Dialog<String> class – note the Dialog‘s type is String and the result Optional‘s type is always a String.
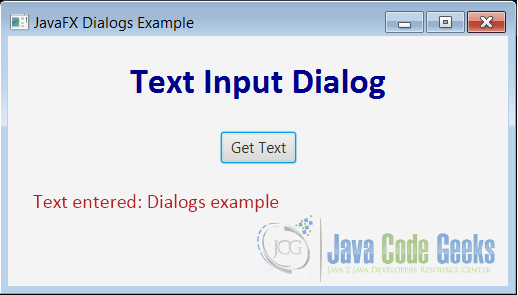
From the Text Input Dialog window: Click the Get Text button to show a text input dialog.
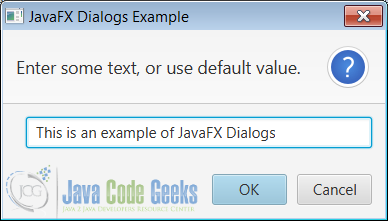
Enter some text in the text input field. Click OK or Cancel. This closes the dialog. The status message shows the entered (or default) text or cancellation of the text input dialog.
The following code shows how the dialog is created, displayed and the result is captured:
dialog = new TextInputDialog(defaultVal);
dialog.setTitle(titleTxt);
dialog.setHeaderText("Enter some text, or use default value.");

Optional<String> result = dialog.showAndWait();
String entered = "none.";

if (result.isPresent()) {

    entered = result.get();
}

actionStatus.setText("Text entered: " + entered);
The showAndWait() method returns an optional of type String; this is the text value entered in the input text field.
5. A Dialog Example
This example uses the Dialog class to construct a dialog and captures some data (Phone Book). The PhoneBook is defined as a class with two string properties – name and phone number.
Two input text field and a button controls are added to the dialog. The text fields capture the phone book info. The Okay button confirms the entered phone data.

From the A Dialog window: Click the Click to Show Dialog button to show a dialog.
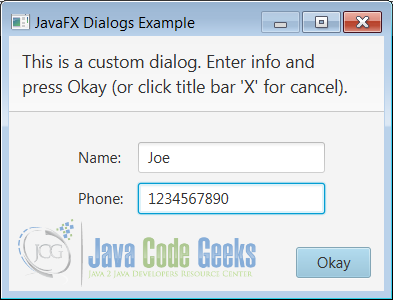
Enter some text in the two text input fields. Click Okay or Cancel. This closes the dialog. The status message shows the entered phone book data or cancellation of the dialog (nothing is displayed in this case).
The following code shows how the dialog is created, displayed and the result is captured:
Dialog<PhoneBook> dialog = new Dialog<>();
dialog.setTitle(titleTxt);
dialog.setHeaderText("This is a custom dialog. Enter info and \n" +
    "press Okay (or click title bar 'X' for cancel).");
dialog.setResizable(true);

Label label1 = new Label("Name: ");
Label label2 = new Label("Phone: ");
TextField text1 = new TextField();
TextField text2 = new TextField();

GridPane grid = new GridPane();
grid.add(label1, 1, 1);
grid.add(text1, 2, 1);
grid.add(label2, 1, 2);
grid.add(text2, 2, 2);
dialog.getDialogPane().setContent(grid);

ButtonType buttonTypeOk = new ButtonType("Okay", ButtonData.OK_DONE);
dialog.getDialogPane().getButtonTypes().add(buttonTypeOk);

dialog.setResultConverter(new Callback<ButtonType, PhoneBook>() {
    @Override
    public PhoneBook call(ButtonType b) {

        if (b == buttonTypeOk) {

            return new PhoneBook(text1.getText(), text2.getText());
        }

        return null;
    }
});

Optional<PhoneBook> result = dialog.showAndWait();

if (result.isPresent()) {

    actionStatus.setText("Result: " + result.get());
}
From the above code:
The dialog is constructed of PhoneBook type:
Dialog<PhoneBook> dialog = new Dialog<>();
This is the data type returned by the dialog.
The dialog’s input text field controls are added to a GridPane and the grid pane is added to the dialog:
dialog.getDialogPane().setContent(grid).
A button of pre-defined type is added to the dialog:
ButtonType buttonTypeOk = new ButtonType("Okay", ButtonData.OK_DONE);
dialog.getDialogPane().getButtonTypes().add(buttonTypeOk);
The dialog’s default type is captured, but the dialog needs to return the phone book data entered into it. For this a result converter is defined and set for the dialog.
dialog.setResultConverter(new Callback<ButtonType, PhoneBook>() {
    @Override
    public PhoneBook call(ButtonType b) {

        if (b == buttonTypeOk) {

            return new PhoneBook(text1.getText(), text2.getText());
        }

        return null;
    }
});
The dialog’s showAndWait() method returns a result of PhoneBook type. The phone book details captured in the dialog are shown in the status message of the example’s window after the dialog is closed.
6. Download Java Source Code
This was an example of javafx.scene.control.Dialog
You can download the full source code of this example here: JavaFxDialogExamples.zip
