In this article we will see how we can update Eclipse. Eclipse is the most popular Integrated Development Environment (IDE) used by Java developers. The Eclipse platform itself is structured as subsystems which are implemented in one or more plug-ins. The subsystems are built on top of a small runtime engine.
The term Workbench refers to the desktop development environment. The Workbench aims to achieve seamless tool integration and controlled openness by providing a common paradigm for the creation, management, and navigation of workspace resources. Each Workbench window contains one or more perspectives. Perspectives contain views and editors and control what appears in certain menus and tool bars. More than one Workbench window can exist on the desktop at any given time.
1. Introduction
If you are upgrading to a newer release of Eclipse from an older release, there are simple steps to follow to migrate your workspace to the new release. Your workspace is the directory on disk that contains all of your project files, as well as meta-data such as preferences you may have customized. The steps to follow for upgrading depend on whether or not you used the “-data” command line argument when starting Eclipse. The “-data” argument is recommended because it clearly specifies the location of your workspace.
The workspace chooser dialog allows you to choose the location of your workspace. This dialog appears on first startup in the absence of a -data argument. The default location provided by this dialog will be a “workspace” child of your home directory
Unless you have an existing workspace from a previous Eclipse version, you can keep this default or choose some other location. You should not store your workspace inside the Eclipse install directory, because that will make it more difficult to upgrade to a newer version of Eclipse. You should not copy or move the workspace directory, because it may contain metadata with absolute file system paths, which will be invalid if the workspace is copied elsewhere.
2. Add New Repository
If upgrading the platform itself to the next full release follow the steps below:
- Go to Window => Preferences => Install/Update => Available Software Sites
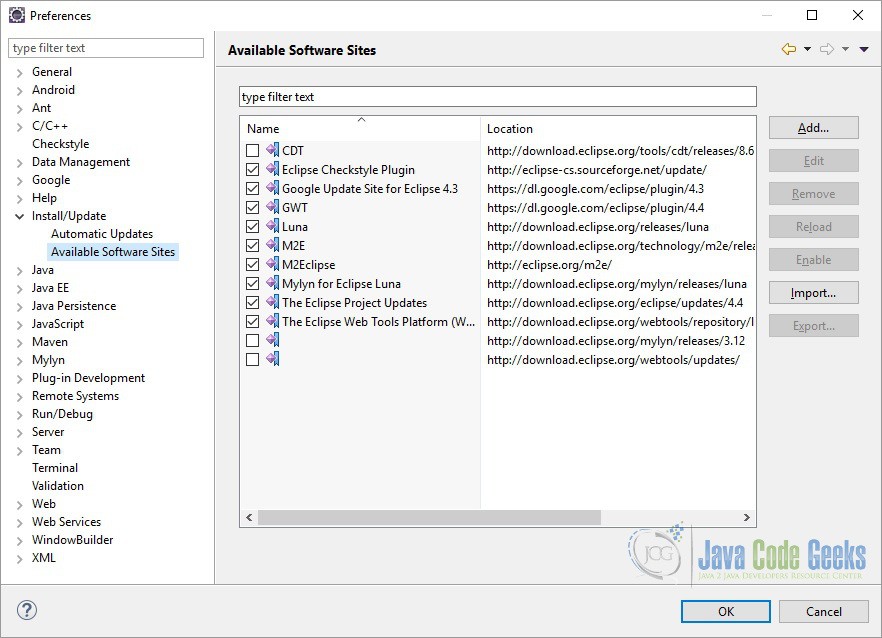
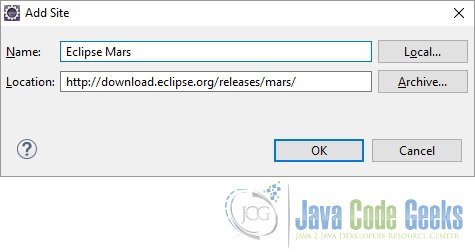
- Click ‘Add‘. Enter the URL of the new repository (for example, http://download.eclipse.org/releases/mars/ for Mars (4.5)). Click OK
3. Check for Updates
Eclipse provides the facility to check for any updates for the existing features and install those updates. To check for updates go to Help => Check For Updates.
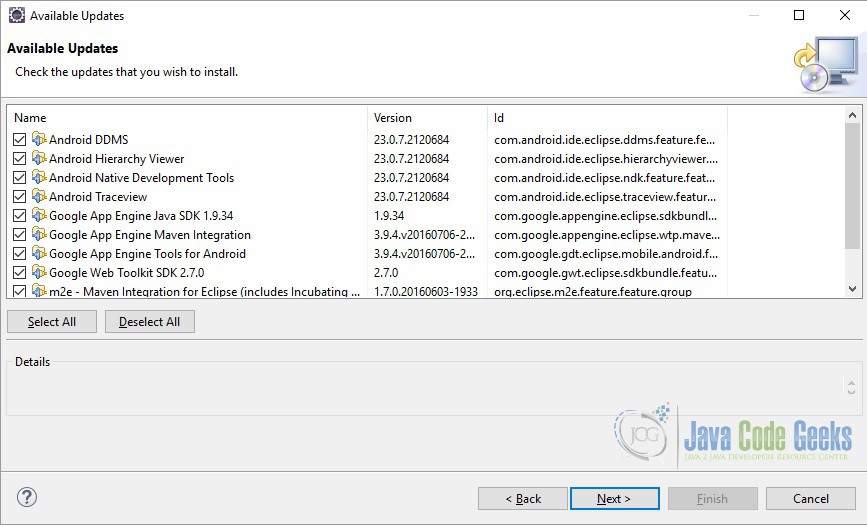
Here you can choose the items which you want to update. If upgrading the platform itself, when you are prompted to restart it is strongly recommended to do so. A restart may not be required when updating other features, but always select to restart if you are unsure. Check your Available Software Sites for release-specific update sites that may need updating as well, e.g. The Eclipse Project Updates URL changes with each release (typically release-specific sites hold the SDK/Source features and off-cycle hot fixes and are not required)
Occasionally you won’t be able to upgrade Eclipse or certain features due to incompatible changes in the update technology. In these cases you will need to download a fresh install. Download a new build from the Eclipse download Web site Eclipse Download and unzip it in a new directory. Complete upgrade instructions are always included in the Eclipse readme_eclipse.html file included with every build in the readme directory.
Upgrades may require administrator privileges to succeed and may fail with error messages claiming “Only one of the following can be installed:” otherwise. Start Eclipse with “Run as administrator…”.
4. Update Manager
The Update Manager allows you to find new plug-ins on your machine, your network, or the Internet, compare new plug-ins to your configuration, and install only those that are compatible with your current configuration. The Update Manager thinks in terms of features, a logical group of related plug-ins, and also provides support for managing configurations to undo a given installation or to automatically update all the features currently installed in your Eclipse configuration. Before plug-ins can be installed by the Update Manager, they need to be collected into a feature. The feature itself has to be published using an update site.
The Update Manager is invoked by Help => Software Updates. Remember to have an ‘open’ connection to the internet when updating. Proxy settings can prevent the update mechanism from reaching the locations you want/need. The proxy-settings can be changed using Windows => Preferences => General => Network Connections.
5. Conclusion
In this article we saw how we can update Eclipse. It is very important feature of any software as it allows new features to be integrated with existing ones without reinstalling the software again. We also saw how we can add new repositories for downloading new plugins.
