Eclipse Zest is a visualization toolkit for graphs. This tutorial explains how to directly create a Zest Graph in Eclipse IDE and how to use the JFace abstraction.
Table Of Contents
1. Introduction
Eclipse Zest is a visualization toolkit for graphs. It is based on SWT / Draw2D to provide layout locations for a set of entities and relationships. Zest supports the viewer concept from JFace Viewers and therefore allows to separate the model from the graphical representation of the model. This article assumes that developers are already familiar with Eclipse RCP or Eclipse Plugin development.

1.1 Zest Components
Eclipse Zest has the following components:
- Graph Node: Node in the graph with the properties.
- Graph Connections: Arrow / Edge of the graph which connections to two nodes.
- Graph Container: Use for, a graph within a graph.
- Graph: Holds the other elements (nodes, connections, container).
1.2 Zest Layout Managers
Eclipse Zest provides the graph layout managers. A graph layout manager determines how the nodes (and the arrows) of a graph are arranged on the screen. The following layout managers are provided:
| Layout Manager | Description |
|---|---|
TreeLayoutAlgorithm |
Graph is displayed in the form of a vertical tree. |
HorizontalTreeLayoutAlgorithm |
Similar to TreeLayoutAlgorithm but the layout is horizontal. |
RadialLayoutAlgorithm |
Root is in the center, the others nodes are placed on this node. |
GridLayoutAlgorithm |
A Layout algorithm that takes advantage of the positions and directions of connection points. Lays out all the nodes in a grid like a pattern based on the structure of the diagram. |
SpringLayoutAlgorithm |
Layout the graph so that all connections should have the same length and that the edges overlap minimally. |
HorizontalShift |
Moves overlapping nodes to the right. |
CompositeLayoutAlgorithm |
Combines other layout algorithms, for example HorizontalShift can be the second layout algorithm to move nodes which were still overlapping with another algorithm if used. |
1.3 Zest Filters
Developers can also define filters (org.eclipse.zest.layouts.Filter) on the layout managers via the setFilter(filter) method. This defines which nodes and connections should be displayed. The filter receives an LayoutItem, the actual graph element can be received with the getGraphData() method.
1.4 Zest Installation
Developers can use the Eclipse update manager to install the Graphical Editing Framework Zest Visualization Toolkit. You may have to un-flag Group items by category to see Eclipse Zest.
Now, open up the Eclipse IDE and let’s start building the application!
2. Eclipse Zest Plugin Tutorial
2.1 Tools Used
We are using Eclipse Kepler SR2, JDK 1.7 and Eclipse Zest plugin to create the visualization components. Having said that, we have tested the code against JDK 1.8 and it works well.
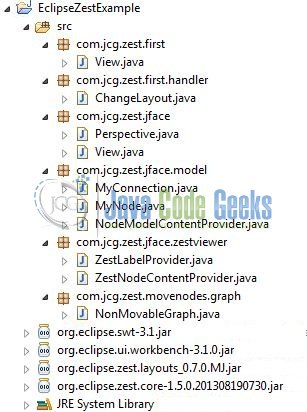
2.2 Project Structure
Firstly, let’s review the final project structure, in case you are confused about where you should create the corresponding files or folder later!
3. Application Building
Below are the steps involved in developing this application.
3.1 Getting Started
Create a new Eclipse RCP application com.jcg.zest.first and use the Eclipse RCP with a view as a template. Add org.eclipse.zest.core and org.eclipse.zest.layouts as dependencies to the MANIFEST.MF. Add the following code to View.java as this code creates a simple graph and connects its elements.
View.java
package com.jcg.zest.first;

import org.eclipse.swt.SWT;
import org.eclipse.swt.events.SelectionAdapter;
import org.eclipse.swt.events.SelectionEvent;
import org.eclipse.swt.widgets.Composite;
import org.eclipse.ui.part.ViewPart;
import org.eclipse.zest.core.widgets.Graph;
import org.eclipse.zest.core.widgets.GraphConnection;
import org.eclipse.zest.core.widgets.GraphNode;
import org.eclipse.zest.core.widgets.ZestStyles;
import org.eclipse.zest.layouts.LayoutStyles;
import org.eclipse.zest.layouts.algorithms.SpringLayoutAlgorithm;
import org.eclipse.zest.layouts.algorithms.TreeLayoutAlgorithm;

public class View extends ViewPart {

	private Graph graphObj;
	private int layoutObj = 1;
	public static final String ID = "com.jcg.zest.first.view";

	public void createPartControl(Composite parent) {

		// Graph Will Hold All Other Objects
		graphObj = new Graph(parent, SWT.NONE);

		// Adding A Few Graph Nodes
		GraphNode node_1 = new GraphNode(graphObj, SWT.NONE, "Jim");
		GraphNode node_2 = new GraphNode(graphObj, SWT.NONE, "Jack");
		GraphNode node_3 = new GraphNode(graphObj, SWT.NONE, "Joe");
		GraphNode node_4 = new GraphNode(graphObj, SWT.NONE, "Bill");

		// Setting Up A Directed Connection
		new GraphConnection(graphObj, ZestStyles.CONNECTIONS_DIRECTED, node_1, node_2);

		// Dotted Graphical Connection
		new GraphConnection(graphObj, ZestStyles.CONNECTIONS_DOT, node_2, node_3);

		// Standard Connection
		new GraphConnection(graphObj, SWT.NONE, node_3, node_1);

		// Change Line Color and Line Width
		GraphConnection graphConnection = new GraphConnection(graphObj, SWT.NONE, node_1, node_4);
		graphConnection.changeLineColor(parent.getDisplay().getSystemColor(SWT.COLOR_GREEN));

		// Setting Up A Dummy Text
		graphConnection.setText("This is a text");
		graphConnection.setHighlightColor(parent.getDisplay().getSystemColor(SWT.COLOR_RED));
		graphConnection.setLineWidth(3);

		graphObj.setLayoutAlgorithm(new SpringLayoutAlgorithm(LayoutStyles.NO_LAYOUT_NODE_RESIZING), true);

		// Adding A Selection Listener On Graph Object
		graphObj.addSelectionListener(new SelectionAdapter() {
			public void widgetSelected(SelectionEvent selectionEventObj) {
				System.out.println(selectionEventObj);
			}
		});
	}

	public void setLayoutManager() {
		switch (layoutObj) {
		case 1:
			graphObj.setLayoutAlgorithm(new TreeLayoutAlgorithm(LayoutStyles.NO_LAYOUT_NODE_RESIZING), true);
			layoutObj++;
			break;
		case 2:
			graphObj.setLayoutAlgorithm(new SpringLayoutAlgorithm(LayoutStyles.NO_LAYOUT_NODE_RESIZING), true);
			layoutObj = 1;
			break;
		}
	}

	// Passing the Focus Request To The Viewer's Control.
	public void setFocus() { }
}
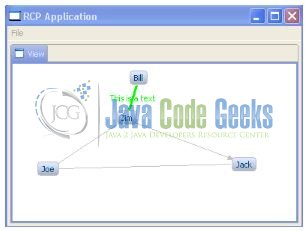
Execute the application and the below name graph will appear on the View console.
3.2 Layout Manager Selection via a command
Create a command with the following default handler: com.jcg.zest.first.handler.ChangeLayout which will change the layout for the graph. Assign the command to the menu and add the following code to it.
ChangeLayout.java
package com.jcg.zest.first.handler;

import org.eclipse.core.commands.AbstractHandler;
import org.eclipse.core.commands.ExecutionEvent;
import org.eclipse.core.commands.ExecutionException;
import org.eclipse.ui.IViewPart;
import org.eclipse.ui.handlers.HandlerUtil;

public class ChangeLayout extends AbstractHandler {

    @Override
    public Object execute(ExecutionEvent event) throws ExecutionException {
        IViewPart findViewObj = HandlerUtil.getActiveWorkbenchWindow(event).getActivePage().findView("com.jcg.zest.first.view");

        // Setting The View Object To Find View
        View viewObj = (View) findViewObj;

        // Chaning The View Layout By Selecting A Command
        viewObj.setLayoutManager();
        return null;
    }
}
Execute the application and if you select your command the layout of your view should change.
4. Eclipse Zest and JFace
JFace provides viewers to encapsulate the data from the presentation. A JFace viewer requires a content provider and a label provider. Eclipse Zest provides as a viewer the class GraphViewer. Content provider in Eclipse Zest is either based on the connections or on the nodes.
Standard Zest Content providers are:
| Content Provider | Description |
|---|---|
| IGraphContentProvider | It is based on the connections and the connections contain the information which nodes they refer to. This interface cannot display nodes without connections. |
| IGraphEntityContentProvider | Based on the Node which contains the information about which relationship they have. These relationships are available in the label provider as EntityConnectionData objects. |
| IGraphEntityRelationshipContentProvider | Node based, the content provider defines getRelationShips(sourceNode, destinationNode) which determines the connections. The advantages compared with IGraphEntityContentProvider is that you decide which objects you return. |
A label provider Eclipse Zest can use the standard JFace interface ILabelProvider (implemented by the class LabelProvider) or the Zest specific IEntityStyleProvider.
4.1 Eclipse Zest and JFace Example
4.1.1 Project Creation
Create a new RCP application com.jcg.zest.jface. Use the RCP application with a view as a template and add the zest dependencies to your MANIFEST.MF. Do remember, to change the Perspective.java to the following: (we do not want a stand-alone view).
Perspective.java
package com.jcg.zest.jface;

import org.eclipse.ui.IPageLayout;
import org.eclipse.ui.IPerspectiveFactory;

public class Perspective implements IPerspectiveFactory {

	public void createInitialLayout(IPageLayout pageLayoutObj) {

		String editorAreaBoj = pageLayoutObj.getEditorArea();
		pageLayoutObj.setEditorAreaVisible(false);
		pageLayoutObj.setFixed(true);

		pageLayoutObj.addView(View.ID, IPageLayout.LEFT, 1.0f, editorAreaBoj);
	}
}
4.1.2 Creating a Model & a POJO Class
Create the model class and add the following code to it:
MyNode.java
package com.jcg.zest.jface.model;

import java.util.ArrayList;
import java.util.List;

public class MyNode {
	private final String id;
	private final String name;
	private List connections;

	public MyNode(String id, String name) {
		this.id = id;
		this.name = name;
		this.connections = new ArrayList();
	}

	public String getId() {
		return id;
	}

	public String getName() {
		return name;
	}

	public List getConnectedTo() {
		return connections;
	}
}
Note: The model can be anything as long as developers can logically convert it into a connected graph.
Let’s create a POJO class now and add the following code to it:
MyConnection.java
package com.jcg.zest.jface.model;

public class MyConnection {

	final String id;
	final String label;
	final MyNode source;
	final MyNode destination;

	public MyConnection(String id, String label, MyNode source, MyNode destination) {
		this.id = id;
		this.label = label;
		this.source = source;
		this.destination = destination;
	}

	public String getLabel() {
		return label;
	}

	public MyNode getSource() {
		return source;
	}
	public MyNode getDestination() {
		return destination;
	}
}
4.1.3 Creating a Data Model Class
We are building this class which provides an instance of the data model. Add the following code to it:
NodeModelContentProvider.java
package com.jcg.zest.jface.model;

import java.util.ArrayList;
import java.util.List;

public class NodeModelContentProvider {

	private List connections;
	private List nodes;

	public NodeModelContentProvider() {
		nodes = new ArrayList();
		MyNode node = new MyNode("1", "Hamburg");
		nodes.add(node);
		node = new MyNode("2", "Frankfurt");
		nodes.add(node);
		node = new MyNode("3", "Berlin");
		nodes.add(node);
		node = new MyNode("4", "Munich");
		nodes.add(node);
		node = new MyNode("5", "Eppelheim");
		nodes.add(node);
		node = new MyNode("6", "Ahrensboek");
		nodes.add(node);

		connections = new ArrayList();
		MyConnection connect = new MyConnection("1", "1", nodes.get(0),nodes.get(1));
		connections.add(connect);
		connect = new MyConnection("2", "2", nodes.get(0), nodes.get(4));
		connections.add(connect);
		connect = new MyConnection("3", "3", nodes.get(2), nodes.get(1));
		connections.add(connect);
		connect = new MyConnection("4", "3", nodes.get(1), nodes.get(3));
		connections.add(connect);

		for (MyConnection connection : connections) {
			connection.getSource().getConnectedTo().add(connection.getDestination());
		}
	}

	public List getNodes() {
		return nodes;
	}
}
4.1.4 Creating the Providers
Here in this section, we will be creating the Zest Content Provider and Label Provider classes to setup the relationship between the nodes. This node relationship will be available as the label provider.
ZestNodeContentProvider.java
package com.jcg.zest.jface.zestviewer;

import org.eclipse.jface.viewers.ArrayContentProvider;
import org.eclipse.zest.core.viewers.IGraphEntityContentProvider;

import com.jcg.zest.jface.model.MyNode;

public class ZestNodeContentProvider extends ArrayContentProvider  implements IGraphEntityContentProvider {

	@Override
	public Object[] getConnectedTo(Object entity) {
		if (entity instanceof MyNode) {
			MyNode node = (MyNode) entity;
			return node.getConnectedTo().toArray();
		}
		throw new RuntimeException("Type Not Supported");
	}
}
ZestLabelProvider.java
package com.jcg.zest.jface.zestviewer;

import org.eclipse.jface.viewers.LabelProvider;
import org.eclipse.zest.core.viewers.EntityConnectionData;

import com.jcg.zest.jface.model.MyConnection;
import com.jcg.zest.jface.model.MyNode;

public class ZestLabelProvider extends LabelProvider {
	@Override
	public String getText(Object element) {
		if (element instanceof MyNode) {
			MyNode myNode = (MyNode) element;
			return myNode.getName();
		}

		// Not Called With The IGraphEntityContentProvider
		if (element instanceof MyConnection) {
			MyConnection myConnection = (MyConnection) element;
			return myConnection.getLabel();
		}

		if (element instanceof EntityConnectionData) {
			EntityConnectionData test = (EntityConnectionData) element;
			return "";
		}
		throw new RuntimeException("Wrong type: "
				+ element.getClass().toString());
	}
}
4.1.5 Creating a View
The View class is used to create the graphical representation of the nodes. Add the following code to it:
View.java
package com.jcg.zest.jface;

import org.eclipse.swt.SWT;
import org.eclipse.swt.widgets.Composite;
import org.eclipse.ui.IActionBars;
import org.eclipse.ui.part.ViewPart;
import org.eclipse.zest.core.viewers.AbstractZoomableViewer;
import org.eclipse.zest.core.viewers.GraphViewer;
import org.eclipse.zest.core.viewers.IZoomableWorkbenchPart;
import org.eclipse.zest.core.viewers.ZoomContributionViewItem;
import org.eclipse.zest.layouts.LayoutAlgorithm;
import org.eclipse.zest.layouts.LayoutStyles;
import org.eclipse.zest.layouts.algorithms.TreeLayoutAlgorithm;

import com.jcg.zest.jface.model.NodeModelContentProvider;
import com.jcg.zest.jface.zestviewer.ZestLabelProvider;
import com.jcg.zest.jface.zestviewer.ZestNodeContentProvider;

public class View extends ViewPart implements IZoomableWorkbenchPart {

	public static final String ID = "com.jcg..zest.jface.view";
	private GraphViewer viewerObj;

	public void createPartControl(Composite parent) {

		viewerObj = new GraphViewer(parent, SWT.BORDER);
		viewerObj.setContentProvider(new ZestNodeContentProvider());
		viewerObj.setLabelProvider(new ZestLabelProvider());

		NodeModelContentProvider modelObj = new NodeModelContentProvider();
		viewerObj.setInput(modelObj.getNodes());

		LayoutAlgorithm layoutObj = setLayout();
		viewerObj.setLayoutAlgorithm(layoutObj, true);
		viewerObj.applyLayout();

		fillToolBar();
	}

	private LayoutAlgorithm setLayout() {
		LayoutAlgorithm selectedLayoutObj;

		// selectedLayoutObj = new SpringLayoutAlgorithm(LayoutStyles.NO_LAYOUT_NODE_RESIZING);

		selectedLayoutObj = new TreeLayoutAlgorithm(LayoutStyles.NO_LAYOUT_NODE_RESIZING);

		// selectedLayoutObj = new GridLayoutAlgorithm(LayoutStyles.NO_LAYOUT_NODE_RESIZING);

		// selectedLayoutObj = new HorizontalTreeLayoutAlgorithm(LayoutStyles.NO_LAYOUT_NODE_RESIZING);

		// selectedLayoutObj = new RadialLayoutAlgorithm(LayoutStyles.NO_LAYOUT_NODE_RESIZING);
		return selectedLayoutObj;
	}

	// Passing the Focus Request To The Viewer's Control.
	public void setFocus() { }

	private void fillToolBar() {
		ZoomContributionViewItem toolbarZoom = new ZoomContributionViewItem(this);

		IActionBars barsObj = getViewSite().getActionBars();
		barsObj.getMenuManager().add(toolbarZoom);
	}

	@Override
	public AbstractZoomableViewer getZoomableViewer() {
		return viewer;
	}
}
4.2 Project Demo
The result should look like the following.

5. Tips and Tricks
By default, the user can move the nodes in Zest plugin. To disable this, a developer has to extend the Graph. Let’s take a look at the sample code.
NonMovableGraph.java
package com.jcg.zest.movenodes.graph;

import org.eclipse.draw2d.SWTEventDispatcher;
import org.eclipse.swt.widgets.Composite;
import org.eclipse.zest.core.widgets.Graph;

public class NonMovableGraph extends Graph {

	public NonMovableGraph(Composite parent, int style) {
		super(parent, style);
		this.getLightweightSystem().setEventDispatcher(new SWTEventDispatcher() {
			public void dispatchMouseMoved(org.eclipse.swt.events.MouseEvent me) {
				// Do Nothing
			}
		});
	}
}
That’s all for this post. Happy Learning!!
6. Conclusion
Here, in this example, we learned about the implementation of the Zest plugin in Eclipse IDE. I hope this simple reference tutorial was helpful.
7. Download the Eclipse Project
This was an example of Eclipse Zest Plugin.
You can download the full source code of this example here: Eclipse Zest Example
