Java Unzip File Example
Java provides us java.util.zip package which contains suitable classes for compressing/decompressing data from Zip and Gzip file formats. You can have a look at this package and all the utility classes that includes, at the documentation of java.util.zip package.
In our example we are going to show you how to decompress a zip file and put all the included files and folders, to a specified destination directory.
For this tutorial, we will use the following tools in a Windows 64-bit platform:
- JDK 1.7
- Eclipse 4.2 Juno
1. Example of file unzipping
Create a new java file with the name UnzipFileClass into the package com.javacodegeeks.javacore.unziptest. Then paste the following code.
UnzipFileClass.java:
package com.javacodegeeks.javacore.unziptest;

import java.io.File;
import java.io.FileInputStream;
import java.io.FileOutputStream;
import java.io.IOException;
import java.util.zip.ZipEntry;
import java.util.zip.ZipInputStream;

public class UnzipFileClass {

	public static void main(String[] args) {
		String zipFile = null;
		String destinationFolder = null;

		// take the arguments from the command line
		if (args.length == 2) {
			try {
				zipFile = args[0];
				destinationFolder = args[1];
				unzipFunction(destinationFolder,zipFile);
			} catch (Exception e) {
				e.printStackTrace();
				System.exit(1);
			}
		}

	}

	private static void unzipFunction(String destinationFolder, String zipFile) {
		File directory = new File(destinationFolder);

		// if the output directory doesn't exist, create it
		if(!directory.exists())
			directory.mkdirs();

		// buffer for read and write data to file
		byte[] buffer = new byte[2048];

		try {
			FileInputStream fInput = new FileInputStream(zipFile);
			ZipInputStream zipInput = new ZipInputStream(fInput);

			ZipEntry entry = zipInput.getNextEntry();

			while(entry != null){
				String entryName = entry.getName();
				File file = new File(destinationFolder + File.separator + entryName);

				System.out.println("Unzip file " + entryName + " to " + file.getAbsolutePath());

				// create the directories of the zip directory
				if(entry.isDirectory()) {
					File newDir = new File(file.getAbsolutePath());
					if(!newDir.exists()) {
						boolean success = newDir.mkdirs();
						if(success == false) {
							System.out.println("Problem creating Folder");
						}
					}
                }
				else {
					FileOutputStream fOutput = new FileOutputStream(file);
					int count = 0;
					while ((count = zipInput.read(buffer)) > 0) {
						// write 'count' bytes to the file output stream
						fOutput.write(buffer, 0, count);
					}
					fOutput.close();
				}
				// close ZipEntry and take the next one
				zipInput.closeEntry();
				entry = zipInput.getNextEntry();
			}

			// close the last ZipEntry
			zipInput.closeEntry();

			zipInput.close();
			fInput.close();
		} catch (IOException e) {
			e.printStackTrace();
		}
	}

}
Now let’s explain the code above. First of all, an instance of ZipInputStream is needed in order to read our zip file. The invoke of ZipInputStream can easily be done with the use of FileInputStream, as you can see above. After that, we should read every ZipEntry in the zip file by calling getNextEntry() operation and we set its name with the use of getName() method. You can notice that we take into consideration if sub-directories exist into the zip file, so we create all the nested directories. Finally with the use of FileOutputStream we write all the entries to the file stream. More specifically we read the bytes of data from the instance of ZipInputStream, and we write all the bytes, from the beginning, to the file output stream. As you can see a specified byte array is used, initialized with 2048 bytes. It is important to mention that we don’t use ZipOutputStream as an output file stream because it includes a default size of buffer (512 bytes). Of course we close every stream (input or output) at the end.
2. Run the example
Now we are going to run the above example. Firstly we will create a .zip file with the name zipFile.zip that contains folders and files as below:
- ./JCGFile.txt
- ./Folder/text.txt
- ./Folder/Folder1/JCG.txt
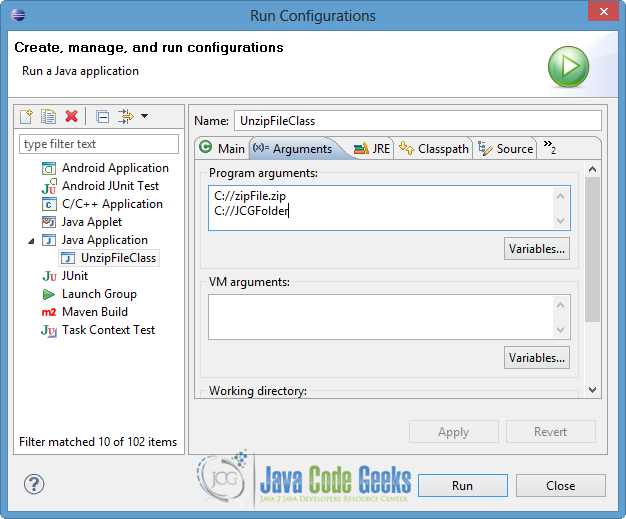
This example take 2 arguments in the command line. The first one is the path of the zip file, while the second one is the path of the destination output folder, where the decompression will take place.
For this reason go to Run tab → Run Configurations… and then choose our Java Application and more specifically UnzipFileClass. In addition select “Arguments” tab and enter the two arguments into the “Program Arguments” textarea, as you can see in the following image. Finally press Run button.

Now you can see the output of the execution.
Output:
Unzip file JCGFile.txt to C:\JCGFolder\JCGFile.txt
Unzip file Folder/ to C:\JCGFolder\Folder
Unzip file Folder/text.txt to C:\JCGFolder\Folder\text.txt
Unzip file Folder/Folder1/ to C:\JCGFolder\Folder\Folder1
Unzip file Folder/Folder1/JCG.txt to C:\JCGFolder\Folder\Folder1\JCG.txt
Also you can check that the file unzip is done, by looking at the destination folder (JCGFolder in our situation).
Download the Eclipse Project
This was an example of file unzip in Java.
You can download the full source code of this example here : UnzipFileExample.zip

