1. Introduction
In this post, we feature a comprehensive Tutorial on integrating MySQL in a simple NodeJS application and execute basic CRUD operations with the same. MySQL is one of the most used SQL databases in many of the world-enterprise applications due to its ability to manage transactions and the ACID-behaviour which is built into its core. One of the reasons MySQL is so popular is due to the easiness it provides for its usage and its related commands. In the open source web application framework LAMP (which consist of Linux, Apache, MySQL and PHP), MySQL server is a central & important component. The MySQL Database server is written using C and C++ which internally uses a lexical analyser to parse and understand the SQL queries.
For this lesson, we need to have a complete MySQL Server installation so that we can run examples for the NodeJS application we create. Please go through the MySQL Server Tutorial lesson to understand how installation can be done with some simple commands to get started with the MySQL operations in a NodeJS application.
Table Of Contents
2. Setting up NodeJS application
In this section, we will start by setting up a simple NodeJS application with important techniques to establish and close the connection with the server along with database connection pooling techniques which is very important to have in any production-grade application. In this lesson, we will make use of MySQL driver for NodeJS for communication between the two. Let us start by creating a new directory for our project:
New Directory
mkdir jcg-node-mysql
Once we have made this new directory, we can move inside it with the following command:
Change Directory
cd jcg-node-mysql
Now, we can make this directory a NodeJS project by creating a package.json file inside it. If you want to understand the NodeJS installation process and how it works, deep dive into NodeJS, I recommend you download the NodeJS minibook by JavaCodeGeeks. Run the following command so that the directory is initialised as a NodeJS app and the corresponding package.json file is created in it:
Initialise NodeJS
npm init
Once we run the above command, we will be presented with a series of questions which we can answer to finalise the creation of the JSON file. Here is what we get when we run the above command (we selected all the default options presented to us):
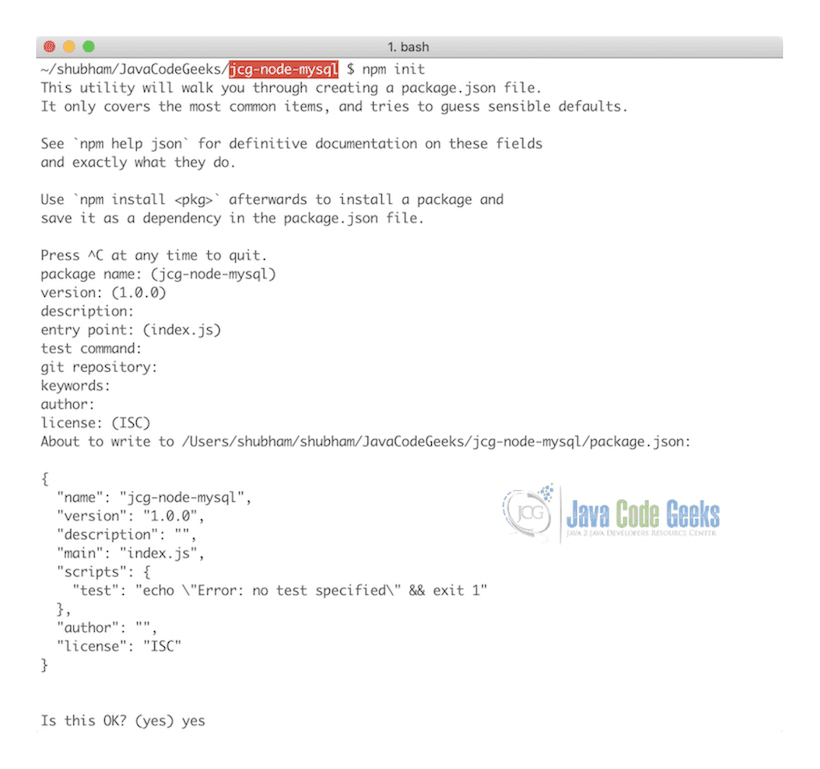
Now, here is the package.json file which we got once we created the above command:
package.json
{
  "name": "jcg-node-mysql",
  "version": "1.0.0",
  "description": "NodeJS app for SystemCodeGeeks",
  "main": "index.js",
  "scripts": {
    "start": "node server.js"
  },
  "dependencies": {
    "express": "^4.16.1"
  },
  "author": "Shubham Aggarwal <sbmaggarwal@gmail.com>",
  "license": "ISC"
}
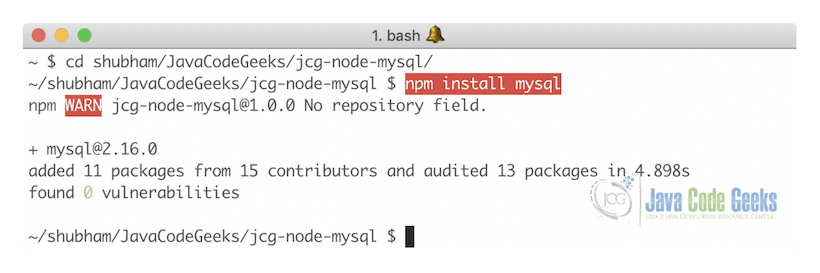
If your package.json file doesn’t look like above, do not worry, you can copy from above and paste it in your package.json file. Now we can install mysql driver for NodeJS so that we can use MySQL packages in the app as well. Run the following command so that MySQL driver is installed:
Installed MySQL Driver for NodeJS
npm install mysql
Here is what we get when we run the above command:
Now, package.json file would have changed to the following with an extra MySQL dependency:
package.json
{
  "name": "jcg-node-mysql",
  "version": "1.0.0",
  "description": "NodeJS app for SystemCodeGeeks",
  "main": "index.js",
  "scripts": {
    "start": "node server.js"
  },
  "dependencies": {
    "express": "^4.16.1",
    "mysql": "^2.16.0"
  },
  "author": "Shubham Aggarwal <sbmaggarwal@gmail.com>",
  "license": "ISC"
}
There is just one more thing which we need to do to start working on our app. We need to create a new database which will be used in the NodeJS application we create. Open MySQL shell and run the following command to create a new database jcg_schema_nodejs which we will use:
Create Database
CREATE SCHEMA jcg_schema_nodejs;
Once this is done, we can start connecting to the MySQL Server.
2.1 Connecting to MySQL from NodeJS
There are multiple ways with which we can connect our application to the MySQL server on the local machine. For this, we create a new file known as database.js in the project home directory and add the following code:
Import MySQL
let mysql = require('mysql');
Now, once we have imported the MySQL into our file, we can connect to it by providing the connection parameters:
Connecting to MySQL
let connection = mysql.createConnection({
    host: 'localhost',
    user: 'root',
    password: 'qweRTY1!',
    database: 'jcg_schema_nodejs'
});
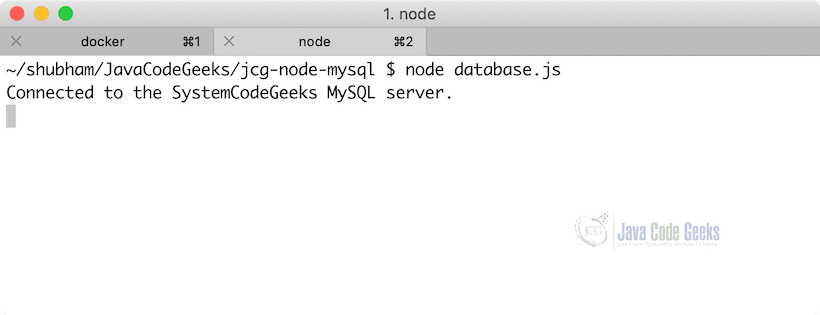
We only created a simple JSON and passed it to the createConnection function which accept credentials for connection and returns a brand new connection object for MySQL which we can use later to execute queries. Now, even though we have a connection object but it doesn’t actually represent a connection unless we call connect on it which will actually create a connection which will be persisted across the lifecycle of our program:
Connecting to MySQL
connection.connect(function(err) {
  if (err) {
    return console.error('error: ' + err.message);
  }

  console.log('Connected to the SystemCodeGeeks MySQL server.');
});
If the user credentials are correct, the appropriate message will be printed to the console. Let us check the same by running the following command:
Run Node app
node database.js
We will see the following output once our application is able to connect to the MySQL server:
2.2 Closing connection to MySQL
Now that we have an open MySQL connection, we will look at another simple NodeJS which can be used to close the MySQL connection in our app. We just need to call a single destroy function in our app to close the database connection, as shown in the following code snippet:
Run Node app
connection.end(function(err) {
    if (err) {
      return console.log('error:' + err.message);
    }
    console.log('Database connection is closing.');
    connection.destroy();
    console.log('Database connection is closed.');
  });
Let us run our NodeJS app again to see what happens:

Please note that once a connection the MySQL server is closed, it cannot be used again for any queries or prepared statements. If we try to do so, we will get an error.
2.3 Connection Pooling
In any application, once we focus on database connection pooling for productionisation of our application, it makes a huge difference because database connections are expensive to make and keep. The implementation for database connection pooling is very simple and we just need to pass one more parameter when we provide details for connection to be made:
Connecting to MySQL
let connection = mysql.createConnection({
    connectionLimit: 10,
    host: 'localhost',
    user: 'root',
    password: 'qweRTY1!',
    database: 'jcg_schema_nodejs'
});
The above code snippet makes sure that the database connection count never exceeds 10 in the application. Whenever we need to execute a query, we can call a single function to get a connection:
Get connection from pool
pool.getConnection(function(err, connection) {
  // execute query here

});
This way, we get a connection from the pool and simply release the connection once we are done executing any query so that connection can be made available in the pool again:
Release connection to the pool
pool.getConnection(function(err, connection) {
  // execute query here
  connnection.release();
});
Once we call the release function, we release the connection to be made available in the pool again.
Finally, note that the connection pool will create connections lazily, which means that even when we set the connection limit to be 10, if we are using only 2 connections at a time, the pool will not create other 8 connections. Each connection will be made only when it is actually needed in the app.
3. Creating Table in NodeJS
Now we are ready to create some tables from our application directly once we have made a connection to the MySQL server in the NodeJS app we created in the last section.
For this, we need to create an SQL statement which will be executed each time the application is run. Please note that we don’t want to create a new table each time we run the app because that will raise an error. We only want to create a new table if it doesn’t exist already. Here is the SQL statement we will make use for the same:
Make new Table
CREATE TABLE IF NOT EXISTS Posts (
    id INT PRIMARY KEY,
    title VARCHAR(64) NOT NULL,
    author_id INT NOT NULL
);
Let us embed this SQL statement in the code so that is executed once a connection is open to the database:
Create new Table in code
// connect to the MySQL server
connection.connect(function(err) {
    if (err) {
      return console.error('error: ' + err.message);
    }

    let createPosts = `CREATE TABLE IF NOT EXISTS Posts (
                            id INT PRIMARY KEY,
                            title VARCHAR(64) NOT NULL,
                            author_id INT NOT NULL
                        )`;

    connection.query(createPosts, function(err, results, fields) {
      if (err) {
        console.log(err.message);
      }
    });

    connection.end(function(err) {
      if (err) {
        return console.log(err.message);
      }
    });
  });
With the above code, we are creating a new table where our data will be stored. The query function takes input as one parameters which are explained here and also provide a single callback function whose parameters are also described here:
- createPosts: This is the SQL statement which will be executed once this function is executed in NodeJS application.
- err: This contains a list of errors which are obtained if the query we passed raised an error.
- results: This signifies the result we obtained if the passed query did not raise any error
- fields: This field contains results fields information. if there are any
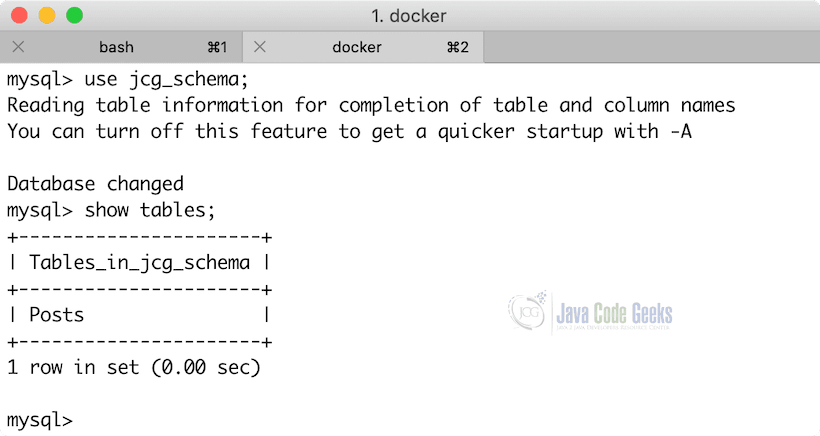
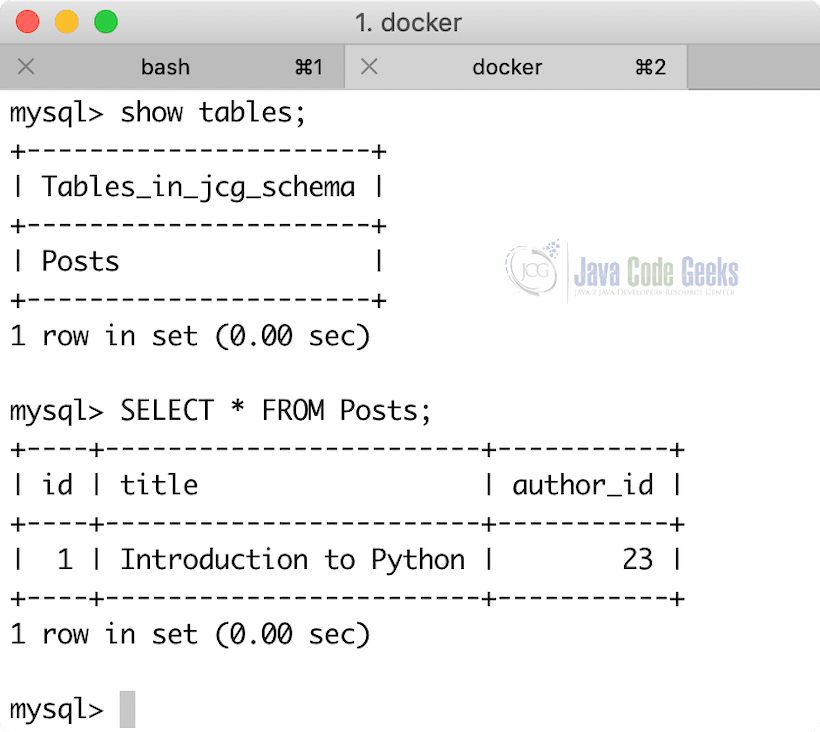
Now that our code is ready, we can execute it again. Once we run the code, we will see the following output when we check what all tables exist in our database:
4. Inserting Data in Table
In the final section of our tutorial, we will show how we can insert data into our table using the NodeJS application we created. We will follow 3 steps to do:
- Create a new database connection
- Write and Execute an Insert statement in SQL
- Close or release the database connection
Let’s get started with these steps. We will create a new file and call it insert.js. This file will contain code used to insert new data in our table we created in the last section. We need to start with our first step and define the connection parameters in this file as well:
Connection to the MySQL
let mysql = require('mysql');

let connection = mysql.createConnection({
    connectionLimit: 10,
    host: 'localhost',
    user: 'root',
    password: 'root',
    database: 'jcg_schema'
});
Now, we need to write an SQL statement which will be an INSERT statement for the table Posts we defined:
Defining INSERT statement
let insertQuery = "INSERT INTO Posts VALUES (1, 'Introduction to Python', 23)";
Finally, we can insert the data and close the database connection:
Connection to the MySQL
// execute the insert query
connection.query(insertQuery);
connection.end();
We can now run the file now:
Run insert file
node insert.js
We will see the following data in our table once we have run the above file:
We were able to insert data into our table using the NodeJS application. Please note that we can perform any database operation just like what we did above, may it be a Delete or Update operation. We can even work on Express view which will help us to view all the data we have in our table into a nice UI view.
5. Update Data in Table
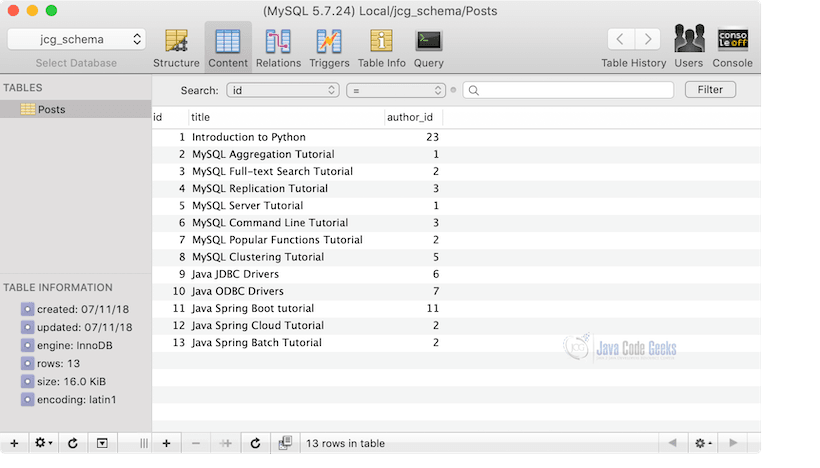
Now that we have some data in our database after the previous section code is complete, we can move to perform some update operations on that data. To make this more interesting, we inserted some more data in our Posts table and now, the data looks like:
We will follow 3 steps to update data in the Posts table:
- Create a new database connection
- Write and Execute an Update statement in SQL
- Close or release the database connection
Let’s get started with these steps. We will create a new file and call it update.js. This file will contain code used to update existing data in our table we created in the last section. We need to start with our first step and define the connection parameters in this file as well:
Connection to the MySQL
let mysql = require('mysql');

let connection = mysql.createConnection({
    connectionLimit: 10,
    host: 'localhost',
    user: 'root',
    password: 'root',
    database: 'jcg_schema'
});
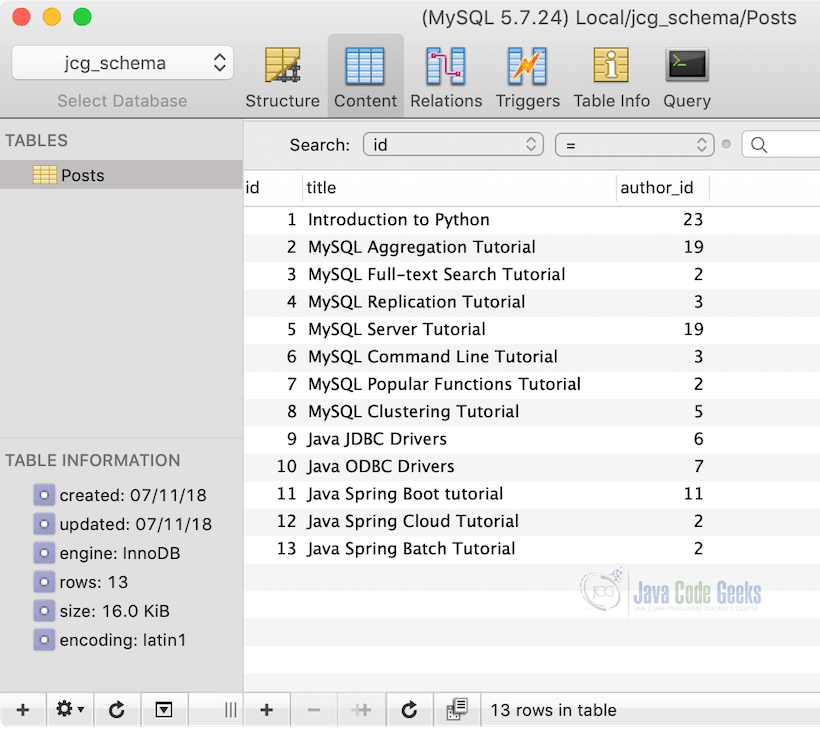
Now, we need to write an SQL statement which will be an UPDATE statement for the table Posts we defined. We will update the Author ID for posts whose author ID was previously 1 and change the same to 19 (or any integer value):
Defining UPDATE statement
let updateQuery = "UPDATE Posts SET author_id = ? WHERE author_id = ?";
We see that we are not setting the update and where values in the query directly because that is a security vulnerability we can avoid just by using Prepared statements. We can define what data needs to be substituted with the following definition:
Preparing statements
let author_ids = [19, 1];
Note that the variables will be substituted in the order they appear in the SQL statement. Finally, we can update the data and close the database connection:
Connection to the MySQL
connection.query(updateQuery, author_ids, (error, results, fields) => {
  if (error){
    return console.error(error.message);
  }
  console.log('Rows affected:', results.affectedRows);
});
We can now run the file now:
Run update file
node update.js
We will see the following data in our table once we have run the above file:
Please note that SQL Injection is a pretty common vulnerability we need to avoid in our application. Finally, if you are sill interested in exploring more, read Using SQL Injection Vulnerabilities to Dump Your Database for much more information and knowledge.
6. Delete Data from Table
One of the most important operation in SQL is DELETE operation. This is what we will be demonstrating in this section by executing one of the DELETE statement in the application. Note that all of the other steps remains the same like making a connection, executing the query and closing the connection after use, so we won’t be redundant here and show only the queries we execute here:
Run update file
// DELETE statement
let deleteQuery = `DELETE FROM Posts WHERE author_id = ?`;

// delete the post with id 19
connection.query(deleteQuery, 1, (error, results, fields) => {
  if (error)
    return console.error(error.message);

  console.log('Deleted Post(s):', results.affectedRows);
});

connection.end();
This code will also print the number of rows which were deleted once this query is executed and it is really helpful to understand if any data was affected with the provided query.
7. Calling a Stored Procedure from NodeJS application
It is possible to run a stored procedure from inside of a NodeJS application. A stored procedure is a very good way to execute a number of SQL statements when you want to do a complex operation which needs more than a couple of statements needed to be executed sequentially. We can consider a stored procedure as a program written in SQL.
Again, the procedure to run a stored procedure is same as well, make an SQL connection (or pick one from the pool), prepare and execute the stored procedure and finally, close the connection (or release it into the pool). Read more about stored procedures in MySQL Stored Procedure Tutorial and also how to use them in a Java application with Java Stored Procedures in Java DB.
We can define a simple SQL statement to call a stored procedure which you have defined in the SQL DB as:
Call Stored procedure SQL Statement
let sql = `CALL findPosts(?)`;
Here, we define a stored procedure defined as findPosts in SQL DB. Please note that this query can be executed just like any other SQL query in which we could have passed parameters and this will be treated as prepared statements. I do not highly recommend using SQL procedures personally due to some of the limitations they present:
- If we want to make sure that database integrity and consistency is maintained, Stored Procedures can become quite long and coupled with application logic and still can’t replace all validations which are needed at an application level.
- Stored Procedures work completely behind the scene. For this reason, it is not possible to figure out everything which happens at the database layer.
- If there are too many Stored Procedures at the database level, they can block database transactions which are originated from application level until a procedure is complete.
- It is possible that we want to trigger an operation only when an event happens 10 times or 100 times. This is not possible with SQL Stored Procedures as they are stateless in themselves and cannot be invoked conditionally inside of them.
8. MySQL NodeJS Example – Conclusion
In this lesson, we looked at a very simple yet effective example of setting up a connection to a MySQL server from a NodeJS application. We started with important techniques to establish and close the connection with the server along with database connection pooling techniques which is very important to have in any production-grade application based on any framework and not just NodeJS. We encourage you to study more about NodeJS and MySQL to run more complex examples which involve Prepared statements and result sets. One of the more important things which can be done inside a NodeJS application is calling stored procedures, define triggers and adding full-text search capabilities to the application.
MySQL Stored procedures are a very powerful tool with very high performance (usually) but the bad thing is that they can grow very large very easily and quickly once your application starts to grow. The main database consistency should be managed at the application level wherever and whenever possible. Still, MySQL Stored procedures make a very good companion if you are a database administrator and just want to make things consistent without relying on too much code because after all, the performance of a Stored procedures is very high because database operations are very fast on the database server itself. Don’t forget to check the examples of using Java with SQL: JDBC Best Practices Tutorial and Java JDBC ResultSet Example. These lessons explain how to effectively use SQL commands with Java & JDBC drivers. There are many more examples present on MySQL which can be studied for a deeper understanding of the database. Finally, do read about some of the most popular MySQL functions which you will find interesting and useful in your daily life when you deal with MySQL. There are many more examples present on MySQL which can be studied for a deeper understanding of the database.
9. Download the Source Code
This was an example of NodeJS Framework and MySQL database.
You can download the full source code of this example here: NodeJS MySQL Example
