JUnit Group Tests Example
In this example we shall show users, how they can group and run their JUnit test cases. JUnit group tests example, will try to resolve issue of running multiple group tests all together. This is not a big deal in JUnit.
This can be achieved in different ways in JUnit. It’s wide API, helps developers all around the world to achieve the flexibility to test their methods. Let’s start with the introduction of JUnit and what JUnit group tests example is all about.
1. Introduction
JUnit is very popular library among Java developers for testing the programs at unit level. JUnit provides many resources to test each and every type of method. You can test simple methods, in the order of the test cases, through keyboard input or multithreaded applications
This example will show the usage of different JUnit annotations that provides users with the ease of running the group test cases. We will be using the Maven as a dependency and build tool for this example.
2. Technologies Used
Following set of technologies are used for this example to work.
- Java
- Maven – It is used as a dependency and build tool.
- Eclipse – Users can use any IDE of their choice.
- JUnit 4.12
3. Project Setup
You may skip project creation and jump directly to the beginning of the example below.
IDE used for this example is Eclipse. Start by creating a new maven project.
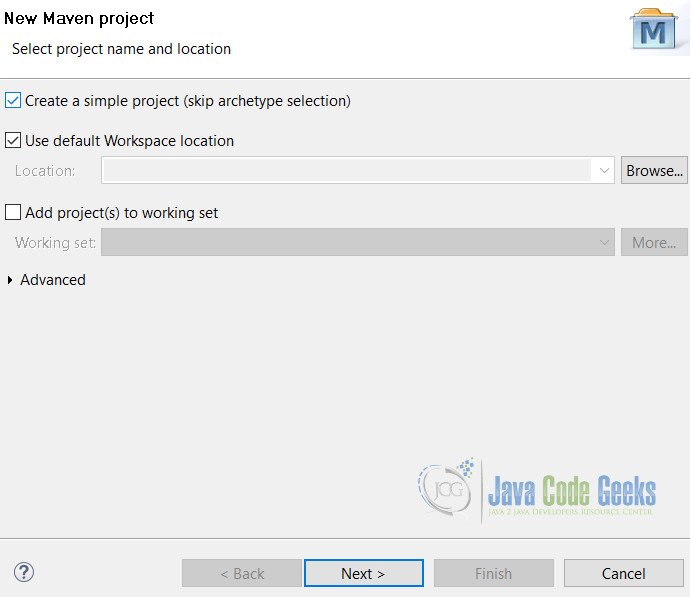
Select File -> New -> Maven Project.
You will see following screen. Fill in the details as shown and click on Next button.

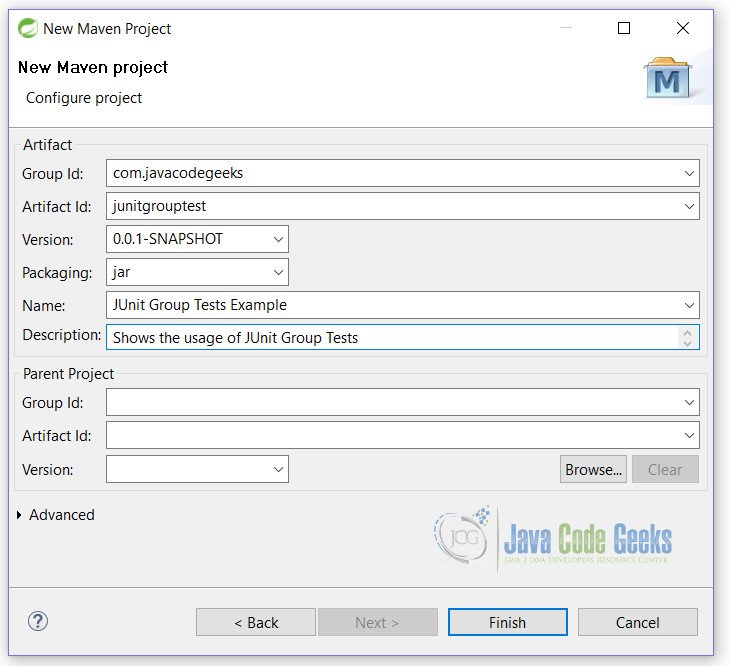
On this screen, you will be asked to enter about the project. Fill all details as shown and click on Finish button.

That’s it. You are done with the project creation. We will start coding the example right away after this.
4. JUnit Group Tests Example
Now open pom.xml and add the following lines to it.
pom.xml
<dependencies>
     <dependency>
          <groupId>junit</groupId>
          <artifactId>junit</artifactId>
          <version>4.12</version>
    </dependency>
</dependencies>
There are 2 approaches in JUnit to group test the methods. We will start with basic and then go with the more complicated one.
4.1 @RunWith(Suite.class)
This annotation is helpful whenever we want to test multiple classes at once. In this case we do not need to run each individual class for testing. Simply run the class with @RunWith(Suite.class) annotation and it will take care of running all your test cases one by one.
See the below example for more clarity.
ClassATest.java
package junitgrouptest;

import org.junit.Test;

public class ClassATest {

	@Test
	public void classA_Test1(){
		System.out.println("classA_Test1");
	}

	@Test
	public void classA_Test2(){
		System.out.println("classA_Test2");
	}

}
ClassBTest.java
package junitgrouptest;

import org.junit.Test;

public class ClassBTest {

	@Test
	public void classB_Test1() {
		System.out.println("classB_Test1");
	}

	@Test
	public void classB_Test2() {
		System.out.println("classB_Test2");
	}
}
ClassCTest.java
package junitgrouptest;

import org.junit.Test;

public class ClassCTest {

	@Test
	public void classC_Test1() {
		System.out.println("classC_Test1");
	}

	@Test
	public void classC_Test2() {
		System.out.println("classC_Test2");
	}
}
4.1.1 Test Suite
Now, we will create a class that will helps in running all our testcases at once.
ClassTestSuite.java
package junitgrouptest;

import org.junit.runner.RunWith;
import org.junit.runners.Suite;
import org.junit.runners.Suite.SuiteClasses;

@RunWith(Suite.class)
@SuiteClasses({ ClassATest.class, ClassBTest.class, ClassCTest.class })
public class ClassTestSuite {

}
When you run ClassTestSuite class, you will get the following output:
classA_Test1
classA_Test2
classB_Test1
classB_Test2
classC_Test1
classC_Test2
Since, we have included all our classes in @SuiteClasses() annotation, all test cases of every class runs. We can modify it to run our specific classes also.
It is very convenient to run in these types of scenarios. But when you want more complicated test cases like some specific test cases to run from a class, or you want to run some type of test cases all together, then you need a more control over your test cases.
In JUnit 4.8, the concept of categories is introduced. We will see the usage of categories in below example.
4.2 @RunWith(Categories.class)
Another way of running test suite is with @RunWith(Categories.class) annotation. This is more organized way of running your test cases. By this way, users have more control over test cases. @Category interface is used for this purpose. It works more like a marker interface, where we mark the test cases with it.
For this to work, first of all we need to create interfaces according to our choices like slowTests. You can take any type of name of your choice. To understand how it works, let’s start by writing our example.
Simple interface without any methods in it.
SlowTests.java
package junitgrouptest;

public interface SlowTests {

}
PerfomanceTests.java
package junitgrouptest;

public interface PerfomanceTests {

}
And now make some changes in our previous classes by assigning them the category. @Category annotation can be used at both method level as well as at class level. Both cases are taken care in this example.
For the sake of simplicity, we are going to show only changed code here. See the highlighted lines for changes.
ClassATest.java
...
@Test
@Category(PerformanceTests.class)
public void classA_Test1() {
     System.out.println("classA_Test1");
}
...
ClassBTest.java
...
@Test
@Category(PerformanceTests.class)
public void classB_Test1() {
     System.out.println("classB_Test1");
}

@Test
@Category(SlowTests.class)
public void classB_Test2() {
     System.out.println("classB_Test2");
}
...
ClassCTest.java
...
@Category(SlowTests.class)
public class ClassCTest {
...
4.1.2 Test Suite
Finally, we will create Test Suites to run these test cases.
PerformanceTestsSuite.java
package junitgrouptest;

import org.junit.experimental.categories.Categories;
import org.junit.runner.RunWith;
import org.junit.runners.Suite;

@RunWith(Categories.class)
@Categories.IncludeCategory(PerformanceTests.class)
@Suite.SuiteClasses({ClassATest.class, ClassBTest.class, ClassCTest.class})
public class PerformanceTestsSuite {

}
When we run this test suite, we will get the following output:
classA_Test1
classB_Test1
This output is self explainatory. It shows us that the test cases marked with @Category(PerformanceTests.class) annotations runs and others don’t.
SlowTestsSuite.java
package junitgrouptest;

import org.junit.experimental.categories.Categories;
import org.junit.runner.RunWith;
import org.junit.runners.Suite;

@RunWith(Categories.class)
@Categories.IncludeCategory(SlowTests.class)
@Suite.SuiteClasses({ClassATest.class, ClassBTest.class, ClassCTest.class})
public class SlowTestsSuite {

}
When we run this test suite, we will get the following output:
classB_Test2
classC_Test1
classC_Test2
All test cases marked with @Category(SlowTests.class) annotation runs.
Similarly, like @Categories.IncludeCategory() annotation, we can also exclude some test cases from running. For this we have to use @Categories.ExcludeCategory() annotation.
5. Conclusion
JUnit Group Tests example provides, the way to test the JUnit test cases in more organized way. Users have learnt how they can achieve this by using 2 scenarios.
Firstly, by using the @RunWith(Suite.class) annotation
Secondly, with the use of @RunWith(Categories.class) annotation
6. Download the Eclipse Project
This is an example of JUnit Group Tests.
You can download the full source code of JUnit Group Tests Example here: JunitGroupTests.zip


