Java 11 Standardized HTTP Client API Example
In this article, we will test a REST API application using the Java HTTP Client API.
1. Introduction
There are many tools available to test your REST API applications. There are command line tools, such as cURL, and there are GUI tools, such as Postman and SoapUI that can perform these tasks.
If you are using a Continuous Integration and Delivery pipeline (Jenkins come to mind), JUnit testing is appropriate. The revamped Java HTTP Client API fits well with JUnit testing.
The HTTP Client API became assimilated into the Java Standard Edition with the Java 11 release. (It was previously part of an incubator module.) The HTTP Client API can send both synchronous and asynchronous requests. It also has native support for the HTTP 2 protocol. In this article, we will provide some examples of the HTTP Client API in action.
1.1 Tools Used in this Example
- Eclipse IDE for Enterprise Java Developers Version: 4.11.0
- Java SE Development Kit 11.0.2
- JUnit Version 4.12
If necessary, download and install Java SE 11 on your workstation.
2. Java 11 Standardized HTTP Client API Example
In this example, we will create JUnit tests for a REST API application. We will use the HTTP Client API in our tests.
2.1 Setup the Environment
Start by downloading the Java 11 JDK from the Oracle website.https://www.oracle.com/technetwork/java/javase/downloads/jdk11-downloads-5066655.html
Next, follow the instructions in the Installation Guide from the Oracle Help Center.https://docs.oracle.com/en/java/javase/11/install/overview-jdk-installation.html#GUID-8677A77F-231A-40F7-98B9-1FD0B48C346A
To configure Java 11 in Eclipse, select Preferences from the menu and type “jre” in the search box. Select Installed JREs from the result list.
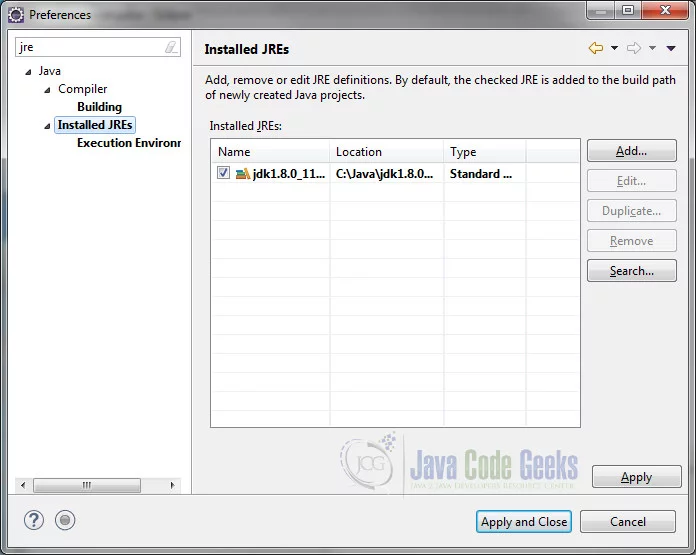
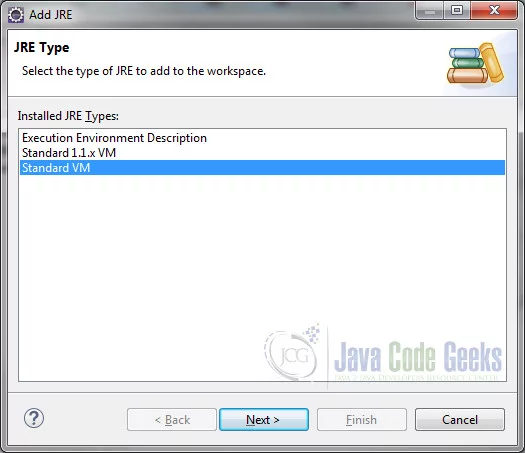
Click on the Add… button. In the JRE Type dialog window, select Standard VM and click Next.
Click on the Directory… button and browse to the directory where you installed the Java 11 JDK.
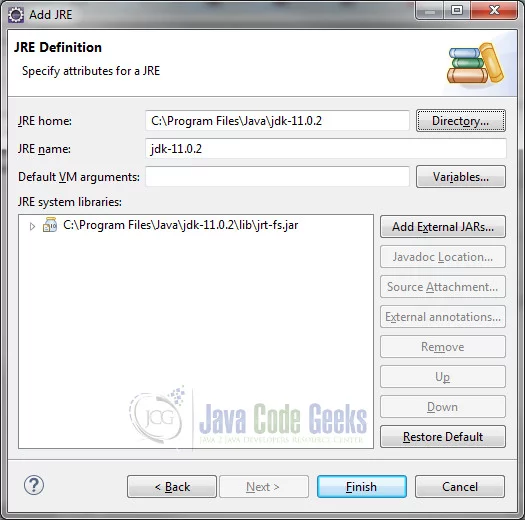
Click Finish and Apply and Close.
2.2 Download the Archive
Begin by downloading the HTTP-Client-API zip from the download section and extracting it to a folder of your choice.
2.3 Start the REST-API Web Service
Extract the
REST-API.zip file. To start the REST-API application, open a terminal
or command prompt in the REST-API directory and run the following command:
Run Spring Boot Appication
$ mvn spring-boot:run
The application is a student management service that allows clients to read, add, update, and delete students. A tutorial on how this application was designed and developed is available at
https://examples.javacodegeeks.com/enterprise-java/spring/boot/spring-boot-rest-api-tutorial/
2.4 Create the JUnit Maven Project
Let’s create a simple Maven Project for our JUnit tests. Select “New” -> Maven Project” and select the “Create a simple project (skip archetype selection)” checkbox and click “Next”.
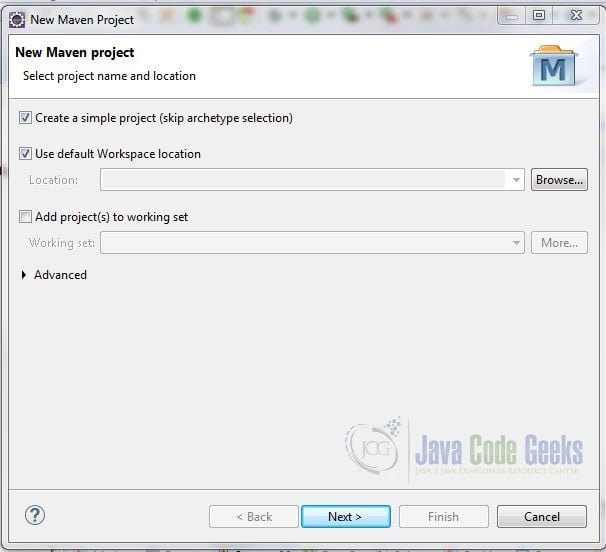
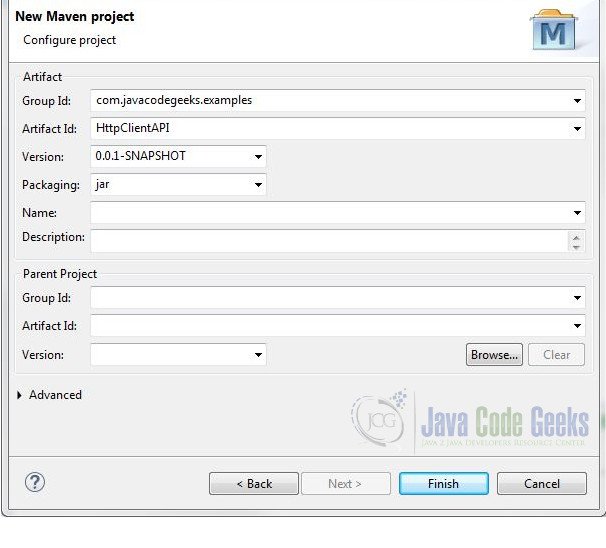
Enter a Group Id, Artifact Id, and select “jar” for Packaging and click “Finish”.
Open the pom.xml file and add the following just below the versionelement.
pom.xml
<project xmlns="http://maven.apache.org/POM/4.0.0"
	xmlns:xsi="http://www.w3.org/2001/XMLSchema-instance"
	xsi:schemaLocation="http://maven.apache.org/POM/4.0.0 http://maven.apache.org/xsd/maven-4.0.0.xsd">
	<modelVersion>4.0.0</modelVersion>
	<groupId>com.javacodegeeks.examples</groupId>
	<artifactId>HttpClientAPI</artifactId>
	<version>0.0.1-SNAPSHOT</version>

	<build>
		<plugins>
			<plugin>
				<groupId>org.apache.maven.plugins</groupId>
				<artifactId>maven-compiler-plugin</artifactId>
				<version>3.8.0</version>
				<configuration>
					<source>11</source>
					<target>11</target>
				</configuration>
			</plugin>
		</plugins>
	</build>

	<dependencies>
		<dependency>
			<groupId>junit</groupId>
			<artifactId>junit</artifactId>
			<version>4.12</version>
		</dependency>
	</dependencies>

</project>
The maven-compiler-plugin will be used for building the project. The compiler is configured for Java SE 11. We also added the JUnit dependency.
Save the changes and select Maven->Update Project from the project context menu. Select your project from “Available Maven Codebases”. Leave the other defaults and click OK.
At this point you may see the following error: Unbound classpath container: ‘JRE System Library [JavaSE-11]’ in project. If this is the case, do the following:
Right-click the project and select Build Path > Configure Build Path. Select the Libraries tab.
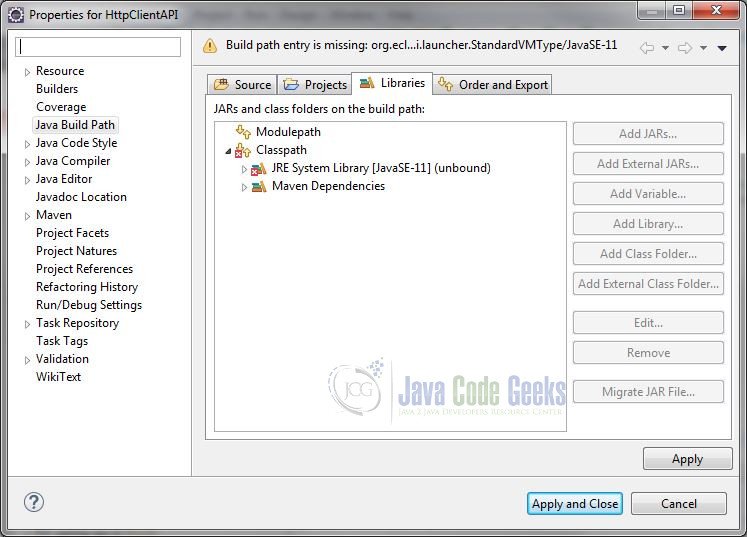
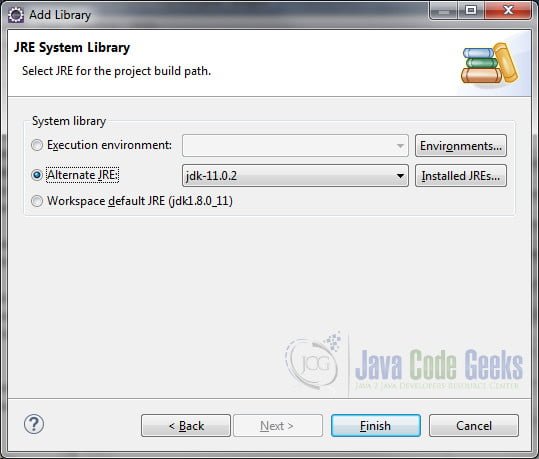
Select JRE System Library [JavaSE-11] 1(unbound) and click the Edit… button. Select “Alternate JRE:” and select “jdk 11.0.2 (or your Java 11 JDK version) from the drop-down menu.
2.5 Add Files to the Resources Directory
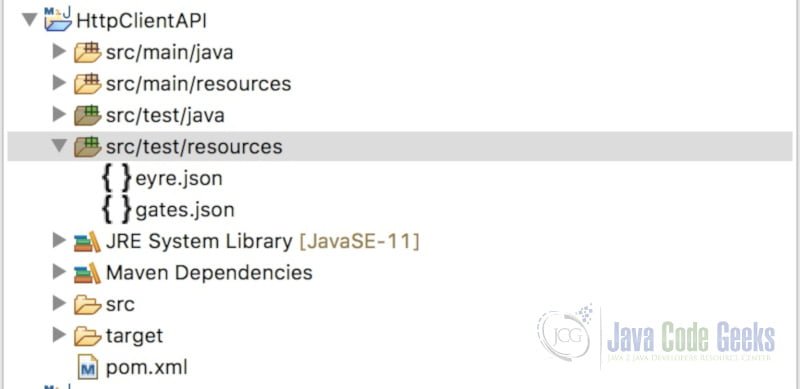
Copy the JSON files from the folder where you extracted the zip archive file and place them in the src/test/resources directory of your Maven project.
2.6 Create the JUnit Test Case
Right-click the /scr/test/java folder and select New > Other…
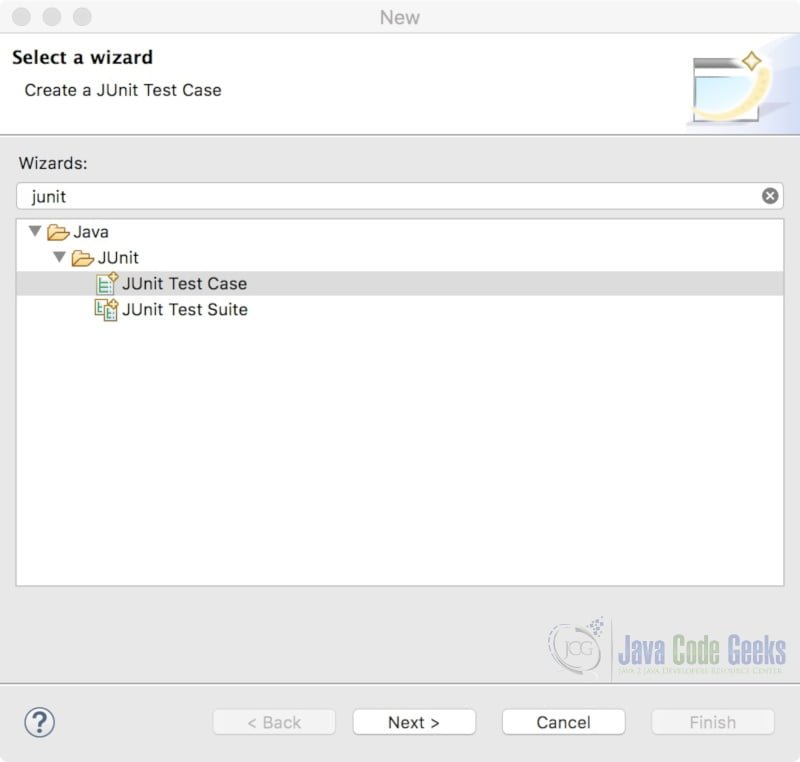
In the “Select a wizard” dialog window, type “junit” and select JUnit Test Case. Click Next.
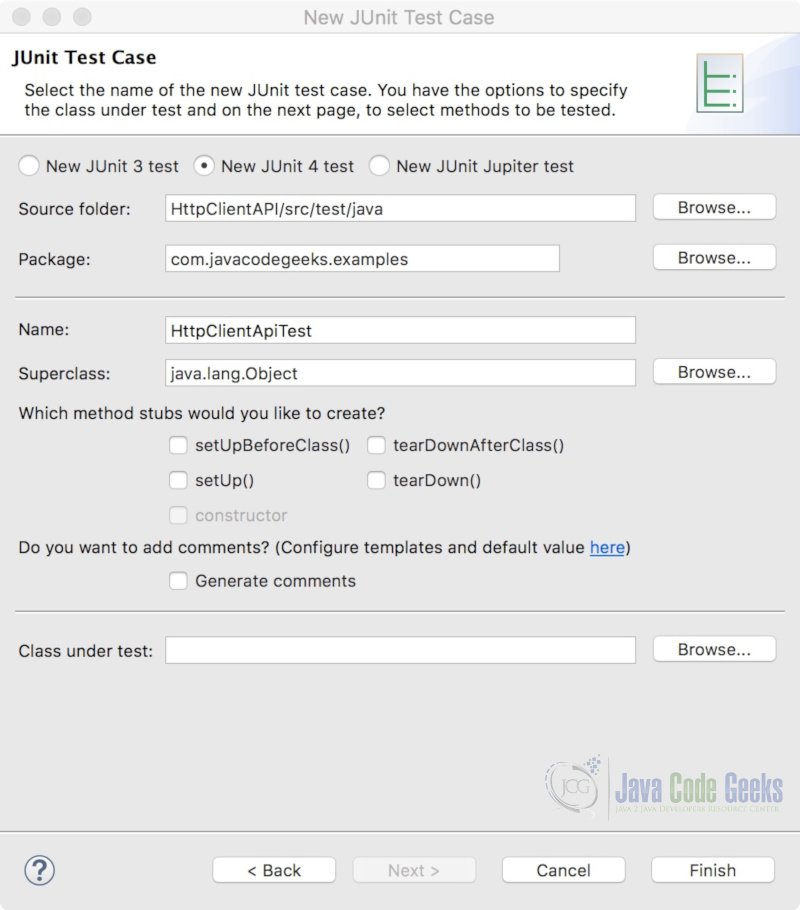
Enter “com.javacodegeeks.example” for the package name and “HttpClientApiTest” for the test case name. Click Finish
Add the following class variables to the test class:
HttpClientApiTest.java
public class HttpClientTest {

	private final String url = "http://localhost:8080/students";
	private final String s_json = "{\"firstName\":\"Jason\",\"lastName\":\"Bourne\",\"year\":\"Sophomore\"}";
}
Note: You can remove the existing test method.
The following import statements will be used in our test case class:
HttpClientApiTest.java
import static org.junit.Assert.assertTrue;

import java.net.URI;
import java.net.http.HttpClient;
import java.net.http.HttpRequest;
import java.net.http.HttpRequest.BodyPublishers;
import java.net.http.HttpResponse;
import java.net.http.HttpResponse.BodyHandlers;
import java.nio.file.Path;
import java.nio.file.Paths;

import org.junit.Test;
2.7 Test GET Request
In this first test, we want to retrieve all students from the datastore and verify that the response returns an OK status code. Create a test method with the following code:
HttpClientApiTest.java
 	@Test
	public void get() throws Exception {
		HttpClient client = HttpClient.newHttpClient();
		HttpRequest request = HttpRequest.newBuilder()
				.uri(URI.create(url))
				.build();

		HttpResponse response = client.send(request, BodyHandlers.ofString());

		System.out.println(response.statusCode());
		System.out.println(response.headers());
		System.out.println(response.body());
		assertTrue("Status Code is not OK", response.statusCode() == 200);
	}
The HttpClient is used to send HTTP requests and to receive HTTP responses. It can send a request synchronously or asynchronously. You do not create a HttpClient directly but through static methods. We use
the static HttpClient::newHttpClient() method to create a pre-built HttpClient with default settings. Alternatively, you can use a HttpClient.Builder to override the default settings or to configure other settings, such as the HTTP protocol version (1.1 or 2) or the connection timeout. To send a client request you need a HttpRequest and a BodyHandler.
The HttpRequest is created with a HttpRequest.Builder, which is acquired through HttpRequest.newBuilder()(line 4). You use the builder to specify the URI for the request, as shown on line 5. Additionally, you can set headers, specify the request method to use, and set the request body, (if applicable), with the builder. (The default request method is HTTP GET.) The call to the Builder::build() method (line 6) builds and returns the HttpRequest instance.
The HttpClient::send(…) method (the synchronous way of sending a request) returns a HttpResponse. The HttpResponse encapsulates the response body, headers, and status
code. How the response body is treated when received is determined by the BodyHandler<T> type passed to HttpClient::send(…). You use one of the static factory methods of the BodyHandlers concrete class to create a BodyHandler. In this test, we chose BodyHandlers::ofString(…) (which returns a
BodyHandler<String>) to manage the response body as a String. The actual conversion of the bytes in the response body to a Java type (e.g. String) is made by the BodySubscriber created by the BodyHandler interface. If you are unconcerned with the body, you can use BodyHandlers.discarding() to discard it.
HttpResponse has body(), headers(), and statusCode() methods to retrieve the message body (if any), response headers and status code of the response. We use these methods to print out their contents to the console. Finally, we use the assertTrue() assertion to test that the status code for this response is 200 (OK).
2.8 Test GET Single Request
In this test, we will retrieve the data for student 102 from the datastore and save it to a file. Create a test method with the following code:
HttpClientApiTest.java
	@Test
	public void getSingle() throws Exception {
		HttpClient client = HttpClient.newHttpClient();
		HttpRequest request = HttpRequest.newBuilder()
				.uri(URI.create(
						new StringBuilder(url).append("/102").toString()))
				.build();

		HttpResponse response = client.send(
				request, BodyHandlers.ofFile(Paths.get("src", "test", "resources", "student-102.json")));
		assertTrue("Status Code is not OK", response.statusCode() == 200);
	}
To retrieve a single student, we need to specify the student ID. We specify the ID as a path parameter (line 6). To convert the response body stream to a file, we use the BodyHandler<Path>handler. We specify this handler with the BodyHandler::ofFile(…) factory method an pass it as a parameter to the client’s send method. Note that we must specify the path where we wish to save the file. Finally, we use assertTrue() to test that the status code for the response is 200 (OK).
2.9 Test POST Request
In this test, we will use the POST method to create a student in the datastore. The data we will send is in a JSON format. Create a test method with the following code:
HttpClientApiTest.java
	@Test
	public void post() throws Exception {
		HttpClient client = HttpClient.newHttpClient();
		HttpRequest request = HttpRequest.newBuilder()
				.uri(URI.create(url))
				.header("Content-Type", "application/json")
				.POST(BodyPublishers.ofString(s_json))
				.build();

		HttpResponse response = client.send(request, BodyHandlers.discarding());
		assertTrue("Status Code is not Created", response.statusCode() == 201);
	}
Since we are sending JSON, we need to include the “Content-Type”,
“application/json” header in the request (line 6). Otherwise, the server will return a 415 error
code, indicating that the media type sent is not supported.
Next, we set the request method in the builder to POST and choose the BodyPublisher we want to use (line 7). Like the BodyHandler (which is a reactive-stream subscriber), we can use factory methods to create the BodyPublisher. We use BodyPublishers::ofString(…) to get a publisher that reads the string and adds it to the builder.
Since the response body is empty, we can dispose of it using BodyHandlers::discarding(). Finally, we use assertTrue() to test that the status code of the response is 201 (Created).
2.10 Test POST Request Asynchronously
In this test, we will use the POST method to create a student in the datastore. The data that we will send is in a JSON file. The response will be received asynchronously. Create a test method with the following code:
HttpClientApiTest.java
	@Test
	public void postAsync() throws Exception {
		HttpClient client = HttpClient.newHttpClient();
		HttpRequest request = HttpRequest.newBuilder()
				.uri(URI.create(url))
				.header("Content-Type", "application/json")
				.POST(BodyPublishers.ofFile(Paths.get("src", "main", "resources", "gates.json"))).build();

		client.sendAsync(request, BodyHandlers.ofString())
				.thenApply(HttpResponse::statusCode)
				.thenAccept(statusCode -> assertTrue("Status Code is not Created", statusCode == 201));
	}
The HttpRequest builder uses a body publisher that reads from a file (line 7).
The HttpClient::sendAsync(…) method requires a HttpRequest and a BodyHandler as parameters. The sendAsync(…) method returns a CompleteableFuture.
The CompleteableFuture returns instantly and so is non-blocking. It does not complete until the HttpResonse is received. When the HttpResonse becomes available, CompleteableFuture::thenApply(HttpResponse::statusCode) returns the status code of the response. This result is passed to CompletableFuture::thenAccept(…) and used by the assertTrue method to assert the status code is equal to 201 ( Created).
2.11 Execute the JUnit Test Case
Start the REST API application. Right-click the JUnit test class and select Run As > JUnit Test. The output will appear as follows:
JUnit Test Console Output
200
java.net.http.HttpHeaders@d39ca0fe { {content-type=[application/json;charset=UTF-8], date=[Mon, 15 Apr 2019 09:18:55 GMT], transfer-encoding=[chunked]} }
[{"id":101,"firstName":"Jane","lastName":"Doe","year":"Junior"},{"id":102,"firstName":"Martin","lastName":"Fowler","year":"Senior"},{"id":103,"firstName":"Roy","lastName":"Fielding","year":"Freshman"}]
Refresh the src/test/resources directory. You will find that the student-102.json file was created during the execution of the “getSingle” GET method test.
3. Summary
In this article, we created JUnit tests using the Java HTTP Client API.
4. Download the Source Code
This was a Java 11 Standardized HTTP Client API example.
You can download the full source code of this example here: Java 11 Standardized HTTP Client API Example


