In this post, we will explain the IoC (Inversion of Control) and how it is applied in Spring.
1. Introduction
Inversion of control is an OOP design principle for writing code that is loosely coupled. The objective is to outsource certain responsibilities typically performed by a class to an external entity, such as a framework or container. The result is a software application that is configurable, modular, and therefore more easily maintained.
First, we are going to understand one of the patterns used to implements inversion of control: the Dependency Injection (DI).
1.1 Tools Used in this Example
- Eclipse IDE for Enterprise Java Developers Version: 2019-09 R (4.13.0)
- Spring Tools 4 – for Spring Boot
Spring Tools 4 for Spring Boot is a set of plugins for Eclipse that support building and running Spring Boot applications. You can add Spring Tools 4 to your existing Eclipse installation by going to the Eclipse Marketplace and searching for “Spring Tools”.
2. Dependency Injection
Dependency Injection allows the creation of dependent objects outside of a class and provides those objects to a class with the help of an assembler. We usually speak of IoC as it relates to the creation and management of objects. In Spring, this task is delegated to the IoC container. You can learn more in our Dependency Injection Java Example.
The Spring IoC container uses information provided by configuration metadata to instantiate, build, and manage objects. Configuration metadata is provided through one or more of the following sources:
- XML files
- Java configuration classes
- Java annotations
In the next sections, we will give an example of each approach.
3. IoC in Spring Example
3.1 Create the Spring Boot Project
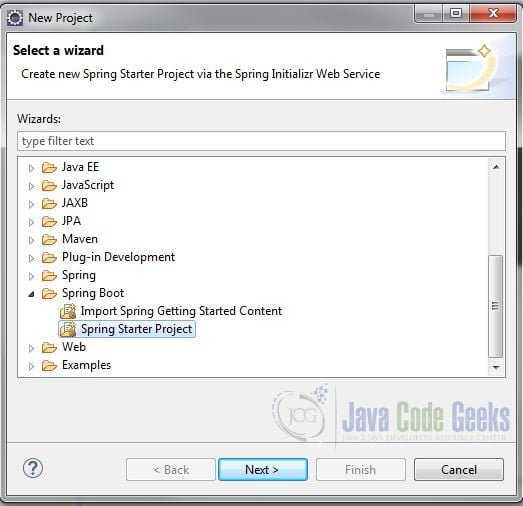
We will be using Spring Boot for this example. In the New Project – Select a Wizard dialog box, expand Spring Boot, and select Spring Starter Project. Click “Next”.
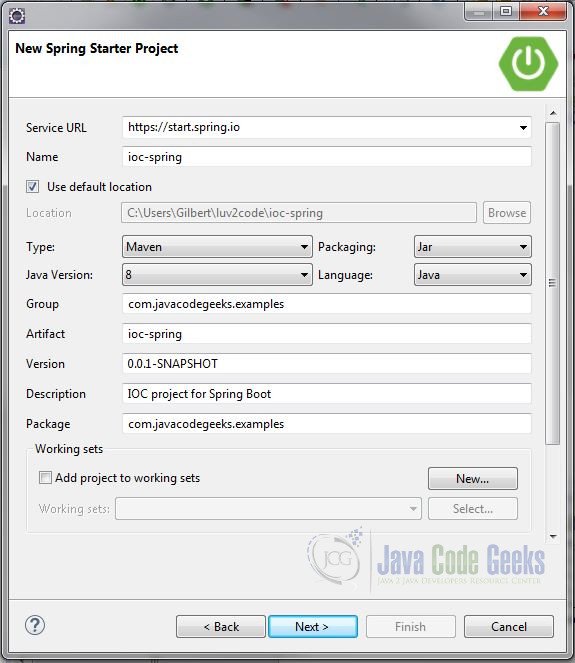
In the New Spring Starter Project dialog box, enter a name for the project. Also, enter the group, artifact, and package information. Accept all the other default values.
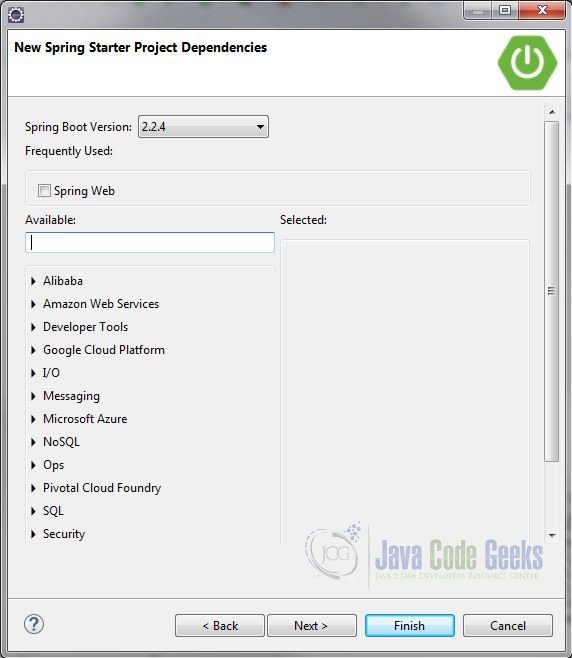
In the New Spring Starter Project Dependencies dialog window, click “Finish”. (We will not require any dependencies for this example.)
3.2 Define the Interface and Classes
For this example, we will use a simple interface and two implementations. Create a new package com.javacodegeeks.examples.beans and interface Animal with following code:
Animal.java
public interface Animal {

	String getFavoritePastime();
}
Also, create two classes (Dog and Cat) that implement the Animal interface.
Dog.java
public class Dog implements Animal {

	@Override
	public String getFavoritePastime() {
		return "I like to bark!";
	}
}
Cat.java
public class Cat implements Animal {

	@Override
	public String getFavoritePastime() {
		return "I like to nap!";
	}
}
3.3 Application without IoC
Modify the IocSpringApplication class in the com.javacodegeeks.examples package and add the following code:
IocSpringApplication.java
import org.springframework.boot.SpringApplication;
import org.springframework.boot.autoconfigure.SpringBootApplication;

import com.javacodegeeks.examples.beans.Animal;
import com.javacodegeeks.examples.beans.Dog;

@SpringBootApplication
public class IocSpringApplication {

	public static void main(String[] args) {
		SpringApplication.run(IocSpringApplication.class, args);

		Animal animal = new Dog();

		System.out.println(animal.getFavoritePastime());
	}

}
The class is creating an instance of Dog using its constructor and the new keyword. It has taken on the responsibility of managing its own objects. This approach leads to a tightly coupled class.
But what if we want to change the implementation of the Animal type to Cat? As it stands now, we will need to modify the class, since it controls the construction of the concrete class (Dog or Cat).
To make this code loosely coupled, we will have the framework control which implementation is to be used. This is an Inversion of Control.
How does the framework decide which implementation to use? We need to configure the IoC container using metadata to assist in this regard. Let’s see how this can be accomplished.
3.4 XML Configuration
We can configure the Spring IoC container using XML files. Create an XML file in the src/main/resources directory and name it applicationContext.xml. (This is the naming convention, but you can name it anything you like.) This file will contain our configuration metadata. Add the following content to the file:
application.xml
<?xml version="1.0" encoding="UTF-8"?>
<beans xmlns="http://www.springframework.org/schema/beans"
    xmlns:xsi="http://www.w3.org/2001/XMLSchema-instance"
    xmlns:context="http://www.springframework.org/schema/context"
    xsi:schemaLocation="http://www.springframework.org/schema/beans
    http://www.springframework.org/schema/beans/spring-beans.xsd
    http://www.springframework.org/schema/context
    http://www.springframework.org/schema/context/spring-context.xsd">


    <!-- Define your beans here -->

	<bean id="myAnimal" class="com.javacodegeeks.examples.beans.Dog" />

</beans>
The <beans> tag contains the required namespaces used for Spring IoC configuration.
You define your beans between the <beans> tags. The <bean> tag in this example has two attributes:
- id – The name to use when referencing this bean
- class – the fully qualified name of the concrete class for this bean
We are defining one bean (Dog) in this file. This bean will be created and managed by the inversion of the control spring container instead of our class.
We can have one or more XML files that contain bean definitions. We specify the location of these resources using the @ImportResource annotation. Beans defined in the specified resource(s) will be registered in the IoC container when it is initialized. Add the @ImportResource annotation to the IocSpringApplication class as follows:
IocSpringApplication.java
import org.springframework.boot.SpringApplication;
import org.springframework.boot.autoconfigure.SpringBootApplication;
import org.springframework.context.annotation.ImportResource;

import com.javacodegeeks.examples.beans.Animal;
import com.javacodegeeks.examples.beans.Dog;

@SpringBootApplication
@ImportResource("classpath:/applicationContext.xml")
public class IocSpringApplication {

// some code...

}
In order to use our bean, we need to retrieve it from the ApplicatonContext. The static SpringApplication.run method returns the running ApplicationContext. Note the if we were using plain vanilla Spring instead of Spring Boot, we would need to instantiate the ApplicationContext ourselves, e.g. ApplicationContext context = new ClassPathXmlApplicationContext(new String[] {" applicationContext.xml "}); .
Modify the the main method as follows:
IocSpringApplication.java
import org.springframework.boot.SpringApplication;
import org.springframework.boot.autoconfigure.SpringBootApplication;
import org.springframework.context.ConfigurableApplicationContext;
import org.springframework.context.annotation.ImportResource;

import com.javacodegeeks.examples.beans.Animal;

@SpringBootApplication
@ImportResource("classpath:/applicationContext.xml")
public class IocSpringApplication {

	public static void main(String[] args) {
		ConfigurableApplicationContext context = SpringApplication.run(
			IocSpringApplication.class, args);

		Animal animal = context.getBean("myAnimal", Animal.class);

		System.out.println(animal.getFavoritePastime());

		context.close();
	}

}
The interface org.springframework.context.ApplicationContext represents the Spring IoC container. (For the remainder of this article, the terms IoC container and application context will be used interchangeably.) ConfigurableApplicationContext is a subinterface of ApplicationContext and provides additional methods for configuring the IoC container. It also extends the Closeable interface, allowing us to close the application context, releasing any resources and destroying all cached singleton beans.
Now that we have a handle on the application context, we can retrieve the bean from the container using its bean id. We are using the overloaded ApplicationContext::getBean method that accepts the value of the bean id and the Java type as parameters to do this. By providing the type, we do not have to cast the return value, which provides a degree of type safety.
Save the change. Right-click your project in Project Explorer and select Run As > Spring Boot App. You will see the following output in the console:
I like to bark!
If we want to use a different implementation for our Animal interface, we do not have to modify the class. We can change the implementation by simply editing the XML configuration file. Let’s change our application to use the Cat implementation for the Animal type. Modify the <bean> tag in applicationContext.xml as follows:
<bean id="myAnimal" class="com.javacodegeeks.examples.beans.Cat" />
Save the changes and rerun the application. You will see the following output in the console:
I like to nap!
3.5 Java Configuration
We can also provide configuration
metadata to the application context using Java configuration. With Java configuration, we no longer require XML to configure
beans in the application.
A class that is annotated with @Configuration can serve as a source of bean definitions. You write methods inside the configuration class that instantiate and otherwise configure objects. These methods are then annotated with @Bean. This will register the beans in the application context, where they will be managed by the IoC container.
Since @SpringBootApplication is meta-annotated with @SpringBootConfiguration, we can add our bean definitions directly in the IocSpringApplication class. (You may want to create your own configuration classes for this purpose.) Add the following method to IocSpringApplication:

IocSpringApplication.java
// other import statements
import com.javacodegeeks.examples.beans.Dog;

@SpringBootApplication
public class IocSpringApplication {

	@Bean
	public Animal dog() {
		return new Dog();
	}
// more code...
}
At this point, you may ask, what is the id of the defined bean? By default, the bean id is the name of the method. For example, the bean id for the Dog bean is “dogâ€. You can change the default bean id name by specifying the name attribute to the @Bean annotation, e.g. @Bean(name="Dog") or simply @Bean("myDog").
We will now update the class to use the configured bean. Change the main method as follows:
IocSpringApplication.java
	public static void main(String[] args) {
		ConfigurableApplicationContext context = SpringApplication.run(
			IocSpringApplication.class, args);

		Animal animal = context.getBean("dog", Animal.class);

		System.out.println(animal.getFavoritePastime());

		context.close();
	}
Finally, remove the @ImportResources annotation. We no longer require it. Save the file and rerun the application. You will see the following in the console:
I like to bark!
3.6 Annotation-Based Configuration
We can also provide configuration metadata using annotation-based configuration. During application startup, Spring will scan specific packages for Java classes annotated with @Component and other specialized annotations. This process is known as component scanning.
Here are some of the specialized (aka stereotype) annotations
Spring will search for during the component scan process:
- @Controller
- @Service
- @Repository
- @Autowired
Spring will automatically register these annotated classes as beans in the application context.
Notes:
- These specialized annotations are meta-annotated with
@Component. - Any annotation that inherits from a stereotype annotation will also be registered in the application context.
You can specify the packages to be scanned with the @ComponentScan annotation. In a Spring boot application, the package containing the Spring Boot application class (e.g. IocSpringApplication in our example) and its sub-packages (e.g. com.javacodegeeks.examples.beans) will automatically get scanned.
Add the @Component annotation to the Dog class as shown:
Dog.java
@Component
public class Dog implements Animal {

	@Override
	public String getFavoritePastime() {
		return "I like to bark!";
	}
}
By default, the bean id is the name of the class in the camel-case with the first character in the lower-case. For example, the bean id for the Dog bean is "dog". You can change the default bean id name by specifying the name attribute to the @Component annotation, e.g. @Component (name="myDog") or simply @Component ("myDog").
Modify the IocSpringApplication class by removing the @Bean method since it is now redundant. Save the changes and rerun the application.
3.6.1 Autowiring Dependencies
Another way to use DI is with the @Autowired annotation. Basically, it allows the Spring container to automatically resolve dependencies between collaborating beans by inspecting the beans that have been defined.
First, let’s create a new class that will bring the necessary configuration to use the @Autowired annotation:
AppConfig.java
@Configuration
@ComponentScan("com.javacodegeeks.examples")
public class AppConfig {

}
This class allows the Spring container to scan for Beans in the "com.javacodegeeks.examples" package (as specified by @ComponentScan) that has the @Component annotation. As a result, the container loads these classes into the application context where they become eligible for injection.
Now, we will create another dependent class to inject this bean using @Autowired annotation. Conventionally, this type of class is called Service, but for this example we will call AnimalActions.java.
AnimalActions.java
@Component
public class AnimalActions {

	@Autowired
	public Animal dog;

	public String doStuff() {
		return dog.getFavoritePastime();
	}
}
The AnimalActions class is marked with the @Component annotation that is located by the Spring Container. The @Autowired annotation will inject a new Animal object. Let’s mark the Dog class with the @Component annotation, so that it will be loaded in the container as an Animal bean.
Dog.class
@Component
public class Dog implements Animal {

	@Override
	public String getFavoritePastime() {
		return "I like to bark!";
	}

}
Finally, we will modify the IocSpringApplication class:
IocSpringApplication.java with AnnotationConfigApplicationConext
@SpringBootApplication
public class IocSpringApplication {


	public static void main(String[] args) {
		AnnotationConfigApplicationContext context = new AnnotationConfigApplicationContext(AppConfig.class);

		AnimalActions animalAction = context.getBean(AnimalActions.class);

        System.out.println(animalAction.doStuff());

        context.close();
	}

}
So, now we are using AnnotationConfigApplicationContext that includes the AppConfig in order to load classes which has the @Component annotation. In conclusion, we can see some changes in the output when the program will run. Last but not least, we can observe how Spring Container loads the classes:
DEBUG org.springframework.beans.factory.support.DefaultListableBeanFactory - Creating shared instance of singleton bean 'org.springframework.context.annotation.internalConfigurationAnnotationProcessor'
DEBUG org.springframework.context.annotation.ClassPathBeanDefinitionScanner - Identified candidate component class: file [/Users/slauriano/dev/ioc-spring-example/annotation-ioc-spring/target/classes/com/javacodegeeks/examples/AnimalActions.class]
DEBUG org.springframework.context.annotation.ClassPathBeanDefinitionScanner - Identified candidate component class: file [/Users/slauriano/dev/ioc-spring-example/annotation-ioc-spring/target/classes/com/javacodegeeks/examples/IocSpringApplication.class]
DEBUG org.springframework.context.annotation.ClassPathBeanDefinitionScanner - Identified candidate component class: file [/Users/slauriano/dev/ioc-spring-example/annotation-ioc-spring/target/classes/com/javacodegeeks/examples/beans/Dog.class]
DEBUG org.springframework.context.annotation.ClassPathBeanDefinitionScanner - Identified candidate component class: file [/Users/slauriano/dev/ioc-spring-example/annotation-ioc-spring/target/classes/com/javacodegeeks/examples/AnimalActions.class]
DEBUG org.springframework.context.annotation.ClassPathBeanDefinitionScanner - Identified candidate component class: file [/Users/slauriano/dev/ioc-spring-example/annotation-ioc-spring/target/classes/com/javacodegeeks/examples/AppConfig.class]
4. Summary
In this article, we discussed the inversion of control in Spring and how it is used to write code that is loosely coupled.
5. Download the Source Code
This was an example about the inversion of control in Spring.
Last updated on Oct. 21st, 2020
