Welcome readers, in this tutorial, we will see an introduction to AWS lambda and how to configure a simple function using java.
1. Introduction
AWS Lambda is a service that helps to compute the code without any server. It is a kind of serverless framework because –
- It manages your code as well the infrastructure
- It supports multiple languages (such as Node JS, Python, Java, etc.)
- Handles security patch deployment to the infrastructure, code monitoring and logging
Let us understand some important Serverless framework concepts –
- Functions: It is an independent and autonomous unit of deployment (Similar to microservices). It is when deployed in the cloud performs a single job i.e. saving details in the database, performing some scheduled task, etc
- Events: Anything that triggers the execution of AWS lambda function is known as an Event. Whenever an event for an AWS lambda function is defined, the serverless framework automatically creates the required infrastructure for that event and confirm the AWS lambda function to listen to it
- Resources: It is the infrastructure component which the function uses such as DynamoDB, S3 bucket, SNS topic, etc
- Services: It is mainly a project file that defines the Function, Event(s) that trigger them, and the Resources that the Function uses.
- Plugins: Offers to extend the functionality of the framework
Now, open the eclipse ide, and let’s see how to create a simple application that will be deployed onto the AWS lambda function.
2. Introduction to AWS Lambda
Here is a systematic guide for implementing this tutorial. But before starting I am hoping that readers are aware of the basic concepts of creating a basic application.
2.1 Importing the package dependency
Add the following aws-lambda-java-events and aws-lambda-java-core dependencies to the application.
pom.xml
|
01
02
03
04
05
06
07
08
09
10
|
<dependency> <groupId>com.amazonaws</groupId> <artifactId>aws-lambda-java-events</artifactId> <version>1.3.0</version></dependency><dependency> <groupId>com.amazonaws</groupId> <artifactId>aws-lambda-java-core</artifactId> <version>1.1.0</version></dependency> |
2.2 Lambda Handler class
Let us create a class that the Lambda function will use to call the Java function.
LambdaFunctionHandler.java
|
01
02
03
04
05
06
07
08
09
10
11
12
13
14
15
16
17
|
package com.amazonaws.lambda.demo;import com.amazonaws.services.lambda.runtime.Context;import com.amazonaws.services.lambda.runtime.RequestHandler;public class LambdaFunctionHandler implements RequestHandler<Object, String> { // input parameter represents the input data. // context parameter contains the aws lambda execution information such as function name and version. @Override public String handleRequest(Object input, Context context) { context.getLogger().log("Input: " + input); // TODO: implement your handler return "Hello from Lambda! Returning arguments= " + input; }} |
2.3 Deploying the Function
To deploy the code created above, the reader can package it using the mvn package command and head over to the AWS console and go to the lambda compute services by typing lambda in the search bar.
2.3.1 Create Function
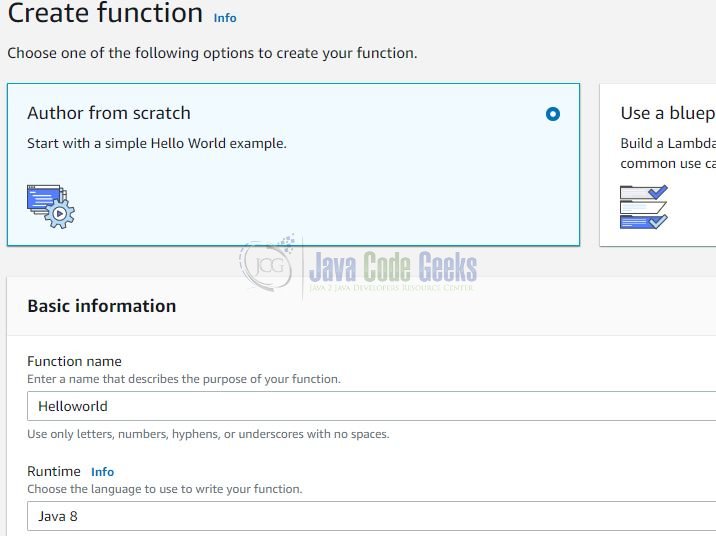
Once we have reached the lambda services page, navigate to the “Create Function” click and select the “Author from Scratch” option where we’ll provide the basic information about our function as shown in Fig. 1.
Once you’re dong click on the “Create Function” button and if everything goes well developers would be taken to the configuration page of the created function as shown in Fig. 2.
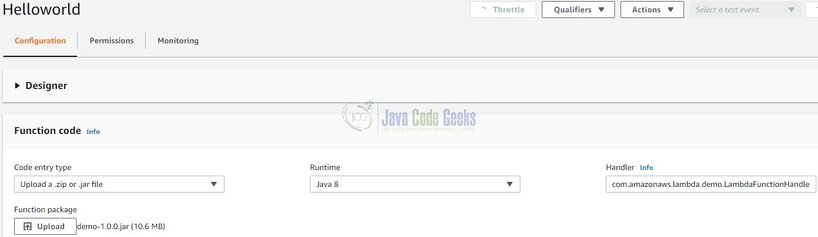
Developers need to upload the code (created in Section 2.2) into the created function and update the Handler name in the following format (<package>.<class>::<function>). Ensure that the runtime environment is the same as selected in Fig. 1. Once everything is done we will now test the function.
2.3.2 Testing the Function
To test the function, click on the dropdown and choose the “Configure test events” option. Once you click on it, you’ll get a modal popup as shown in Fig. 3. In this popup, we’ll enter the test event name and some data that will be passed the code as an argument.

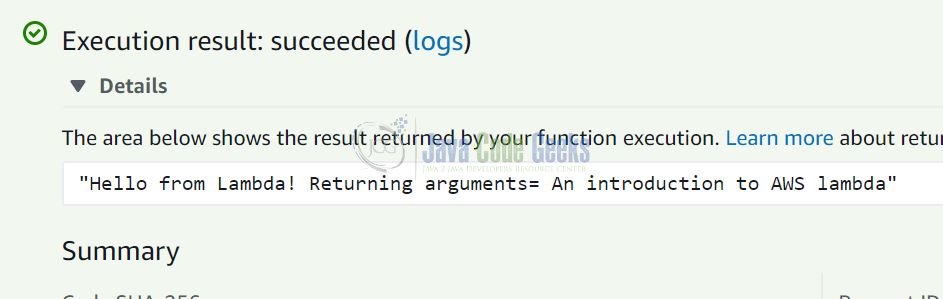
Once done, click on the “Create” button and then hit the “Test” button. If everything goes well the success modal appears with a paragraph of information about the function execution as shown in Fig. 4.
Developers can add the loggers to the handler class to print the additional information about the AWS lambda. That is all for this tutorial and I hope the article served you whatever you were looking for. Happy Learning and do not forget to share!
3. Introduction to AWS Lambda – Summary
In this section, we learned the following:
- We saw an introduction to AWS Lambda
- Sample Java code to understand the interaction with Lambda function
- Deployment and Testing of Lambda functions
Developers can download the sample application as an Eclipse project in the Downloads section.
4. Download the Eclipse Project
This was an introduction to AWS Lambda.
You can download the full source code of this example here: Introduction to AWS Lambda
