How to Download and Install Java 9
In this article, we will explain how to download and install Java 9.
1. Introduction
Java 9 was first released on October 17, 2017 and its final version – 9.0.4 – was released on January 16, 2018. In this example, I will demonstrate the following:
- Download and Install Java 9
- Java 9 Collection Factory
- Java 9 Module
- Java 9 JShell Command
2. Technologies Used
The example code in this article was built and run using:
- JDK9/JShell
- Maven 3.6.0
- Spring Tool Suit 4.10
3. Download and Install JDK9
Java 9 is not a long-term support (LTS) version. Please reference Oracle documentation for step-by-step instructions on how to download and install JDK9. Go to Oracle archive site to download and pay attentions to the following two items:
- Select the desired version from the “Java SE Development Kit” section, not the “Java SE Runtime Environment” section.
- Select the installation file based on the operating system (OS).
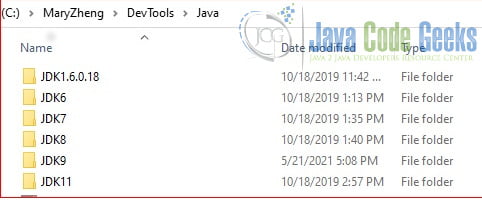
After the installation, verify with java -version command. Set the JDK version the JAVA_HOME environment variable. I installed several different JDK versions, see Figure 1.
Run the java9.bat file to use JDK9 at my pc.
jdk9.bat
@echo off
set JAVA_HOME=C:\MaryZheng\DevTools\Java\JDK9
set PATH=%JAVA_HOME%\bin;%PATH%;


set M2_HOME=C:\MaryZheng\DevTools\Maven\apache-maven-3.6.0
set PATH=%M2_HOME%\bin;%PATH%;
4. Maven Project
Java 9 Jigsaw introduces a module to bundle a set of Java packages. It provides two benefits.
- Strong encapsulation – access only these parts of the modules that have been made available for use.
- Clear dependencies – the dependency must be declared in the module-info.java file.
4.1 Create New Module Project
In this step, I will create a new Java module project in STS with the following steps:
- Launch STS.
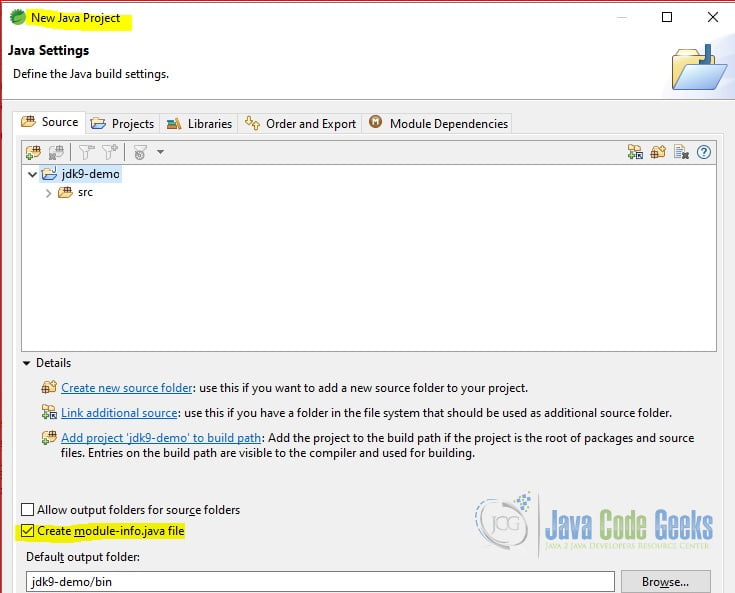
- Click File->New->Project->Java Project, enter a project name: “jdk9-demo” in the “Create a Java Project” dialog. Click the “Next” button. Select the “Create module-info.java file” in the “Java Setting” dialog as Figure 2.
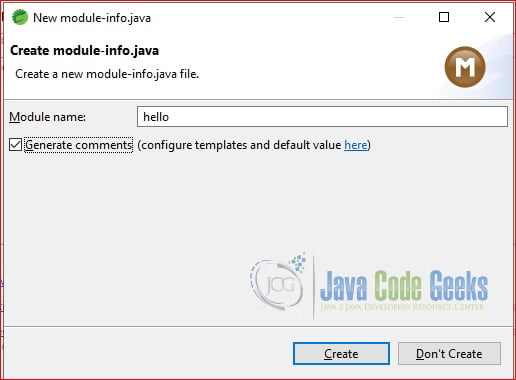
- Enter “hello” for Module name at the “Create module-info.java” dialog as Figure 3.
- Then click “Create” and then click the “Finish” button to create a new project.
- Select the “jdk9-demo” project, right-click to show the context menu, and select Configure ->Convert to Maven Project. Fill artifacts information and then click the “Finish” button.
4.2 CollectionFactoryDemo
In this step, I will create a CollectionFactoryDemo class which creates a collection of List, Set, Map with the of() method.
CollectionFactoryDemo.java
package org.jcg.zheng.demo;

import java.util.List;
import java.util.Map;
import java.util.Set;

public class CollectionFactoryDemo {
	private static void immutableList() {
		List<String> tests = List.of("A", "B", "C");
		System.out.println(tests);
	}

	private static void immutableMap() {
		Map<String, String> maptest = Map.of("A", "Best", "B", "good", "C", "ok");
		System.out.println(maptest);
	}

	private static void immutableSet() {
		Set<String> tests = Set.of("Green", "Red", "Blue");
		System.out.println(tests);
	}

	public static void main(String[] args) {
		immutableList();
		immutableSet();
		immutableMap();
	}

}
Run as a Java application and capture the output.
CollectionFactoryDemo Output
[A, B, C]
[Blue, Red, Green]
{C=ok, B=good, A=Best}
4.3 NotSeenOutside
In this step, I will create a NotSeenOutside class which has a public method and used by the Hello class.
NotSeenOutside.java
package org.jcg.zheng.demo2;

public class NotSeenOutside {

	public String showMe(String message) {
		return message.toUpperCase();
	}

}
4.4 Hello
In this example, I will create a Hello class with two public methods.
Hello.java
package org.jcg.zheng.demo;

import org.jcg.zheng.demo2.NotSeenOutside;

public class Hello {
	public String sayHello(String name) {
		return "Hello " + name;
	}

	public String withUpper(String name) {
		NotSeenOutside not = new NotSeenOutside();
		return not.showMe(name) + " is an important person." ;
	}
}
4.5 Module-info.java
In this step, I will edit the generated module-info.java file to export the org.jcg.zheng.demo package. The NotSeenOutside class is not accessible from outside of this module as its package is not exported.
module-info.java
 module hello {
	 exports org.jcg.zheng.demo;
}
5. JShell
Java 9 provides REPL (Read, Eval, Print, Loop) JShell command interface.
5.1 Basic Example of JShell
In this step, I will demonstrate several basic Jshell commands.
Basic JShell Commands
jshell> /help
|  Type a Java language expression, statement, or declaration.
|  Or type one of the following commands:
|  /list [<name or id>|-all|-start]
|       list the source you have typed
|  /edit <name or id>
|       edit a source entry
|  /drop <name or id>
|       delete a source entry
|  /save [-all|-history|-start] <file>
|       Save snippet source to a file
|  /open <file>
|       open a file as source input
|  /vars [<name or id>|-all|-start]
|       list the declared variables and their values
|  /methods [<name or id>|-all|-start]
|       list the declared methods and their signatures
|  /types [<name or id>|-all|-start]
|       list the type declarations
|  /imports
|       list the imported items
|  /exit [<integer-expression-snippet>]
|       exit the jshell tool
|  /env [-class-path <path>] [-module-path <path>] [-add-modules <modules>] ...
|       view or change the evaluation context
|  /reset [-class-path <path>] [-module-path <path>] [-add-modules <modules>]...
|       reset the jshell tool
|  /reload [-restore] [-quiet] [-class-path <path>] [-module-path <path>]...
|       reset and replay relevant history -- current or previous (-restore)
|  /history [-all]
|       history of what you have typed
|  /help [<command>|<subject>]
|       get information about using the jshell tool
|  /set editor|start|feedback|mode|prompt|truncation|format ...
|       set configuration information
|  /? [<command>|<subject>]
|       get information about using the jshell tool
|  /!
|       rerun last snippet -- see /help rerun
|  /<id>
|       rerun snippets by ID or ID range -- see /help rerun
|  /-<n>
|       rerun n-th previous snippet -- see /help rerun
|
|  For more information type '/help' followed by the name of a
|  command or a subject.
|  For example '/help /list' or '/help intro'.
|
|  Subjects:
|
|  intro
|       an introduction to the jshell tool
|  id
|       a description of snippet IDs and how use them
|  shortcuts
|       a description of keystrokes for snippet and command completion,
|       information access, and automatic code generation
|  context
|       a description of the evaluation context options for /env /reload and /reset
|  rerun
|       a description of ways to re-evaluate previously entered snippets

jshell> System.out.println("Hello World!");
Hello World!

jshell> int a=9;
a ==> 9

jshell> 9 +2
$3 ==> 11

jshell> /list

   1 : System.out.println("Hello World!");
   2 : int a=9;
   3 : 9 +2

jshell> void sayHello(){
   ...> System.out.println("Hello");
   ...> }
|  created method sayHello()

jshell> /list

   1 : System.out.println("Hello World!");
   2 : int a=9;
   3 : 9 +2
   4 : void sayHello(){
       System.out.println("Hello");
       }

jshell> sayHello()
Hello

jshell> /list

   1 : System.out.println("Hello World!");
   2 : int a=9;
   3 : 9 +2
   4 : void sayHello(){
       System.out.println("Hello");
       }
   5 : sayHello()

jshell> /edit 4
|  modified method sayHello()

jshell> sayHello()
Hello from Mary


jshell> /exit
|  Goodbye
- Line 1 –
/helpcommand of jshell with useful commands and usages. - Line 4 –
/listcommand to show all the jshell commands used so far. - Line 6 –
/editcommand to edit the jshell command used with the desired command. - Line 22 –
/exitcommand to exit the jshell tool. - Line 63 – invoke
System.out.println("Hellow World!"); - Line 66 – declare a variable with
inttype and value 9. - Line 69 – calculate a math expression.
- Line 72 –
/listcommand to show the jshell commands used so far. - Line 78 – create a
sayHello()function. - Line 92 – invoke
sayHello(). - Line 95 –
/listcommand again. - Line 105 –
/edit 4to update the command line 4 as Figure 4. - Line 108 – invoke
sayHello()to get updated value.
5.2 Use Hello Module in JShell
In this step, I will use the hello module created earlier with JShell commands.
Access Hello Module
jshell> /env -module-path C:\MaryZheng\sts_4_10_ws\jdk9-demo\target\jdk9-demo-0.0.1-SNAPSHOT.jar
|  Setting new options and restoring state.
jshell> /env -add-modules hello
|  Setting new options and restoring state.
jshell> org.jcg.zheng.demo.Hello test = new org.jcg.zheng.demo.Hello();
test ==> org.jcg.zheng.demo.Hello@35d176f7

jshell> System.out.println(test.sayHello("Mary"));
Hello Mary
jshell> import org.jcg.zheng.demo.Hello;

jshell> Hello test2 = new Hello();
test2 ==> org.jcg.zheng.demo.Hello@22a67b4

jshell>
jshell> System.out.println(test.withUpper("Mary"));
MARY is an important person.

jshell> CollectionFactoryDemo.main(null);
[Green, Red, Blue]
[Red, Blue, Green]
{C=ok, A=Best, B=good}

jshell> /exit
| Goodbye- Line 1 –
/envcommand to set the module path for thehellomodule - Line 3 –
/envcommand to add thehellomodule - Line 5 – declare an object from the
hellomodule - Line 8 – invoke
sayHello()from theHelloclass - Line 10 – import the package from the
hellomodule - Line 12 – declare an object from the
Helloclass
5.3 Demo NotSeenOutside in JShell
In this step, I will import the NotSeenOutside class in JShell and get an error message.
Try to access NotSeenOutSide
jshell> import org.jcg.zheng.demo2.NotSeenOutside;
|  Error:
|  package org.jcg.zheng.demo2 is not visible
|    (package org.jcg.zheng.demo2 is declared in module hello, which does not export it)
|  import org.jcg.zheng.demo2.NotSeenOutside;
|         ^-----------------^
6. Summary
In this step, I explained how to download and install Java 9 and demonstrated the following:
- Java 9 collection factory method
- Create a Java Module
- JShell commands
7. More articles
- How to update Java for Windows 10, macOS, and Android
- Download and Install Java Development Kit (JDK) 8
- Download and Install Java Development Kit (JDK) 11
- Download and Install Java Development Kit (JDK) 13
8. Download the Source Code
You can download the full source code of this example here: How to Download and Install Java 9


