1. Introduction
A web application is an application program that is stored on a remote server and delivered over the Internet through a browser interface.
Vaadin is a web application framework written in Java, and is built on Google Web Toolkit from Vaadin Ltd. It is designed for creating rich and interactive applications that run in the browser.
By design, Vaadin is compatible with any Java Virtual Machine (JVM) language, such as Java, Groovy, Scala, etc. In this example, I will demonstrate how to build a web application in Java.
2. Business Requirements
An online contacts management application will manage user’s contacts with the requirements below:
- It displays the contacts in a way that user can sort the contacts by name, phone number, or email
- It allows user to add new contacts, and modify or delete an existing contact
- It validates the contact’s first name and last name with max 30 characters
- It validates the user’s email address with valid format
- It validates the user’s phone number with valid format
- It marks the contact’s first name, last name and phone number as required.
3. Technologies Used
The example code in this article was built and run using:
- Java 1.8.101 (1.8.x will do fine)
- Maven 3.3.9 (3.3.x will do fine)
- Eclipse Mars (Any Java IDE would work)
- Vaadin 8.3.0
- Vaadin Spring Boot 1.5.10.RELEASE
- Spring Boot 1.5.10.RELEASE
4. Design
We will build a Single Paged Application (SPA) with Spring Boot and Vaadin UI components which meets the business requirements outlined at step 2. We will build the web application based on three-tier design pattern:
- UI – UI Components based on Vaadin
- Service – Create Service to access contacts via a Data Access Object (DAO)
- DAO – Contact DAO to manage the user’s contacts via JPA
5. Spring Boot Vaadin Web Application
The easiest way to generate a Spring Boot Vaadin application is via the Spring starter tool with the steps below:
- Go to
https://start.spring.io/. - Select
Maven ProjectwithJavaand Spring Boot version 1.5.10 and type inVaadinin the “search for dependencies” bar. - Enter the group name as
jcg.zheng.demoand artifact asvaadin-web-demo. - Click the
Generate Projectbutton.
A maven project will be generated and downloaded to your workstation. Import it into your Eclipse workspace.
5.1 Generated Code
The generated project includes pom.xml and VaadinWebDemoApplication.java.
We need to modify the pom.xml to add JPA and H2 as dependencies.
pom.xml
<?xml version="1.0" encoding="UTF-8"?>
<project xmlns="http://maven.apache.org/POM/4.0.0" xmlns:xsi="http://www.w3.org/2001/XMLSchema-instance"
	xsi:schemaLocation="http://maven.apache.org/POM/4.0.0 http://maven.apache.org/xsd/maven-4.0.0.xsd">
	<modelVersion>4.0.0</modelVersion>

	<groupId>jcg.zheng.demo</groupId>
	<artifactId>vaadin-web-demo</artifactId>
	<version>0.0.1-SNAPSHOT</version>
	<packaging>jar</packaging>

	<name>vaadin-web-demo</name>
	<description>Demo Web Application with Vaadin</description>

	<parent>
		<groupId>org.springframework.boot</groupId>
		<artifactId>spring-boot-starter-parent</artifactId>
		<version>1.5.10.RELEASE</version>
		<relativePath /> <!-- lookup parent from repository -->
	</parent>

	<properties>
		<project.build.sourceEncoding>UTF-8</project.build.sourceEncoding>
		<project.reporting.outputEncoding>UTF-8</project.reporting.outputEncoding>
		<java.version>1.8</java.version>
		<vaadin.version>8.3.0</vaadin.version>
	</properties>

	<dependencies>
		<dependency>
			<groupId>com.vaadin</groupId>
			<artifactId>vaadin-spring-boot-starter</artifactId>
		</dependency>

		<dependency>
			<groupId>org.springframework.boot</groupId>
			<artifactId>spring-boot-starter-data-jpa</artifactId>
		</dependency>

		<dependency>
			<groupId>com.h2database</groupId>
			<artifactId>h2</artifactId>
		</dependency>

		<dependency>
			<groupId>org.springframework.boot</groupId>
			<artifactId>spring-boot-starter-test</artifactId>
			<scope>test</scope>
		</dependency>
	</dependencies>

	<dependencyManagement>
		<dependencies>
			<dependency>
				<groupId>com.vaadin</groupId>
				<artifactId>vaadin-bom</artifactId>
				<version>${vaadin.version}</version>
				<type>pom</type>
				<scope>import</scope>
			</dependency>
		</dependencies>
	</dependencyManagement>

	<build>
		<plugins>
			<plugin>
				<groupId>org.springframework.boot</groupId>
				<artifactId>spring-boot-maven-plugin</artifactId>
			</plugin>
		</plugins>
	</build>
</project>
The generated VaadinWebDemoApplication.java is annotated with @SpringBootApplication. It is equivalent to using @Configuration, @EnableAutoConfiguration, and @ComponentScan with their default attributes. In this example, we will modify it to load sample contacts data.
VaadinWebDemoApplication.java
package jcg.zheng.demo.vaadinwebdemo;

import org.springframework.boot.CommandLineRunner;
import org.springframework.boot.SpringApplication;
import org.springframework.boot.autoconfigure.SpringBootApplication;
import org.springframework.context.annotation.Bean;

import jcg.zheng.demo.vaadinwebdemo.dao.ContactRepository;
import jcg.zheng.demo.vaadinwebdemo.entity.Contact;

@SpringBootApplication
public class VaadinWebDemoApplication {

	public static void main(String[] args) {
		SpringApplication.run(VaadinWebDemoApplication.class, args);
	}

	@Bean
	public CommandLineRunner loadData(ContactRepository repository) {
		return (args) -> {
			// save a couple of contacts for demo
			repository.save(new Contact("Mary", "Zheng", "mary.zheng@jcg.org", "6365272943"));
			repository.save(new Contact("Tom", "Smith", "tom.smith@jcg.org", "(636) 527-2943"));
			repository.save(new Contact("John", "Joe", "john.joe@jcg.org", "(314) 527 2943"));
			repository.save(new Contact("Cindy", "Chang", "cindy.change@jcg.org", "404-789-1456"));
		};
	}
}
5.2 Contact Entity
In this step we will create a contact entity which has a first name, last name, email, and phone number. We will annotate it with @Entity, @GeneratedValue, and @Id.
Contact.java
package jcg.zheng.demo.vaadinwebdemo.entity;

import javax.persistence.Entity;
import javax.persistence.GeneratedValue;
import javax.persistence.Id;

@Entity
public class Contact {

	@Id
	@GeneratedValue
	private Long id;

	private String firstName;

	private String lastName;

	private String email;

	private String phoneNumber;

	private String phoneType;

	private String notes;

	private String socialMediaLink;

	public Contact() {
	}

	public Contact(String firstName, String lastName, String email, String phone) {

		this.firstName = firstName;
		this.lastName = lastName;
		this.email = email;
		this.phoneNumber = phone;
	}

	public Long getId() {
		return id;
	}

	public String getFirstName() {
		return firstName;
	}

	public void setFirstName(String firstName) {
		this.firstName = firstName;
	}

	public String getLastName() {
		return lastName;
	}

	public void setLastName(String lastName) {
		this.lastName = lastName;
	}

	public String getEmail() {
		return email;
	}

	public void setEmail(String email) {
		this.email = email;
	}

	public void setId(Long id) {
		this.id = id;
	}

	public String getPhoneNumber() {
		return phoneNumber;
	}

	public void setPhoneNumber(String phoneNumber) {
		this.phoneNumber = phoneNumber;
	}

	public String getNotes() {
		return notes;
	}

	public void setNotes(String notes) {
		this.notes = notes;
	}

	public String getPhoneType() {
		return phoneType;
	}

	public void setPhoneType(String phoneType) {
		this.phoneType = phoneType;
	}

	public String getSocialMediaLink() {
		return socialMediaLink;
	}

	public void setSocialMediaLink(String socialMediaLink) {
		this.socialMediaLink = socialMediaLink;
	}

}
The PhoneType is defined as enum.
PhoneType.java
package jcg.zheng.demo.vaadinwebdemo.type;

public enum PhoneType {

	OFFICE, HOME, MOBILE, OTHER;

}
6. Vaadin UI Components
If you have not worked with Vaadin before, please check it out here. Vaadin Sampler also provides an interactive documentation about Vaadin components. If you have not worked with Vaadin Spring before, please check out my other article here. At this step, we will build five Vaadin UI Classes:
- MainUI – the web application entry UI
- ContactsView – the view to display the contacts
- ContactDetailView – the view to edit, create, or delete a contact
- DefaultView – the default landing page for the web application
- ErrorView – the default error message for the web application
6.1 Main UI
MainUI.java is the core part of the SPA. We will configure its path with @SpringUI annotation. The page contains a “Contact” button. It will display the contacts view when clicks.
MainUI.java
package jcg.zheng.demo.vaadinwebdemo.ui;

import com.vaadin.navigator.View;
import com.vaadin.navigator.ViewDisplay;
import com.vaadin.server.VaadinRequest;
import com.vaadin.spring.annotation.SpringUI;
import com.vaadin.spring.annotation.SpringViewDisplay;
import com.vaadin.ui.Button;
import com.vaadin.ui.Component;
import com.vaadin.ui.CssLayout;
import com.vaadin.ui.Panel;
import com.vaadin.ui.UI;
import com.vaadin.ui.VerticalLayout;
import com.vaadin.ui.themes.ValoTheme;

import jcg.zheng.demo.vaadinwebdemo.view.ContactsView;
import jcg.zheng.demo.vaadinwebdemo.view.ErrorView;

@SpringUI(path = MainUI.APP_ROOT)
@SpringViewDisplay
public class MainUI extends UI implements ViewDisplay {

	static final String APP_ROOT = "/vaadin-web-demo";

	private static final String CONTACTS_VIEW = "Contacts";

	private Panel springViewDisplay;

	private static final long serialVersionUID = 4967383498113318791L;

	@Override
	protected void init(VaadinRequest vaadinRequest) {

		final VerticalLayout root = new VerticalLayout();
		root.setSizeFull();
		setContent(root);

		final CssLayout navigationButtons = new CssLayout();

		navigationButtons.addStyleName(ValoTheme.LAYOUT_COMPONENT_GROUP);
		navigationButtons.addComponent(createNavigationButton(CONTACTS_VIEW, ContactsView.VIEW_NAME));

		root.addComponent(navigationButtons);

		springViewDisplay = new Panel();
		springViewDisplay.setSizeFull();
		root.addComponent(springViewDisplay);
		root.setExpandRatio(springViewDisplay, 1.0f);

		getNavigator().setErrorView(ErrorView.class);
	}

	private Button createNavigationButton(String caption, final String viewName) {
		Button button = new Button(caption);
		button.addStyleName(ValoTheme.BUTTON_SMALL);

		button.addClickListener(event -> getUI().getNavigator().navigateTo(viewName));
		return button;
	}

	@Override
	public void showView(View view) {
		springViewDisplay.setContent((Component) view);
	}
}
6.2 Default View
DefaultView is the one used when the web application starts.
DefaultView.java
package jcg.zheng.demo.vaadinwebdemo.view;

import javax.annotation.PostConstruct;

import com.vaadin.navigator.View;
import com.vaadin.navigator.ViewChangeListener.ViewChangeEvent;
import com.vaadin.spring.annotation.SpringView;
import com.vaadin.spring.annotation.UIScope;
import com.vaadin.ui.Label;
import com.vaadin.ui.VerticalLayout;

@UIScope
@SpringView(name = DefaultView.VIEW_NAME)
public class DefaultView extends VerticalLayout implements View {

	private static final long serialVersionUID = -3903205444585313680L;
	public static final String VIEW_NAME = ""; //default

    @PostConstruct
    void init() {
        addComponent(new Label("Welcome to Vaadin Web Application Demo!!"));
    }

    @Override
    public void enter(ViewChangeEvent event) {
        // This view is constructed in the init() method()
    }
}
6.3 Error View
ErrorView is the one used when the web application cannot find the view based on the URL mapping. It must be annotated with @UIScope because the SPA handles errors for the entire UI.
ErrorView.java
package jcg.zheng.demo.vaadinwebdemo.view;

import javax.annotation.PostConstruct;

import com.vaadin.navigator.View;
import com.vaadin.navigator.ViewChangeListener.ViewChangeEvent;
import com.vaadin.spring.annotation.SpringView;
import com.vaadin.spring.annotation.UIScope;
import com.vaadin.ui.Label;
import com.vaadin.ui.VerticalLayout;

@UIScope
@SpringView(name = ErrorView.VIEW_NAME)
public class ErrorView extends VerticalLayout implements View {

	private static final long serialVersionUID = -134715779625065266L;

	public static final String VIEW_NAME = "error";

    @PostConstruct
    void init() {
        addComponent(new Label("This is the error view - Oops!"));
    }

    @Override
    public void enter(ViewChangeEvent event) {
        // This view is constructed in the init() method()
    }
}
6.4 Contacts View
Vaadin Grid is for displaying and editing tabular data laid out in rows and columns. At this step, we will use it to display the contacts data, the sorting feature is enabled at the column header and click event is also implemented to open the contact detail view.
There are four functions in this view:
- Display the contacts via Vaadin
Gridcomponent - A
New Contactbutton to allow the user to enter a new contact - A
Refreshbutton to allow the user to refresh the contacts ClickEventon the grid’s selection to allow the user to view the selected contact details
ContactsView.java
package jcg.zheng.demo.vaadinwebdemo.view;

import javax.annotation.PostConstruct;

import org.springframework.beans.factory.annotation.Autowired;

import com.vaadin.navigator.View;
import com.vaadin.navigator.ViewChangeListener.ViewChangeEvent;
import com.vaadin.spring.annotation.SpringView;
import com.vaadin.spring.annotation.UIScope;
import com.vaadin.ui.Button;
import com.vaadin.ui.CssLayout;
import com.vaadin.ui.Grid;
import com.vaadin.ui.Grid.SelectionMode;
import com.vaadin.ui.VerticalLayout;

import jcg.zheng.demo.vaadinwebdemo.entity.Contact;
import jcg.zheng.demo.vaadinwebdemo.service.ContactService;

@UIScope
@SpringView(name = ContactsView.VIEW_NAME)
public class ContactsView extends VerticalLayout implements View {

	private static final long serialVersionUID = -3089511061636116441L;

	public static final String VIEW_NAME = "contacts";

	@Autowired
	private ContactService contactService;

	@Autowired
	private ContactDetailView contactDetail;

	Button newBtn = new Button("New Contact");
	Button refreshBtn = new Button("Refresh");
	CssLayout actions = new CssLayout(newBtn, refreshBtn);
	Grid grid = new Grid<>(Contact.class);

	@PostConstruct
	void init() {

		newBtn.addClickListener(e -> contactDetail.showDetail(new Contact()));
		refreshBtn.addClickListener(e -> refresh());

		grid.setSizeFull();
		grid.setSelectionMode(SelectionMode.SINGLE);
		grid.setColumns("id", "firstName", "lastName", "email", "phoneNumber");
		grid.setItems(contactService.getContacts());

		grid.asSingleSelect().addValueChangeListener(e -> {
			contactDetail.showDetail(e.getValue());
		});

		addComponent(grid);
		addComponent(actions);
		addComponent(contactDetail);

		contactDetail.setChangeHandler(() -> {
			contactDetail.setVisible(false);
			refresh();
		});

	}

	public final void refresh() {
		grid.setItems(contactService.getContacts());
	}

	@Override
	public void enter(ViewChangeEvent event) {
		// This view is constructed in the init() method()
	}
}
6.5 Contact Detail View
At this step, we will use Vaadin UI components – TextField, NativeSelect, and TextArea to capture the contact detail from the user’s input and bind the UI components’ value to the contact entity created at step 5.2. There are four data validations needed:

- Validate the first name and last name with max length of 30 characters
- Validate the email based on Vaadin provided
EmailValidator - Validate the phone number based on the
RegexpValidator - Mark the contact’s first name, last name and phone number as required fields
Contact detail view allows users to view the given contact details. It also provides three action buttons – Save, Delete, and Cancel.
ContactDetailView.java
package jcg.zheng.demo.vaadinwebdemo.view;

import java.util.stream.Collectors;
import java.util.stream.Stream;

import org.springframework.beans.factory.annotation.Autowired;

import com.vaadin.data.Binder;
import com.vaadin.data.validator.EmailValidator;
import com.vaadin.data.validator.RegexpValidator;
import com.vaadin.spring.annotation.SpringComponent;
import com.vaadin.spring.annotation.UIScope;
import com.vaadin.ui.Button;
import com.vaadin.ui.CssLayout;
import com.vaadin.ui.HorizontalLayout;
import com.vaadin.ui.NativeSelect;
import com.vaadin.ui.TextArea;
import com.vaadin.ui.TextField;
import com.vaadin.ui.VerticalLayout;
import com.vaadin.ui.themes.ValoTheme;

import jcg.zheng.demo.vaadinwebdemo.entity.Contact;
import jcg.zheng.demo.vaadinwebdemo.service.ContactService;
import jcg.zheng.demo.vaadinwebdemo.type.PhoneType;

@SpringComponent
@UIScope
public class ContactDetailView extends VerticalLayout {

	private static final long serialVersionUID = -3307156756600939660L;

	private static final String ENTER_VALID_EMAIL_ADDRESS = "Enter valid email address";

	private static final String ENTER_VALID_PHONE_NUMBER = "Enter valid phone number!";

	private static final String PHONE_FORMAT = "\\D*([2-9]\\d{2})(\\D*)([2-9]\\d{2})(\\D*)(\\d{4})\\D*";

	private static final String MAX_LENGTH_OF_NAME_IS_30_CHARS = "Max length of name is 30 chars";
	private static final String PHONE_NUMBER_IS_REQUIRED = "Every contact must have a phone number";

	private static final String LAST_NAME_IS_REQUIRED = "Every contact must have a last name";

	private static final String FIRST_NAME_IS_REQUIRED = "Every contact must have a first name";

	private static final String OUTLINED = "outlined";

	@Autowired
	private ContactService service;

	private Contact contact;

	Binder<Contact> binder = new Binder<>(Contact.class);

	TextField firstName = new TextField("First name");
	TextField lastName = new TextField("Last name");
	TextField email = new TextField("Email");
	TextField phoneNumber = new TextField("Phone number");
	NativeSelect<String> phoneType = new NativeSelect<>("Phone Type");
	TextField socialMediaLink = new TextField("Social Media Link");
	TextArea notes = new TextArea("Notes");

	Button save = new Button("Save");
	Button delete = new Button("Delete");
	Button cancel = new Button("Cancel");

	CssLayout actions = new CssLayout(save, delete, cancel);

	@Autowired
	public ContactDetailView() {

		phoneType.setItems(Stream.of(PhoneType.values()).map(PhoneType::name).collect(Collectors.toList()));
		phoneType.setValue(PhoneType.OFFICE.name());
		notes.setSizeFull();

		addComponents(nameRow(), phoneRow(), emailRow(), notes);
		setSpacing(true);
		actions.setStyleName(ValoTheme.LAYOUT_COMPONENT_GROUP);

		save.setStyleName(ValoTheme.BUTTON_PRIMARY);

		save.addClickListener(e -> service.save(contact));
		delete.addClickListener(e -> service.delete(contact));
		cancel.addClickListener(e -> hide());

		bindingFields();

		addComponent(actions);
		setVisible(false);
	}

	private void bindingFields() {
		binder.forField(this.firstName).withNullRepresentation("")
				.withValidator(str -> str.length() <= 30, MAX_LENGTH_OF_NAME_IS_30_CHARS)
				.asRequired(FIRST_NAME_IS_REQUIRED).bind(Contact::getFirstName, Contact::setFirstName);

		binder.forField(this.lastName).withNullRepresentation("")
				.withValidator(str -> str.length() <= 30, MAX_LENGTH_OF_NAME_IS_30_CHARS)
				.asRequired(LAST_NAME_IS_REQUIRED).bind(Contact::getLastName, Contact::setLastName);

		binder.forField(this.email).withValidator(new EmailValidator(ENTER_VALID_EMAIL_ADDRESS)).bind(Contact::getEmail,
				Contact::setEmail);

		binder.forField(this.phoneNumber).withValidator(new RegexpValidator(ENTER_VALID_PHONE_NUMBER, PHONE_FORMAT))
				.asRequired(PHONE_NUMBER_IS_REQUIRED).bind(Contact::getPhoneNumber, Contact::setPhoneNumber);

		binder.bindInstanceFields(this);
	}

	private HorizontalLayout nameRow() {
		HorizontalLayout sample = new HorizontalLayout();
		sample.addStyleName(OUTLINED);
		sample.setSpacing(false);
		sample.setMargin(false);
		sample.setSizeFull();

		sample.addComponents(firstName, lastName);
		return sample;
	}

	private HorizontalLayout phoneRow() {
		HorizontalLayout sample = new HorizontalLayout();
		sample.addStyleName(OUTLINED);
		sample.setSpacing(false);
		sample.setMargin(false);
		sample.setSizeFull();

		sample.addComponents(phoneType, phoneNumber);
		return sample;
	}

	private HorizontalLayout emailRow() {
		HorizontalLayout sample = new HorizontalLayout();
		sample.addStyleName(OUTLINED);
		sample.setSpacing(false);
		sample.setMargin(false);
		sample.setSizeFull();

		sample.addComponents(email, socialMediaLink);
		return sample;
	}

	public final void hide() {
		setVisible(false);
	}

	public interface ChangeHandler {
		void onChange();
	}

	public final void showDetail(Contact c) {
		contact = c;

		binder.setBean(contact);

		setVisible(true);
		save.focus();
	}

	public void setChangeHandler(ChangeHandler h) {
		save.addClickListener(e -> h.onChange());
		delete.addClickListener(e -> h.onChange());
	}

}
7. Spring Components
If you have not worked with Spring before, please check it out here.
At this step, we will build two Spring components:
ContactService– the service to access the contactsContactRepository– theJpaRepositoryfor Contact entity
7.1 Contact Repository
Spring JpaRepository provides handy operations to manage the entity. We just create the ContactRepository by extending it from JpaRepository.
ContactRepository.java
package jcg.zheng.demo.vaadinwebdemo.dao;

import org.springframework.data.jpa.repository.JpaRepository;
import org.springframework.stereotype.Repository;

import jcg.zheng.demo.vaadinwebdemo.entity.Contact;

@Repository
public interface ContactRepository extends JpaRepository<Contact, Long> {

}
7.2 Contact Service
At this step, we will create a ContactService which provides three operations – getContacts, save and delete contact by interacting with ContactRepository.
ContactService.java
package jcg.zheng.demo.vaadinwebdemo.service;

import java.util.List;

import org.springframework.beans.factory.annotation.Autowired;
import org.springframework.stereotype.Service;

import jcg.zheng.demo.vaadinwebdemo.dao.ContactRepository;
import jcg.zheng.demo.vaadinwebdemo.entity.Contact;

@Service
public class ContactService {

	@Autowired
	private ContactRepository contactDao;

	public List getContacts() {
		return contactDao.findAll();
	}

	public Contact save(Contact contact) {
		contactDao.save(contact);
		return contact;
	}

	public void delete(Contact contact) {
		contactDao.delete(contact);
	}

}
8. Demo Time
Select VaadinWebDemoApplication.java and execute Run As Java Application. The Spring-boot output indicates that the web application is up.
Output
2018-03-03 14:05:26.715  INFO 10872 --- [           main] o.s.w.s.handler.SimpleUrlHandlerMapping  : Mapped URL path [/vaadin-web-demo] onto handler of type [class org.springframework.web.servlet.mvc.ServletForwardingController]
2018-03-03 14:05:26.715  INFO 10872 --- [           main] o.s.w.s.handler.SimpleUrlHandlerMapping  : Mapped URL path [/vaadin-web-demo/] onto handler of type [class org.springframework.web.servlet.mvc.ServletForwardingController]
2018-03-03 14:05:27.309  INFO 10872 --- [           main] o.s.j.e.a.AnnotationMBeanExporter        : Registering beans for JMX exposure on startup
2018-03-03 14:05:27.420  INFO 10872 --- [           main] s.b.c.e.t.TomcatEmbeddedServletContainer : Tomcat started on port(s): 8080 (http)
2018-03-03 14:05:27.535  INFO 10872 --- [           main] j.z.d.v.VaadinWebDemoApplication         : Started VaadinWebDemoApplication in 9.251 seconds (JVM running for 9.864)
2018-03-03 14:05:30.794  WARN 10872 --- [nio-8080-exec-2] c.v.s.DefaultDeploymentConfiguration     :
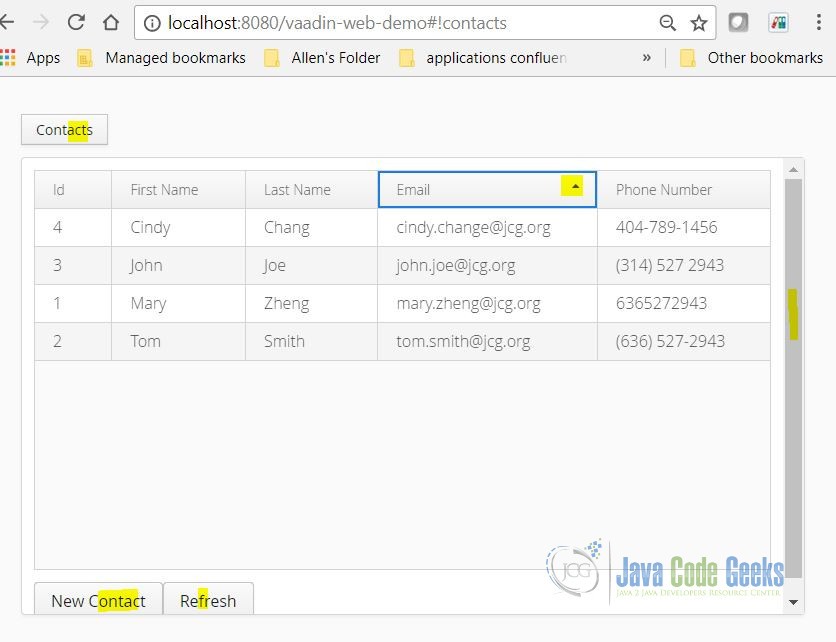
I will demonstrate the web application which meets the business requirements outlined at step 2:
- Go to
http://localhost:8080/vaadin-web-demo. - Click the “Contacts” button. It will display the contacts in a grid along with “New Contact” and “Refresh” buttons.
- Click on the grid header. It will sort the data. Repeat this step for all columns.

Figure 1 Contacts - Click on a grid row. It will display the selected contact detail.
- Click the “Cancel” button. It will hide the contact detail section.
- Click the “New Contact” button. It will display a contact form. The first name, last name and phone number should be marked with a red * to indicate that this is required.
- Enter an invalid phone number or email address to confirm that the validation works.

Figure 2 contacts detail - Click the “Save” button for valid data. It will show the newly created contact in the grid.
- Click on the existing contact. It will fill the contact detail form with the selected contact’s data.
- Edit the contact detail and click the “Save” button. The grid data will be updated.
- Repeat the step 9. Click the “Delete” button. The grid will be updated. The contact deleted no longer in the grid.


9. Summary
In this example, we built a Vaadin web application which manages a user’s contacts. It allows users to view their contacts, sort them based on name, phone number, and email. It allow user to enter new contact, edit and delete an existing contact. It validates the user input and provides feedback if the data is invalid.
You can secure the web application with Spring Security, please check out my other article for more detail.
10. Download the Source Code
This example consists of a Vaadin web application which provides CRUD operation on the contacts.
You can download the full source code of this example here: Vaadin Web Application Example in Java

Hello,
When I compile vaadin widgetset I get error BUILD FAILURE, No plugin found for prefix ‘vaadin’ in the current project and in the plugin groups.
Do you have to make any configuration?