We can organize commands into a menu. The menu allows us to stack multiple buttons in a logic way for the work flow. If we have too much commands or buttons in our user interface we need to consider to use a menu in our application.
A menu has a tree structure with a main root with the top nodes attached to it and every node and sub-nodes could have child nodes, creating a tree structure.
1. The tools
- Java JDK 8
- Latest Eclipse Mars
- Vaadin 7.6.7
- Tomcat Server 8
2. Introduction
In this example we are going to create two menus. On each menu we are going to handle the click event and identify the parent and children item of the item we are clicking. Also we have some labels to give feedback of the action performed on the menu.
3. Prerequisites
- JDK installed
- Eclipse Mars installed and working
- Vaadin plug-in installed
- Tomcat 8 installed and running
4. Set up the project
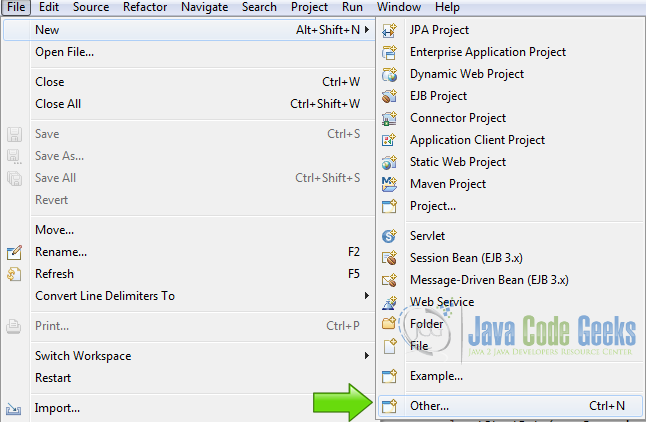
In the file menu choose File -> New -> Other
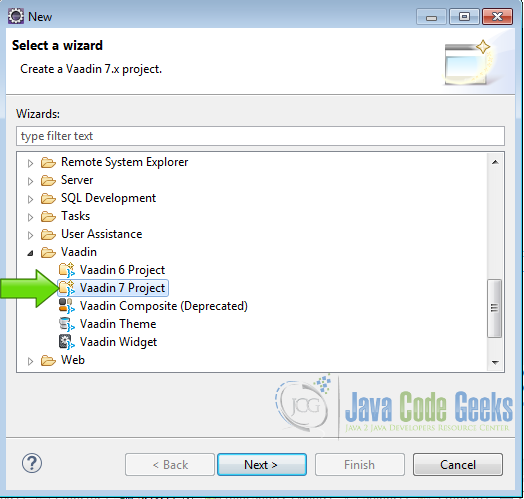
Now from the list choose Vaadin 7 project
Press next and name your project then press finish.
5. Coding the example
5.1 Layouts and labels
Layouts
		final VerticalLayout layout = new VerticalLayout();
		layout.setMargin(true);
		layout.setSpacing(true);
		setContent(layout);

		HorizontalLayout menuLayout = new HorizontalLayout();
		menuLayout.setSpacing(true);
>final VerticalLayout layout = new VerticalLayout(); creates a vertical layout.
>layout.setMargin(true); Sets the margin of the vertical layout.
>layout.setSpacing(true); Gets some space between the items inside the layout.
>setContent(layout); Sets the vertical layout as our main layout.
>HorizontalLayout menuLayout = new HorizontalLayout(); Creates an Horizontal layout.
>menuLayout.setSpacing(true); Sets some space inside the items of the horizontal layout.
Labels
		Label myFirstLabel = new Label("-");
		myFirstLabel.addStyleName("myfirstlabel");

		Label mySecondLabel = new Label("-");
		mySecondLabel.addStyleName("mysecondlabel");

		Label secondMenuLabel = new Label("-");
		secondMenuLabel.addStyleName("secondmenulabel");
>Label myFirstLabel = new Label("-"); Creates a label to show feedback when the user click a parent menu item.
>myFirstLabel.addStyleName("myfirstlabel"); Assigns a style to the label.
>Label mySecondLabel = new Label("-"); Creates another label to show when user click on a child menu item.
>mySecondLabel.addStyleName("mysecond Adds a style to the second label.
>Label secondMenuLabel = new Label(" Creates a label to show the activity on the second menu.
>secondMenuLabel.addStyleName("secondmenulabel"); Adds a style to the second menu label.
5.2 Styles
First label style
.v-label-myfirstlabel {
    color: white;
    text-align: center;
    background-color: #6666FF;
    border-color: white;
    font-weight: bold;
}
In this style we change the background color to a shade of blue and the text color to white, we center the text and the weight of the font is set to bold.
Second label style
.v-label-mysecondlabel {
    color: black;
    text-align: center;
    background-color: #EEFF44;
    border-color: white;
    font-weight: bold;
}
In this style we change the background color to yellow and the text color to black.
Second menu label style
.v-label-secondmenulabel {
    color: white;
    text-align: center;
    background-color: #33AA33;
    border-color: white;
    font-weight: bold;
}
In this style we change the background color to green and the text color to white.
First menu style
.v-menubar-firstmenu {
	    background: #AAAAEE;
	}
We set the color of the menu to blue.
Second menu style
.v-menubar-firstmenu {
	    background: #EEEEAA;
	}
We set the color of the menu to yellow
5.3 Menu command callbacks
Parent callback
		MenuBar.Command myFirstCommand = new MenuBar.Command() {

			@Override
			public void menuSelected(MenuItem selectedItem) {
				myFirstLabel.setValue(selectedItem.getText());
				if(selectedItem.hasChildren()){
					List items = selectedItem.getChildren();
					StringBuilder sb = new StringBuilder();
					for(MenuItem item : items){
						sb.append(item.getText());
					}
					mySecondLabel.setValue(sb.toString());
				}else{
					mySecondLabel.setValue("-");
				}
				secondMenuLabel.setValue("-");
			}
		};
We create a callback to the parent nodes of the menu.
>myFirstLabel.setValue(selectedItem.getText()); Gets the text of the selected menu item and set it to the first label.
>if(selectedItem.hasChildren()){ Checks if the selected menu item has children.
>List items = selectedItem.getChildren(); Gets all children of the selected node.
>StringBuilder sb = new StringBuilder(); Creates a string builder.
>for(MenuItem item : items){ For each one of the children items.
>sb.append(item.getText()); Appens the node to the string builder.
>mySecondLabel.setValue(sb.toString()); Converts the string builder into string and copy it to the second label.
>mySecondLabel.setValue("-"); If the node has no children it clears the second label.
>secondMenuLabel.setValue("-"); Clears the second menu label.
Children callback
		MenuBar.Command mySecondCommand = new MenuBar.Command() {

			@Override
			public void menuSelected(MenuItem selectedItem) {
				mySecondLabel.setValue(selectedItem.getText());
				MenuItem parent = selectedItem.getParent();
				if(parent!=null){
					myFirstLabel.setValue(parent.getText());
				}
				secondMenuLabel.setValue("-");
			}
		};
We define a callback to capture bottom end nodes clicks.
>mySecondLabel.setValue(selectedItem.getText()); Sets the selected item text into the label value.
>MenuItem parent = selectedItem.getParent(); Gets the parent of the current node.
>if(parent!=null){ Checks if the selected item has parent.
>myFirstLabel.setValue(parent.getText()); Sets the first label to te parent value.
>secondMenuLabel.setValue("-"); Clears the second menu label.
We create a callback to use when the user interact with the second menu.
Second menu callback
		MenuBar.Command secondMenuCommand = new MenuBar.Command() {

			@Override
			public void menuSelected(MenuItem selectedItem) {
				myFirstLabel.setValue("-");
				mySecondLabel.setValue("-");
				secondMenuLabel.setValue("second menu clicked " + selectedItem.getText());
			}
		};
We create a callback to use when the user interacts with the second menu.
>myFirstLabel.setValue("-"); Clears the first label.
>mySecondLabel.setValue("-"); Clears the second label.
>secondMenuLabel.setValue("second menu clicked " + selectedItem.getText()); Sets the value of the second menu label.
5.4 First menu bar
We are going to create the top nodes first. Then we will add the child nodes level by level. For the icons we are going to use, the FontAwesome icons are included in Vaadin by default.
The commands are attached on some of the nodes, only when we are going to use it. When we don’t need a command attached to a node, we use null as a parameter of the function.
Create the first menu
		MenuBar menu = new MenuBar();
		menu.addStyleName("firstmenu");
		MenuItem file = menu.addItem("File", FontAwesome.FOLDER, null);
		MenuItem edit = menu.addItem("Edit", null, null);
		MenuItem help = menu.addItem("Help", FontAwesome.QUESTION_CIRCLE, null);
>MenuBar menu = new MenuBar(); Creates the menu.
>menu.addStyleName("firstmenu"); Adds the style of the menu.
>MenuItem file = menu.addItem("File", FontAwesome.FOLDER, null); Adds a “file” top node to the menu.
>MenuItem edit = menu.addItem("Edit", null, null); Adds a “Edit” top node.
>MenuItem help = menu.addItem("Help", FontAwesome.QUESTION_CIRCLE, null); Adds a “help” top node
Populate the file node
		MenuItem create = file.addItem("New", FontAwesome.NEWSPAPER_O, myFirstCommand);
		file.addItem("Open", FontAwesome.FOLDER_OPEN, myFirstCommand);
		file.addItem("Close", null, myFirstCommand);
>MenuItem create = file.addItem("New", FontAwesome.NEWSPAPER_O, myFirstCommand); Adds the item “New” to the file node and saves it to a variable in order later to add children to it.
>file.addItem("Open", FontAwesome.FOLDER_OPEN, myFirstCommand); Adds a “Open node”
>file.addItem("Close", null, myFirstCommand); Adds another item to the “File” node called “Close”.
Populate the create node
		create.addItem("New Text File", FontAwesome.FILE, mySecondCommand);
		create.addItem("Other", mySecondCommand);
>create.addItem("New Text File", FontAwesome.FILE, mySecondCommand); Adds the item “New text File” to the create node.
>create.addItem("Other", mySecondCommand); Adds the “Other” node to the “create” node.
Populate the edit node
		edit.addItem("Cut", FontAwesome.CUT, myFirstCommand);
		edit.addItem("Copy", FontAwesome.COPY, myFirstCommand);
		edit.addItem("Paste", FontAwesome.PASTE, myFirstCommand);
>edit.addItem("Cut", FontAwesome.CUT, myFirstCommand); Adds the “Cut” node to the “edit” node.
>edit.addItem("Copy", FontAwesome.COPY, myFirstCommand); Adds the “Copy” node to the “edit” node.
>edit.addItem("Paste", FontAwesome.PASTE, myFirstCommand); Adds the “Paste” node to the “edit” node.
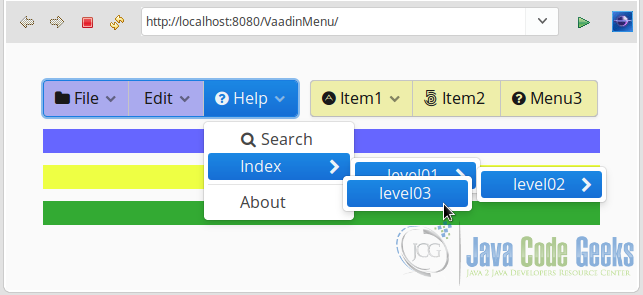
Populate the help menu
		help.addItem("Search", FontAwesome.SEARCH, myFirstCommand);
		MenuItem index = help.addItem("Index", myFirstCommand);
		MenuItem level01 = index.addItem("level01", mySecondCommand);
		MenuItem level02 = level01.addItem("level02", mySecondCommand);
		level02.addItem("level03", mySecondCommand);
		help.addSeparator();
		help.addItem("About", myFirstCommand);
>help.addItem("Search", FontAwesome.SEARCH, myFirstCommand); Adds the search item to the help menu.
>MenuItem index = help.addItem("Index", myFirstCommand); Adds the index item to the help menu.
>MenuItem level01 = index.addItem("level01", mySecondCommand); Adds the level01 item to the index menu.
>MenuItem level02 = level01.addItem("level02", mySecondCommand); Adds the level02 node to the level01 node.
>level02.addItem("level03", mySecondCommand); Adds the level03 node to the level02 node.
>help.addSeparator(); Adds a separator to the menu.
>help.addItem("About", myFirstCommand); Adds the about menu item to the help menu.
Create the second Menu Bar
		MenuBar menu2 = new MenuBar();
		menu2.addStyleName("secondmenu");
		MenuItem item1 = menu2.addItem("Item1", FontAwesome.ADN, null);
		item1.addItem("X1", FontAwesome.AMBULANCE, secondMenuCommand);
		item1.addItem("X2", FontAwesome.WIFI, secondMenuCommand);
		item1.addItem("X3", FontAwesome.ADJUST, secondMenuCommand);
		menu2.addItem("Item2", FontAwesome._500PX, secondMenuCommand);
		menu2.addItem("Menu3", FontAwesome.QUESTION_CIRCLE, secondMenuCommand);
>MenuBar menu2 = new MenuBar(); Creates the menu bar.
>menu2.addStyleName("secondmenu"); Adds he style to the menu.

>MenuItem item1 = menu2.addItem("Item1", FontAwesome.ADN, null); Adds the item “Item1” to the menu root.
>item1.addItem("X1", FontAwesome.AMBULANCE, secondMenuCommand); Adds the node “X1” to the “item1” menu.
>item1.addItem("X2", FontAwesome.WIFI, secondMenuCommand); Adds the node “X2” to the “item1” menu.
>item1.addItem("X3", FontAwesome.ADJUST, secondMenuCommand); Adds the node “X3” to the “item1” menu.
>menu2.addItem("Item2", FontAwesome._500PX, secondMenuCommand); Adds the item “Item2” to the menu root.
>menu2.addItem("Menu3", FontAwesome.QUESTION_CIRCLE, secondMen Adds the item “Menu3” to the menu root.
Add the widgets to the layout
		menuLayout.addComponent(menu);
		menuLayout.addComponent(menu2);
		layout.addComponent(menuLayout);
		layout.addComponent(myFirstLabel);
		layout.addComponent(mySecondLabel);
		layout.addComponent(secondMenuLabel);
>menuLayout.addComponent(menu); Adds the first menu to the horizontal layout.
>menuLayout.addComponent(menu2); Adds the second menu to the horizontal layout.
>layout.addComponent(menuLayout); Adds the horizontal layout to the main vertical layout.
>layout.addComponent(myFirstLabel); Adds the first label to the main vertical layout.
>layout.addComponent(mySecondLabel); Adds the second label to the main vertical layout.
>layout.addComponent(secondMenuLabel); Adds the second menu label to the main vertical layout.
6. The complete source code
vaadinmenu.scss
@import "../valo/valo.scss";

@mixin vaadinmenu {
  @include valo;

.v-label-myfirstlabel {
    color: white;
    text-align: center;
    background-color: #6666FF;
    border-color: white;
    font-weight: bold;
}

.v-label-mysecondlabel {
    color: black;
    text-align: center;
    background-color: #EEFF44;
    border-color: white;
    font-weight: bold;
}

.v-label-secondmenulabel {
    color: white;
    text-align: center;
    background-color: #33AA33;
    border-color: white;
    font-weight: bold;
}

.v-menubar-firstmenu {
	    background: #AAAAEE;
	}

.v-menubar-secondmenu {
	    background: #EEEEAA;
	}


}
VaadinmenuUI.java
package com.example.vaadinmenu;

import java.util.List;

import javax.servlet.annotation.WebServlet;

import com.vaadin.annotations.Theme;
import com.vaadin.annotations.VaadinServletConfiguration;
import com.vaadin.server.FontAwesome;
import com.vaadin.server.VaadinRequest;
import com.vaadin.server.VaadinServlet;
import com.vaadin.ui.HorizontalLayout;
import com.vaadin.ui.Label;
import com.vaadin.ui.MenuBar;
import com.vaadin.ui.MenuBar.MenuItem;
import com.vaadin.ui.UI;
import com.vaadin.ui.VerticalLayout;

@SuppressWarnings("serial")
@Theme("vaadinmenu")
public class VaadinmenuUI extends UI {

	@WebServlet(value = "/*", asyncSupported = true)
	@VaadinServletConfiguration(productionMode = false, ui = VaadinmenuUI.class, widgetset = "com.example.vaadinmenu.widgetset.VaadinmenuWidgetset")
	public static class Servlet extends VaadinServlet {
	}

	@Override
	protected void init(VaadinRequest request) {
		final VerticalLayout layout = new VerticalLayout();
		layout.setMargin(true);
		layout.setSpacing(true);
		setContent(layout);

		HorizontalLayout menuLayout = new HorizontalLayout();
		menuLayout.setSpacing(true);

		Label myFirstLabel = new Label("-");
		myFirstLabel.addStyleName("myfirstlabel");

		Label mySecondLabel = new Label("-");
		mySecondLabel.addStyleName("mysecondlabel");

		Label secondMenuLabel = new Label("-");
		secondMenuLabel.addStyleName("secondmenulabel");

		MenuBar.Command myFirstCommand = new MenuBar.Command() {

			@Override
			public void menuSelected(MenuItem selectedItem) {
				myFirstLabel.setValue(selectedItem.getText());
				if(selectedItem.hasChildren()){
					List items = selectedItem.getChildren();
					StringBuilder sb = new StringBuilder();
					for(MenuItem item : items){
						sb.append(item.getText());
					}
					mySecondLabel.setValue(sb.toString());
				}else{
					mySecondLabel.setValue("-");
				}
				secondMenuLabel.setValue("-");
			}
		};

		MenuBar.Command mySecondCommand = new MenuBar.Command() {

			@Override
			public void menuSelected(MenuItem selectedItem) {
				mySecondLabel.setValue(selectedItem.getText());
				MenuItem parent = selectedItem.getParent();
				if(parent!=null){
					myFirstLabel.setValue(parent.getText());
				}
				secondMenuLabel.setValue("-");
			}
		};

		MenuBar.Command secondMenuCommand = new MenuBar.Command() {

			@Override
			public void menuSelected(MenuItem selectedItem) {
				myFirstLabel.setValue("-");
				mySecondLabel.setValue("-");
				secondMenuLabel.setValue("second menu clicked " + selectedItem.getText());
			}
		};

		MenuBar menu = new MenuBar();
		menu.addStyleName("firstmenu");
		MenuItem file = menu.addItem("File", FontAwesome.FOLDER, null);
		MenuItem edit = menu.addItem("Edit", null, null);
		MenuItem help = menu.addItem("Help", FontAwesome.QUESTION_CIRCLE, null);

		MenuItem create = file.addItem("New", FontAwesome.NEWSPAPER_O, myFirstCommand);
		file.addItem("Open", FontAwesome.FOLDER_OPEN, myFirstCommand);
		file.addItem("Close", null, myFirstCommand);

		create.addItem("New Text File", FontAwesome.FILE, mySecondCommand);
		create.addItem("Other", mySecondCommand);

		edit.addItem("Cut", FontAwesome.CUT, myFirstCommand);
		edit.addItem("Copy", FontAwesome.COPY, myFirstCommand);
		edit.addItem("Paste", FontAwesome.PASTE, myFirstCommand);

		help.addItem("Search", FontAwesome.SEARCH, myFirstCommand);
		MenuItem index = help.addItem("Index", myFirstCommand);
		MenuItem level01 = index.addItem("level01", mySecondCommand);
		MenuItem level02 = level01.addItem("level02", mySecondCommand);
		level02.addItem("level03", mySecondCommand);
		help.addSeparator();
		help.addItem("About", myFirstCommand);

		MenuBar menu2 = new MenuBar();
		menu2.addStyleName("secondmenu");
		MenuItem item1 = menu2.addItem("Item1", FontAwesome.ADN, null);
		item1.addItem("X1", FontAwesome.AMBULANCE, secondMenuCommand);
		item1.addItem("X2", FontAwesome.WIFI, secondMenuCommand);
		item1.addItem("X3", FontAwesome.ADJUST, secondMenuCommand);
		menu2.addItem("Item2", FontAwesome._500PX, secondMenuCommand);
		menu2.addItem("Menu3", FontAwesome.QUESTION_CIRCLE, secondMenuCommand);

		menuLayout.addComponent(menu);
		menuLayout.addComponent(menu2);
		layout.addComponent(menuLayout);
		layout.addComponent(myFirstLabel);
		layout.addComponent(mySecondLabel);
		layout.addComponent(secondMenuLabel);
	}

}
7. Running the example
Right click on the project folder and choose Run as -> Run on server choose Tomcat 8 server and press finish.
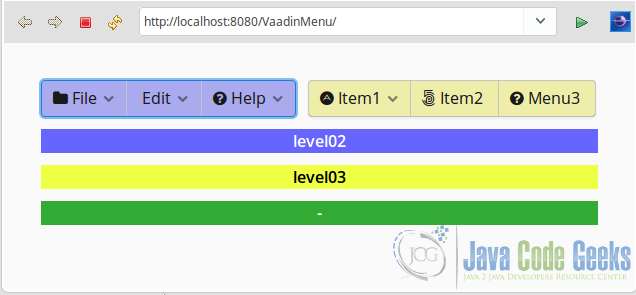
8. Results
Our main menu.
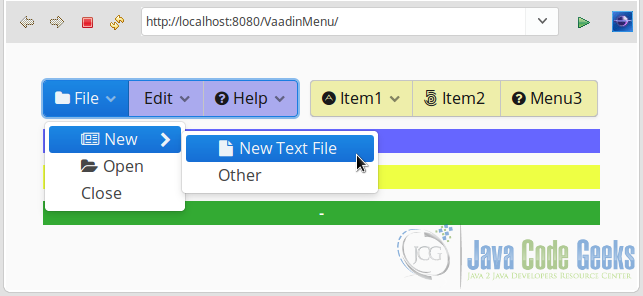
The file menu.
The help menu.
Our second menu.

9. Download the Source Code
This was an example of: Vaadin MenuBar.
