Struts 2 “HelloWorld” Example
Struts 2 is a famous Model-View-Controller (MVC) framework, mainly found in the enterprise market since its release in 2000. Its goal is to separate the model (the business logic) from the view (the HTML pages) and the controller (the instance that manages the interaction between the model and the view). Struts provides the controller class, while we are in charge of creating the rest.
In this example we will create a “Hello World Struts 2” application that will show you the basics of this framework.
Despite its simplicity, you will learn about the different parts of a Struts 2 applications and how you can use them as a base for your future projects.
1. Initial steps
If you haven’t done this, go to http://struts.apache.org/ and download the latest Struts 2 version. Once downloaded, unzip it and keep it at hand.
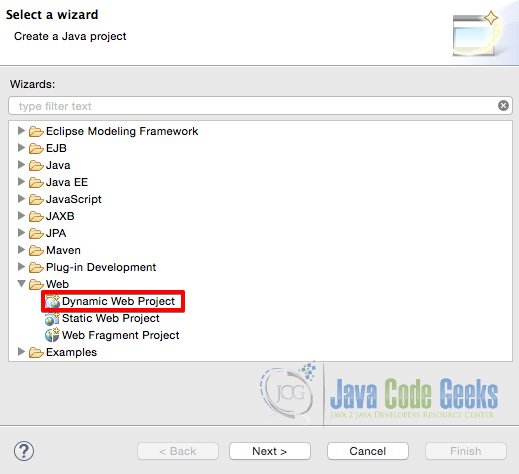
Open Eclipse and create a new Dynamic Web Project.
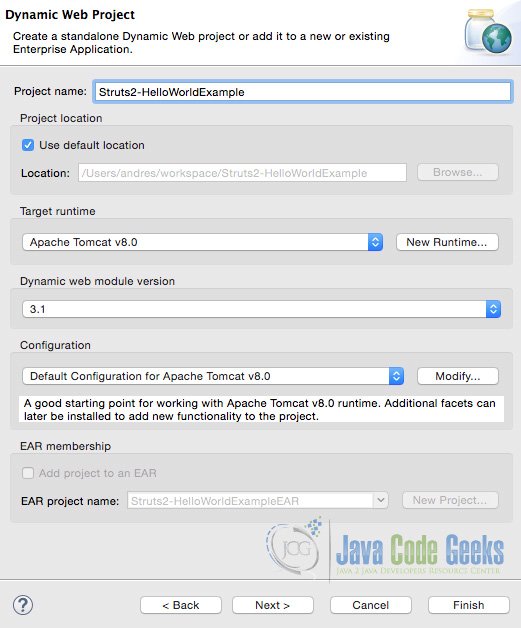
Fill the New Dynamic Web Project information window. You can use the following screenshot as a guide:
Finally, type a Context root for this project:
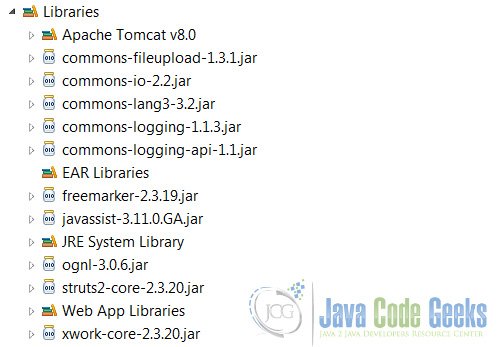
As a final step, add the following JAR files to the project (all of them are included in the Struts file you previously downloaded):
Ok, it’s time to begin coding.
2. Action Classes
The Struts controller calls Actions Classes (the model) to respond to web requests. A simple Action Class does not have any dependency.
In this example, we will create an Action class named HelloWorldExample. Go ahead and create a new Class file with the following contents:
HelloWorldExample.java:
package com.javacodegeeks;

public class HelloWorldExample {

    private String name;

    public String execute() throws Exception {
        return "success";
    }

    public String getName() {
        return name;
    }

    public void setName(String name) {
        this.name = name;
    }
}
This Action Class contains just a field called name. There’s nothing really important about it; just a getter and a setter. Boring, right?. But wait! There is also a method called execute. This is very important because this is the one that Struts will call and the one that will define what is the next resource to bring into the game. The name of this method can be anything, but execute is a standard one.
In this example we just return the success string. What this action will bring next is defined later in the Struts configuration file.
3. Views – JSP Files
In this example we have two views (JSP files). The first one, index.jsp, shows a simple HTML form that prompts for a name. The important thing here is that the form’s action must match the name we’ll later use in our struts.xml configuration file. If they don’t match, it will never work.
index.jsp:
<!DOCTYPE html>
<html>
<head>
    <title>Hello World Example</title>
</head>
<body>
    <h1>Hello World Example</h1>
    <form action="hello">
        <label for="name">Enter your name</label><br/>
        <input type="text" name="name"/>
        <input type="submit" value="Submit"/>
    </form>
</body>
</html>
The second file, hello.jsp, will be in charge of displaying a gracious salutation to whomever dares to type a name in the previous HTML form. Pretty simple and to the point.
hello.jsp:
<%@taglib prefix="s" uri="/struts-tags" %>
<!DOCTYPE html>
<html>
<head>
    <title>Hello World Example</title>
</head>
<body>
    Hello <s:property value="name"/>!
</body>
</html>
The HTML response uses a special Struts tag: s:property. This tag simply calls the corresponding getter (getName) from our HelloWorldExample action class.
4. Configuration Files
In a Servlet Container context, Struts plays the role of a filter. With this in mind, we can set it up as such in our web.xml file. A standard configuration looks like the following:
web.xml:
<?xml version="1.0" encoding="UTF-8"?>

<web-app xmlns="http://xmlns.jcp.org/xml/ns/javaee"
        xmlns:xsi="http://www.w3.org/2001/XMLSchema-instance"
        xsi:schemaLocation="http://xmlns.jcp.org/xml/ns/javaee http://xmlns.jcp.org/xml/ns/javaee/web-app_3_1.xsd"
        version="3.1">

  <display-name>Struts 2 - Hello World Example</display-name>
  <welcome-file-list>
     <welcome-file>index.jsp</welcome-file>
  </welcome-file-list>
  <filter>
     <filter-name>struts2</filter-name>
     <filter-class>
        org.apache.struts2.dispatcher.ng.filter.StrutsPrepareAndExecuteFilter
     </filter-class>
  </filter>
  <filter-mapping>
     <filter-name>struts2</filter-name>
     <url-pattern>/*</url-pattern>
  </filter-mapping>
An important part in this file is the url-pattern option. It instructs the Servlet Container to execute the given filter – Struts 2 – on any request made to the given url.
The second (and last) part of the configuration is the creation of a file named struts.xml. The main goal of this file is to set the relations between URL’s and our action classes; this means, what action class should Struts call for any requested URL.
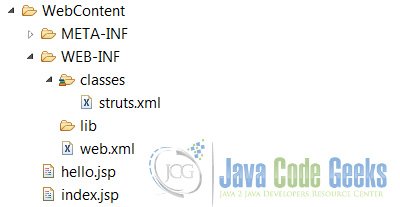
It is very, very important that you place this file inside your WEB-INF/classes directory. Failing to do this will bring you many hours of frustration… I can tell you. Most IDE’s do not automatically create this directory, so go ahead and create it. Once created, add a new XML file and name it struts.xml. Copy and paste the following configuration into it:
struts.xml:
<?xml version="1.0" encoding="UTF-8"?>

<!DOCTYPE struts PUBLIC
"-//Apache Software Foundation//DTD Struts Configuration 2.0//EN"
"http://struts.apache.org/dtds/struts-2.0.dtd">
<struts>
    <constant name="struts.devMode" value="true" />
    <package name="default" namespace="/" extends="struts-default">
        <action name="hello"
                class="com.javacodegeeks.HelloWorldExample">
                <result name="success">hello.jsp</result>
        </action>
    </package>
</struts>
Let’s check the action tag in it. This tag is in charge of matching URL’s and actions classes. The name attribute defines the URL that Struts will try to match whenever a request is made (remember the form action value we used in index.jsp?, well, this is the one). Next we’ll find the class attribute; this is the class that will be instantiated and executed whenever the value in the name attribute is matched. Finally we’ll see the result sub-element. The given resource in it, in this case hello.jsp, will be called whenever class returns a String with a value of success.
Now that everything is setup it is time to run it.
5. Running the Hello World Example
At this point your folder structure should look like the following:
Run your project and open a web browser. Type the following address:
http://localhost:8080/Struts2-HelloWorldExample/
You should see the contents of the index.jsp file when you run the application:
Type your name and click Submit to receive a nice surprise:
Congratulations!
6. Common Problems
Most issues on Struts are related to a wrong configuration file or a missing one. Yes, even if Struts cannot find this (really) important file, you may see an error like the following:
There is no Action mapped for namespace / and action name hello
This can be tricky to tackle, since you might spend countless hours trying to look for errors inside this file, when the real reason is that Struts cannot locate it.
To fix this error make sure struts.xml resides in your /WEB-INF/classes directory. Common editors like Eclipse and Netbeans do not automatically create this folder, so go ahead and create it.
7. Download the Eclipse Project
This was a Struts 2 “HelloWorld” example.
You can download the full source code of this example here: Struts2-HelloWorld.zip


