In this example, we will see how to make use of JDBC from a servlet to access database and read data from table. We will use MySQL as the database and MySQL Workbench as the client for database to prepare the data. However this example does not cover installation of MySQL and MySQL Workbench.
We will be using Eclipse as the IDE and tomcat as the application server. In this example we will read the data from a database table and display it as a table in html page. Therefore, understanding of Basic servlet and Java is required.
Table Of Contents
1. Introduction to JDBC
Java DataBase Connectivity, in short JDBC, is a Java API that helps us access various types of tabular data, especially from a Relational Database. It works on any platform where Java can run and is a part of JDK by default. We can perform various kinds of operations on a database using this API. Just like ODBC, JDBC lets us write database independent code with ease.

Whenever we develop a Java application, we use JDBC API which interacts with JDBC Driver Manager, which will in-turn interact with the appropriate Driver class. The driver class contains the necessary code to interact with the respective database. Database manufacturers will develop the driver for their database so we can download the Driver from the database manufacturers website. In this example, we are using MySQL database, hence we need to download the driver from the following page https://dev.mysql.com/downloads/connector/j/5.0.html.
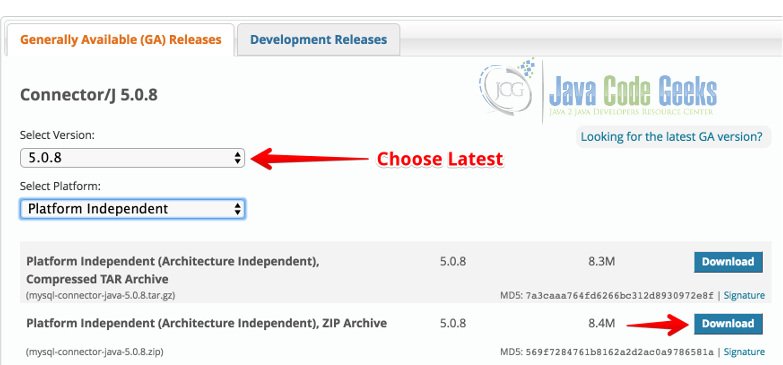
Choose Latest version and download the archive and extract in into any folder of your choosing.
2. Workbench Setup
In this example, we will read a list of book records from the table and display them on HTML page using servlets. First of all, we have to create the table and insert a few records into it. For this, we will be using MySQL Workbench, which can be downloaded from MySQL downloads page.
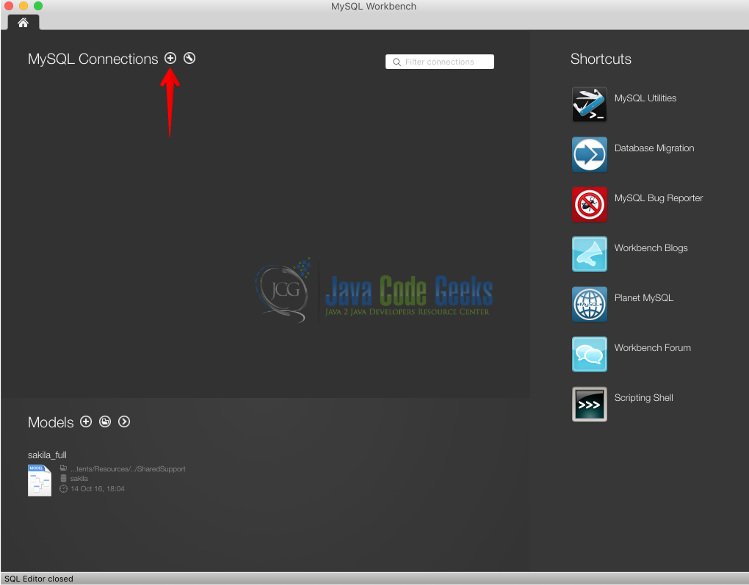
Open MySQL Workbench and Create a connection to your locally running MySQL database. If you don’t have MySQL, you can download MySQL community server from MySQL Community Server Edition download page. Once installed you have to start mysql and access it through workbench. In order to do so, create a connection to your database from your workbench by clicking on plus sign in MySQL connections page that will be opened when you open workbench for the first time.
This brings up a Setup New Connection wizard in which we give the values for hostname, username, and port. Unless you change the values during MySQL installation, the values shown in the below screenshot should work. Give the password for root by clicking in Store in Keychain button beside Password field.
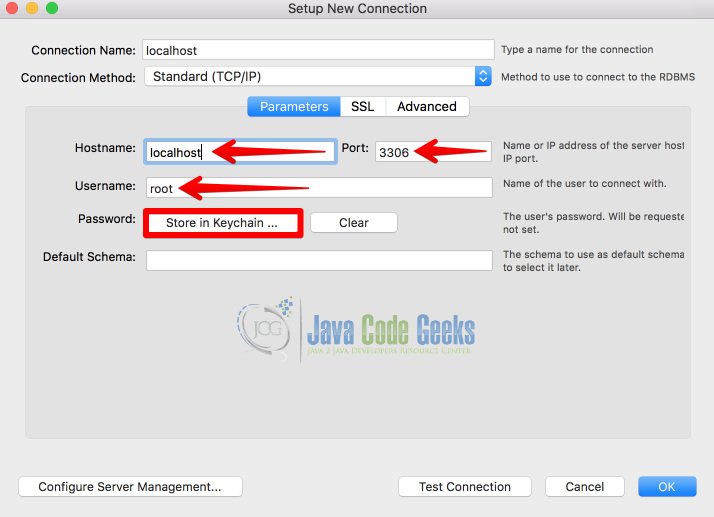
If you have just installed MySQL, you may have given a password while installing it in mysql if you are on windows, but if you are on Mac, installation wizard creates a random password and displays it in a dialog box. However, you cannot use the default password until you reset it first. Once done, click Test connection in New Connection wizard and ensure you get a success message.
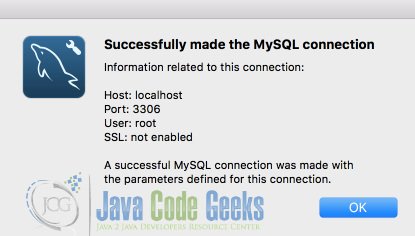
If you get any error, make sure that you have given the correct password and other values are same as the ones given during installation. If they are all correct, ensure that MySQL server is up and running. Once done, you can find the new connection in connections page of workbench. Double click the newly created connection to access the database.
3. Schema Creation
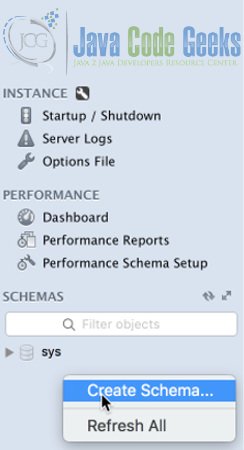
Let us first create the data before we try to access it. Right click in the empty area under Schemas in left side menu bar in workbench and choose create schema.
Schema is a container for various tables. It has a different meaning in different databases, but in MySQL, it is equivalent to database.
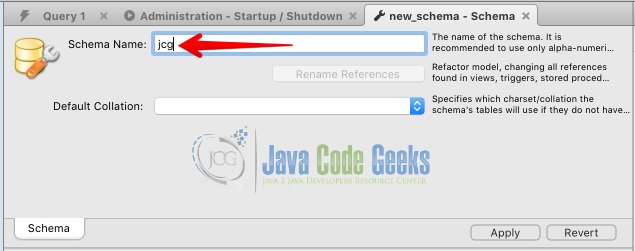
Give a name of your choosing. I’m giving it as jcg. Click apply to get a new wizard that displays the the query that gets executed.
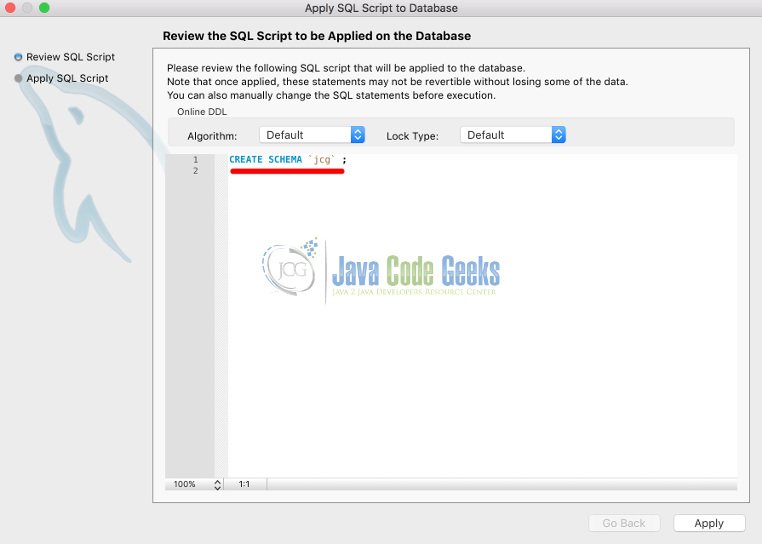
You do not have to make any modifications, click apply again. This will create a new schema. You can also create the schema by directly running the query without going through the wizard.
4. Table Creation
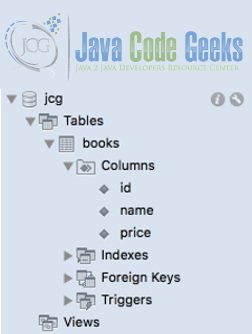
Once created, you can find the freshly created schema in schemas section of left menu bar as shown as shown below.
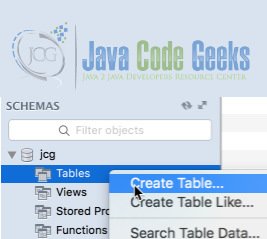
Right click on Tables under jcg schema and choose Create Table, we shall now create a new table to store our data. This will bring up a new wizard that makes our life easy while creating tables.
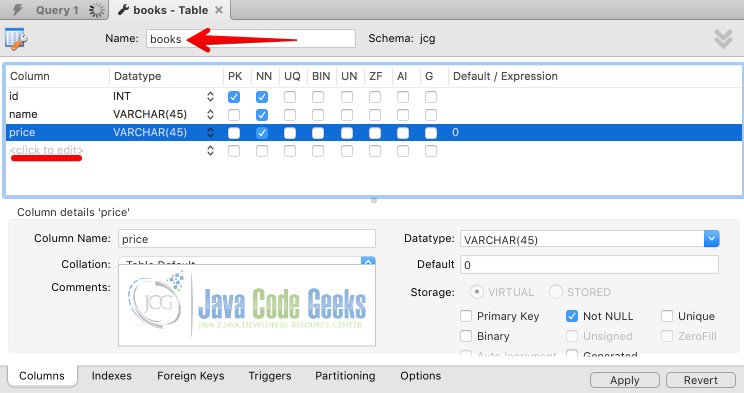
Provide the name as books and you can add as many rows as you want by clicking on click to edit text in columns section. Create three columns. First one is id which is of type integer and select PK column and NN column. PK indicates that id is a primary key and there will be no duplicates in the entire table. NN means that id cannot be null and is mandatory. The other two columns are of type varchar which means that they are strings.I have also given a default value for price column as 0.
Click Apply to finish the table creation. You will again get a new wizard that will display the query that will be executed behind the scenes in order to create the table. You should see something similar to the screenshot below once the table is created.
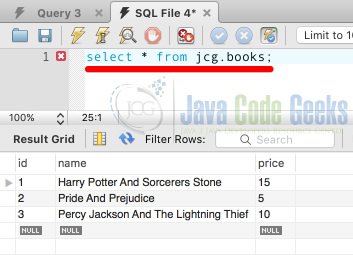
Switch to the query tab in workbench and run the following query to create 3 records in books table. You can run the query by clicking the lightning icon in query tab. Look for success message in Action Output section.
INSERT INTO jcg.books
	(id, name, price)
	VALUES
	(1, 'Harry Potter And Sorcerers Stone',15),
	(2, 'Pride And Prejudice', 5),
	(3, 'Percy Jackson And The Lightning Thief', 10);

You can run a select query to ensure that the data is inserted fine. Run the query shown in screenshot to make sure that the data is returned.
5. Project Setup
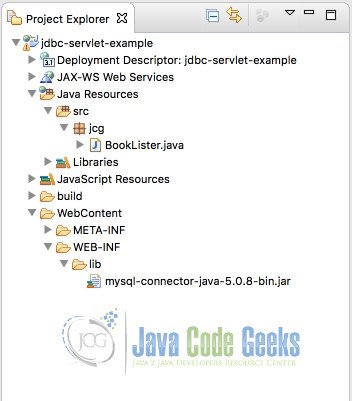
Create a Dynamic Web-Project named jdbc-servlet-example, and copy the mysql driver jar you have downloaded into WEB-INF/lib folder. The file name will be of format mysql-connector-java-<version-number>-bin.jar. Create a package named jcg. Right click on the package and choose Servlet and provide the name as BookLister. Provide path as /books in WebServlet annotation for the class.
The reason for copying the driver jar into WEB-INF/lib folder is because then the jar file will be in the classpath when the application is deployed on application server.
6. Source Code and Explanation
Following is the source for the BookLister servlet.
BookLister.java
package jcg;

import java.io.*;
import java.sql.*;
import javax.servlet.ServletException;
import javax.servlet.annotation.WebServlet;
import javax.servlet.http.*;

@WebServlet("/books")
public class BookLister extends HttpServlet {

    public BookLister() {}

	protected void doGet(HttpServletRequest request, HttpServletResponse response) throws ServletException, IOException {
	    response.setContentType("text/html");
	    PrintWriter out = response.getWriter();

        try {
	        Class.forName("com.mysql.jdbc.Driver");

	        Connection connect = DriverManager.getConnection("jdbc:mysql://localhost:3306/jcg?"
	                                        + "user=root&password=letmein");

	        Statement statement = connect.createStatement();

	        ResultSet resultSet = statement.executeQuery("select * from jcg.books");
	        out.println("<table border=\"1\">");
	        while(resultSet.next()) {
	        	out.println("<tr>");
	        	out.println("<td>" + resultSet.getInt("id") + "</td>");
	        	out.println("<td>" + resultSet.getString("name") + "</td>");
	        	out.println("<td>" + resultSet.getString("price") + "</td>");
	        	out.println("</tr>");
	        }
	        out.println("</table>");
		} catch (ClassNotFoundException e) {
			e.printStackTrace();
		} catch (SQLException e) {
			e.printStackTrace();
		} finally {
			if(out != null)
				out.close();
		}
	}

}
Observe the lines highlighted in the above code. Line number 19 ensures that the Driver class for mysql will be loaded into runtime and is available for JDBC driver manager. JDBC driver jar contains this class. DriverManager.getConnection creates a connection object to the mysql database. We need to pass the connection url along with username and password. Once connection object is created, we can execute queries.
To execute any sql query, we need to create a statement object using createStatement method from connection object. Once statement is created, we can simply call executeQuery method of statement object which will return a result set object. Result set object provides a mechanism to access each row in the result of the SQL query. Calling next method of result set will set the pointer to a row and calling next again will move the pointer to next row. Finally when there are no more rows, next() will return false causing the loop to exit.
From each row, we can access individual column data using respective get method based on column datatype. In the above while loop body, we have used resultSet.getInt method to read id field as id is an integer, remaining two fields are strings hence getString method will work.
7. Deploying and Running
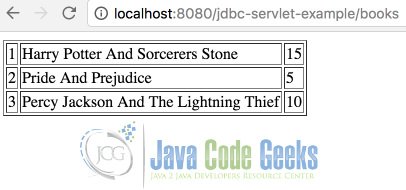
Right click on the project choose Run As > Run On Server. Once the server is up, access the following URL http://localhost:8080/jdbc-servlet-example/books. You should see something similar to the below screenshot.
8. Summary
- JDBC API is a part of JDK which helps us interact with RDBMS with ease.
- Database specific driver can be downloaded from db manufacturer’s website
- Driver jar must be added to class path of the web application by placing it in WEB-INF/lib folder.
- We first need to create a connection object, then a statement and execute query using execute query method.
- Result set is returned from execute query method which can be iterated to access each row of data

How do I write the unit test for this? I have been struggling with it for a while now, and am a newbie to Java Web applications. Please do let me know