This article is about using Selenium grid to automate testing efforts. This covers using selenium inside a Docker container to speed up the testing setup and easier administration.
1. Introduction
1.1 Selenium Grid
Selenium is used to automate browsers. Selenium WebDriver has found its place in test automation for web applications. It is used to create robust, browser-based regression automation suites and tests. It can be used for end to end testing of an application. This ensures that application works as designed. Selenium testing is limited to a single browser within a single machine. This would be time-consuming in case of an application with a large number of tests. Selenium grid was designed to provide the following advantages
- scale by distributing tests on several machines ( parallel execution )
- manage multiple environments from a central point, making it easy to run the tests against a vast combination of browsers / OS.
- minimize the maintenance time for the grid by allowing you to implement custom hooks to leverage virtual infrastructure for instance.
Conceptually, a Selenium Grid architecture looks similar to this:
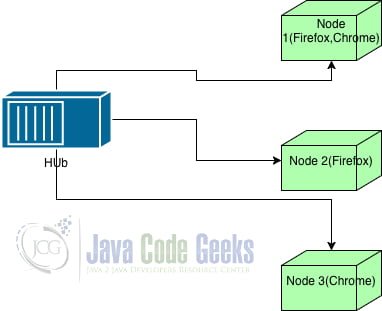
It involves a single Hub for coordinating all the requests from clients. Nodes register themselves in the grid advertising their capabilities (browser, browser version and operating system). This indicates that nodes can be different machines or even virtual instances. In our case, Node 2 might advertise the capability as Firefox 63 running on Windows. Hub coordinates the request from clients and checks if any of the nodes match the capability. If matched, the corresponding node is used for execution. It is an exact match for the client request i.e. Firefox 63 will match the node with Firefox 63 on Windows and also Firefox 63 on Linux.
Though this provides great flexibility, it needs a bit of configuration and administration. The next section will explain the process to avoid maintenance hassle.
1.2 Docker
Docker is a computer program performing operating-system-level virtualization known as containerization. Containers are isolated from each other and bundle their own application, tools, libraries and configuration files which communicate with each other through well-defined channels. All containers are run by a single operating system kernel and more lightweight than virtual machines. Containers are created from “images” that specify their precise contents. Images are often created by combining and modifying standard images downloaded from public repositories.
2. Docker Selenium
Our approach is to combine Selenium grid with docker so to provide a flexible and easy environment for our testing. We will create a docker compose file which can bring up the target environment in seconds. This tutorial assumes that docker has been installed already in the operating system. Docker can be downloaded from the following link while docker can be installed via the package managers in most nix environments.
docker-compose.yml
version: "3"
services:
  selenium-hub:
    image: selenium/hub:3.141.59-bismuth
    container_name: selenium-hub
    ports:
      - "4444:4444"
  chrome:
    image: selenium/node-chrome:3.141.59-bismuth
    depends_on:
      - selenium-hub
    environment:
      - HUB_HOST=selenium-hub
      - HUB_PORT=4444
  firefox:
    image: selenium/node-firefox:3.141.59-bismuth
    depends_on:
      - selenium-hub
    environment:
      - HUB_HOST=selenium-hub
      - HUB_PORT=4444
The above file configures the containers needed for our application. We are using version 3 of the docker which is indicated by the version.
- We create a container named
Selenium-hubwhich is configured from the selenium-hub image available in docker repository - We expose the container port 4444 to our localhost with the same port so that we can access the hub and grid URL.
- Next, We create a chrome container based on the image
selenium/node-chrome:3.141.59-bismuth. This creates a hub node with chrome capabilities. - We have specified the hub as a dependency for the chrome node and also provided the hub details as environment variables to the node.
- In a similar vein, firefox node is also configured to be part of the hub.
To create the docker containers, We need to run the following command in the directory where docker-compose.yml is located.
docker-compose up
This creates at first a network named dockerselenium_default within which hub and nodes can communicate. This ends up creating the firefox and chrome node. After the creation, it launches the hub and node processes. Nodes register with the grid so that hub can learn about the nodes and their capabilities with the operating system as Linux. It is better to run Docker in the detached mode so that we can continue executing commands in the same shell. To enable detached mode, We need to affix -d option to the previous command.
docker-compose up -d
In our current grid, We have a single chrome node and firefox node registered with the grid. This has saved much of the configuration hassles involved in downloading the webdrivers needed and running the jars in each of the instances. With a simple configuration, We have 2 nodes and a hub within our ecosystem. Grid can be accessed from the URL as we have exposed port 4444 to our local machine. In case port 4444 is used by another application in our local machine, we can expose via a different port by updating the ports section in the yml file. The first port is our local port 4444 (can be anything) mapped to the docker hub port of 4444 delimited by :.
3. Selenium Test Configuration
The first step in creating the selenium is to create a base class which can be inherited by further test classes.
TestBase.java
public class TestBase {

    protected static ThreadLocal driver = new ThreadLocal<>();

    public WebDriver getDriver() {
        return driver.get();
    }

    public MutableCapabilities capabilities;

    @Parameterized.Parameters
    public static MutableCapabilities[] getBrowserCapabilities() {
        return new MutableCapabilities[]{
                new ChromeOptions(),
                new FirefoxOptions()
        };
    }

    public TestBase(MutableCapabilities capabilities) {
        this.capabilities = capabilities;
    }

    @Before
    public void setUp() throws Exception {
        RemoteWebDriver webDriver = new RemoteWebDriver(new URL("http://localhost:4444/wd/hub"), capabilities);
        webDriver.manage().timeouts().implicitlyWait(40, TimeUnit.SECONDS);
        driver.set(webDriver);
    }

    @After
    public void tearDown() {
        getDriver().quit();
    }

    @AfterClass
    public static void remove() {
        driver.remove();
    }

}TestBaseclass supports a constructor for injecting capabilities such as firefox or chrome.- It maintains a threadpool of webdrivers to avoid concurrency issues when we extend the feature for parallelism.
@Beforeindicates the method will be executed before each test case and we have configured to initialize a webdriver for use. WebDriver connects to the selenium grid along with the passed capability@Aftermethod executes after the testcase and cleans up the driver.@AfterClassis executed after all the testcases are completed and ensures the cleanup of the thread pool.
Our test classes will extend the base class and cover the required functionality. Our test project is going to be a simple application testing the google.com.
GoogleSearchTest.java
public class GoogleSearchTest extends TestBase {

    public GoogleSearchTest(){
        super(new ChromeOptions());
    }

    @Test
    public void openGoogle() {
        WebDriver webDriver = getDriver();
        webDriver.navigate().to("http://www.google.com");
        Assert.assertEquals("Google", webDriver.getTitle());
    }

    @Test
    public void enterGoogleSearchAndViewResults() {
        WebDriver webDriver = getDriver();
        By searchLocator = By.cssSelector("input[value='Google Search']");
        webDriver.navigate().to("http://www.google.com");
        WebElement searchText = webDriver.findElement(By.cssSelector("input[title=Search]"));
        searchText.sendKeys("hi");
        WebElement searchButton = webDriver.findElement(searchLocator);
        searchButton.click();
        Assert.assertEquals("hi - Google Search", webDriver.getTitle());
    }

    @Test
    public void enterGoogleSearchAndImageSearch() {
        WebDriver webDriver = getDriver();
        By searchLocator = By.cssSelector("input[value='Google Search']");
        webDriver.navigate().to("http://www.google.com");
        WebElement searchText = webDriver.findElement(By.cssSelector("input[title=Search]"));
        searchText.sendKeys("hi");
        WebElement searchButton = webDriver.findElement(searchLocator);
        searchButton.click();
        WebElement imageSearch = webDriver.findElement(By.xpath("//a[contains(text(), 'Images')]"));
        imageSearch.click();
    }


}- This test class directly initializes our base class with chrome capability and thus our grid connects to a node with chrome browser.
- The first test case opens google.com and checks if the title is Google.
- The second test case enters the search text as hi and clicks the search button. It then verifies the title is equal to search text.
- The third test case adds onto the second case and clicks the image search button.
These test cases will be executed within the chrome node inside the docker network and we would get the successful assertions in our program.

4. Parameters and Parallelization
In this section, We will extend the previous example. Selenium grid is leveraged to run tests on a combination of multiple browsers. We can achieve this by using ParameterizedRunner class.
As the first step, TestBase class has to be annotated with the Parameterized runner as below
@RunWith(Parameterized.class)
public class TestBase {
..........
}
This class also involves @Parameterized.Parameters. This annotation is used to indicate the parameters to be supplied for execution. Here we have specified firefox and chrome to be executed as the options. The other change needs to be done in the constructor of GoogleSearchTest.java
public GoogleSearchTest(MutableCapabilities capabilities) {
   super(capabilities);
}
Since our base class is annotated with Parameterized, the Parameterized injects the capabilities at runtime. It creates two instances of our test class – one with chrome and other with firefox. Running the test class, We can see two test suites running one as 0 and another as 1.
This runs the tests in sequence and it can take some time to complete. We can speed up the execution by using Parallel runner. We will define a custom runner with threadPool to manage multithreaded execution. This covers the second benefit of selenium grid. The base class annotation will change to @RunWith(ParallelParameterized.class)
ParallelParameterized.java
public class ParallelParameterized extends Parameterized {
    private static class ThreadPoolScheduler implements RunnerScheduler {
        private ExecutorService executor;

        public ThreadPoolScheduler() {
            String threads = System.getProperty("junit.parallel.threads", "8");
            int numThreads = Integer.parseInt(threads);
            executor = Executors.newFixedThreadPool(numThreads);
        }

        @Override
        public void finished() {
            executor.shutdown();
            try {
                executor.awaitTermination(10, TimeUnit.MINUTES);
            } catch (InterruptedException exc) {
                throw new RuntimeException(exc);
            }
        }

        @Override
        public void schedule(Runnable childStatement) {
            executor.submit(childStatement);
        }
    }

    public ParallelParameterized(Class klass) throws Throwable {
        super(klass);
        setScheduler(new ThreadPoolScheduler());
    }
}
This creates a thread pool scheduler with the maximum limit of 8 threads. ThreadPoolScheduler utilizes Java’s ExecutorService to submit the threads and manage the execution of threads. Each thread has a hard limit of 10 minutes which is a long time for our test case.
This covers one side of the equation. We have parallelized our tests but there are only one firefox and chrome node. If our test cases increase, our application performance might not scale. We can also increase parallelization by using ParallelComputer of Junit but still end up in resource bottleneck as the number of nodes is only 1.
But this problem is easily handled by docker. Nodes can be increased by firing a command even during the program execution. Up/Down scaling during test execution may lead to flaky test failures.
docker-compose up -d --scale chrome=2 --scale firefox=2
This increases firefox and chrome node by 1 satisfying max limit of 2. Scale specifies the maximum number of nodes to spin up from the docker end. If a lower number is specified, the nodes are turned off.
Now we can run the tests to view the increased performance of test execution.
5. Download the Source code
In this article we looked at the implementation of selenium grid using Docker and how it aids in easy and extensible execution of tests.
You can download the full source code of this example here: DockerSelenium

How do you execute after images are up for selenium hub etc?
I have used the command “docker-compose up -d” Now which command should be used to see the test results and for execution.
Same question here