This article explores best practices and use cases for Selenium. For our purpose, We will be utilizing Selenium with Java.
1. Introduction
Selenium is used to automate browsers. Selenium WebDriver has found its place in test automation for web applications. It is used to create robust, browser-based regression automation suites and tests. It can be used for end to end testing of an application. This ensures that application works as designed. Selenium supports various programming languages such as C#, Haskell, Java, Javascript, Python and Ruby through Selenium drivers. Selenium supports various browsers such as chrome, firefox, safari, opera and internet explorer.
Table Of Contents
2. Selenium Best Practices
In this section, We will cover some of the best practices we need to follow in Selenium projects. We will cover each one in its subsection. But before going into that, We will look at the gradle configuration for our project.
build.gradle
group 'com.jcg'
version '1.0-SNAPSHOT'

apply plugin: 'java'

sourceCompatibility = 1.8

repositories {
    mavenCentral()
}

dependencies {
    testCompile group: 'junit', name: 'junit', version: '4.12'
    compile group: 'org.seleniumhq.selenium', name: 'selenium-java', version: '3.141.59'
}

group 'com.jcg'
version '1.0-SNAPSHOT'

apply plugin: 'java'

sourceCompatibility = 1.8

repositories {
    mavenCentral()
}
- We have specified a java project using
gradlebuild tool - Currently the project has only two dependencies listed – one as
Junitand other theselenium
This gives us a starter for the following subsections. The needed dependencies will be covered under each subsection.
2.1. Page Object
The first good practice we want to cover is the Page Object Pattern. We will cover first an example without page object to discuss its problems. We will cover the test section only below
TestSuite.java
@Test
    public void enterGoogleSearchAndViewResults() {
        webDriver.navigate().to("http://www.google.com");
        WebElement searchText = webDriver.findElement(By.cssSelector("input[title=Search]"));
        searchText.sendKeys("Selenium",Keys.ENTER);
        Assert.assertEquals("Selenium - Google Search", webDriver.getTitle());
    }


    @Test
    public void enterGoogleImageSearch() {
        webDriver.navigate().to("http://www.google.com");
        WebElement searchText = webDriver.findElement(By.cssSelector("input[title=Search]"));
        searchText.sendKeys("Selenium",Keys.ENTER);
        WebElement imageSearch = webDriver.findElement(By.xpath("//a[contains(text(), 'Images')]"));
        imageSearch.click();
    }
The above code opens a Google home page and executes a web search for selenium. The Second test is similar to the first test and finally opens up the image search. As seen above, both the tests have the repetitive code and there is no reusability involved. The first step would be to move the code as a function within the same class. Though that might suffice for the current example, it might not be scalable. This might lead to problems when we need to change a single part of the script. Alternatively, We can use a Page Object Model. This encapsulates the element locator and the way of interacting with the element inside a single class. This can be reused across various test suites and promotes single responsibility.
POTestSuite.java
@Test
    public void enterGoogleSearchAndViewResults() {
        googleHomePage.openPage();
        googleHomePage.searchText("Selenium", Keys.ENTER);
        Assert.assertEquals("Selenium - Google Search", webDriver.getTitle());
    }


    @Test
    public void enterGoogleImageSearch() {
        googleHomePage.openPage();
        googleHomePage.searchText("Selenium", Keys.ENTER);
        googleResultsPage.performImageSearch();
    }
This represents a much thinner test using the Page Object to execute Selenium’s locator. The test is concerned with only its assertion or verification logic.
GoogleHomePage.java
public class GoogleHomePage {

    WebDriver webDriver = null;

    public GoogleHomePage(WebDriver webDriver) {
        this.webDriver = webDriver;
    }


    public void openPage() {
        webDriver.navigate().to("http://www.google.com");
    }

    public static By searchInput = By.cssSelector("input[title=Search]");

    public void searchText(CharSequence... keys) {
        webDriver.findElement(searchInput).sendKeys(keys);
    }

}
GoogleResultsPage.java
public class GoogleResultsPage {

    WebDriver webDriver = null;

    public GoogleResultsPage(WebDriver webDriver) {
        this.webDriver = webDriver;
    }


    public void performImageSearch() {
        webDriver.findElement(imageSearch).click();
    }

    public static By imageSearch = By.xpath("//a[contains(text(), 'Images')]");
}
The above two code blocks indicate the use of Page Object Model. It holds all the locators used in the page and also provides reusable behaviour such as searching. This will be of tremendous help when it needs to be used across multiple tests.
2.2. Test and Code Separation
Considering the first example in previous section, We noticed that Selenium and test code were located in same file under test folder. But this leads to tight coupling between the test framework (Junit) and automation framework(Selenium). Ideally, We need to decouple them. Page Object is one way of such separation. Even if we do not use Page Object(though I highly recommend it), We should seperate the Selenium logic from the core testing logic of Junit. This provides logical and cleaner separation of code which benefits programmers a lot.
2.3 Selector Hierarchy
The general selector hierarchy to be followed is id > name > css > xpath. By Id, We can uniquely locate an element within the site and can gurantee identifying the element. Name locator is followed by id locator though it is possible, certain elements can reuse the name and we may end up in conflicts. CSS locator is the recommended way to use when id and name are not available. CSS locator is used to identify a element by its attributes and in some cases, its position w.r.to its parent element(s). It is one of the most flexible locators available. Xpath is also a good locator strategy which works on the basis of html document structure. Though it is highly flexible, it has comparatively less performance than CSS. CSS is natively supported by browser while Xpath implementation is different for different browsers which can lead to inconsistency. We will take a look at example for each locator in the code block below.
Index.html
<html>
<head>
    <title>Hello</title>
</head>
<body>
<button id="click">Click Me</button>
<ol name="list">
    <li>Item1</li>
    <li>Item2</li>
    <li>Item3</li>
</ol>
</body>
</html>
This is a simple html page which contains a button and ordered list with three items. We will use various locators to identify each element and correspondingly assert the text fo the element.
Selectors.Java(Id)
WebElement clickElement = webDriver.findElement(By.id("click"));
Assert.assertEquals("Click Me", clickElement.getText());
We locate the button using its id click. Once the element is located, we verify if the button text is click Me
Selectors.Java(Name)
WebElement listElement = webDriver.findElement(By.name("list"));
Assert.assertTrue(listElement.isDisplayed());
We locate the unordered list using its name list. We assert that the element is displayed on the html page in the subsequent line
Selectors.Java(CSS)
WebElement listElement = webDriver.findElement(By.cssSelector("ol[name='list']>li"));
Assert.assertEquals(listElement.getText(),"Item1");
We locate the unordered list using its name list. We then specify the direct child li of the unordered list. This gives us the first list item whose text we assert as Item1.
Selectors.Java(XPath)
WebElement listElement = webDriver.findElement(By.xpath("//ol[@name='list']/li[2]"));
 Assert.assertEquals(listElement.getText(),"Item2");
We locate the unordered list using its name list. We then find the second child li of the unordered list. This gives us the list item whose text we assert as Item2.
2.4 Wait For
All User operations in a browser are asynchronous. i.e. We wait for the user to perform some action. This will be directly applicable in selenium tests also. Sometimes an application takes some to load due to various factors. We do not want Selenium tests to fail during that time. As always, We cannot have an infinite wait time which again leads to poor performance. During this time, We can use Thread.Sleep to make our java thread to wait for execution. It is definitely not recommended to use because it always waits for the specified time. This results in increased execution time of Selenium tests. Alternatively, we should use selenium wait to handle these time-consuming calls. Further waits are also classified as implicit, explicit and fluent wait.
Implicit Wait
webDriver.manage().timeouts().implicitlyWait(10,TimeUnit.SECONDS);
Webdriver waits for 10 seconds before throwing an element not found exception in the above case. Here we have specified the timeout implicitly for all calls.
Explicit Wait
WebDriverWait webDriverWait = new WebDriverWait(webDriver,3);
webDriverWait.until(ExpectedConditions.visibilityOfElementLocated(By.xpath("//ol[@name='list']/li[2]")));
This example specifies explicitly the timeout for a specific condition. Here we have specified timeout period of 3 seconds or the list item in the previous example has been loaded. If the item is not loaded within 3 seconds, Selenium throws an element not found exception.
Fluent Wait
 WebDriverWait webDriverWait = new WebDriverWait(webDriver,10,1000);
webDriverWait.until(ExpectedConditions.visibilityOfElementLocated(By.cssSelector("ol[name='list']>li")));
Extening the above example, We can also specify an optional polling time for the web driver. In this case webdriver polls every 1000ms ie 1 second before locating the element in web page. This reduces the frequent polling from webdriver end.
2.5 Behaviour Driven Development
Selenium caters to E2E testing of an application and ensures that system is working as deisgned. Acceptance test ensures that the right things are built. Automated acceptance testing is one of the principles of Extreme programming.
Cucumber tries to address the area of acceptance testing. Cucumber allows collaboration between business stakeholder and development team to express the business outcomes. Cucumber has its own ubiquitous language and adheres to syntax rules known as Gherkin. BDD is recommended to ensure the features are clearly communicated to business stakeholders and engineering folks alike.
In this section, We will take a look at converting the Google test case to a cucumber feature which clearly signifies our testing intention.
search.feature
Feature: Search

  Scenario: Successful Search
    Given I open chrome browser
    When I navigate to google search page
    And I provide search text as selenium and enter
    Then Selenium should be in page title
The file above is a Cucumber feature file which clearly indicates the steps taken by user and the field which we want to assert on. This is achieved using Cucumber specific keywords such as Given, When, And and Then. The entire test case is tagged as Scenario while group of such test cases form the Feature
This sets up a Cucumber Test suite when coupled with a Cucumber junit runner. We will take a look below at the test file generated for the corresponding feature.
SearchSeleniumSteps.java
public class SearchSeleniumSteps {

    GoogleHomePage googleHomePage;


    @Given("^I open chrome browser$")
    public void iOpenChromeBrowser() throws Throwable {
        googleHomePage = new GoogleHomePage(new ChromeDriver());
    }

    @When("^I navigate to google search page$")
    public void iNavigateToGoogleSearchPage() throws Throwable {
        googleHomePage.openPage();
    }

    @When("^I provide search text as selenium and enter$")
    public void iProvideSearchTextAsSeleniumAndEnter() throws Throwable {
        googleHomePage.searchText("Selenium",Keys.ENTER);
    }

    @Then("^Selenium should be in page title$")
    public void seleniumShouldBeInPageTitle() throws Throwable {
        Assert.assertEquals("Selenium - Google Search", googleHomePage.getWebDriver().getTitle());
        googleHomePage.getWebDriver().quit();
    }
}
- Each method follows the step defined in feature file.
- Here, We have used it along with the page object pattern described above.
- This presents a clear feature for test among both developers and stakeholders.
2.6 Data Driven Tests
We will build upon the previous section to build Data Driven Tests. We are currently testing Google search by providing a keyword to search. Ideally, We might have to test Google search with various keywords. One way to do that would be having scenarios for each keyword search. This would be highly repetitive for even couple of searches. An ideal approach is to have the exact steps but provide a way for us to input the search term alone.

search.feature
Scenario Outline: Successful Search
    Given I open chrome browser
    When I navigate to google search page
    And I provide search text as "<searchTerm>" and enter
    Then "<searchTerm>" should be in page title

    Examples:
      | searchTerm |
      | Selenium |
      | Cucumber |
In the example above, Scenario Outline is used to provide a data driven test. The parameter is provided as searchTerm within angled brackets. Finally the data for our search term is provided under Examples section.
We will look at the corresponding test implemenation for this feature in the block below
SearchSeleniumSteps.java
public class SearchSeleniumSteps {

  ...

@When("^I provide search text as \"([^\"]*)\" and enter$")
    public void iProvideSearchTextAsAndEnter(String searchTerm) throws Throwable {
        googleHomePage.searchText(searchTerm,Keys.ENTER);
    }

    @Then("^\"([^\"]*)\" should be in page title$")
    public void shouldBeInPageTitle(String searchTerm) throws Throwable {
        Assert.assertEquals(searchTerm+" - Google Search", googleHomePage.getWebDriver().getTitle());
        googleHomePage.getWebDriver().quit();
    }
}
- The test accepts a regex pattern(Any characters) as input for search term which corresponds with the text entered.
- The same search term is used for assertion in the subsequent test method.
2.7 Ease of Setup
As much as Selenium gives us a consistent way to test across many browsers, We might need to download the appropriate drivers in each machine along with the required browsers. Incorrect versions of browsers can sometimes cause weird issues and may be difficult to debug. The best approach is to containerize using docker and provide docker images for the developers to test. We will look at a sample docker file and see how we can leverage the docker file in our test.
docker-compose.yml
  version: "3"
  services:
    selenium-hub:
      image: selenium/hub:3.141.59-bismuth
      container_name: selenium-hub
      ports:
        - "4444:4444"
    chrome:
      image: selenium/node-chrome:3.141.59-bismuth
      depends_on:
        - selenium-hub
      environment:
        - HUB_HOST=selenium-hub
        - HUB_PORT=4444
    firefox:
      image: selenium/node-firefox:3.141.59-bismuth
      depends_on:
        - selenium-hub
      environment:
        - HUB_HOST=selenium-hub
        - HUB_PORT=4444
The file above is used to build a Selenium grid containing firefox instance and chrome instance. The browsers are connected to the grid and the corresponding selenium hub is exposed via the port 4444. Docker also provides the benefit of scaling up the instances in case of parallel execution of tests.
SearchSeleniumSteps.java
@Given("^I open chrome browser$")
    public void iOpenChromeBrowser() throws Throwable {
        googleHomePage = new GoogleHomePage(new RemoteWebDriver(
                new URL("http://localhost:4444/wd/hub"), new ChromeOptions()));
    }
The only change required to connect to a Docker based Selenium instance is to use RemoteWebDriver and connect to the docker selenium hub exposed via the port 4444.
2.8 All Browsers
The inherent flexibility selenium brings is that same code can be used to test across all browsers. But it is not advisable to test the same functionality across all browsers. We can test critical features across all browsers but not necessary all the features. It leads to an increase in testing time and rarely some of the features might fail. We will take a look at scaling the test across all browsers but for some of the examples.
search.feature
  Scenario Outline: Successful Search
    Given I open "<browser>" browser
    When I navigate to google search page
    And I provide search text as "<searchTerm>" and enter
    Then "<searchTerm>" should be in page title

    Examples:
      | searchTerm|browser  |
      | Selenium  |chrome   |
      | Cucumber  |chrome   |
      | Selenium  |firefox  |
In this feature, We have specified browser also as configurable param. This indicates the test for each example, the type of browser to be used. We search for Selenium in both browsers while cucumber is searched only in chrome. This is to emphasize the idea that not all features and examples need to be run across all the browsers available.
2.9 Reporting
In the final section, We will take a look at the important part of Selenium i.e. reporting. Running the Junit tests indicates the number of tests passed in the console. But this would not be available for later analysis. Detailed reports should be generated for analysis and also identify success rates.
CucumberLauncher.java
  @RunWith(Cucumber.class)
@CucumberOptions(plugin = {"html:target/cucumber-html-report"},
        snippets = SnippetType.CAMELCASE)
public class CucumberLauncher {

}
- This default launcher generates a report containing example level reports
- This can provide a detailed analysis of the test failures which we can see from the screenshot below.
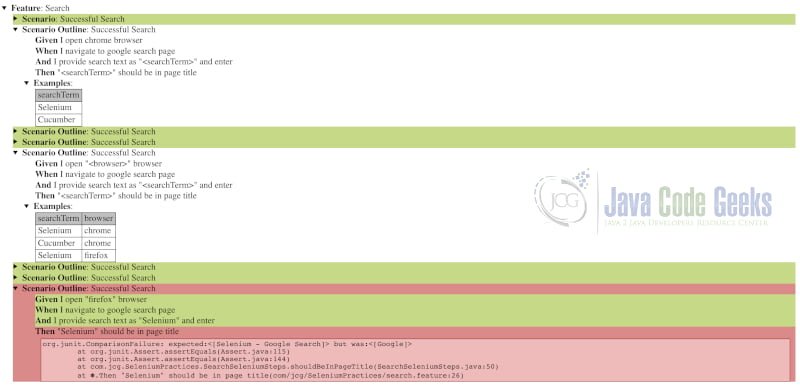
The above indicates that a failure has occurred. But this might not be enough to debug. So in case of failures, it is advisable to take a screenshot of the actual page. This can be achieved by using the below code which takes a screenshot of the web page.
CucumberLauncher.java
 public void takeScreenShot(String fileName){
        byte[] bytes=((TakesScreenshot) webDriver).getScreenshotAs(OutputType.BYTES);
        File DestFile=new File(fileName);
        try (FileOutputStream fos = new FileOutputStream(fileName)) {
            try {
                fos.write(bytes);
            } catch (IOException e) {
                e.printStackTrace();
            }
        } catch (FileNotFoundException e) {
            e.printStackTrace();
        } catch (IOException e) {
            e.printStackTrace();
        }
    }
- We unbox the
WebDriverto type ofTakesScreenshot - We take a screenshot and save it as
byte array. - The obtained
byte arrayis saved to the file provided by the test case.
Cucumber report by default provides a step by step report of features. This can satisfy the needs of developers but might be insufficient for a high-level picture. We can utilize ExtentReports plugin along with cucumber to provide a dashboard of our test suite
build.gradle
compile group: 'com.aventstack', name: 'extentreports', version: '4.0.7'
    compile group: 'com.vimalselvam', name: 'cucumber-extentsreport', version: '3.1.1'
CucumberLauncher.java
@RunWith(Cucumber.class)
@CucumberOptions(plugin = {"html:target/cucumber-html-report",
        "com.vimalselvam.cucumber.listener.ExtentCucumberFormatter:target/cucumber-reports/report.html"},
        snippets = SnippetType.CAMELCASE)
public class CucumberLauncher {

}
We have added the gradle dependency for extent reports and also the corresponding change in our java class to ensure the plugin is picked up for reporting. The below screenshot indicates the dashboard with a clear picture of failures vs successes.

3. Summary
In this tutorial, We have covered the best practices involved in Selenium testing. We covered the Page Object pattern and Behaviour Driven Testing. We saw how Docker can reduce the setup time for Selenium tests. We took a look at how the reporting landscape exists and also saw how to structure selenium tests for maintainability. By any means, this list is not exhaustive but it covers some of the best practices which definitely helps in selenium development and avoid common pitfalls.
4. Download the Source Code
You can download the full source code of all the examples here: Selenium Best Practices Tutorial
